Recover lost photos on Mac
Check the methods to recover deleted or lost photos on Mac.
Quick Navigation:
In the world of digital photography and professional imaging, RAW files are often considered the gold standard. Unlike JPEG or PNG formats, RAW files capture and preserve all the data from the camera sensor, giving photographers maximum flexibility in post-processing. However, just like any other file, RAW files are susceptible to accidental deletion, corruption, and other types of data loss, especially on Mac computers. Losing these files can be devastating, particularly when they contain important or irreplaceable images. This article will explore how to recover lost or corrupted RAW files on a Mac, ensuring that your precious images are safe and retrievable.
RAW files are digital image files that store unprocessed and uncompressed data from a camera's image sensor. Each camera manufacturer has its own version of RAW file formats, such as Canon's .CR2 and .CR3, Nikon's .NEF, Sony's .ARW, and others. Unlike JPEG or TIFF files, RAW files offer several advantages:
However, due to their uncompressed nature, RAW files are larger and more prone to data corruption or loss. This makes it essential for photographers to understand the best ways to recover lost or damaged RAW files.
Recognizing the signs of lost or corrupted RAW files early can help you take prompt action and improve your chances of successful recovery. Some common indicators include:
Understanding these signs can help you determine the nature of the problem and choose the best recovery method.
When RAW files are lost or corrupted, it's crucial to act quickly to prevent further damage or loss. Here are some important steps to prepare for recovery:
By following these steps, you increase your chances of successfully recovering your RAW files.
There are several methods to recover lost or corrupted RAW files on a Mac, ranging from using data recovery software to restoring from backups or seeking professional help.
Data recovery software is one of the most effective ways to recover RAW files on a Mac. One of the best Mac data recovery software is Do Your Data Recovery for Mac:
Do Your Data Recovery for Mac is a user-friendly recovery tool that supports various file formats, including RAW files from different camera manufacturers. It provides a straightforward process for scanning and recovering lost data. Also, it's highly effective for deep recovery tasks.
With the software, you can recover deleted files, formatted data, or lost data in any other data loss scenarios. The software is capable of recovering lost files from SD card, external drives, HDD/SSD, USB flash drives, etc.
📝 Step-by-Step Guide to Using Do Your Data Recovery for Mac:
Step 1.Download and Install the Software: Choose the software that best fits your needs and install it on your Mac. Make sure to install it on a different drive than the one you want to recover files from to avoid overwriting data.
Step 2. Run a Scan: Launch the software and select the drive or storage device where the RAW files were lost. Select the drive and start a scan to locate recoverable files.

Step 3. Examine and Choose Files: Examine the list of files that can be recovered after the scan is finished. The software lets you inspect files before recovering them.

Step 4. Restore and Save Files: To prevent data overwriting, choose the files you wish to restore and save them to a different storage place.

Pros and Cons of Using Recovery Software:
If you regularly back up your Mac using Time Machine or other backup services, recovering lost RAW files becomes much easier.
Using Time Machine Backup:
1. Connect Backup Drive: Attach your Mac to your Time Machine backup drive.
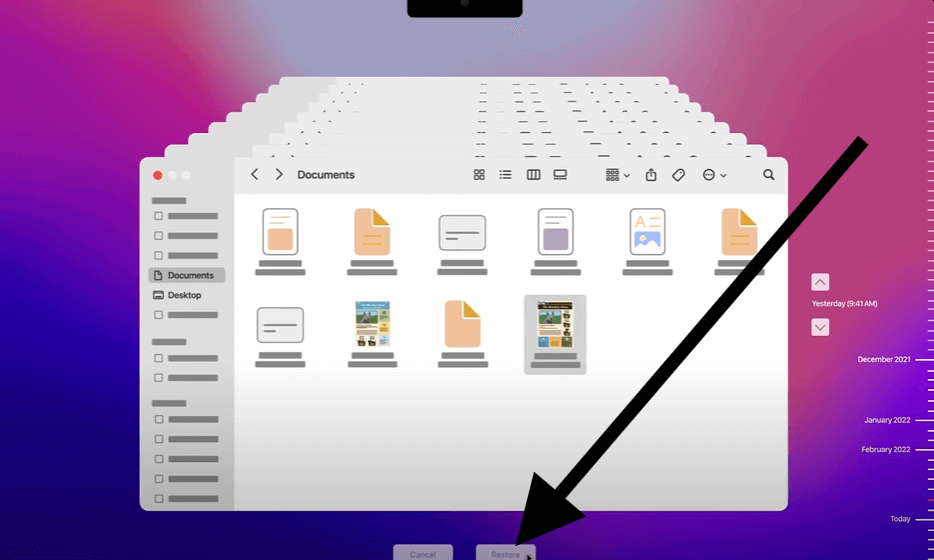
2. Enter Time Machine: To do this, click the menu bar's Time Machine symbol and choose "Browse Time Machine Backups."

3. Navigate to File Location: Use the timeline on the right side to locate the time when the RAW files were still available. Navigate to the folder containing the lost files.
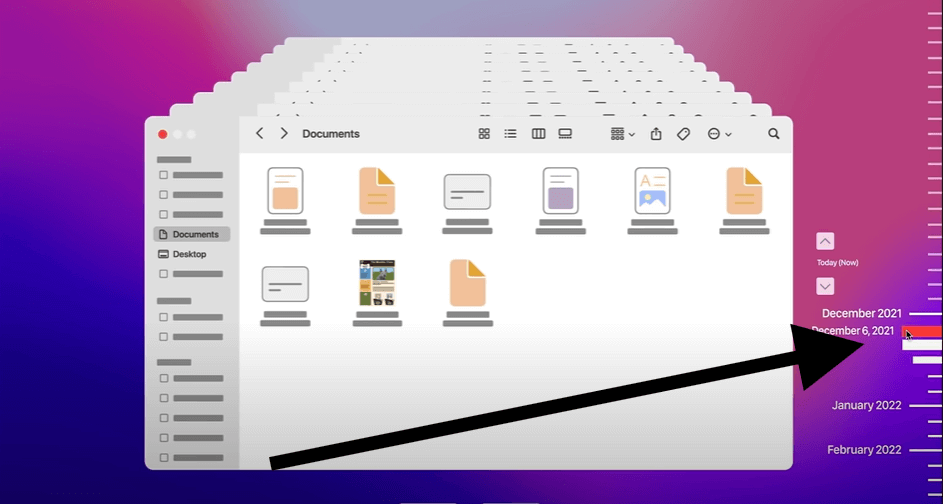
4. Restore Files: Select the RAW files and click "Restore" to bring them back to their original location.
Checking iCloud or Other Cloud Storage:
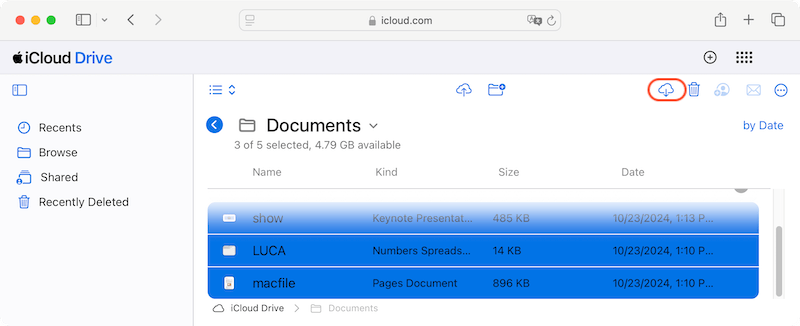
1. Open iCloud Drive: Go to iCloud website and select iCloud Drive option.
2. Check for Files: Look through your iCloud Drive for any backed-up RAW files.
3. Download and Restore files back to your Mac.
Pros and Cons of Manual Recovery from Backup:
If you cannot recover RAW files using software or backup methods, it may be time to consider expert data recovery services. These services specialize in recovering data from damaged or corrupted storage devices.
When to Consider Professional Help:
What to Expect from Professional Recovery Services:
Pros and Cons of Professional Data Recovery Services:
To avoid the stress and potential costs associated with RAW file recovery, it is essential to follow some best practices for data management and protection:
RAW files are invaluable for photographers and professionals, offering the highest quality and flexibility in image editing. However, their size and complexity make them more prone to loss and corruption. By understanding the signs of lost or corrupted files, preparing properly, and choosing the right recovery method—whether through Mac data recovery software, backups, or professional services—you can significantly increase your chances of recovering your valuable data. Above all, regular backups and proactive data management are key to preventing future loss.
Do Your Data Recovery for Mac
Do Your Data Recovery for Mac, one of the best Mac data recovery software, can help you easily and completely recover deleted, formatted or lost files from Mac HDD/SSD, external HDD/SDD, USB drive, memory card, digital camera, or other storage devices.