Quick Navigation:
- Causes of Data Loss in Mac OS X 10.9 Mavericks
- Preliminary Steps Before Data Recovery
- Built-in Tools for Data Recovery in Mac OS X Mavericks
- Recover Lost Data in Mac OS X 10.9 Mavericks with Data Recovery Software
- Conclusion
"I have a MacBook Air that runs OS X 10.9 Mavericks operating system. Yesterday, I mistakenly deleted a important file from the desktop when I was cleaning up the disk space. The Trash bin was emptied. After realizing I have made a big mistake, I download a Mac data recovery app, but it is not compatible with the OS X Mavericks, I can't use it to scan the drive. Is there an effective Mac 10.9 Mavericks file recovery solution? Can your software do file recovery in Mac OS X 10.9 Mavericks? I really need your help." – Halter Lin
Data loss can be a devastating experience, especially when it involves critical files that are essential for personal or professional use. Mac OS X 10.9 Mavericks, although known for its reliability and performance, is not immune to data loss. Whether it's due to accidental deletion, file system corruption, or hardware failure, losing important data can happen to anyone. In this comprehensive guide, we'll explore various methods to recover lost data on Mac OS X 10.9 Mavericks, including built-in tools, third-party software, and professional services.

Causes of Data Loss in Mac OS X 10.9 Mavericks
Before diving into the recovery methods, it's crucial to understand the common causes of data loss in Mac OS X 10.9 Mavericks. Knowing the root cause can help you choose the most effective recovery method and prevent future occurrences.
- Accidental Deletion: One of the most common causes of data loss is accidental deletion. This can happen when you mistakenly drag a file to the Trash or use the Command + Delete shortcut.
- File System Corruption: File system corruption can occur due to improper shutdowns, software crashes, or power outages. When the file system is corrupted, the operating system may fail to locate the files, leading to data loss.
- Hard Drive Failure: Mechanical or logical failure of the hard drive can lead to data loss. Mechanical failures often require professional intervention, while logical failures can sometimes be addressed with software tools.
- Software Crashes or Glitches: Software crashes or glitches during file transfers or editing can result in incomplete or corrupted files, making them inaccessible.
- Malware or Virus Attacks: Although macOS is known for its robust security, it is not entirely immune to malware or virus attacks. Data loss may result from malicious software's ability to erase or corrupt files.
- Power Outages During File Transfer: Power outages during file transfers can cause incomplete data writes, leading to file corruption or loss.
Preliminary Steps Before Data Recovery
Before attempting any data recovery, it's important to take a few precautionary steps to avoid further data loss and improve your chances of successful recovery.
- Stop Using the Affected Device Immediately
- Continuing to use the device after data loss can overwrite the deleted files, making them unrecoverable. Avoid saving new files or installing software until recovery is complete.
- Check the Trash for Deleted Files
- The first place to check after accidental deletion is the Trash. Files that have been deleted recently may still be in the Trash and can be easily restored by dragging them back to their original location.
- Verify Backups
- If you have been regularly backing up your data using Time Machine or another backup method, check the backup for the lost files. Restoring from a backup is often the easiest and safest recovery method.
- Ensure Sufficient Storage Space
- Make sure you have enough free storage space on your Mac or an external drive to recover the lost files. Insufficient storage can hinder the recovery process and lead to further data loss.
Built-in Tools for Data Recovery in Mac OS X Mavericks
Mac OS X 10.9 Mavericks comes with several built-in tools that can assist in recovering lost data. These tools are often sufficient for addressing minor data loss issues.
Using Time Machine
Time Machine is macOS's built-in backup solution, and it's incredibly useful for data recovery. If you have been regularly backing up your data with Time Machine, you can easily recover lost files.
- How to Restore Files from a Time Machine Backup
- Attach your Mac to the Time Machine backup drive.
- Access the folder containing the misplaced files.
- Choose "Enter Time Machine" after clicking the Time Machine icon in the menu bar.
- To view various backup versions, use the timeline on the right side of the screen.
- After locating the version containing the necessary files, pick them and press "Restore."
![Data Recovery in Mac OS X Mavericks]()
- Navigating Through Different Backup Versions
- Time Machine allows you to view and restore files from different points in time. This is particularly useful if you need to recover a file that was accidentally overwritten or modified.
Using Disk Utility
Disk Utility is another powerful tool included in Mavericks that can help with data recovery, especially if the issue is related to disk errors.
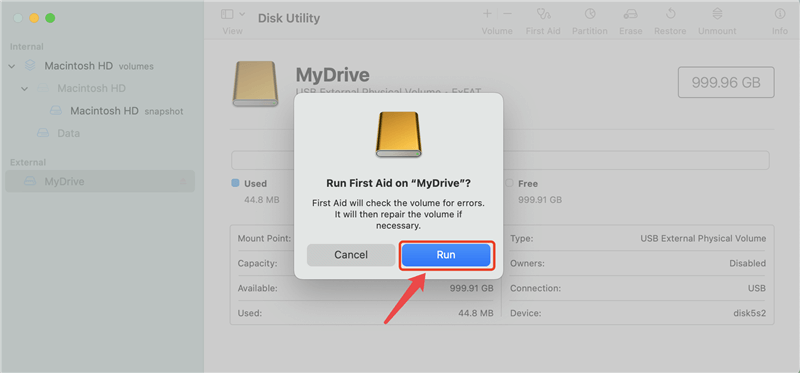
- Running First Aid to Fix Minor Disk Errors
- Open Disk Utility from the Applications > Utilities folder.
- Select the affected disk or partition from the left-hand sidebar.
- Click on the "First Aid" button and then "Run" to check for and repair disk errors.
![Data Recovery in Mac OS X Mavericks]()
- If Disk Utility finds and fixes errors, your files may become accessible again.
- Verifying and Repairing Disk Permissions
- Disk permissions errors can cause files to become inaccessible. In Mavericks, you can verify and repair disk permissions through Disk Utility.
- Select your startup disk in Disk Utility.
- Click on "First Aid" and then choose "Verify Disk Permissions" and "Repair Disk Permissions."
Using Terminal Commands
For advanced users, Terminal commands can be a powerful way to recover deleted files or fix disk issues.
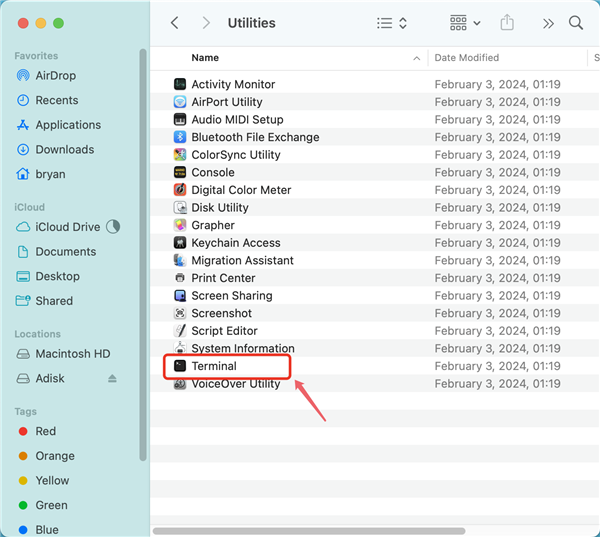
- Recovering Deleted Files Using Command-Line Methods
- Open Terminal from the Applications > Utilities folder.
![Data Recovery in Mac OS X Mavericks]()
- Open Terminal from the Applications > Utilities folder.
- Use the ls command to list files in directories and locate the deleted files.
- Use the cp command to copy the deleted files to a new location if they are still present in the file system.
- Basic Terminal Commands for Data Recovery
- The grep command can be used to search for specific file types or names in the file system.
- The dd command can create disk images for further recovery attempts.
Recover Lost Data in Mac OS X 10.9 Mavericks with Data Recovery Software
If the built-in tools in OS X Mavericks are not sufficient to recover your lost data, you may need to resort to third-party data recovery software. These tools are designed to recover deleted, corrupted, or lost files from your Mac.
Do Your Data Recovery for Mac is one of the best Mac data recovery software. It is fully compatible with OS X 10.9 Mavericks. It can help OS X 10.9 Mavericks users to recover deleted, formatted and lost files from Mac-based drive, HDD, SSD, external disk, USB flash drive, memory card, digital camera, etc.
Do Your Data Recovery for Mac
- Recover permanently deleted files in OS X 10.9 Mavericks.
- Recover formatted hard drive in OS X 10.9 Mavericks.
- Recover inaccessible or corrupted data in OS X 10.9 Mavericks.
Step 1. Download and install Do Your Data Recovery for Mac on your Mac, then open it, select the hard drive where you delete or lose your files.

Step 2. Click on Scan button to deeply scan the hard drive and find all recoverable files.

Step 3. Once the scan is completed, you can preview all recoverable files. Then select the wanted files, click on Recover button to save them.

With Do Your Data Recovery for Mac, you can easily and completely recover lost files in OS X 10.9 Mavericks. It is very easy-to-use, even the most inexperienced Mac user can use it to recover data. But remember that you should do Mac 10.9 Mavericks file recovery as soon as possible when you lose your files, in case that your lost files would be overwritten by new data.
Conclusion
Recovering lost data in Mac OS X 10.9 Mavericks can be a straightforward process if you act quickly and use the right tools. Start by checking the Trash and Time Machine backups, and use built-in tools like Disk Utility for basic repairs. If these methods do not work, third-party data recovery software can offer more advanced recovery options. By following best practices for data protection and regular backups, you can minimize the risk of data loss and ensure that your valuable files remain safe.
Do Your Data Recovery for Mac not only can help you recover lost files in Mac OS X 10.9 Mavericks, but it also supports to mount drive on Mac, fix crash hard drive, format external storage device, etc.


