Quick Navigation:
- What Is Hard Drive Formatting?
- Format a Drive to NTFS on Windows
- Format a Drive to NTFS on Mac
- How to Recover Lost Data after Formatting a Drive to NTFS?
- Common Issues and Troubleshooting
- Conclusion
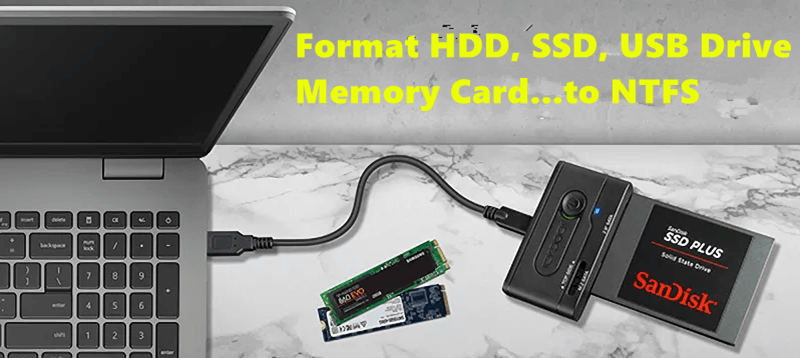
NTFS is a Windows-based file system. With built-in tools and third-party disk formatting tools, you can easily format a drive to NTFS on Windows and macOS. Make a backup before formatting since formatting will delete everything stored on the drive.
What Is Hard Drive Formatting?
Format Methods:
Hard drive formatting is the process of preparing a storage device for data storage by setting up an empty file system. There are two types of formatting:
- Quick Format: Sets up a new file system without erasing the data thoroughly. Faster but less secure.
- Full Format: Erases data thoroughly and checks for bad sectors. Takes longer but is more secure and reliable.
Why Format a Hard Drive?
- Preparation for a New Installation: Essential for installing a new operating system.
- Removing Malware and Viruses: Clears malicious software and corrupted files.
- Improving Performance: Resolves errors and boosts drive efficiency.
- Cleaning Up Data: Delete all private data before selling or donating the device.
Overview of File Systems:
Types of File Systems:
- NTFS: The primary file system for Windows, offering advanced features and reliability.
- FAT32: An older file system, limited to 4GB file sizes.
- ExFAT: A modern alternative to FAT32, suitable for external drives.
- Mac OS Extended (HFS+): Used primarily for Mac systems.
- APFS: For macOS 10.13 or later.
Advantages of NTFS:
- Security Features: Supports file permissions and encryption.
- Large File and Partition Support: Handles large files and volumes efficiently.
- Reliability and Error Correction: Built-in error-checking capabilities.
- Disk Quota Management: Allows administrators to set storage limits.
Preparing to Format a Hard Drive:
Backup Important Data:
Before formatting, it's crucial to back up any important data, as formatting will erase all content on the drive. You can use external drives or cloud storage services for backups.
Check Compatibility and Requirements:
Ensure your system supports NTFS and meets the minimum requirements for the process. Most modern Windows systems are fully compatible.
Gather Necessary Tools:
For this task, you can use:
- Built-in Windows tools like Disk Management, Command Prompt (for Windows) and macOS tools such as Disk Utility, Terminal.
- Third-party software such as DoYourData Super Eraser or NTFS for Mac.
Format a Drive to NTFS on Windows
Method 1. Formatting Through Disk Management
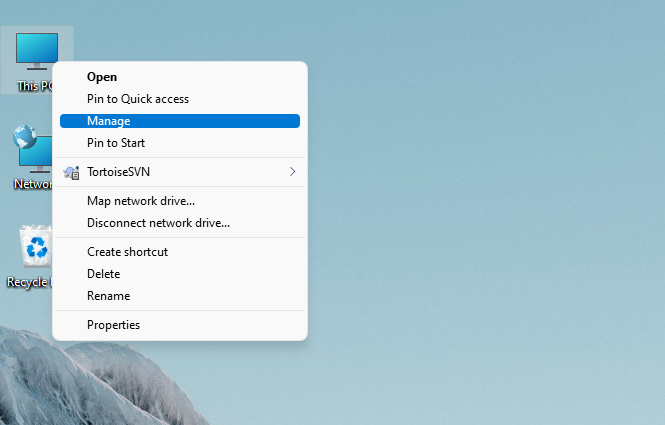
Step 1. Access Disk Management: Right-click on This PC or My Computer and select Manage. Then, navigate to Disk Management.
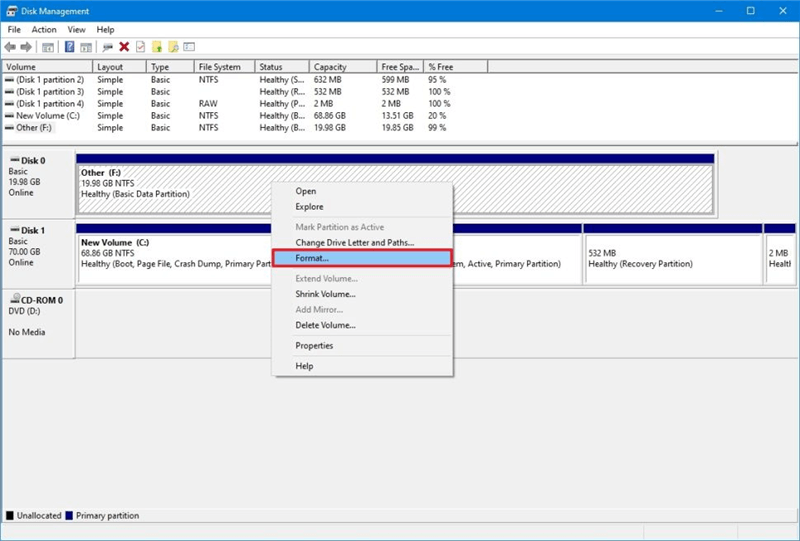
Step 2. Select the Drive: Right-click on the drive you want to format and choose Format.
Step 3. Choose NTFS File System: In the format window, select NTFS from the file system dropdown.
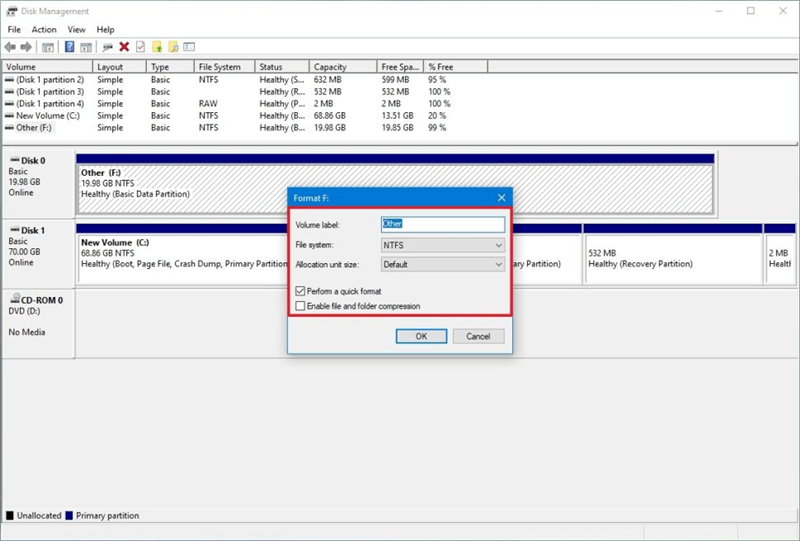
Step 4. Set Allocation Unit Size and Volume Label: Choose the default allocation size and enter a volume label (name for the drive).
Step 5. Start the Format Process: Click OK to begin formatting. Confirm any warnings about data loss.
Method 2. Using Windows File Explorer
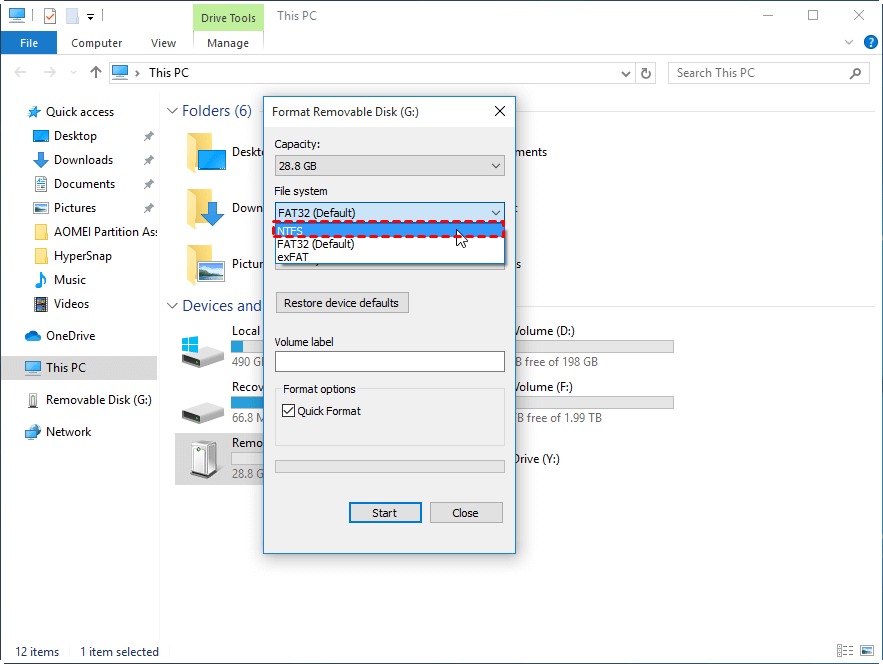
Step 1. Open File Explorer: Double-click on "My Computer" or "This PC" to open File Explorer.
Step 2. Right-Click the Drive: Locate the drive you wish to format, right-click on it, and select "Format…".
Step 3. Choose NTFS File System: In the pop-up window, select "NTFS" under the File System section.
Step 4. Select Quick Format: Tick the "Quick Format" option.
Step 5. Start the Formatting Process: Click "Start" to begin formatting the drive.
Method 3. Formatting via Command Prompt
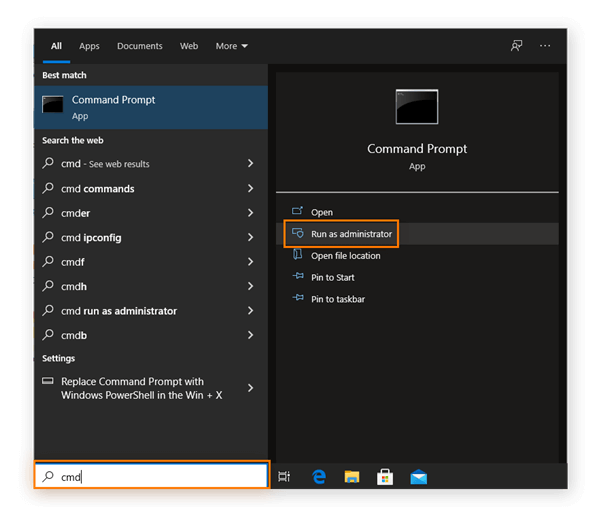
Step 1. Open Command Prompt as Administrator: Search for 'cmd' in the start menu, right-click, and select 'Run as administrator.'
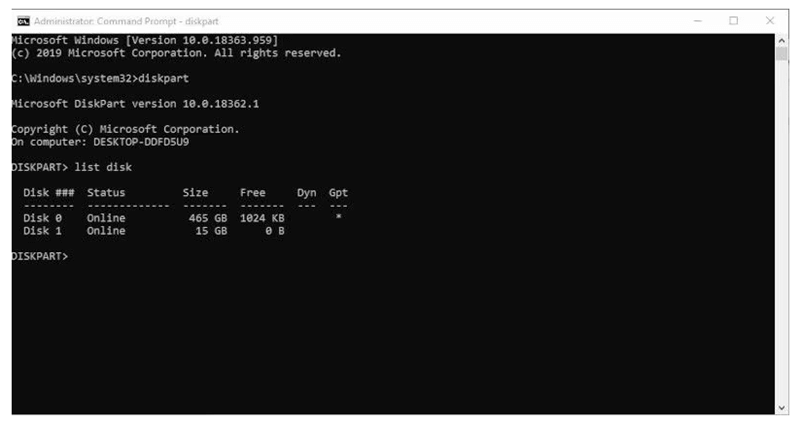
Step 2. Use Diskpart Command: Type diskpart and press Enter.
Step 3. List and Select Disk: Type list disk to display disks. Identify your disk number, then type select disk X (replace X with your disk number).
Step 4. Clean the Disk (Optional): Type clean to wipe the disk.
Step 5. Create a Partition: Type create partition primary.
Step 6. Select the Partition: Type select partition X.
Step 7. Format the Partition to NTFS: Type format fs=ntfs quick to perform a quick format.
Step 8. Assign a Drive Letter: Type assign letter=X (replace X with the desired drive letter).
Format a Drive to NTFS on Mac
Method 1. Using Disk Utility
Step 1. Open Disk Utility:
- Click on the Finder icon in the Dock.
- Select Applications from the sidebar.
- Open the Utilities folder.
- Double-click on Disk Utility to launch the application.
Step 2. Selecting the Drive:
- In Disk Utility, you will see a list of drives and volumes on the left sidebar.
- Locate and select the hard drive you want to format. Ensure you select the correct drive to avoid data loss on other drives.
Step 3. Erasing the Drive:
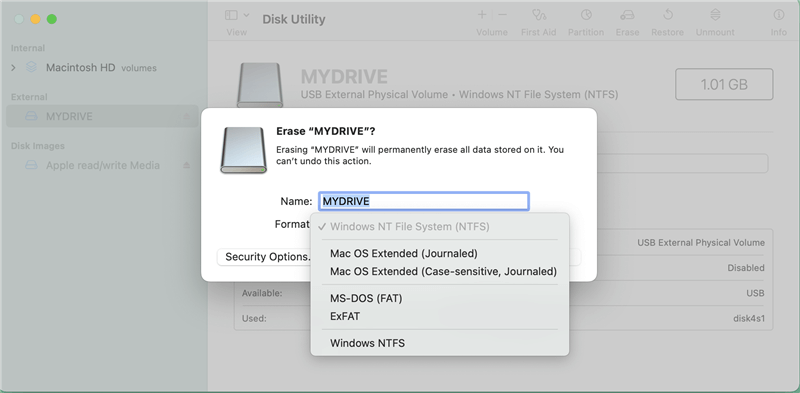
- With the target drive selected, click on the Erase button located at the top of the Disk Utility window.
- A dialog box will appear, prompting you to confirm the erase action and provide additional formatting options.
Step 4. Choosing NTFS as the File System:
- In the dialog box, you will see a field labeled Format. By default, macOS does not support formatting to NTFS natively, but if the external hard drive had been pre-formatted to NTFS before you used it on your Mac, you can select NFTS as the Format.
- Click on Erase button again to format the drive to NTFS.
Method 2. Using Terminal
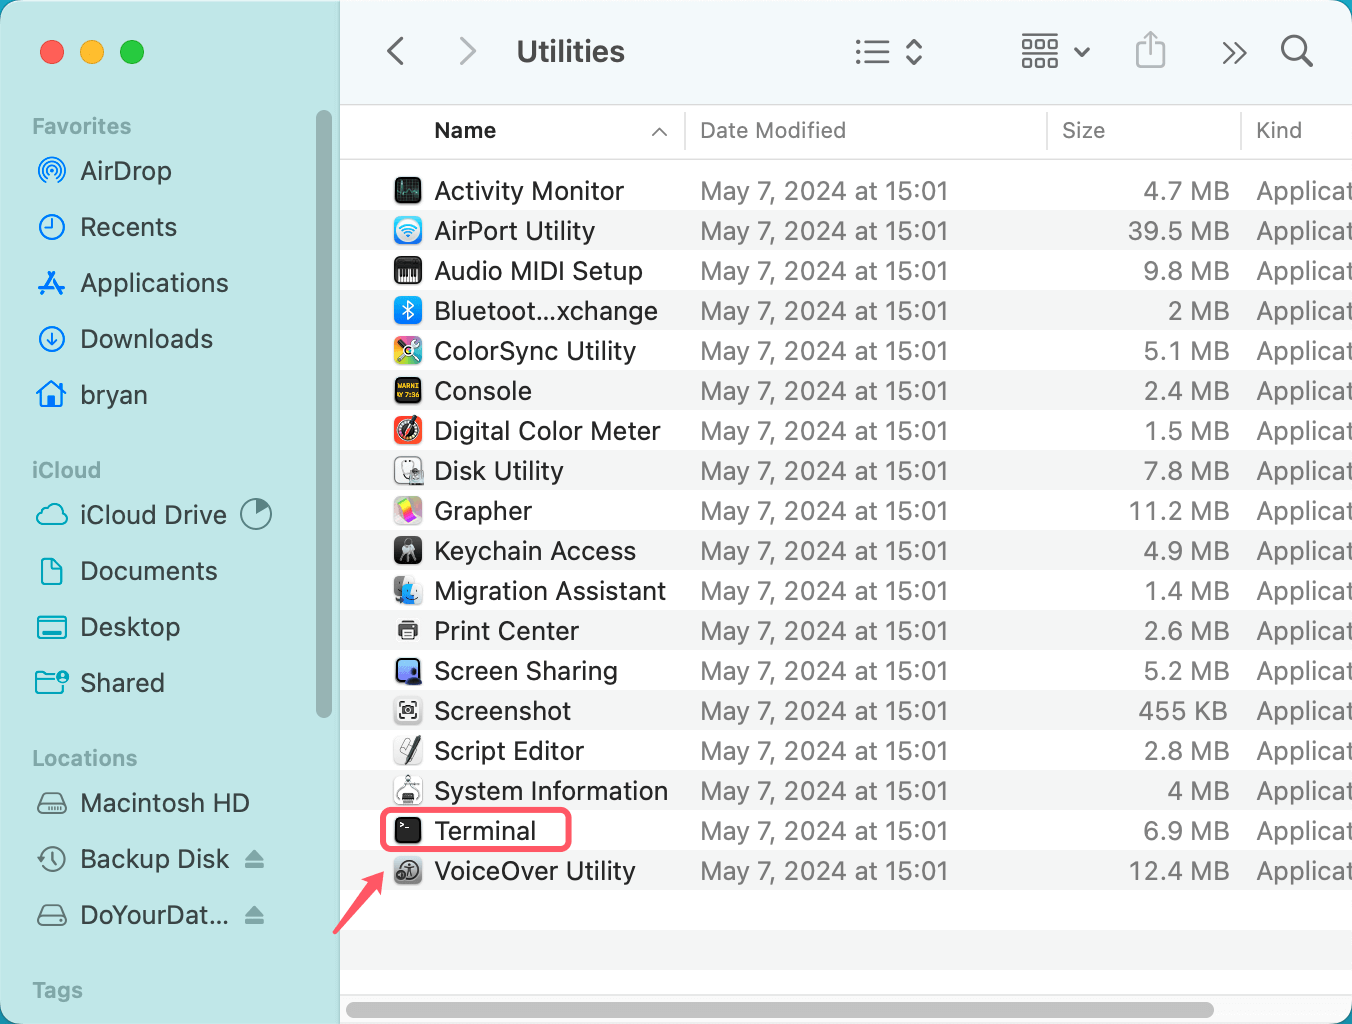
Step 1. Go to Applications > Utilities > Terminal, open this app.
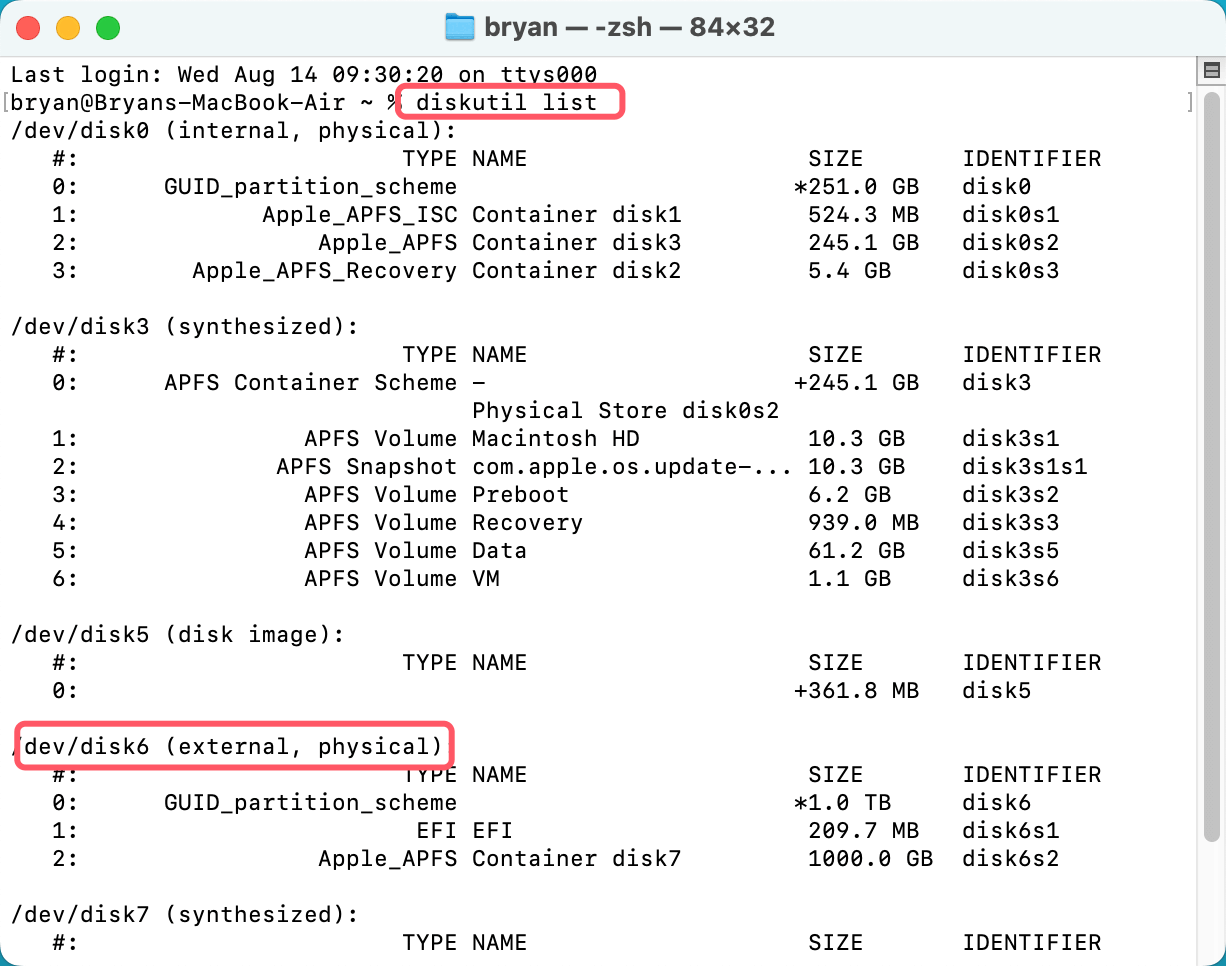
Step 2. Type diskutil list, press Enter to list the drives. Find the drive you want to format to NTFS.
Step 3. Then type diskutil eraseDisk NTFS MyDrive /dev/diskX (X is the disk identifier), press Enter.
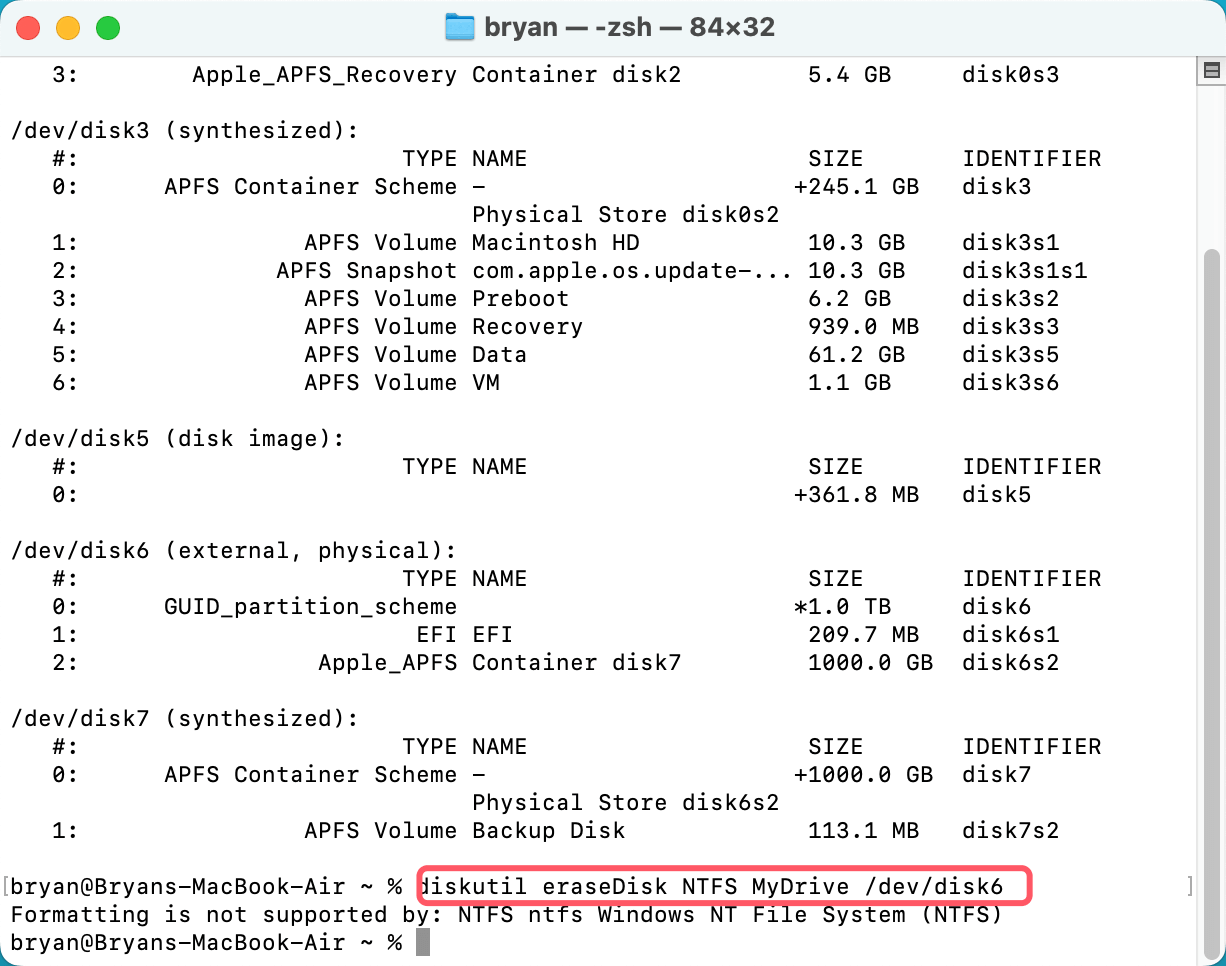
Note: If NTFS is not supported, the formatting process will not be completed.
Method 3. Using NTFS for Mac to Force Format a Drive to NTFS on Mac
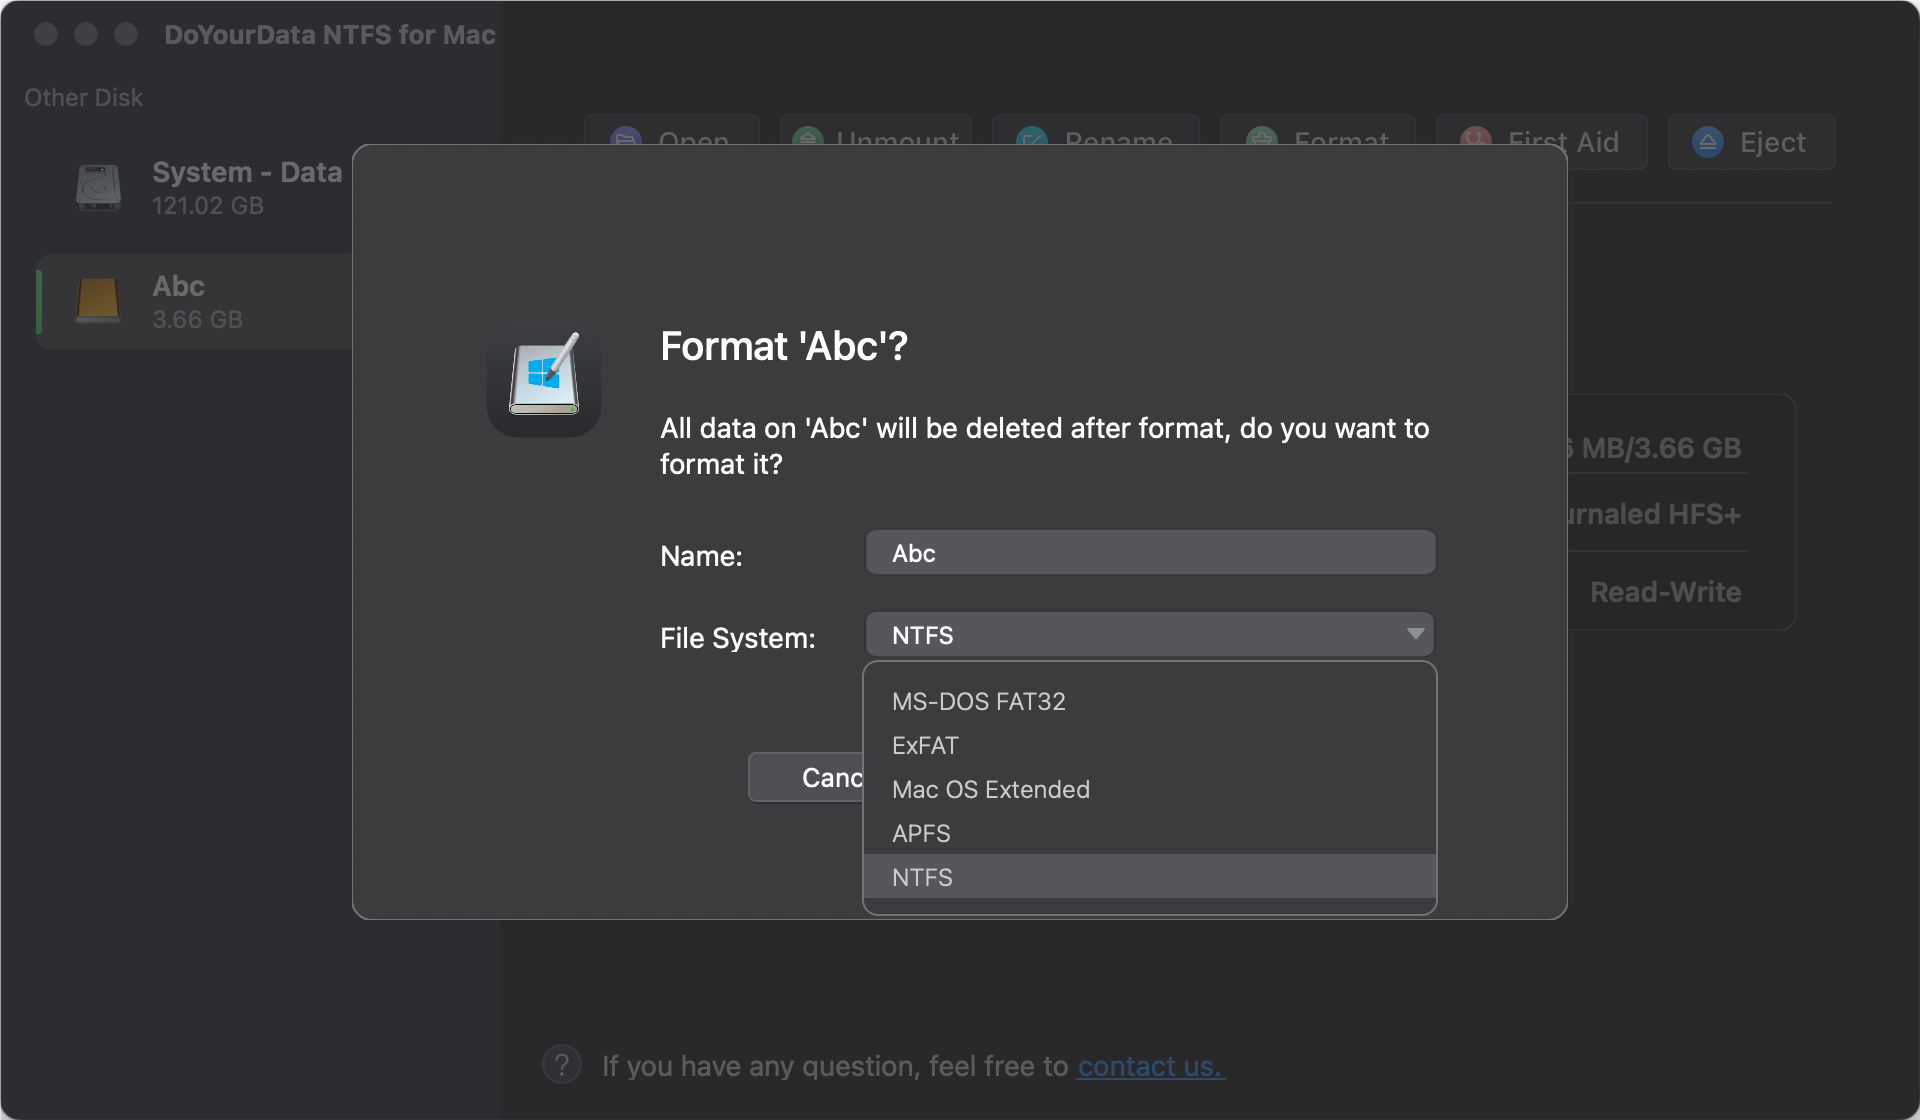
NTFS for Mac can forcedly format any drive to NTFS on Mac. DoYourData NTFS for Mac is a powerful NTFS for Mac tool. It can help you securely format a HDD, SSD, USB flash drive, SD card to NTFS file system.
Step 1. Download and install DoYourData NTFS for Mac, open it.
Step 2. Open DoYourData NTFS for Mac, select the target drive, then click on Format button.
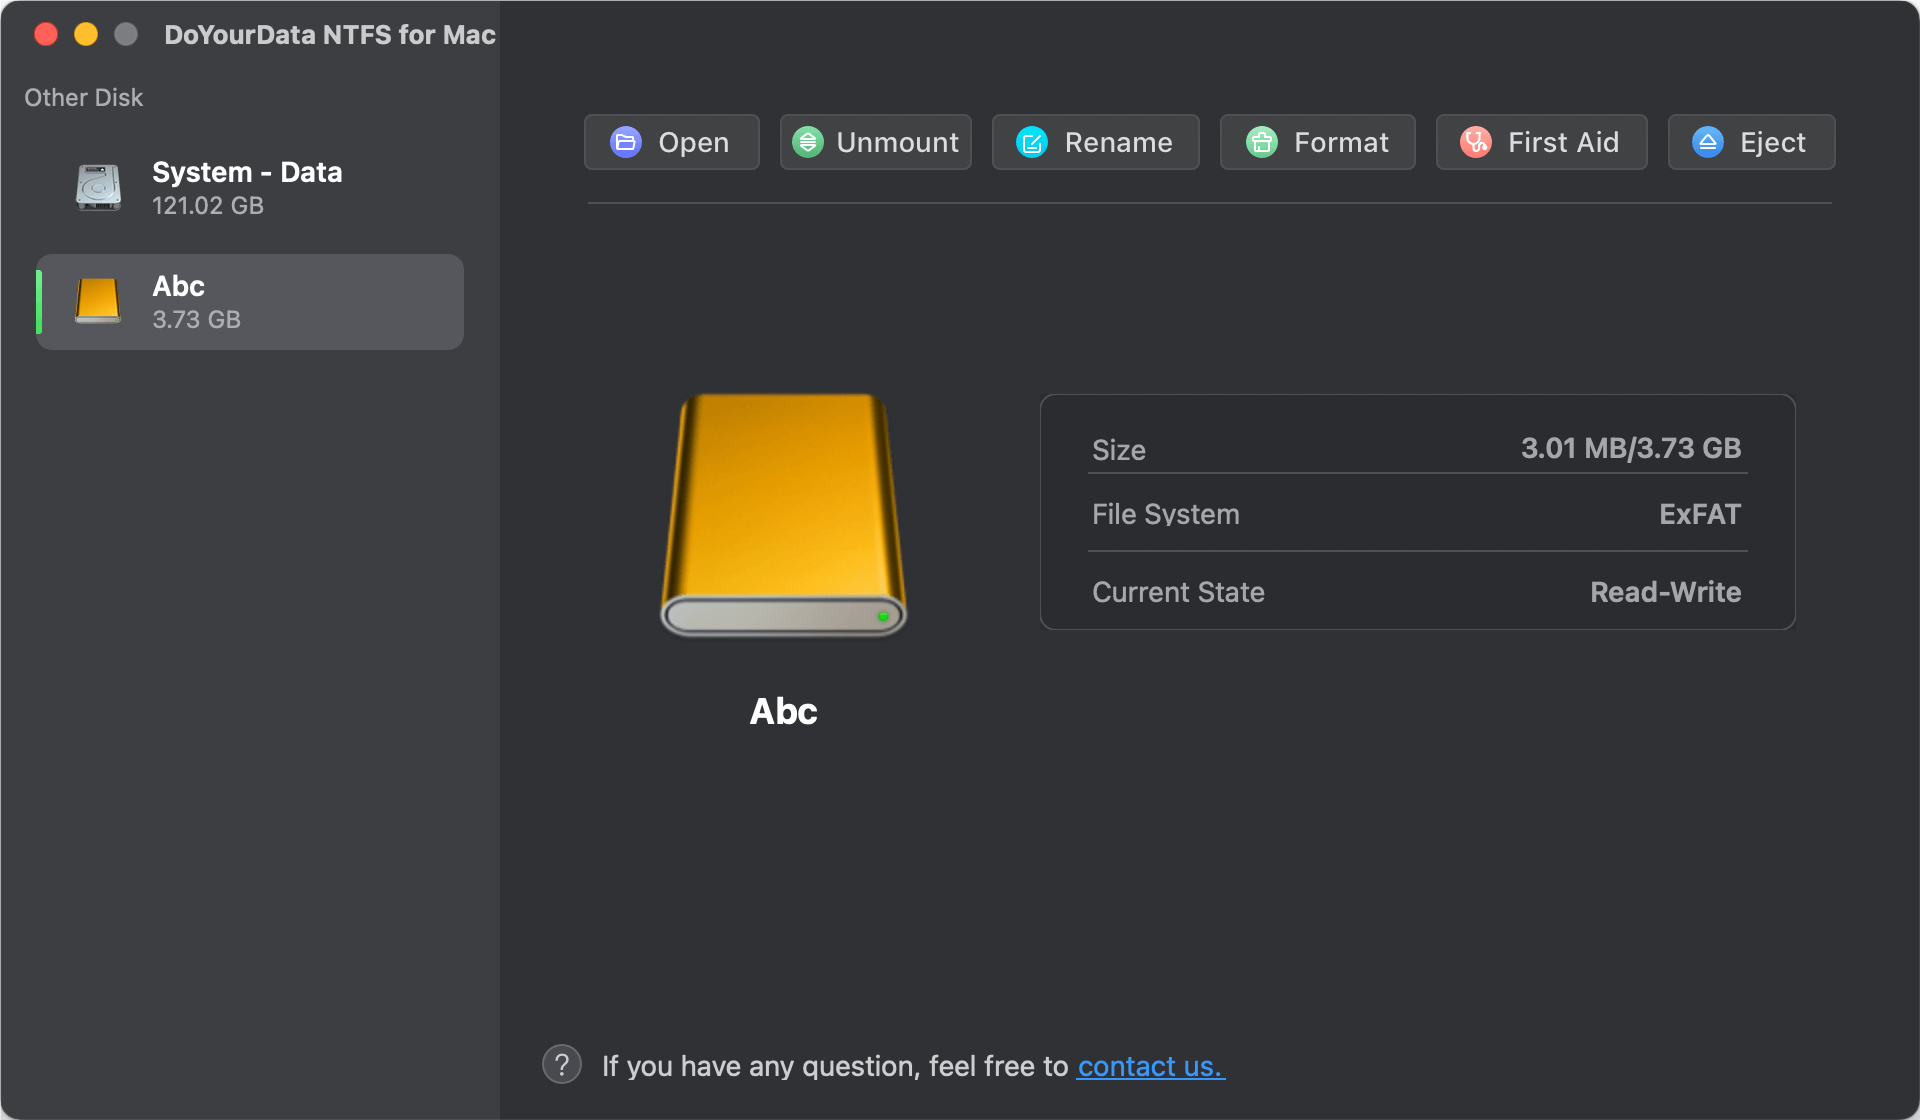
Step 3. Select NTFS as the Format, then click on Continue button to format the drive to NTFS.
How to Recover Lost Data after Formatting a Drive to NTFS?
If you have lost data due to formatting a drive to NTFS, you can use data recovery software to unformat the drive and get all lost data back. Do Your Data Recovery is a powerful data recovery program. It supports to securely and quickly recover lost data from a formatted drive on Windows PC and Mac.
Step 1. Download and install Do Your Data Recovery on your computer, then connect the formatted drive (NTFS drive) to your computer.
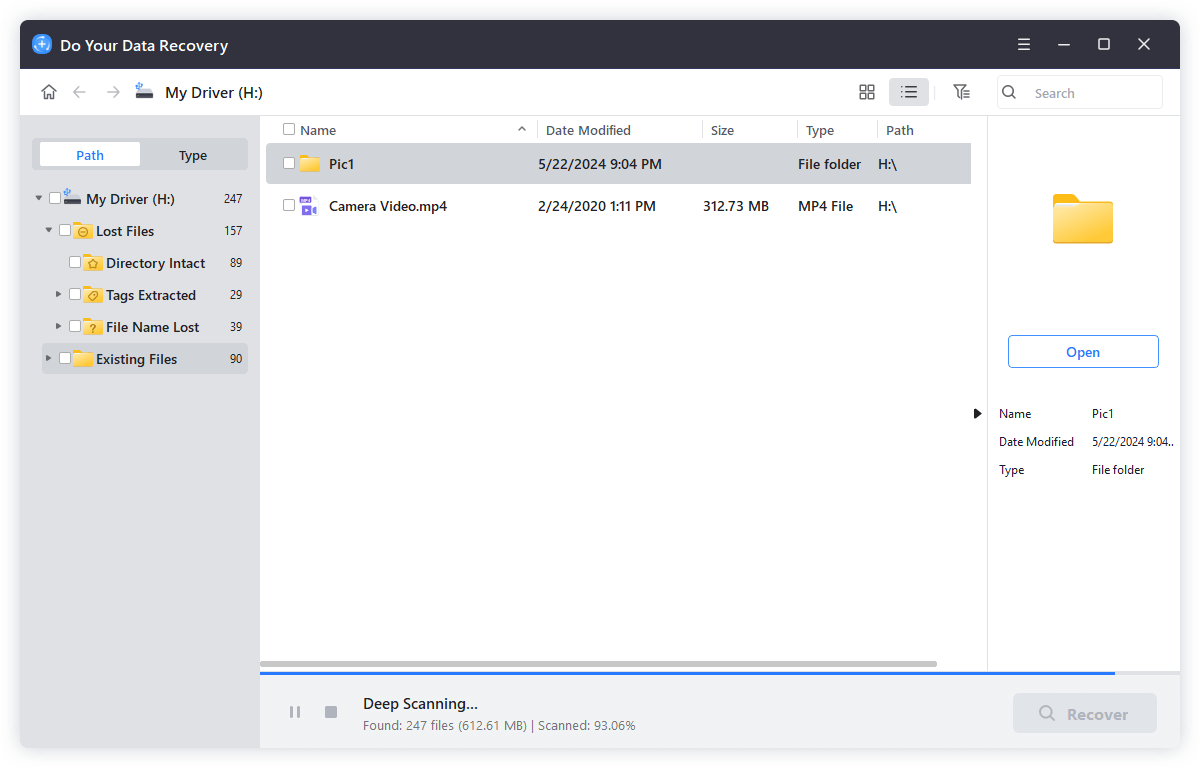
Step 2. Open Do Your Data Recovery, then select the NTFS drive and click on Scan button.

Step 3. This software will deeply scan the formatted drive and find all recoverable files.
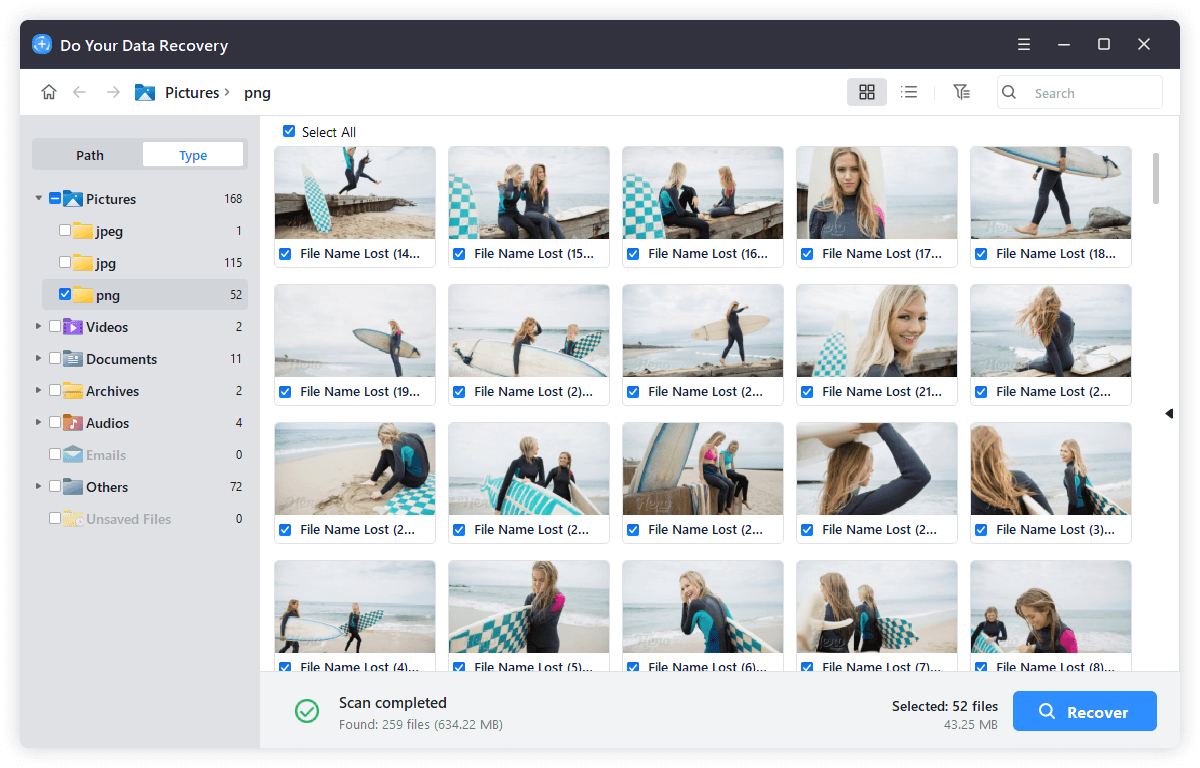
Step 4. Once the scan is completed, select the wanted files and click on Recover button to save the files.
Common Issues and Troubleshooting
#1 Drive Not Recognized
Steps to Troubleshoot a Drive Not Appearing:
- Check Physical Connections:
- Ensure the hard drive is properly connected to your computer.
- Try a different USB port or cable if using an external drive.
- Confirm that the drive is receiving power, indicated by any lights on the drive.
- Verify Disk Utility or Disk Management:
- Open Disk Utility on macOS or Disk Management on Windows.
- Check if the drive appears in these utilities, even if it doesn't appear in Finder or File Explorer.
- Initialize the Drive:
- In Disk Utility (macOS) or Disk Management (Windows), if the drive appears but is unallocated or uninitialized, you may need to initialize it.
- On macOS, select the drive and choose Erase to format it.
- On Windows, right-click the unallocated space and choose Initialize Disk.
- Update Drivers:
- Ensure your operating system and any third-party NTFS drivers are up to date.
- Check for any specific drivers required for the external drive model.
- Check for Disk Errors:
- On macOS, use the First Aid tool in Disk Utility to check and repair the drive.
- On Windows, use the Check Disk tool by right-clicking the drive in File Explorer, selecting Properties, navigating to the Tools tab, and clicking Check.
- Try on Another Computer:
- Connect the drive to another computer to determine if the issue is with the drive or the original computer.
#2 Formatting Errors
Common Error Messages and Solutions:
- "Drive is in Use" or "Cannot Format" Error:
- Ensure no files or applications are open from the drive.
- Close any programs that might be accessing the drive.
- Restart your computer and attempt the format again.
- "The Format Did Not Complete Successfully" Error:
- Check for disk errors using First Aid on macOS or Check Disk on Windows.
- Try formatting the drive with different utilities like Command Prompt on Windows or Terminal on macOS using diskutil.
- "Write-Protected" Error:
- Check if the drive has a physical write protection switch and disable it if present.
- On Windows, use Command Prompt:
- Open Command Prompt as an administrator.
- Type diskpart and press Enter.
- Type list disk and press Enter.
- Select the disk by typing select disk X (replace X with the disk number).
- Type attributes disk clear readonly and press Enter.
- "File System Not Supported" Error:
- Ensure you have the appropriate third-party drivers installed for NTFS on macOS.
- Update your operating system and any third-party software.
#3 Data Recovery
Options for Recovering Data Accidentally Lost During Formatting
- Stop Using the Drive Immediately:
- Avoid writing new data to the drive to prevent overwriting lost files.
- Use Data Recovery Software:
- Recuva (Windows): A free tool that can recover deleted files from hard drives.
- Do Your Data Recovery (Windows & macOS): A comprehensive tool that supports deep scans and recovery of formatted drives.
- Disk Drill (Windows & macOS): Another reliable option for recovering lost files.
- Professional Data Recovery Services:
- If software solutions fail, consider contacting a professional data recovery service.
- Services like DriveSavers and Ontrack specialize in recovering data from damaged or formatted drives.
- Backup and Restore:
- Regularly back up your data to an external drive or cloud service to avoid data loss in the future.
- Utilize built-in backup tools like Time Machine on macOS or File History on Windows.
#4 Data Erasure
If you want to format your drive to NTFS and permanently erase all data from it, you can use data erasure tool (such as DoYourData Super Eraser for Windows/Mac) to securely format and wipe the drive.
Step 1. Download the reliable data erasure tool - DoYourData Super Eraser and install it on your Windows PC or Mac.
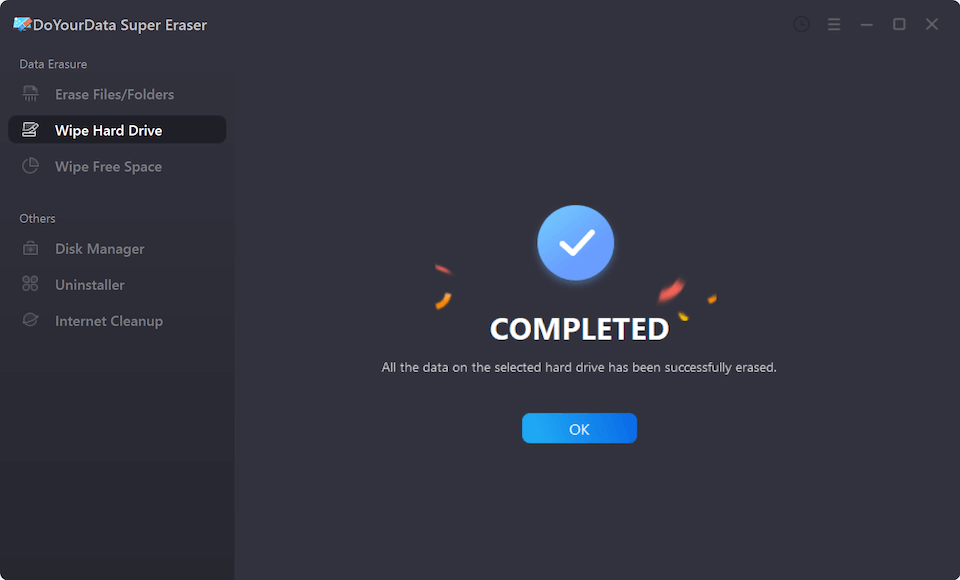
Step 2. Open DoYourData Super Eraser and choose Wipe Hard Drive mode.
Step 3. Select the target drive, click on Wipe Now button.

Step 4. Click on Continue button, then wipe all data from the selected drive.
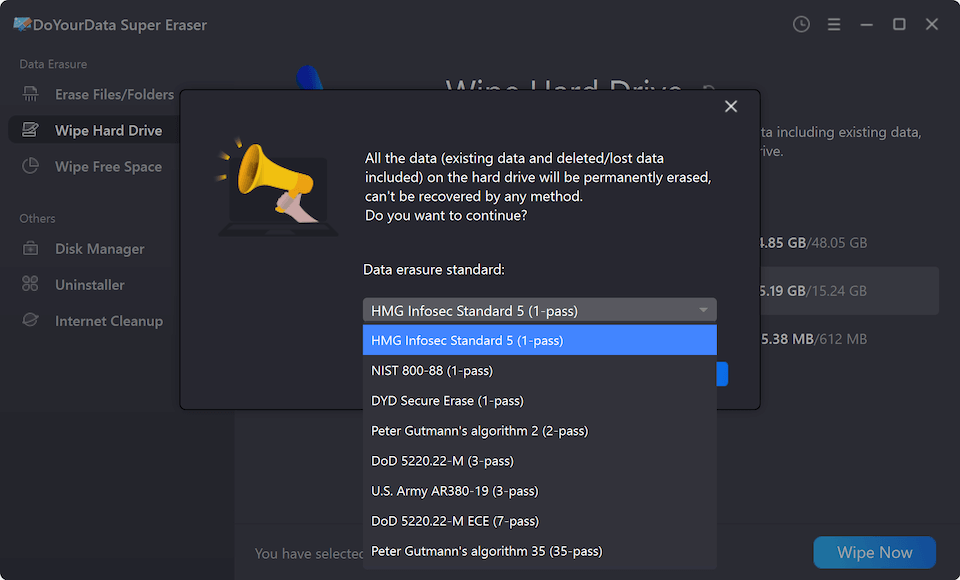
Once the process gets finished, all data stored on the drive is lost for good, cannot be recovered by any method.
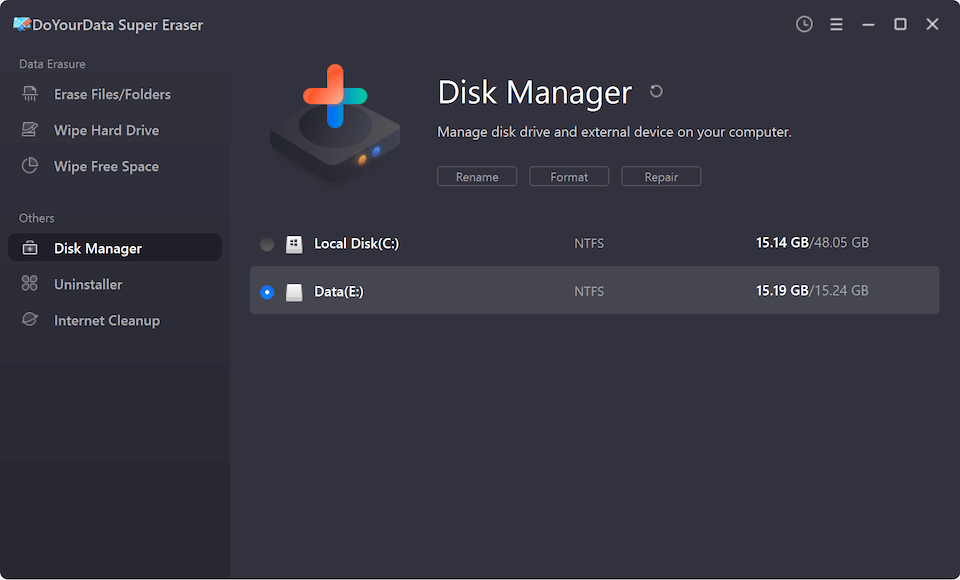
Step 5. Choose Disk Repair, then select the drive and click on Format button. Then select NTFS as the file system, format the drive to NTFS.
Conclusion
Formatting a hard drive to NTFS is essential for optimizing storage efficiency, ensuring data security, and enhancing compatibility with various systems. This guide provides a thorough overview of the preparation steps, the formatting process on both Windows and macOS, and addresses common issues such as drive recognition and formatting errors. By following these detailed instructions and troubleshooting tips, users can confidently format their drives to NTFS, ensuring their data is well-organized and accessible. Always remember to back up your data before formatting to prevent any potential data loss, and consider using data recovery tools if needed.