Recover deleted, formatted or corrupted data from hard drive or external device.
Free TrialHow to Convert ReFS Hard Drive to NTFS?
![]() Updated by Ricky Lin on December 25, 2023
Updated by Ricky Lin on December 25, 2023
Quick Navigation:
- Understanding NTFS/ReFS
- Why Convert from ReFS to NTFS?
- Step-by-Step Guide to Convert ReFS to NTFS
- How to Recover Lost Data after Converting ReFS to NTFS?
- Conclusion
Users may face a trade-off between robustness and flexibility when deciding between ReFS and NTFS, two popular file systems. Consider this: ReFS stands tall thanks to its solid data integrity in contrast to NTFS's alluring variety of features. Now, what if you need to make a change in your current course?
Just think about how important it is to have features that are compatible, fast, and able to access new ones. Learn the ins and outs of ReFS and NTFS as we delve into why we would want to switch from ReFS's robustness to NTFS's adaptability. Hold on tight as we go over the rationale, the insights, and the specific steps to take to ensure a smooth transition.

Understanding NTFS/ReFS:
ReFS: Resilient File System
- ReFS, developed by Microsoft, replaced NTFS to improve reliability and scalability.
- Key aspects include data integrity through checksums, error handling, scalability for high volumes, and optimal data mirroring and storage spaces.
- The design prioritizes data corruption resilience, enabling efficient data storage and protection.

New Technology File System (NTFS):
- NTFS has been Windows' principal file system for decades due to its robustness, security, and wide file attribute support.
- Security and consistency are ensured by encryption, compression, access control, and file system journaling.
- It's compatible with many apps, devices, and utilities, making it versatile.
Why Convert from ReFS to NTFS?
For several reasons, you might need to convert from ReFS to NTFS:
- Compatibility: It is recommended to use NTFS for seamless compatibility, as ReFS may not be completely supported by some apps or older versions of Windows.
- Feature Set: NTFS provides more comprehensive capabilities, including compression, encryption, and sophisticated security properties, which are vital for certain needs or uses.
- Performance: Unlike ReFS, NTFS may offer faster file access and system activities in specific cases.
- System Requirements: Switching to NTFS is essential if the present configuration calls for features that ReFS cannot provide.
Step-by-Step Guide to Convert ReFS to NTFS:
1. Backup Data:
Any important data stored on the ReFS volume should be fully backed up before any changes are initiated. You should back up your vital files using an external hard drive, online storage, or any other dependable way.
2. Check System Requirements:
Verify that the versions of Windows you're using are compatible with the ReFS and NTFS file systems. Just to be sure:
- Go to "This PC" or "My Computer."
- Find the drive you want to convert, then right-click on it and choose "Properties."
- Please verify the kind of file system. Go on to the next step if it currently displays ReFS.
3. Access Command Prompt:
Launch the command prompt as an administrator. For this, go to the Start menu and right-click. Then, choose "Command Prompt (Admin)" or "Windows PowerShell (Admin)."
4. Convert ReFS to NTFS:
Press the enter key: change [drive letter]: (NTFS file system)
Substitute the letter of the ReFS volume you want to convert for [drive letter]. One example is the file system to NTFS format.
5. Confirmation Prompt:
A warning will show if you try to convert the file system and lose data. Type "Y" and press Enter to confirm the conversion.
6. Allow Conversion to Complete:
The system will initiate the process of conversion:
- Transforming the ReFS drive into an NTFS format will start soon. The amount of data saved and the size of the volume determine the duration.
- Make sure nothing gets in the way of the procedure finishing. The Command Prompt window will show you progress indications.
7. Verification and Testing:
- Verify the drive's successful conversion to NTFS once the conversion is finished.
- Right-click the drive, choose "Properties," and ensure the file system type says NTFS.
8. Reconfigure Settings (if necessary):
- Verify everything works properly by opening the files, folders, and programs on the converted disk.
- Ensure that the permissions and file access remain the same after the conversion.
9. Restart Your System (if needed):
- To make sure all of your changes take effect properly, you may need to restart your computer.
- After restarting your system, ensure the converted drive is working again.
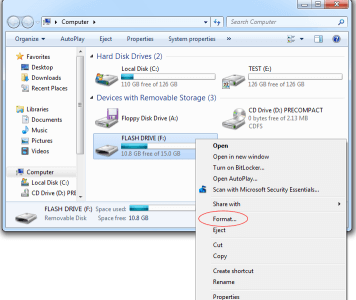
If the disk volume is not OS volume, you can quickly format the ReFS to NTFS:
Step 1. Open This PC and find the ReFS drive.
Step 2. Right-click the ReFS drive and choose Format.
Step 3. Select NTFS as the file system, click Start to format the drive to NTFS.
How to Recover Lost Data after Converting ReFS to NTFS?
If you don’t have a backup, you can try a data recovery program to scan the hard drive after formatting.
Step 1. Download and install the powerful data recovery program - Do Your Data Recovery, open it.
Step 2. Make sure the disk drive is recognized by Do Your Data Recovery. Then select the disk to start data recovery.

Step 3. Click on Scan button. It will deeply scan the formatted disk drive and find all recoverable files.
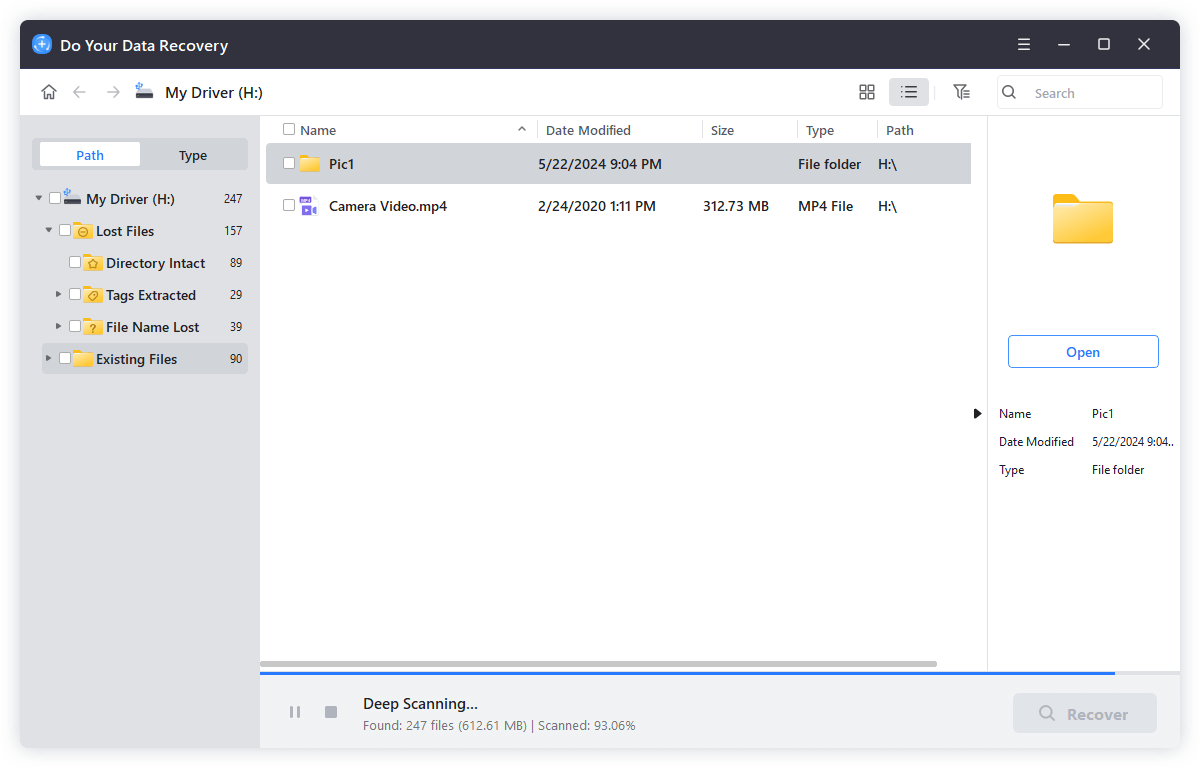
Step 4. Once the scan is completed, you just need to select all files, then save them by clicking on Recover button.

Conclusion:
There are many factors to consider while switching from ReFS to NTFS, such as data backup and system compatibility. Sometimes, you'll need to convert to NTFS because of compatibility issues, feature needs, performance, or system demands, even if ReFS has its own set of benefits regarding data resilience, scalability, and improved error handling.
Insights into the two file systems, the rationale for the conversion, and a detailed procedure for converting from ReFS to NTFS are all provided in this exhaustive book. Before converting file systems, ensure your system is compatible and back up all of your data to avoid data loss and ensure the move goes well.
DoYourData Products
Written & Updated by Ricky Lin
Ricky Lin is an senior editor of DoYourData who lives in Adelaide, Australia. He is interested in writing technology articles related with data recovery, computer issue fixes, disk clone, iPhone data recovery, video edit, Mac optimization, etc. He Joined DoYourData in 2019 and have written 500+ articles to help both Windows users and Mac users to solve data or computer problems.