Fix Samsung SSD Not Detected/Not Showing Up on Mac
Follow this guide to fix Samsung SSD not mounting, not detected, not recognized, not showing up on Mac.
Disk Management can help you initialize Samsung SSD, reformat Samsung SSD, give a new drive letter for unrecognized Samsung SSD, etc. If you have lost data due to formatting or repairing your Samsung SSD, just use data recovery program - such as Do Your Data Recovery to help you deeply scan the Samsung SSD and recover all lost files.
![]() Updated by Nancy on July 15, 2024
Updated by Nancy on July 15, 2024
Quick Navigation:
Your Samsung SSD (such as internal SSD, portable SSD T3, T5, T7, T9, X5, etc.) might not appear on your Windows computer for some reason. If this happens, don't worry - we're here to help you with easy fixes. Solid-state drives (SSDs) are very important for making your computer faster, but they can have problems from time to time. This easy-to-follow guide will explain the most common reasons why your Samsung SSD won't show up and give you simple steps to fix the problem.
We'll take you through every process, from checking the physical links to installing new drivers and firmware. Let's go on a journey to fix problems so that your Samsung SSD on your Windows machine gets the attention it needs!

Data recovery software can deeply scan the Samsung SSD and find all recoverable files, such as existing files, inaccessible files, formatted data, deleted or lost files, etc. Before repairing the damaged Samsung SSD or unrecognized Samsung SSD, you can use a data recovery tool to scan the Samsung SSD and export all files from it to your Windows computer.
Step 1. Download and install Do Your Data Recovery on your computer. This data recovery software supports to recover lost files from any HDD, SSD, USB flash drive, SD card, etc.
Step 2. Open Do Your Data Recovery, select the Samsung SSD, click on Scan button.

Step 3. It will deeply scan the Samsung SSD and find all recoverable files.
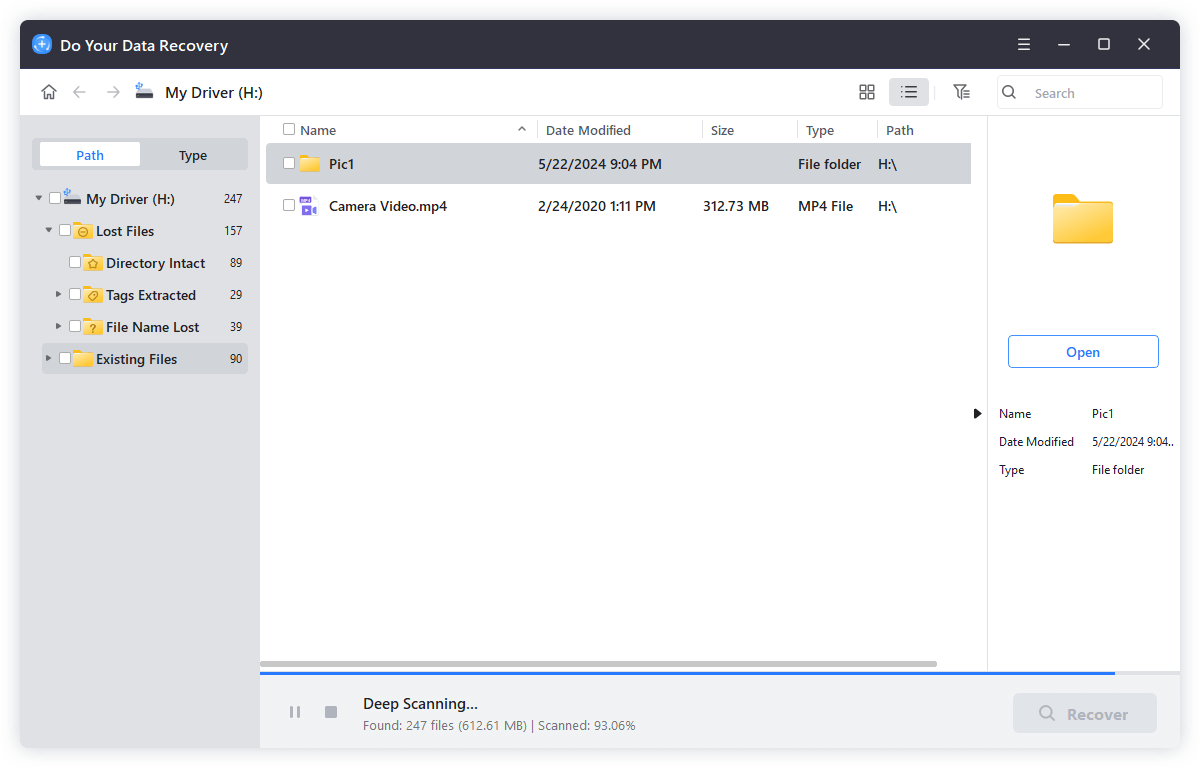
Step 4. Once the scan is completed, you can preview all recoverable files. Then select the desirable files, click on Recover button to save them.

Your SSD might have disappeared because of a link that is too loose or broken. Ensure all wires connecting your Samsung SSD to the motherboard or external enclosure are tight before you start troubleshooting. If you need to, swap out the cords because broken ones can stop them from talking to each other and cause your SSD to disappear. A thorough look at the physical links is what makes a recovery possible.
If you don't give your SSD enough power, it could fail. For areas that are outside, make sure they get enough power. Check the power cord from the power supply unit to your SSD again. A bad power source could be to blame, so you should replace it with one that works and is compatible. Ensuring you have a stable and strong power supply is important for your Samsung SSD always to work well.
Drivers and software that are too old can make it hard for your Samsung SSD to work with Windows. Please visit the Samsung website to get the most up-to-date drivers and firmware for your SSD type. Installing these updates can eliminate bugs and improve speed, ending the disappearance act. If you want your SSD and Windows to work well together, you must ensure that the drivers and software are always up to date.
Step 1. Press Win + X to bring up the quick menu, then select Device Manager.
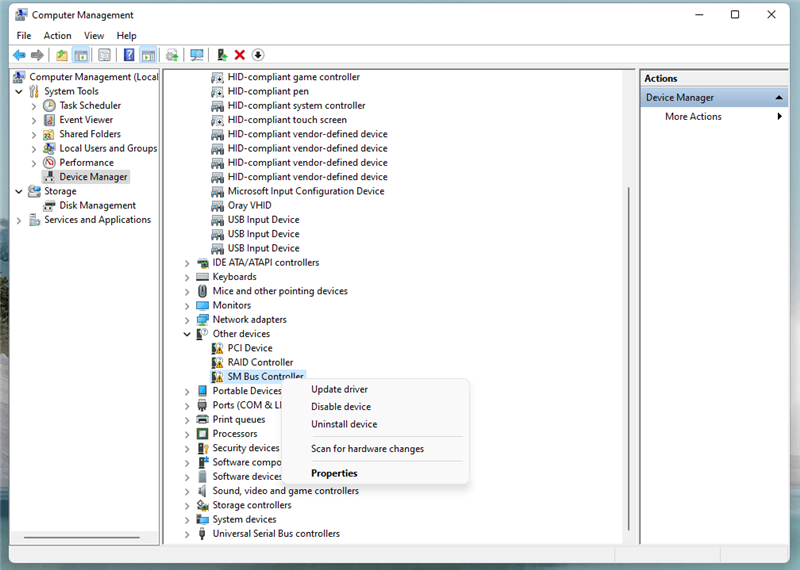
Step 2. Pick up the drive, right-click, and pick "Update driver" from the window that comes up.
Step 3. When asked, choose "Search automatically for drivers." Then, follow the on-screen guidance for the next steps.
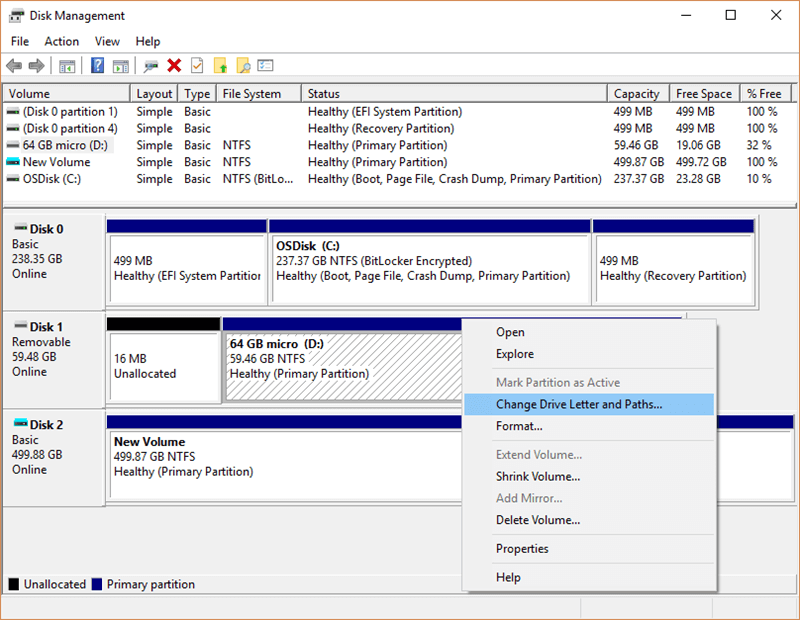
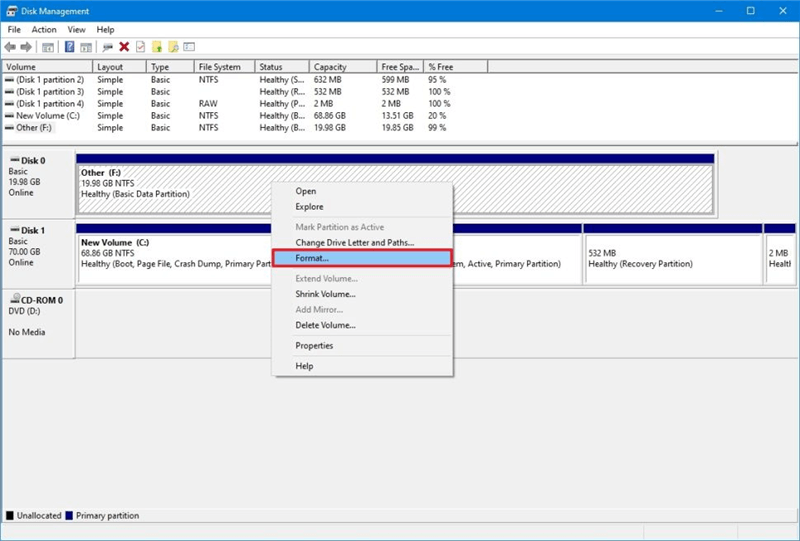
Windows Disk Management can help you with jobs that have to do with disks. If your Samsung SSD is hiding, open Disk Management (press Win + X and choose Disk Management), find your SSD and give it a drive letter if needed. To identify the SSD, ensure it is properly initialized and formatted. Disk Management gives you a more detailed look at how your disks are set up, and it might help you find secret SSDs and fix problems with recognition.
If the Samsung SSD is not initialized, right-click it and choose Initialize Disk, then follow guide to format and create disk volume on the Samsung SSD.
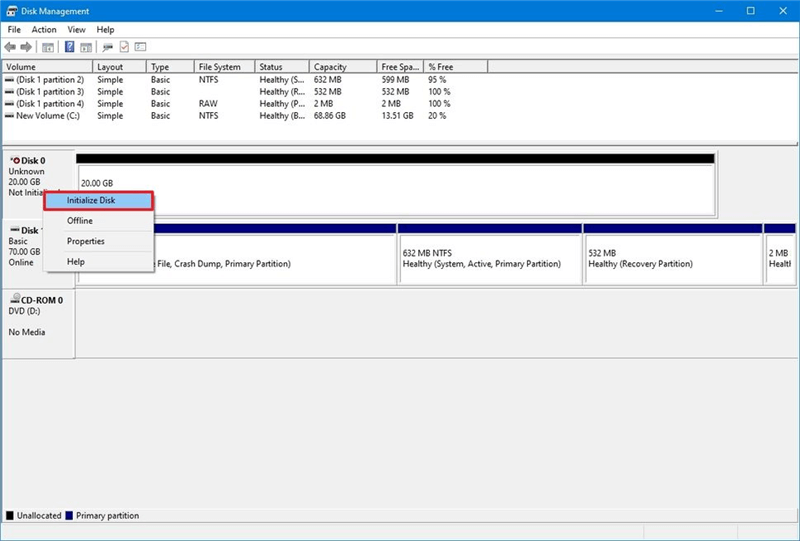
If the Samsung SSD shows as unallocated, right-click it and choose New Simple Volume, create a new disk volume on the Samsung SSD.
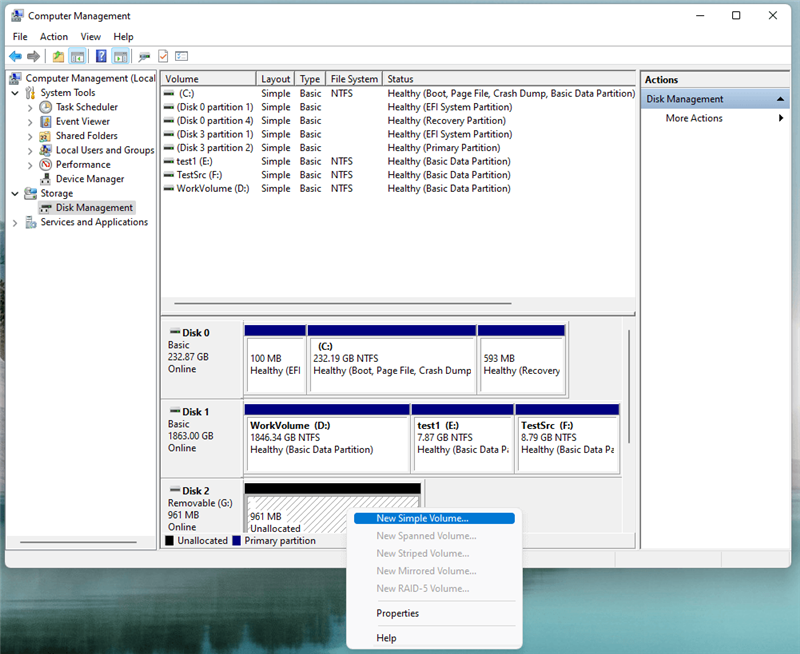
Right-click it, choose Change Drive Letter and Path...if the Samsung SSD has no drive letter.
If the file system gets corrupted, choose Format to format the Samsung SSD.
You might find the answer in the BIOS or UEFI options. Start your computer again and press the right key during boot-up to enter the BIOS/UEFI. Check to see if your SSD is recognized. If it isn't, turn on AHCI mode because not having it can make it harder to find SSDs. When you save your changes and close the program, your SSD may become visible. Going into the BIOS/UEFI settings needs to be done in a planned way to make sure that your Samsung SSD works with the system and is recognized correctly.
Step 1. Turn your computer back on and press keys, like F2, Delete, F10, etc., to enter BIOS.
Step 2. Go to Peripherals > SATA Configuration and pick IDE as the SATA Mode choice.
Problems with software can't be ignored. Do a full antivirus check to ensure no malware is getting in the way. Consider using disk management tools or Samsung's SSD control software for a more thorough diagnosis. These software options could be the key to getting your Samsung SSD to reappear. Dedicated software tools give you extra peace of mind because they ensure that your SSD works in a safe setting without any problems caused by software or hackers.
The Solutions provided in this article can help you fix Samsung SSD not showing up on Windows. If the Samsung SSD is not detected or not showing up on your Mac, check this guide.
Fix Samsung SSD Not Detected/Not Showing Up on Mac
Follow this guide to fix Samsung SSD not mounting, not detected, not recognized, not showing up on Mac.
If you have a damaged Samsung SSD and will sell/donate it, you can use data erasure program to fix and wipe it to ensure all data is erased permanently, then the SSD can be used again.
Step 1. Download and install DoYourData Super Eraser on your computer.
Step 2. Open DoYourData Super Eraser, choose Wipe Hard Drive mode, click Wipe Now button.
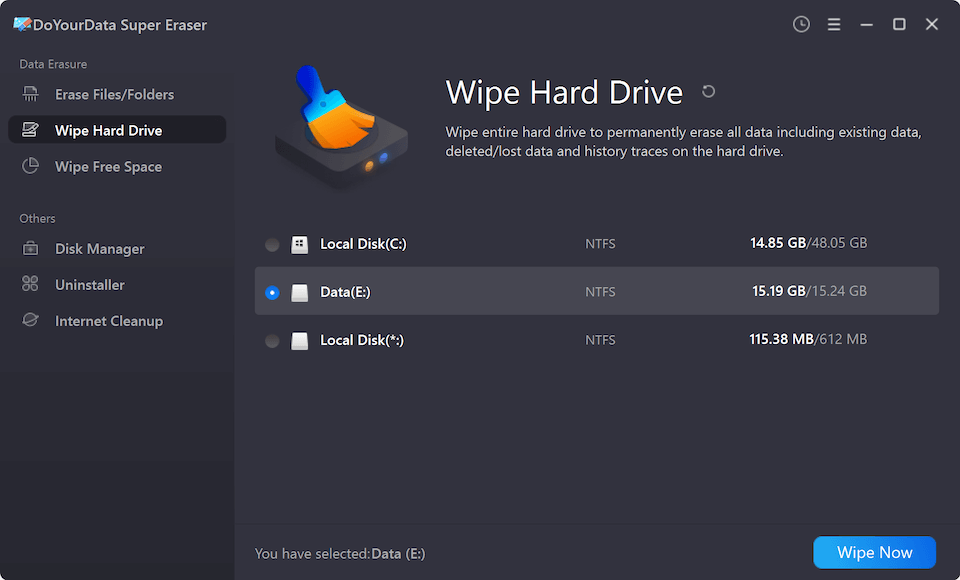
Then the software will fix logical errors on the SSD and wipe all data from it. Once the data is erased by DoYourData Super Eraser, the data is lost for good, cannot be recovered by any data recovery software.
If your Samsung SSD is not showing up on Windows, you can fix the problem by following the steps. The problem can be fixed by ensuring the power source works, checking the physical connections, updating drivers and firmware, using Disk Management, changing BIOS/UEFI settings, and using software solutions. Then, you can use your Samsung SSD normally again.
You can find and fix the problem quickly, ensuring your Samsung SSD works perfectly with your Windows system. It will make your work experience better. If you have lost data from your Samsung SSD, just try data recovery software to help you get all lost data back.
Written & Updated by Nancy
Nancy works as a tech columnist at DoYourData. She is familiar with macOS and Windows OS and writes computer solution, data recovery, disk clone, data erasure articles for DoYourData. She is a big fan of Mac products and is fond of testing utilities software (such as cleaner, recovery, eraser, NTFS for Mac, video editor, etc) on Mac.