Quick Navigation:
- About Microsoft Office File Recovery on Mac
- Methods to Recover Microsoft Office Files on Mac
- Preventive Measures to Avoid Future Data Loss
- Troubleshooting Common Issues During File Recovery
- Conclusion
Losing a Microsoft Office file is one of the most frustrating experiences, especially when you've put in hours of hard work. Whether it's a Word document, Excel spreadsheet, or PowerPoint presentation, the risk of losing your work due to an unexpected software crash, accidental deletion, or power failure is always present. Fortunately, there are various ways to recover Microsoft Office files on a Mac. This guide provides comprehensive methods to help you retrieve your lost files and prevent future data loss.
About Microsoft Office File Recovery on Mac
Microsoft Office files, such as those created in Word, Excel, or PowerPoint, are commonly used for a wide range of professional and personal purposes. On a Mac, these files are stored within the macOS file system, which offers several ways to recover lost or deleted documents. Before diving into the methods for recovery, it's essential to understand where these files are stored and how the system handles temporary and autosaved versions.
When you create a file in Microsoft Office on a Mac, the software often saves temporary versions or backup copies in hidden locations on your hard drive. macOS also includes features like Time Machine, which can back up files regularly, and the Trash folder, which temporarily stores deleted files. In addition to native recovery methods, third-party recovery tools are available that can dig deep into the file system to restore lost files.
Methods to Recover Microsoft Office Files on Mac
A. Using Microsoft Office AutoRecover Feature
Microsoft Office applications, such as Word, Excel, and PowerPoint, have a built-in AutoRecover feature that automatically saves a copy of your file at regular intervals. This feature is particularly useful if the program crashes unexpectedly or if your computer shuts down abruptly.
Steps to Recover Files Using AutoRecover:
Step 1. Launch the Office application (Word, Excel, or PowerPoint) where the file was originally created.
Step 2. A document recovery panel may appear on the left side of the window, showing the autosaved versions of the file.
Step 3. Click on the file that you want to recover. Review the content to ensure it is the correct version.
Step 4. Save the file immediately to prevent it from being lost again. Go to "File" > "Save As" and choose your desired location.
Location of AutoRecover Files on Mac:
If the AutoRecover panel does not appear, you can manually search for AutoRecover files. By default, these files are located in:
- Word: ~/Library/Containers/com.microsoft.Word/Data/Library/Preferences/AutoRecovery/
- Excel: ~/Library/Containers/com.microsoft.Excel/Data/Library/Preferences/AutoRecovery/
- PowerPoint: ~/Library/Containers/com.microsoft.Powerpoint/Data/Library/Preferences/AutoRecovery/

To access these files: Open "Finder" and press Cmd + Shift + G. Enter the path above that corresponds to your application and click "Go." Search for files with the "AutoRecovery" prefix and open them to find your lost content.
B. Restoring from the Mac Trash
If you accidentally deleted a file, it might still be in your Mac's Trash folder. Files in the Trash are not permanently deleted until you empty the Trash. Steps to Recover Files from the Trash:
Step 1. Open the Trash: Click on the Trash icon in the Dock.
Step 2. Locate the File: Search for the file by name or by its icon. If there are many files, you can use the search bar to narrow down your search.
Step 3. Restore the File: Right-click on the file and select "Put Back." This will restore the file to its original location.

C. Recover Files from the Mac Temporary Folder
You can also access the temporary folder on Mac to check if you can find the cache data for the lost Microsoft Office files. Here are the steps:
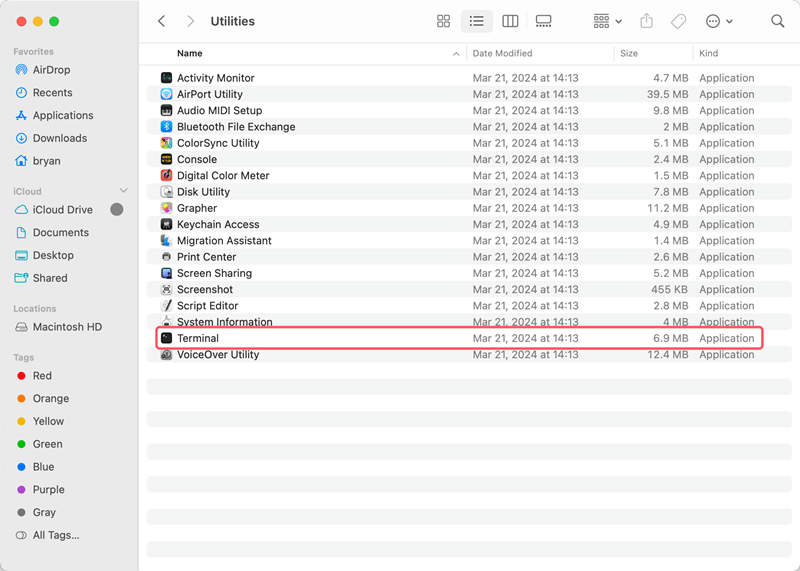
Step 1. Open the Terminal application on your Mac. You can find it by searching "Terminal" in Spotlight (Cmd + Space) or by navigating to Applications > Utilities > Terminal.

Step 2. In the Terminal, type the following command to navigate to the system's temporary folder:
open $TMPDIR
Press Enter. This command will open the system's temporary folder (/private/var/folders) in a Finder window.

Step 3. In the Finder window that opens, you will see several folders with random names. Search for folders that begin with com.microsoft. Look for folders named like:
- com.microsoft.Word
- com.microsoft.Excel
- com.microsoft.Powerpoint
Step 4. Open each folder and look for files with extensions such as .tmp, .asd (for Word AutoRecover), .wbk (for Excel), or other temporary file formats. These files may not have the exact original file name but can be identified by their date and size.
Step 5. Once you find a potential temporary file, open it to check if it's the correct version of your lost document. If it is the correct file, save it immediately to a safe location on your Mac. Rename the file with the appropriate extension (e.g., .docx for Word, .xlsx for Excel, .pptx for PowerPoint) if needed, to ensure it can be opened correctly by the Office application.
D. Utilizing Third-Party Recovery Software
If the above methods do not work, you may need to use third-party recovery tools. These tools can scan your Mac's hard drive for traces of deleted or corrupted files and recover them.
Highly Recommended Third-Party Recovery Tool:
Do Your Data Recovery for Mac: A popular recovery tool for Mac that offers deep scanning to find lost files, including Microsoft Office documents. It's an intuitive tool that supports multiple file formats and provides a step-by-step recovery process. With this powerful tool, you can even recover lost files from damaged or formatted drives.
Do Your Data Recovery for Mac
- Reliable data recovery software for macOS.
- Support multiple file formats, including Microsoft files.
- 100% secure and easy to use data recovery tool.
Steps to Recover Files on Mac with Do Your Data Recovery:
Step 1. Open the recovery tool from launchpad or Applications and select the drive where the Microsoft files were lost.

Step 2. Click on the Scan button to perform a deep scan. The scanning process may take some time, depending on the size of the drive.

Step 3. Once the scan is complete, review the list of recoverable files. Select the files you want to restore and click Recover. Choose a safe location to save the recovered files instead of the original drive.

💡 Additional Tips for Specific Microsoft Office Applications
While the general recovery methods discussed above apply to all Microsoft Office applications, certain nuances and features are specific to Word, Excel, and PowerPoint. Below are some additional tips for recovering files in these particular applications.
Recovering Word Documents
Microsoft Word documents are often critical, whether for academic, professional, or personal use. In addition to the general recovery methods, consider the following:
1. Word automatically saves versions of your document as you work. You can check for previous versions by going to "File" > "Browse Version History."
2. Sometimes, Word saves temporary files that can be recovered. These files are typically stored in the /private/var/folders directory on your Mac.
Recovering Excel Spreadsheets
Excel spreadsheets can contain crucial data, making their recovery vital. Here are some tips:
1. Similar to Word, Excel saves versions of your spreadsheet. Check "File" > "Browse Version History" to see if an earlier version is available.
2. Excel often saves unsaved files in the same AutoRecover folder mentioned earlier. Check there if you believe your file might have been autosaved.
Recovering PowerPoint Presentations
PowerPoint presentations often involve significant work, especially in professional settings. To recover lost presentations:
1. If your presentation was recently closed without saving, PowerPoint might list it under "File" > "Open Recent."
2. PowerPoint has a built-in recovery feature that attempts to save and recover files if the application crashes unexpectedly.
Preventive Measures to Avoid Future Data Loss
Recovering lost files can be stressful and time-consuming, so it's always better to prevent data loss in the first place. Here are some effective preventive measures:
- Regularly Save Your Work: Make it a habit to frequently save your work by pressing Cmd + S periodically.
- Enable AutoSave and AutoRecover: Ensure that AutoSave is turned on in Microsoft Office applications to create backups of your work automatically.
- Back Up with Time Machine: Regularly back up your entire Mac using Time Machine or another reliable backup method.
- Use Cloud Storage: Save your important documents in cloud storage services like OneDrive, Google Drive, or Dropbox for easy access and recovery from any device.
- Implement Version Control: Use versioning features available in cloud storage platforms to manage different versions of a document and restore older versions if needed.
Troubleshooting Common Issues During File Recovery
While recovering files, you may encounter some issues. Here are some common problems and their solutions:
- AutoRecover Doesn't Work: If AutoRecover does not display any files, check if the feature is enabled in your Office settings. Also, manually search for AutoRecover files in the default locations mentioned earlier.
- Handling Corrupted Files: Sometimes, recovered files may be corrupted. You can use the "Open and Repair" option in Office applications or try a third-party tool that specializes in repairing corrupted files.
- Dealing with Unsaved Files: If a file was never saved, look for it in the AutoRecover or Temporary folder. Some third-party tools can also help retrieve unsaved files.
Conclusion
Losing a Microsoft Office file on a Mac can be a daunting experience, but with the right knowledge and tools, you can recover your documents quickly and effectively. Whether you use the built-in AutoRecover feature, restore from the Trash, rely on Time Machine backups, or opt for third-party data recovery software, multiple methods are available to retrieve lost files. Additionally, adopting preventive measures like regular backups and enabling AutoSave can safeguard your data against future loss.

Do Your Data Recovery for Mac
Do Your Data Recovery for Mac, one of the best Mac data recovery software, can help you easily and completely recover deleted, formatted or lost files from Mac HDD/SSD, external HDD/SDD, USB drive, memory card, digital camera, or other storage devices.