How to back up Mac data?
Different methods to create full backups for you Mac and ensure data security.

Quick Navigation:
Losing HD videos on your Mac can be a distressing experience. Whether it's a precious family video, a critical project for work, or footage from a memorable event, the disappearance of these files can feel devastating. Understanding the reasons behind data loss and knowing how to recover your lost videos can make a significant difference in regaining access to your valuable content. In this guide, we'll explore various methods for recovering lost HD videos on Mac, from basic troubleshooting to advanced recovery techniques.
Below are some reasons for loss of HD videos on Mac:
Knowing the cause of the data loss can help in choosing the most effective data recovery method.
Once you find HD videos or any other files are lost, it's better to do the following things to ensure you have the greatest chance to get back the lost videos.
The most crucial first step is to stop using the drive where the videos were stored. When a file is deleted, the space it occupied is marked as available for new data. Continued use of the drive increases the risk of overwriting this space, which can make recovery difficult or even impossible.
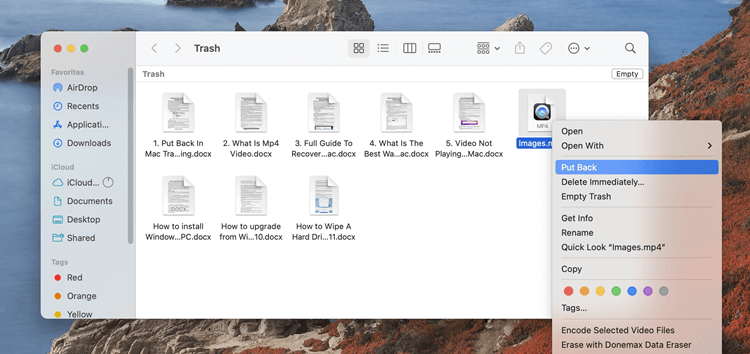
Before diving into more complex recovery methods, always check the Trash Bin. Often, deleted files are simply moved to the Trash and can be easily restored. To do this:
1. In the dock, click on the Trash icon to select it.
2. Browse through the contents to find your lost videos.
3. To put them back where they belong, right-click on them when you locate them and select "Put Back."
Sometimes, files may not be lost but simply hidden due to a system glitch or user error. macOS allows you to view hidden files, which might help you locate your missing HD videos.
To show hidden files on Mac:
1. Open Finder and navigate to the folder where your HD videos were stored.
2. Press Command + Shift + . (period). This shortcut will display hidden files in the folder.
3. Look for the missing HD video files. If you find them, you can move them to a more accessible location.
Once you are done, you can press Command + Shift + . again to hide the files.
Recovering your lost HD videos can be simple if you have been backing up your Mac using Time Machine. To restore files from a Time Machine backup, follow these steps:
1.Attach your Mac to the Time Machine backup drive.
2.Go to the original folder where the videos were kept.
3.Choose "Browse Time Machine Backups" after clicking the Time Machine icon in the menu bar.

4.To access the date when the videos were still on your Mac, use the timeline on the right.
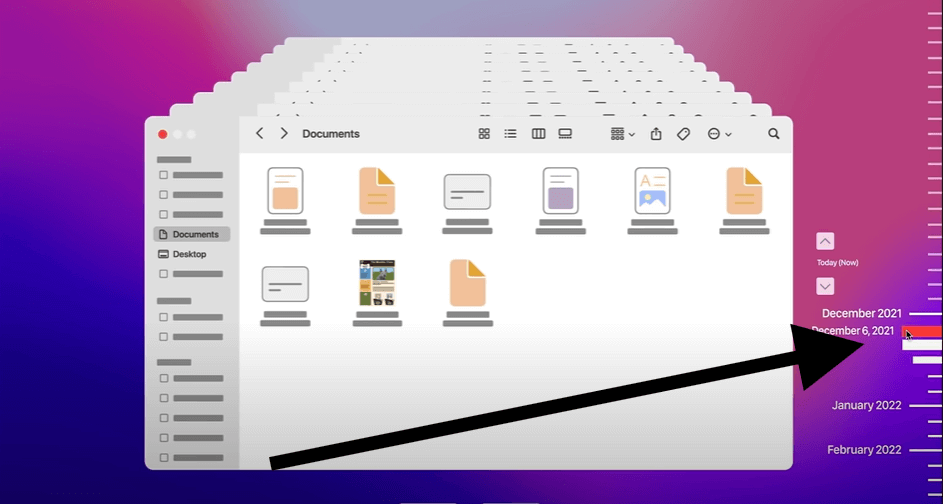
5.Click "Restore" after selecting the HD videos you wish to recover.
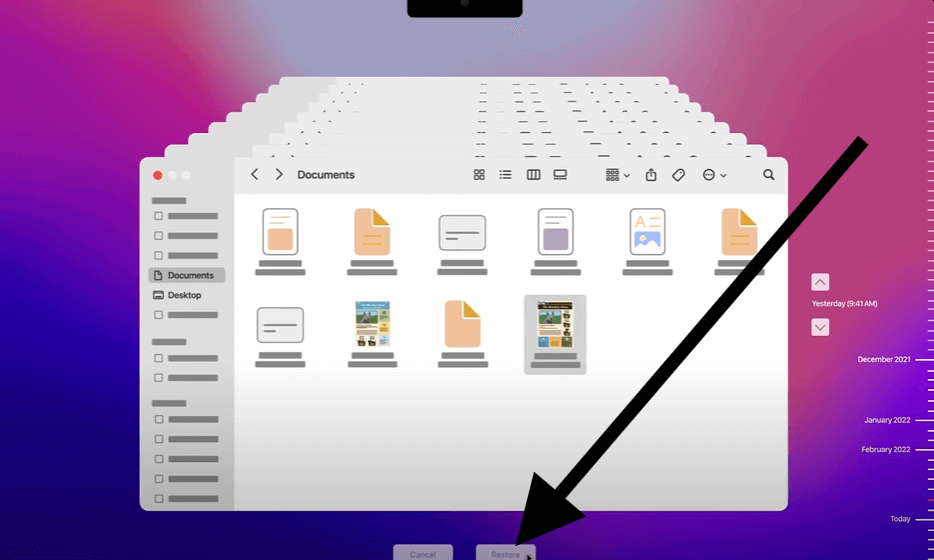
Time Machine backs up your files hourly, daily, and weekly, so even if you lose your videos weeks ago, you might still be able to recover them.
If you don't have backups for the files and the files cannot be found with the above methods, you can still check manually with advanced methods as follows:
For users comfortable with command-line tools, macOS Terminal offers basic methods for attempting file recovery. Although this method may not always be effective, it's worth a try before moving on to more advanced tools.
1. Open Terminal from Applications > Utilities.
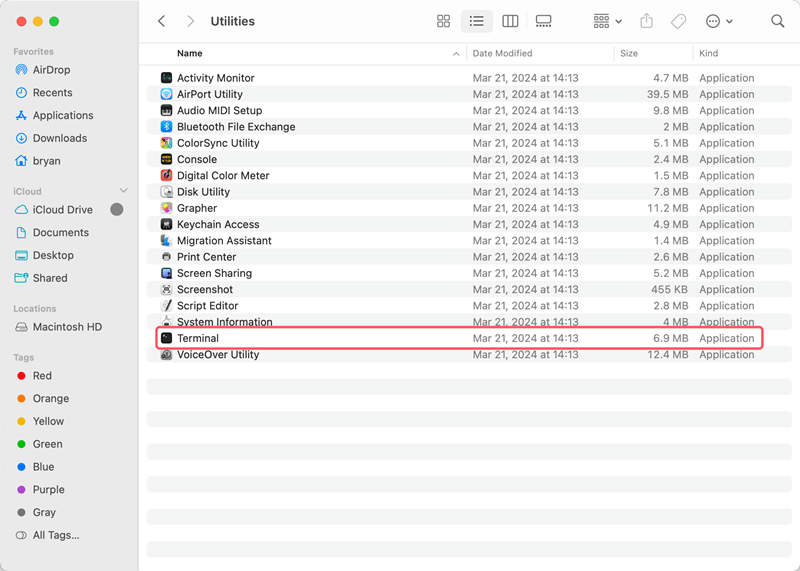
2. Use the ls command to list files and directories. For example:
ls /Users/YourUsername/Documents/
3. You can also use find to search for specific file types:
find / -name "*.mov"

Be cautious with Terminal commands, as incorrect usage can lead to further complications.
1. Open Disk Utility from Applications > Utilities.

2. Select your drive from the list on the left. Click on "First Aid" to start.

3. In the pop up windows, click on "Run" to start the repair process.
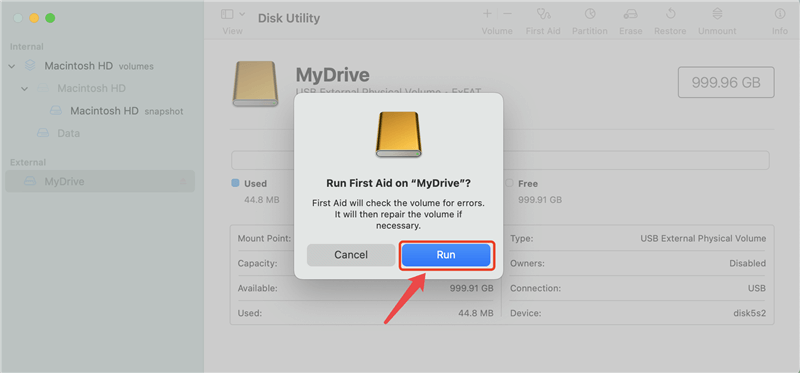
Disk Utility can sometimes resolve issues that prevent files from being accessed, but it is not a guaranteed method for recovering deleted files.
When manual methods fail, specialized data recovery software can offer a higher chance of success. Here is the most popular data recovery tool for HD videos on Mac:
Do Your Data Recovery for Mac: Known for its user-friendly interface and powerful scanning capabilities. Offers a range of recovery options and supports multiple file types, including HD videos. The software provides deep scanning options for complex recovery situations.
Here's a general guide to using data recovery software:
1. Download and install the software:
Ensure you download the software from a reputable source, and install it on your Mac.
2. Run the software and scan for lost files:
Launch the software and select the drive where the HD videos were lost.

3. Scan the drive for lost HD videos:
Click on the Scan button and start the scanning process.

4. Preview and select files:
The software will allow you to preview recoverable files. Check and choose the videos you need.

5. Recover and save files:
Click Recover button and follow the software's instructions to recover the files and save them to a different drive to avoid overwriting.

If the above methods don't work, professional data recovery services might be your best option. These services have specialized tools and expertise to handle severe data loss situations, such as physical damage or complex corruption.
What to Expect:
Choosing a Service:
While recovering lost HD videos is possible, prevention is always better than cure. Implementing preventive measures can save you time and stress in the future. Below are some tips to help prevent the loss of HD videos on your Mac.
1. Regular Backups: The most effective way to prevent data loss is by regularly backing up your files. Use Time Machine or another backup solution to create frequent backups of your HD videos and other important files. Ensure your backup drive has enough storage and is connected regularly for automatic backups.
How to back up Mac data?
Different methods to create full backups for you Mac and ensure data security.
2. Use Multiple Storage Devices: Storing your HD videos on multiple devices, such as an external hard drive, cloud storage, or a network-attached storage (NAS) device, can provide an additional layer of protection. Even if one device fails, you will have a copy of your files on another device.
3. Be Cautious with File Management: Exercise caution when managing files, especially when deleting or moving them. Double-check the files you are about to delete and ensure they are not needed. When formatting drives, verify that you have selected the correct drive or partition.
4. Protect Against Malware: Keep your Mac secure by regularly updating your operating system and using antivirus software to protect against malware and virus attacks.
5. Eject Drives Properly: Always eject external drives properly before disconnecting them from your Mac. This helps prevent data corruption and potential file loss due to improper ejection.
6. Monitor Drive Health: Use tools like Disk Utility or third-party software to monitor the health of your storage devices. Early detection of drive issues can help you take action before data loss occurs.
Losing HD videos on a Mac can be a distressing experience, but it is not necessarily the end of the road. By understanding the causes of video loss and following the recovery methods outlined in this article, you can increase your chances of successfully retrieving your lost files. From simple solutions like checking the Trash Bin and using Time Machine to more advanced options like data recovery software and professional services, there are multiple ways to recover your valuable HD videos.
Moreover, taking preventive measures such as regular backups, using multiple storage devices, and protecting your system from malware can help safeguard your videos against future loss. Remember, the key to successful data recovery is acting quickly and choosing the right recovery method for your specific situation. By staying informed and prepared, you can protect your HD videos and preserve your digital memories for years to come.
Do Your Data Recovery for Mac
Do Your Data Recovery for Mac, one of the best Mac data recovery software, can help you easily and completely recover deleted, formatted or lost files from Mac HDD/SSD, external HDD/SDD, USB drive, memory card, digital camera, or other storage devices.
