Quick Navigation:
- About LaCie External Drive
- Before Formatting Your LaCie External Hard Drive
- Format LaCie External Hard Drive on Windows
- Format LaCie External Hard Drive on Mac
- How to Recover Lost from Formatted LaCie External Hard Drive?
- How to Format and Wipe the LaCie External Hard Drive Before Selling/Donating?
- Final Words
External hard disks are becoming a necessary tool in the technical era, for both personal and professional use. They provide an efficient way to store large amounts of data, back up important files, and transfer information between different devices. Among the many brands available, LaCie stands out for its durability, performance, and design. However, there are times when you may need to format your LaCie external hard drive, whether to change the file system, resolve errors, or simply prepare the drive for new use. We will explore the steps of formatting your LaCie external hard drive on both Windows and Mac operating systems.

About LaCie External Drive
LaCie is a brand known for its high-quality external storage solutions, particularly external hard drives and solid-state drives (SSDs). LaCie products are widely recognized for their stylish designs, often created in collaboration with renowned designers, and their robust build quality. These drives are used by professionals and consumers alike for storing, backing up, and transferring large amounts of data.
LaCie external drives are popular among creative professionals, such as photographers, videographers, and graphic designers, due to their reliability, high performance, and large storage capacities. They are compatible with both Windows and Mac operating systems, and many models offer advanced features like ruggedized cases for durability, high-speed data transfer rates, and support for USB-C, Thunderbolt, and other modern connectivity standards.
The brand is a subsidiary of Seagate Technology, a leading manufacturer of data storage devices. LaCie drives are often used in environments where data security, speed, and capacity are critical, making them a preferred choice for those who need to store and access large files quickly and reliably.
Before Formatting Your LaCie External Hard Drive
Before formatting your LaCie external hard drive (HDD or SSD), it's crucial to make a secure backup of your sensitive information / data.
Backing Up Important Data:
Before formatting a hard drive, make sure you have a backup of any crucial files because doing so will remove all of the data on it. You can do this by transferring your data to another external drive, cloud storage, or another secure location on your computer.
Format LaCie External Hard Drive on Windows
Formatting a LaCie external hard drive on Windows is a straightforward process. Here's how to do it:
1. Connecting the Drive
First, ensure that your LaCie external hard drive is properly connected to your Windows computer. Use the appropriate USB cable and connect it to a functioning USB port. The drive should appear as a removable drive in File Explorer.
2. Accessing Disk Management
To format the drive, you'll need to access Disk Management. To accomplish this, press Windows + X or right-click the Start button, then choose Disk Management from the menu. Disk Management is a built-in Windows utility that allows you to manage disk drives, including formatting, partitioning, and assigning drive letters.
3. Selecting the LaCie Drive
Once in Disk Management, locate your LaCie external hard drive in the list of available drives. It's essential to identify the correct drive to avoid accidentally formatting the wrong one. The LaCie drive will be listed along with other drives connected to your computer, usually labeled as "Removable" or "External."
4. Choosing the Format Option
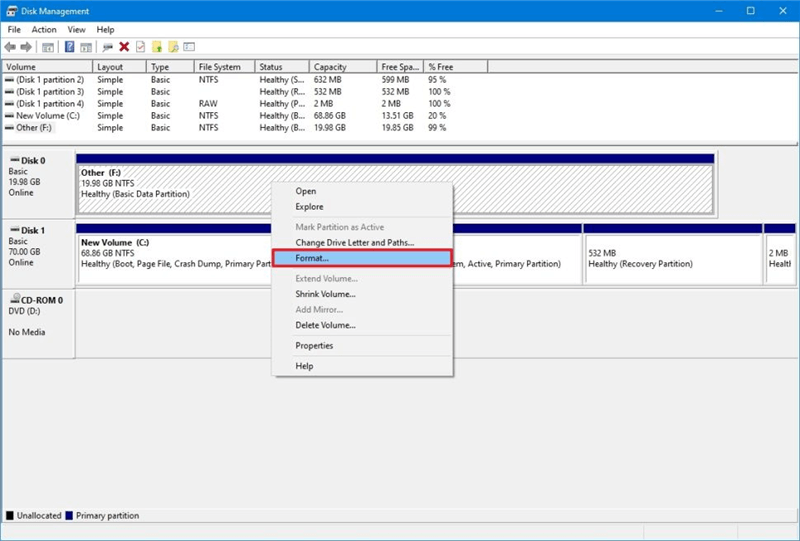
Right-click on the partition of the LaCie drive that you want to format, and select Format from the context menu. If the drive has multiple partitions, you may need to format each one individually, or you can delete all partitions and create a new single partition.
5. Configuring Format Settings
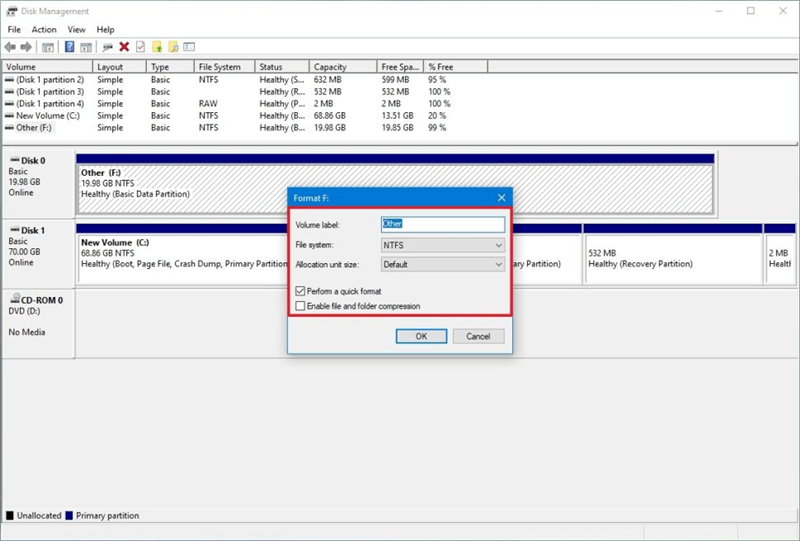
In the format window, you'll need to configure the format settings:
- File System: Choose the file system that best suits your needs (e.g., NTFS, exFAT, FAT32).
- Allocation Unit Size: For most users, the default allocation unit size is fine. This setting determines how data is stored on the disk.
- Volume Label: You can give the drive a name by entering it in the Volume Label field.
- Quick Format: Check this box if you want to perform a quick format, which is faster but less thorough. Uncheck it for a full format, which takes longer but checks the drive for bad sectors.
6. Completing the Format
After configuring the settings, click OK to begin the formatting process. A warning message will appear, reminding you that formatting will erase all data on the drive. Click OK to confirm and start the process. The time it takes to format the drive will depend on its size and whether you chose a quick or full format.
7. Post-Formatting Steps
Once the formatting is complete, the drive will be ready to use. Open File Explorer to check that the drive is accessible and that it has been formatted correctly. If you backed up data earlier, you can now transfer it back to the drive.
Format LaCie External Hard Drive on Mac
If you're using a Mac, the process of formatting your LaCie external hard drive is slightly different but still straightforward. Here’s how to do it:
1. Connecting the Drive
Connect your LaCie external hard drive to your Mac using the appropriate cable. The drive should appear on your desktop or in Finder under the Devices or Locations section.
2. Accessing Disk Utility
To format the drive, you'll need to use Disk Utility, a built-in macOS tool for managing disks. You can access Disk Utility by going to Applications > Utilities > Disk Utility, or by searching for it using Spotlight.
3. Selecting the LaCie Drive
You may view a list of all the drives that are attached to your Mac in Disk Utility. From the list on the left, pick your LaCie external hard drive. Make sure you select the right drive because formatting will remove all of the data on the chosen drive.
4. Choosing the Erase Option
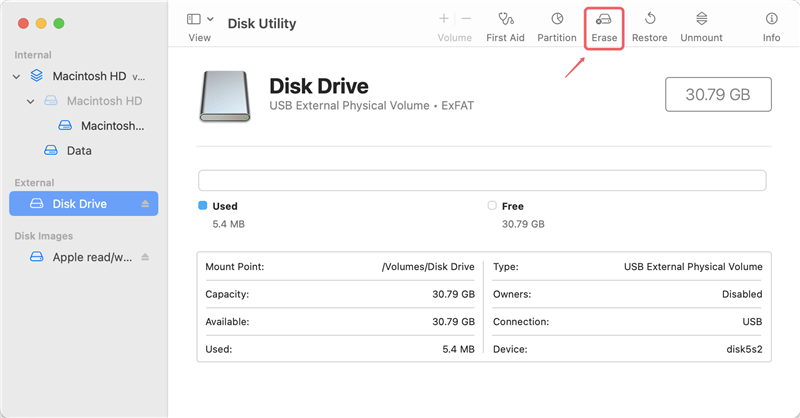
With the LaCie drive selected, click the Erase button at the top of the Disk Utility window. This will bring up a new window where you can configure the formatting options.
5. Configuring Format Settings
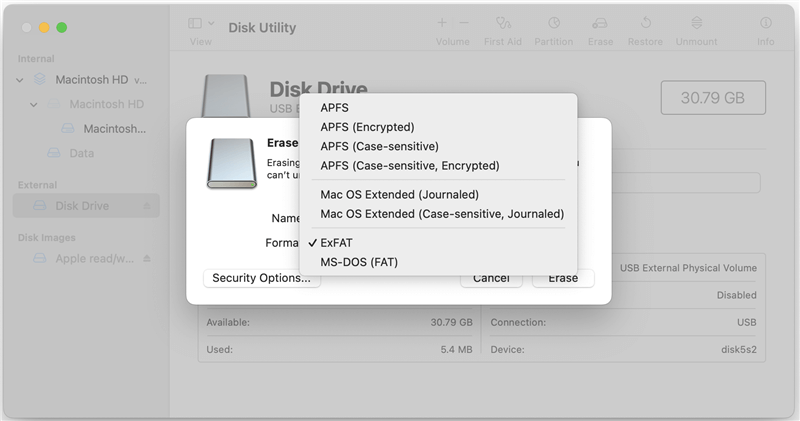
In the Erase window, you’ll need to set the following options:
- Name: Enter a name for the drive.
- Format: Choose the file system format (e.g., APFS, Mac OS Extended, exFAT). If you plan to use the drive with both Mac and Windows, exFAT is a good choice.
- Scheme: For most external drives, the GUID Partition Map is the recommended scheme.
6. Completing the Format
After configuring the settings, click Erase to begin the formatting process. Disk Utility will erase the drive and apply the new file system. This process may take a few minutes, depending on the size of the drive. Once the format is complete, you’ll see a confirmation message.
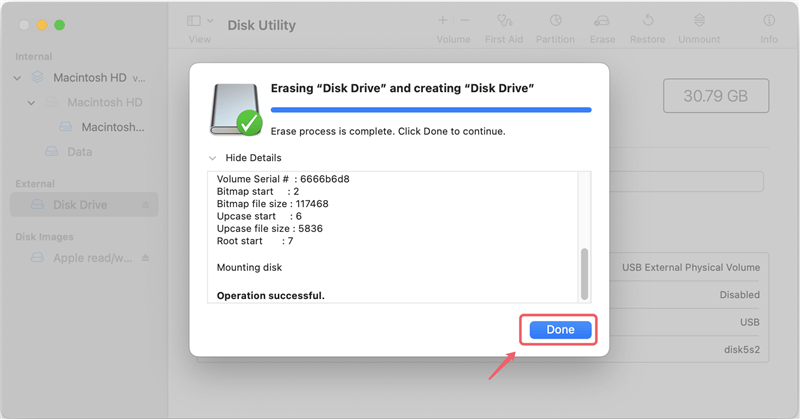
7. Post-Formatting Steps
After formatting, your LaCie drive will be ready for use. It should now appear in Finder under Devices. You can transfer files back to the drive if you backed them up before formatting.
How to Recover Lost from Formatted LaCie External Hard Drive?
Please note that the formatted data is not lost for good and can be recovered by data recovery software. If you have lost data due to formatting a LaCie external hard drive, you can use a tool to unformat the drive and get all the lost data back.
Step 1. Download and install a data recovery program - such as Do Your Data Recovery on your computer.
Step 2. Connect the formatted LaCie external hard drive to the computer and open Do Your Data Recovery, select the formatted LaCie external hard drive to start data recovery.

Step 3. Click on Scan button to deeply scan the formatted LaCie external hard drive and find all lost files including the deleted/formatted files.
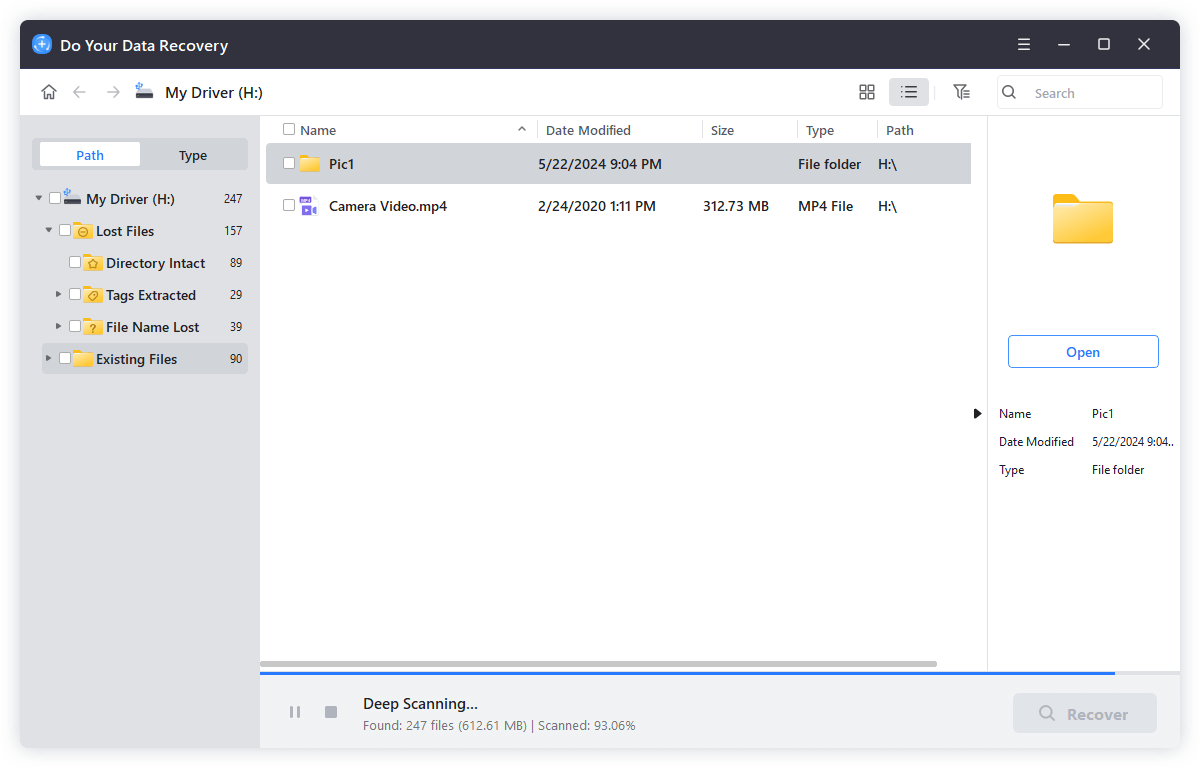
Step 4. Once the scan is completed, select the wanted files, click on Recover button to save them.
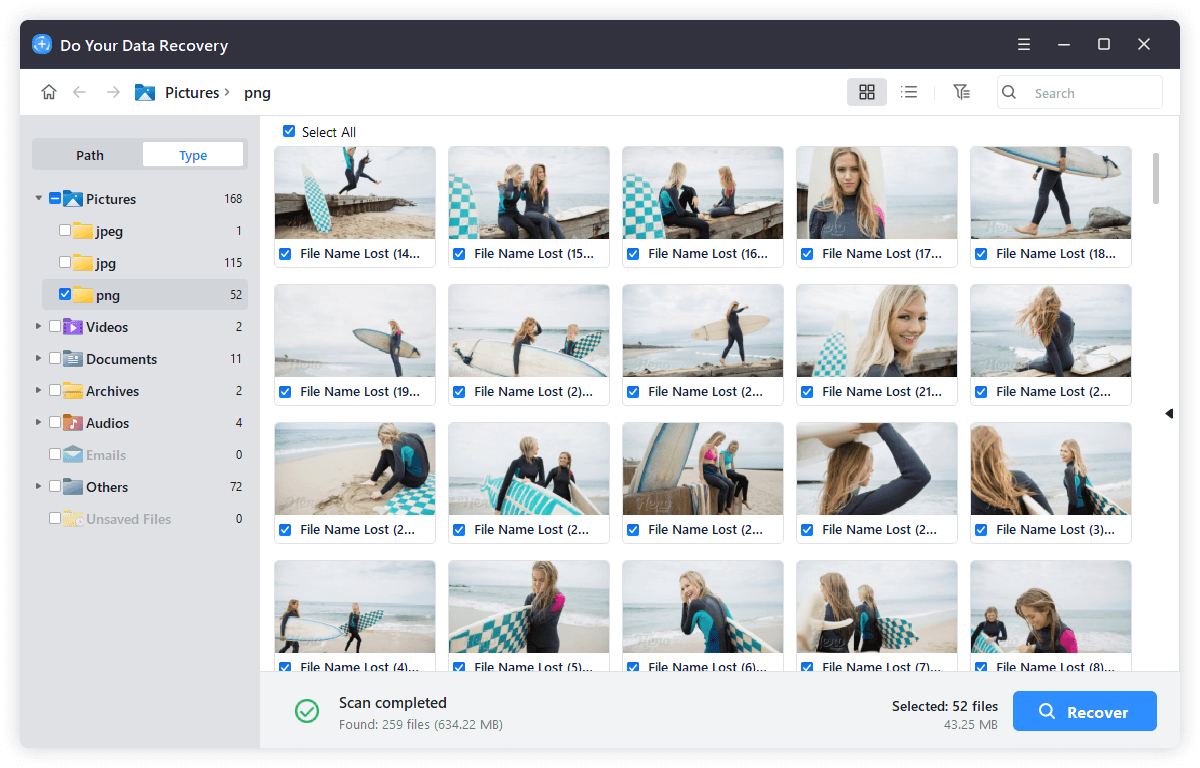
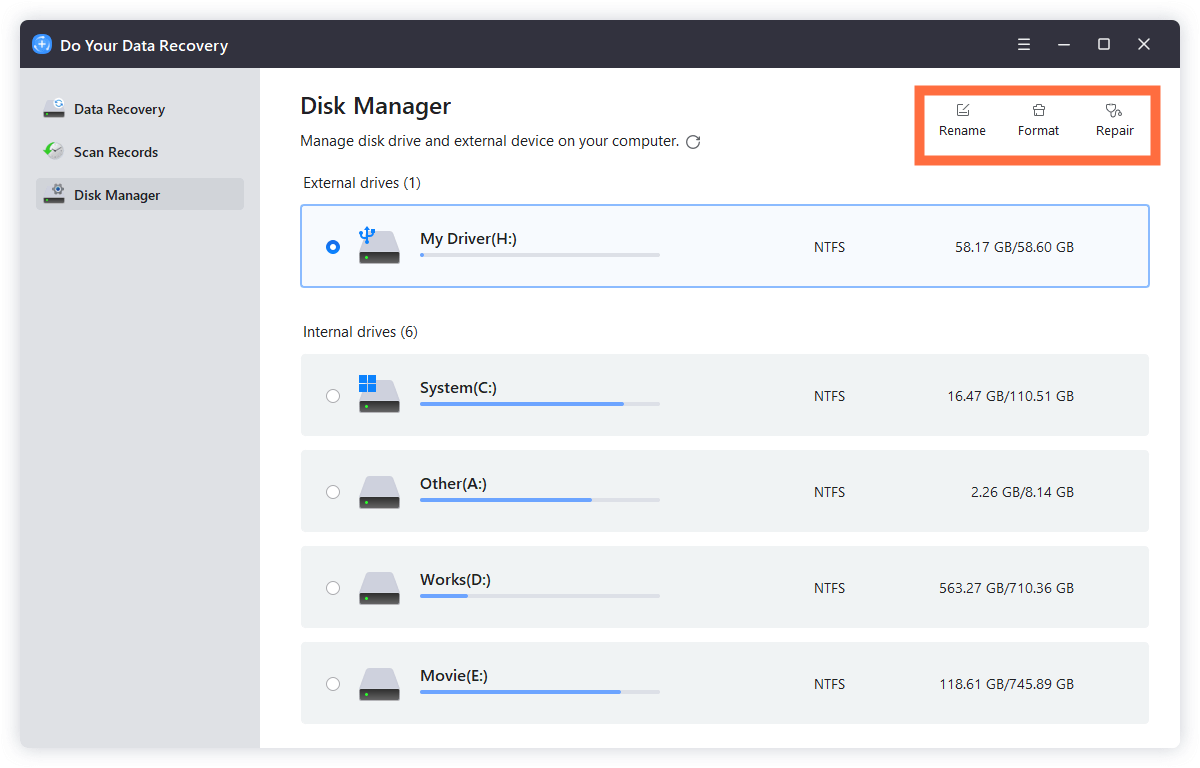
Do Your Data Recovery also can help you format a LaCie external hard drive on Windows or macOS:
- Open Do Your Data Recovery, choose Disk Manager.
- Select the LaCie external hard drive, click on Format button.
- Select a file system, then format he LaCie external hard drive.
How to Format and Wipe the LaCie External Hard Drive Before Selling/Donating?
Before you sell, donate or dispose of your old LaCie external hard drive, you should permanently erase all data from it. Disk wipe software can help you securely and completely wipe your LaCie external hard drive, ensure everything stored on the LaCie external hard drive is lost for good, cannot be recovered by any method.
Step 1. Download and install the reliable disk wipe software - DoYourData Super Eraser on your computer and connect your LaCie external hard drive to the computer.
Step 2. Open DoYourData Super Eraser, choose Wipe Hard Drive mode. This mode can help you erase all data (including existing data, deleted data, formatted data, hidden data) from a drive. Just select the LaCie external hard drive to start disk wipe.

Step 3. Click on Wipe Now button, then select a data erasure standard, click on Continue button.
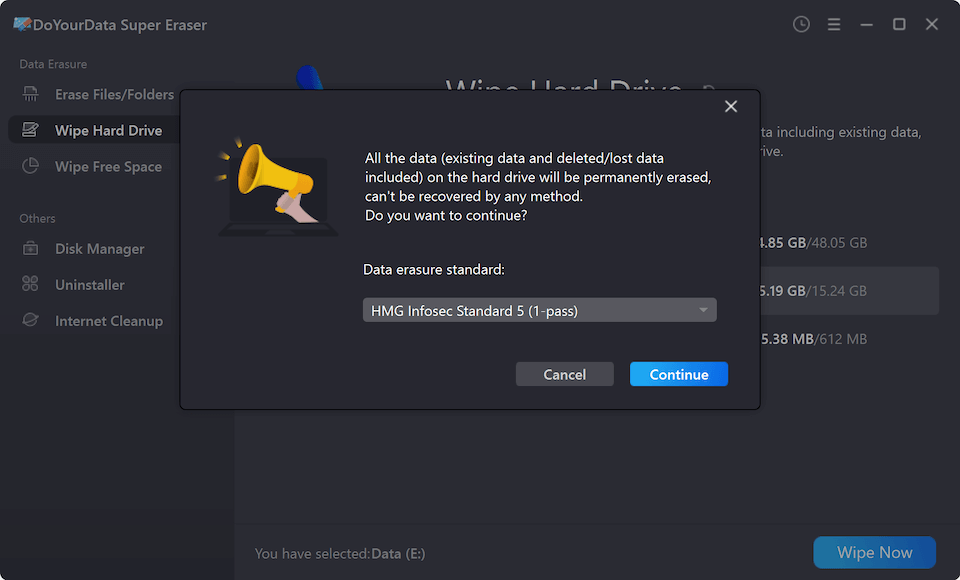
Step 4. Securely and permanently erase all data from the LaCie external hard drive.
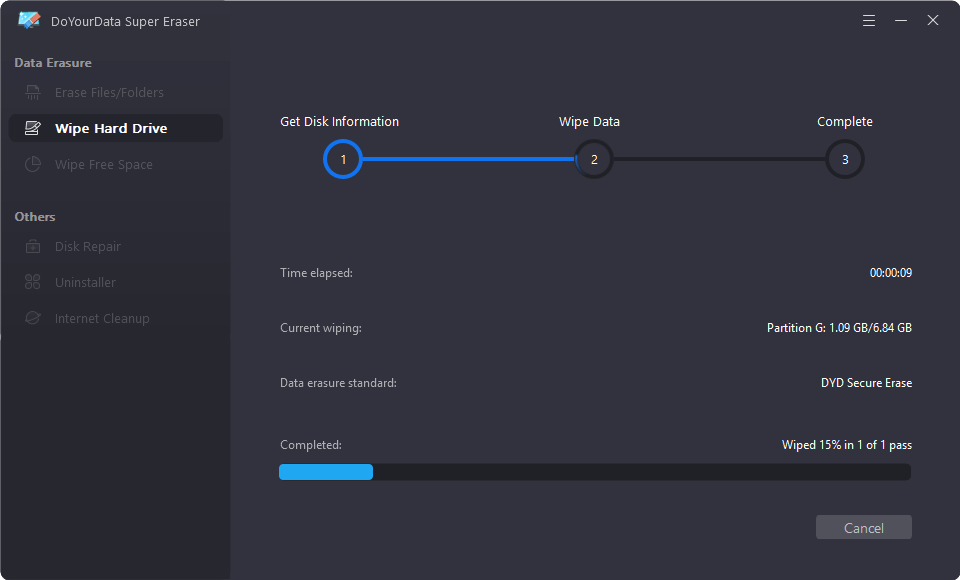
Note: Once the data is erased by DoYourData Super Eraser, the data is lost for good, cannot be recovered by any method.
Final Words:
Formatting a LaCie external hard drive is a necessary task that can improve performance, fix errors, and prepare the drive for a new purpose. Whether you're using Windows or Mac, the process is relatively simple if you follow the steps outlined in this guide. By choosing the correct file system and following best practices, you can ensure that your LaCie drive remains a reliable and efficient tool for your data storage needs. Regular maintenance and careful handling will extend the life of your drive and keep your data safe.
Troubleshooting Common Issues:
Sometimes, you might encounter issues when formatting your LaCie external hard drive. Here are some common problems and their solutions:
- Drive Not Recognized: If your drive doesn't appear in Disk Management (Windows) or Disk Utility (Mac), try using a different USB port or cable. Ensure the drive is properly connected, and check if it appears in another computer.
- Formatting Errors: If the formatting process fails, try using a different file system or performing a full format instead of a quick format. On Mac, ensure the drive is not mounted by clicking Unmount before formatting.
- Performance Issues Post-Format: If the drive's performance is slow after formatting, consider reformatting it using a different file system or checking it for errors using tools like CHKDSK (Windows) or First Aid in Disk Utility (Mac).
Alternative Methods and Tools:
While the built-in tools on Windows and Mac are sufficient for most users, there are alternative methods and third-party tools available for formatting your LaCie external hard drive. These tools can offer additional features such as secure erase, partition management, and advanced formatting options:
- Third-Party Software: Programs like DoYourData Super Eraser, MacClean360 can help you format or wipe a LaCie external hard drive on Windows or macOS. These tools also can help you repair damaged LaCie external hard drive, wipe LaCie external hard drive, etc.
- Command-Line Tools: Advanced users can use command-line tools like DiskPart on Windows or the Terminal on Mac for more precise control over the formatting process.
Best Practices for Maintaining LaCie External Hard Drive:
To keep your LaCie external hard drive in good working condition, follow these best practices:
- Regular Backups: Always keep a backup of important data. External hard drives can fail, and having a backup ensures you won’t lose critical information.
- Avoiding File System Corruption: Ensure that you properly eject the drive before disconnecting it from your computer. Sudden disconnections can lead to file system corruption.
- Using Proper Ejection Methods: On Windows, use the "Safely Remove Hardware" option, and on Mac, eject the drive from Finder or the desktop before unplugging it.
- Regular Maintenance: Periodically check your drive for errors using tools like CHKDSK (Windows) or First Aid (Mac). This can help identify and fix potential issues before they become severe.
DoYourData Super Eraser
DoYourData Super Eraser, the award-winning data erasure software, offers certified data erasure standards including U.S. Army AR380-19, DoD 5220.22-M ECE to help you securely and permanently erase data from PC, Mac, HDD, SSD, USB drive, memory card or other device, make data be lost forever, unrecoverable!