Copy and backup your Windows 7
Clone the Windows 7 hard drive to backup the entire system, applications and data. Read more >>

Quick Navigation:
Our computers are storehouses of vast amounts of personal and professional data. From family photos to sensitive work documents, hard drives hold a treasure trove of information. However, there comes a time when you might want to sell, donate, or recycle your computer. Before doing so, it's important to realize that your information is completely wiped from the hard drive, especially if you're using an older operating system like Windows 7. In this article, we will explore the steps necessary to securely wipe your hard drive on Windows 7, ensuring your data cannot be recovered by anyone else.
Wiping a hard drive means completely erasing all the data on it. This process is different from simply deleting files or even formatting the drive. When you delete files or format a drive, the data is not truly erased; as an alternative, Its occupied space is noted as being open to new data. Until latest data overwrites the old data, it can still be recovered using specialized software.
On the other hand, wiping a hard drive involves overwriting every bit of data on the drive, rendering it unrecoverable. This is particularly important if you're planning to dispose of your computer or transfer ownership, as it protects your personal and sensitive information from falling into the wrong hands.
Before you begin the process of wiping your hard drive, it's essential to prepare adequately:
1. Backing up important data
Once you wipe your hard drive, there's no going back. All data will be permanently erased, that's why it is important to back up any important data before proceeding. Documents, pictures, movies, and any other data you want to save may fall under this category. Your data can be backed up to a cloud storage provider, an external hard drive, or a USB flash drive.
For example, you can use the DoYourClone to copy your Windows 7 hard drive directly. It can clone the system along with the programs and personal files. In case of issues happen while wiping the drive, you can still boot from the cloned drive directly.
Copy and backup your Windows 7
Clone the Windows 7 hard drive to backup the entire system, applications and data. Read more >>
2. Creating a recovery or installation disk
If you plan to continue using the computer after wiping the hard drive, you'll need to reinstall Windows 7. To do this, you'll need a recovery disk or an installation disk. If you don't have an installation disk, you can create one using a USB drive or a DVD. You'll need to download the Windows 7 ISO file from Microsoft's website or use a recovery partition if your computer has one.
3. Ensuring access to necessary drivers and software
Once you've reinstalled Windows 7, drivers for your hardware, including the network adapter, sound card, and graphics card, must be installed. Before wiping the drive, make sure you have access to these drivers, either by downloading them from the manufacturer's website or by using a driver backup tool.
There are several methods you can use to wipe a hard drive on Windows 7. These methods range from using the built-in Disk Management tool to utilizing third-party software specifically designed for securely erasing data.
Windows 7 includes a built-in tool called Disk Management that allows you to manage your hard drives, including formatting and deleting partitions. However, while this tool is useful for organizing your hard drives, it doesn't securely wipe the data in the way that specialized software does. If you choose to use Disk Management, it's best to follow up with a more thorough wiping method to ensure your data is unrecoverable.
Step 1. Right-click on "Computer" or "My Computer" on your desktop or in the Start menu, and select "Manage." In the Computer Management window, select "Disk Management" under the "Storage" category.
Step 2. In the Disk Management window, you'll see a list of all your hard drives and partitions. Right-click on the drive or partition you want to wipe, and select "Format."
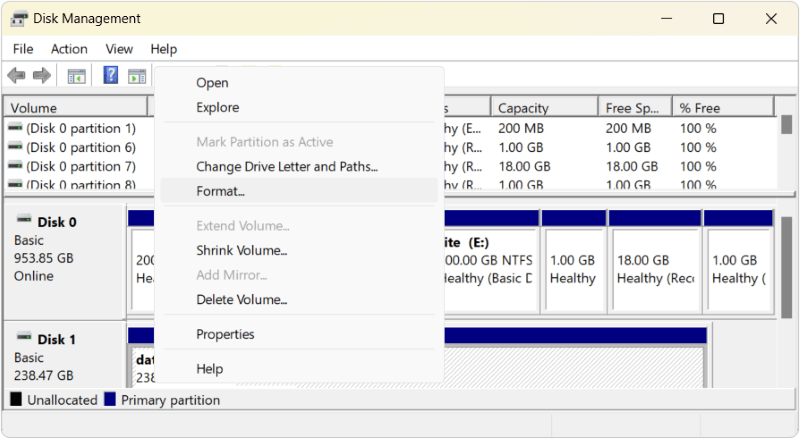
Step 3. In the Format dialog box, you can choose the file system (typically NTFS), the allocation unit size, and whether to perform a quick format. Deselect the quick format option for a more thorough process, though this still won't overwrite the data entirely.
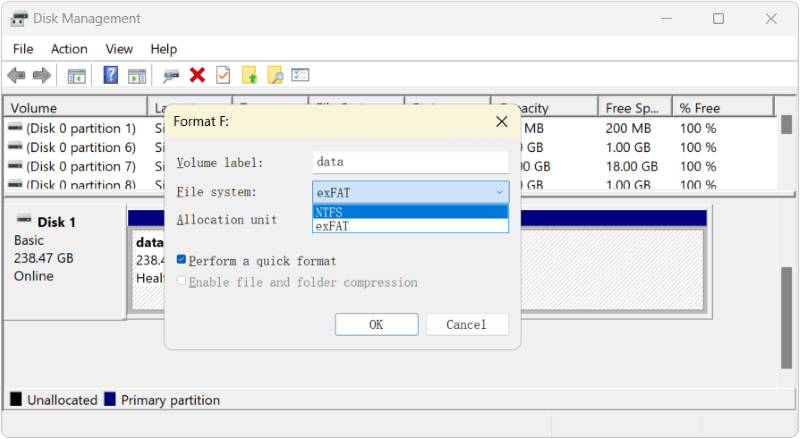
Step 4. Click "OK" to begin formatting the drive. This process will erase the file system but won't overwrite the data, making it recoverable using specialized software.
🎈 Note: This method can only format the drive and remove the files from the hard drive. However, the formatted data is still recoverable with professional data recovery software. If the computer will be delivered to another hand, you need to try other methods and ensure the data is wiped and unrecoverable.
How to recover formatted data?
Quickly recover lost data from a formatted hard drive partition with data recovery software. Read more >>
If you want to wipe the data on a hard drive in Windows 7, you can access the Command Prompt to use the diskpart utility, which offers a more manual way to wipe a hard drive. This method allows you to clean the disk and even securely erase data.
Step 1. Press Win + R keys, enter "cmd" and click OK button to open Command Prompt.
Step 2. Type diskpart and press Enter to launch the Diskpart utility.
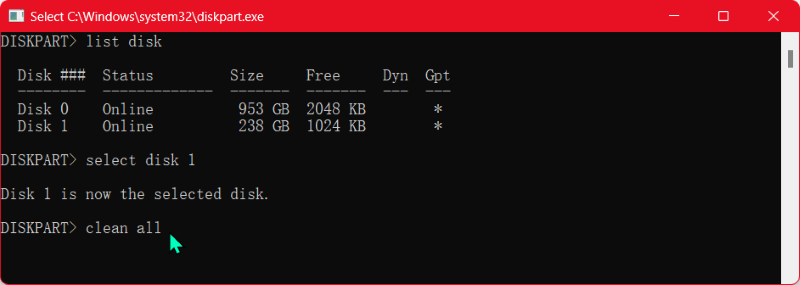
Step 3. Type list disk and press Enter to see all the drives connected to your computer.
Step 4. Type select disk X (replace X with the number of the disk you want to wipe) and press Enter.
Step 5. Type clean all and press Enter. This command will overwrite every sector on the disk with zeros, effectively wiping all data. The process may take some time depending on the size of the disk.
Step 6. Type exit and press Enter to close the utility.
🎈 Note: As this method will wipe all the data securely and no possible to recover the data, ensure to check to select the correct drive to clean.
There is another easy and most secure method to wipe a hard drive in Windows 7. You can use the professional data erasure tool DoYourData Super Erasure to wipe the hard drive. This software is very simple to handle with any user. If you are not familiar with command lines, this software is the best data wiping solution for you.
You can wipe a hard drive in Windows 7 easily with this software. Just follow the guide below step by step to erase a hard drive:
Step 1. Run the software and select the Wipe Hard Drive mode. Select a hard drive and click Wipe Now to continue.

Step 2. You can select a data erasure standard at this step. Click the Next button and the software will start to wipe all data from the hard drive.
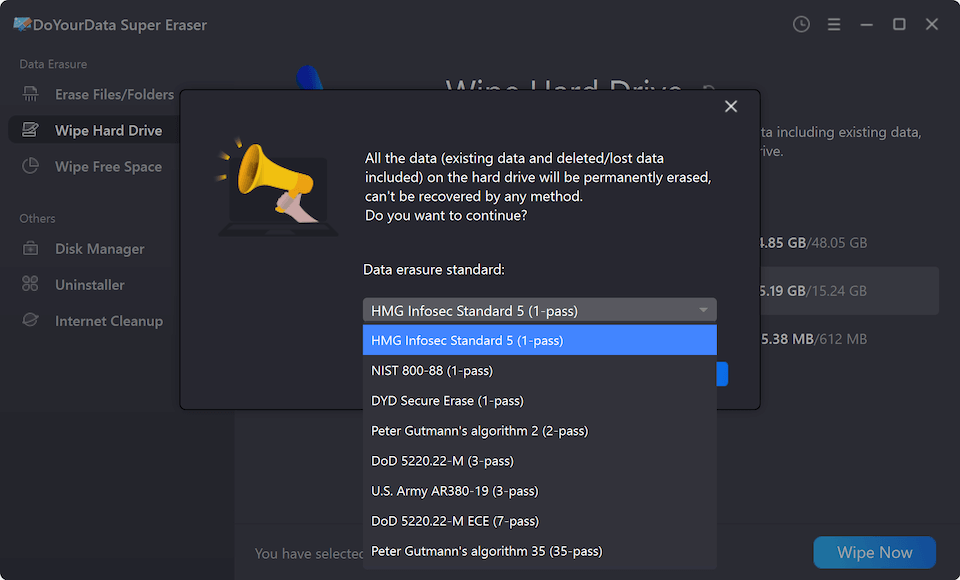
Step 3. It will take some time to finish the data wiping process. The time depending on the data erasure standard you choose and the size of the hard drive.
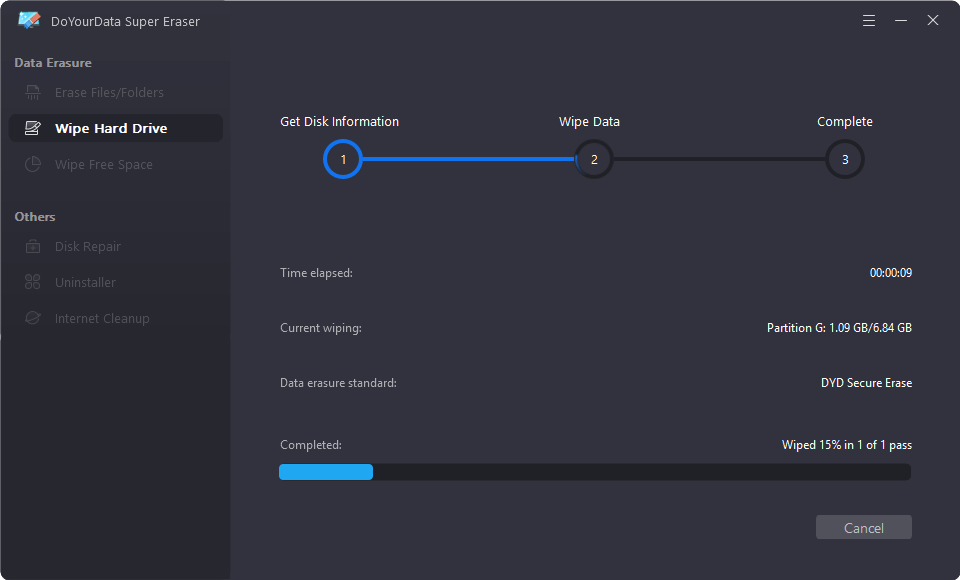
After the process is done, all the data on the selected hard drive is permanently wiped and no software can recover the data from the hard drive.
🎈 Note: The above 3 methods can only wipe a data drive in Windows. It's impossible to wipe the system drive.
If you want to wipe the system drive and reinstall Windows 7 with minimal effort, you can do as follows to reinstall the Windows 7 first, it will removes personal files and applications. Then wipe the free space of the drive to permanently wipe the removed data on system drive:
Step 1. Put your Windows 7 installation disk into the USB port or CD/DVD drive. Restart your computer and press the relevant key (like Del, F2, F10, etc). Choose to boot from the installation disk.
Step 2. Select your preferred language, time zone, and keyboard layout when the Windows 7 installation screen shows up, then click "Next."
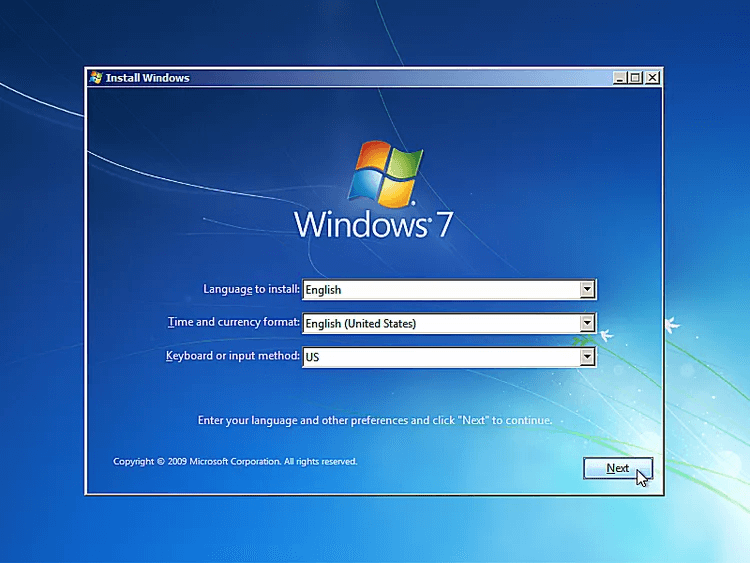
Step 3. The installation process can then start by clicking "Install Now". After reading and agreeing to the license terms, press "Next."
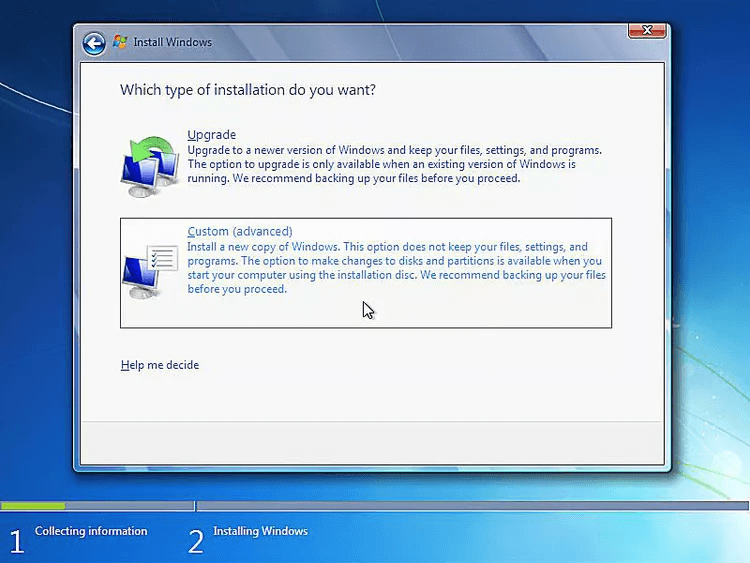
Step 4. To carry out a clean installation, pick "Custom" when asked to choose between a "Custom" and "Upgrade" installation. This option will ensure to remove the applications and personal files from the hard drive.
Step 5. A list of your hard drive partitions will appear in the "Where do you want to install Windows?" box. After making your selection for the partition on which to install Windows 7, select "Drive options (advanced)." To remove the partition, click "Delete" after that.
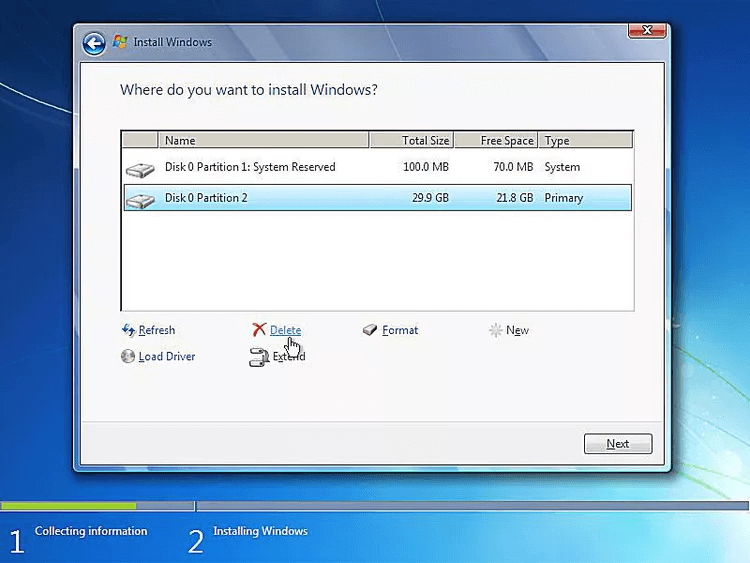
Step 6. To finish installing Windows 7, adhere to the on-screen directions. Your computer will restart after the installation is finished.
Step 7. Install DoYourData Super Eraser on the reinstalled Windows 7 system. Then run the software, choose the Wipe Free Space mode and select the system drive to wipe.
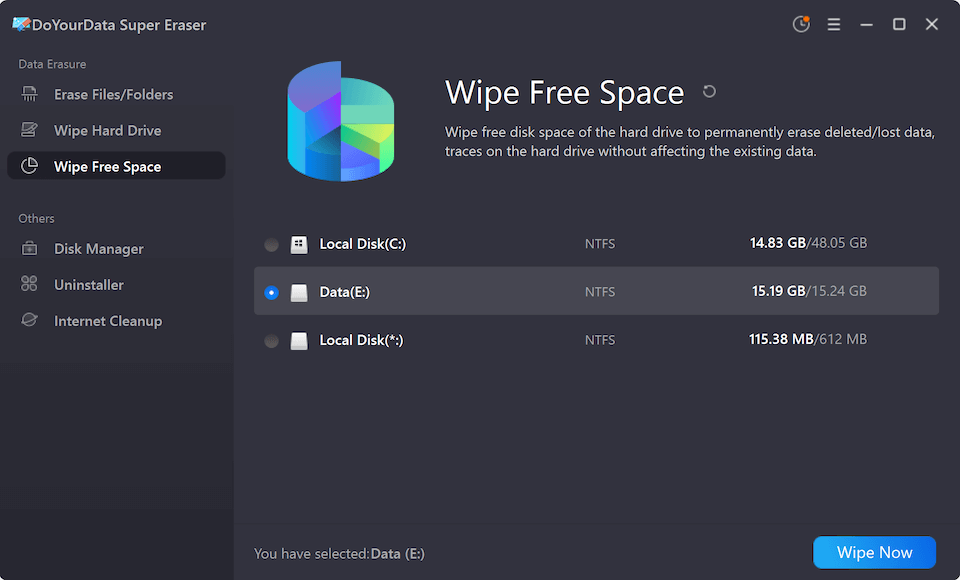
The software will wipe all the personal files and applications which were removed during system reinstalling. No one can recover these data in any way. You can feel free to resell or donate your computer without worrying about data leakages.
Following a hard disk wipe and Windows 7 reinstallation, there are a few post-wipe considerations to keep in mind if you will keep using the computer by yourself. These include restoring your backed-up data, reinstalling essential software and drivers, and configuring your system settings.
1. Restoring backed-up data
Once Windows 7 is installed, you can begin restoring your backed-up data. Make use of your cloud storage, USB drive, or external hard disk, and copy your files back to the computer.
2. Reinstalling essential software and drivers
Next, reinstall the essential software and drivers for your hardware components. This may include your antivirus software, web browser, office suite, and any other programs you use regularly. Don't forget to install the latest drivers for your hardware to ensure everything works correctly.
3. Configuring system settings
Finally, take some time to configure your system settings according to your preferences. This might include setting up your desktop background, adjusting power settings, configuring network connections, and personalizing the Start menu.
Wiping a hard drive on Windows 7 is a critical step in protecting your personal data when preparing to sell, donate, or recycle your computer. By following the methods outlined in this article, you can ensure that your data is securely erased and unrecoverable. Whether you use the preinstalled Disk Management tool, third-party software like DoYourData Super Eraser, or advanced wiping methods, it's essential to take the time to do it right. You can have peace of mind knowing that your data is safe.
1. How to format a hard drive in Windows 7?
To wipe a hard drive in Windows 7, you can use Disk Management. Here are the steps:
2. Is the formatted data recoverable?
Yes, the data on a formatted data is still recoverable before the drive is overwritten with new data. You can use data recovery software, like Do Your Data Recovery to recover the formatted data.
3. How to wipe data from drive permanently in Windows 7?
There are some methods to wipe data from a drive permanently in Windows 7. for example:
1) When formatting a hard drive in Disk Management, uncheck the option "Perform a quick format." Then it tool will perform a full format and erase the data on the disk.
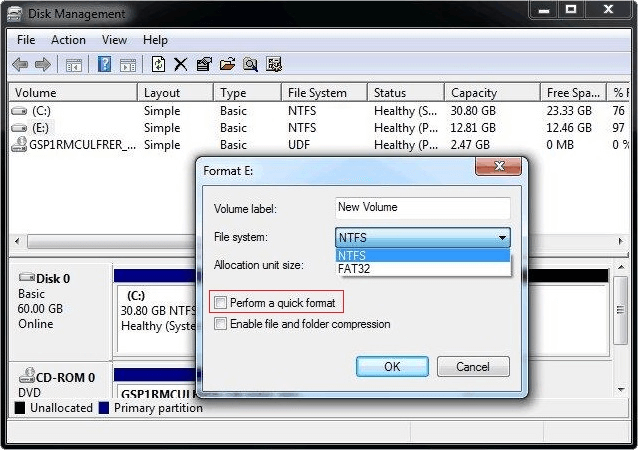
2) Use diskpart to clean the data from a hard drive. Press Win + R, type "cmd" to open Command Prompt. Type "diskpart" to start the tool, and then type the following commands to clean a drive.
list disk
select disk X (replace X with the number of the disk you want to wipe)
clean all
3) Wipe a hard drive with software DoYourData Super Eraser. Download and install the software on your Windows 7. Change to Wipe Hard Drive mode, select the drive and follow the wizard to wipe all data on the drive.
4. The steps to wipe Windows 7 system drive data permanently.
To wipe all data on Window 7 system drive, you need to reinstall the operating system first. You can just put in the installation disc and following the guide to install a new copy system without keep the old applications and personal files. After the installing is done, you will have a clean system without old applications and personal data.
Then use the software DoYourData Super Eraser to wipe the free space of the system drive. Then all the old applications and personal data will be permanently wiped from the drive.
DoYourData Super Eraser
DoYourData Super Eraser, the award-winning data erasure software, offers certified data erasure standards including U.S. Army AR380-19, DoD 5220.22-M ECE to help you securely and permanently erase data from PC, Mac, HDD, SSD, USB drive, memory card or other device, make data be lost forever, unrecoverable!

