Back up solution for Windows Server
It's necessary to create full backup for important Windows Server data before you wipe the data.
Quick Navigation:
In today's data-driven world, managing and securing data is paramount for organizations. Whether you're decommissioning old servers, preparing hardware for resale, or ensuring compliance with data protection regulations, wiping data on Windows Server is a critical task. This guide will walk you through the importance of data wiping, methods for performing it, and best practices to ensure your data is securely erased.

Data wiping is the process of removing data from a storage device so that it cannot be recovered. For Windows Server environments, this is especially crucial as these servers often hold sensitive and critical information. Proper data wiping helps prevent unauthorized access, meets compliance standards, and protects your organization from potential data breaches. This guide explores why data wiping is necessary and provides detailed steps to ensure data is completely erased from Windows Server systems.
Data wiping, sometimes referred to as data erasure, is the process of overwriting information on a storage medium so as to make it unrecoverable. Unlike simple deletion, which only removes file pointers but leaves the actual data intact, data wiping renders the original data irretrievable.
📊 Difference Between Data Wiping and Data Deletion
Data deletion removes the file's reference from the file system, making it invisible to the operating system but not necessarily erasing the underlying data. However, data wiping entails repeatedly overwriting the data in random patterns, which prevents traditional recovery tools from being able to recover the data.
🚨Importance of Using Proper Data Wiping Techniques
Using effective data wiping techniques is essential to prevent unauthorized data recovery. Whether you're decommissioning a server or preparing it for reuse, ensuring that data is completely erased helps protect sensitive information and meet regulatory requirements.
♻️ Backup Important Data
Before you proceed with data wiping, ensure that all important data is backed up. Data wiping is irreversible, so having a backup ensures that critical information is preserved and can be restored if needed.
Back up solution for Windows Server
It's necessary to create full backup for important Windows Server data before you wipe the data.
📝 Verify the Data to Be Wiped
Double-check the data you intend to wipe to avoid accidental loss of important information. Ensure that the correct drives and partitions are selected for data wiping.
🪄 Notify Relevant Stakeholders
Inform relevant stakeholders, including IT staff and management, about the data wiping process. This helps ensure that everyone is aware of the procedure and that any concerns are addressed before the process begins.
Wiping data from a Windows Server involves using various built-in tools and methods to ensure that data is removed securely. Below is a comprehensive guide that details how to use Disk Cleanup, the Format command, and PowerShell commands for data management and wiping.
Disk Cleanup is a straightforward utility designed to help free up disk space by removing unnecessary files. Although it does not securely wipe data, it can be useful for routine maintenance. Here are the steps:
Step 1. Open Disk Cleanup
Click on the Start menu or press the Windows Key. In the search bar, type "Disk Cleanup" and press Enter. Select the Disk Cleanup application from the search results.

Step 2. Select the Drive to Clean
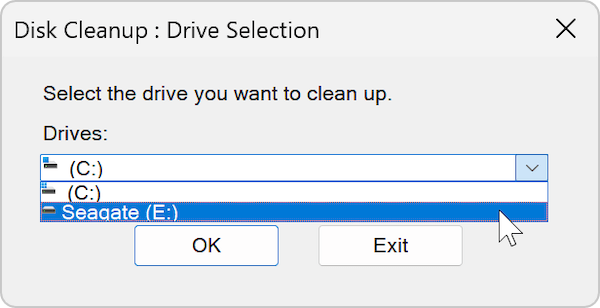
A dialog box will appear asking you to select the drive you want to clean. Typically, this will be the C: drive, but you can choose any drive connected to your server. Click OK to proceed.
Step 3. Choose Files to Delete
Disk Cleanup will scan the selected drive and display a list of file types that can be deleted. These consist of Recycle Bin contents, System Error Memory Dump Files, and Temporary Internet Files.
Go over the list and select the file types you wish to remove by checking the boxes next to them. You can click on each item to see a description of the files it includes.
Step 4. Complete the Cleanup Process
After selecting the files, click OK. A message requesting your confirmation will show up before deleting these files. To be sure, click Delete Files.

Disk Cleanup will remove the selected files and free up space on the drive.
The format command is used to prepare a disk by removing the file system and creating a new one. While this resets the drive, it does not securely wipe data. You can do as follows:
Step 1. Open Command Prompt as Administrator
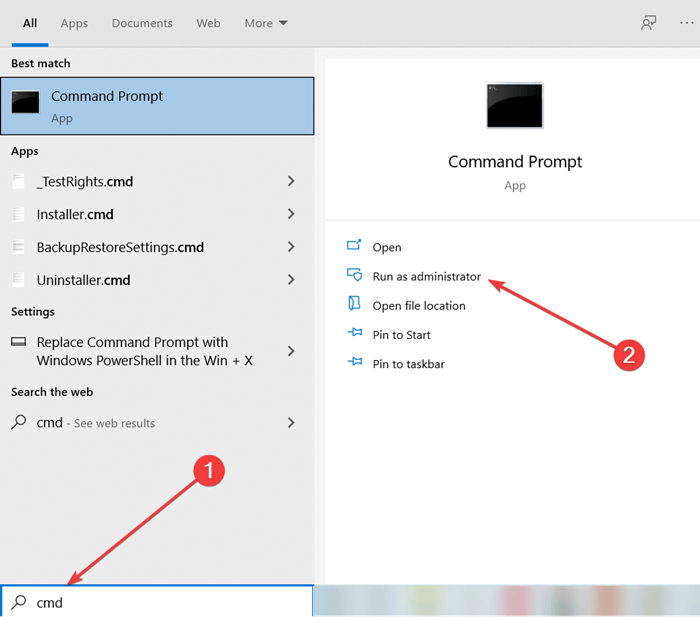
Press Windows key to type "cmd" and press Enter. To access the Command Prompt with elevated privileges, choose "Run as administrator".
Step 2. Enter the Format Command
Enter the following command in the Command Prompt window:
format X:
Replace X: with the letter of the drive you want to format (e.g., D: if formatting a different drive).
Step 3. Follow the Prompts
You will be prompted to confirm the format operation. You might see a warning about losing all data on the drive. Type Y and press Enter to confirm.

Step 4. Complete the Formatting Process
The format process will start, removing the existing file system and preparing the drive for new data. You may be prompted to specify a volume label (name) for the drive. Enter a name if desired and press Enter.
Pause for the procedure to complete. The drive will now have a new file system and be ready for use.
1. Using Clear-Disk Cmdlet
The Clear-Disk cmdlet in PowerShell is used to remove all partitions and data from a specified disk. This is a more advanced method for clearing data but still may not be suitable for secure wiping without additional steps.
Step 1. Open PowerShell as Administrator
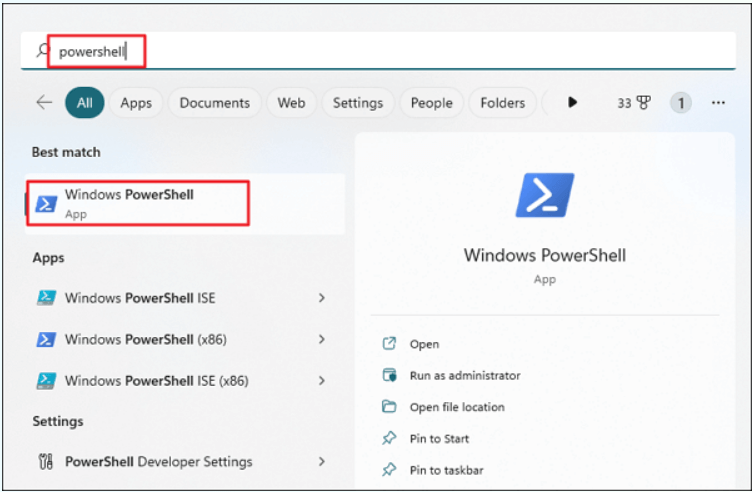
Type "PowerShell" in the search bar, right-click on the PowerShell icon, and select "Run as administrator." Alternatively, press Windows key + X and select "Windows PowerShell (Admin)" from the menu.
Step 2. Run the Clear-Disk Command
In the PowerShell window, type the following command:
Get-Disk
It will list the connected disks and show the disk numbers for the disks. Then enter the following command to remove data.
Clear-Disk -Number [DiskNumber] -RemoveData
The parameter -RemoveData specifies that all data should be removed. Replace [DiskNumber] with the number of the disk you want to clear.

Step 3. Press Enter and Wait for Completion
Press Enter to execute the command. Wait for the process to complete. The specified disk will be cleared of all partitions and data.
2. Using Remove-Item Cmdlet
The Remove-Item cmdlet allows you to delete specific files or directories. While useful for removing files, it does not securely erase data.
Step 1. Open PowerShell as Administrator
Open PowerShell with administrative privileges as described in the previous section.
Step 2. Enter the Remove-Item Command
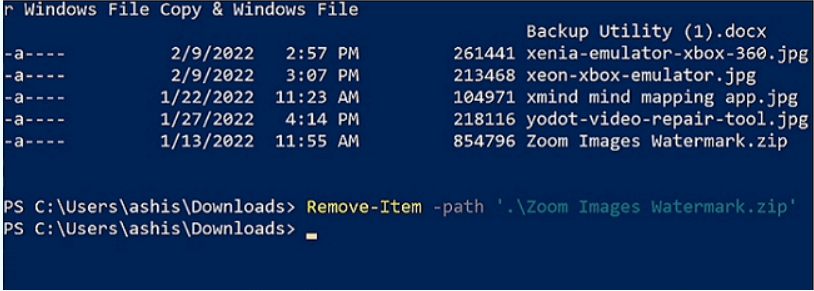
To delete a specific file or directory, type the following command:
Remove-Item -Path [FilePath] -Recurse -Force
Replace [FilePath] with the path to the file or directory you want to delete. The -Recurse parameter deletes all items within the directory, and -Force bypasses prompts and restrictions.
Step 3. Press Enter to Execute
Press Enter to execute the command. The specified file or directory will be deleted.
For higher data security requirements, the data wiping process would be involved in professional data wiping software. With the third-party data erasure software, you can erase the data with advanced data wiping algorithms to ensure data be wiped completely.
To wipe data on Windows Server, it's essential to choose the reliable software, like DoYourData Super Eraser. The software is professional at data erasure with international data sanitation algorithms, like DoD 5220.22-M ECE, Peter Gutmann's algorithm, etc.
With the software, you can easily shred individual files/folder, specified partitions/drives, or the deleted data on free space of a drive. Here we will show you how to wipe a drive with the software as an example.
Step 1. Download and install the software on the Windows Server. Start the software and then choose the mode Wipe Hard Drive. Check and ensure to choose the correct drive you want to wipe and click Wipe Now.

Step 2. At this step, you can choose a data destruction method to wipe the data. Check and confirm a method depending on your data security requirement.
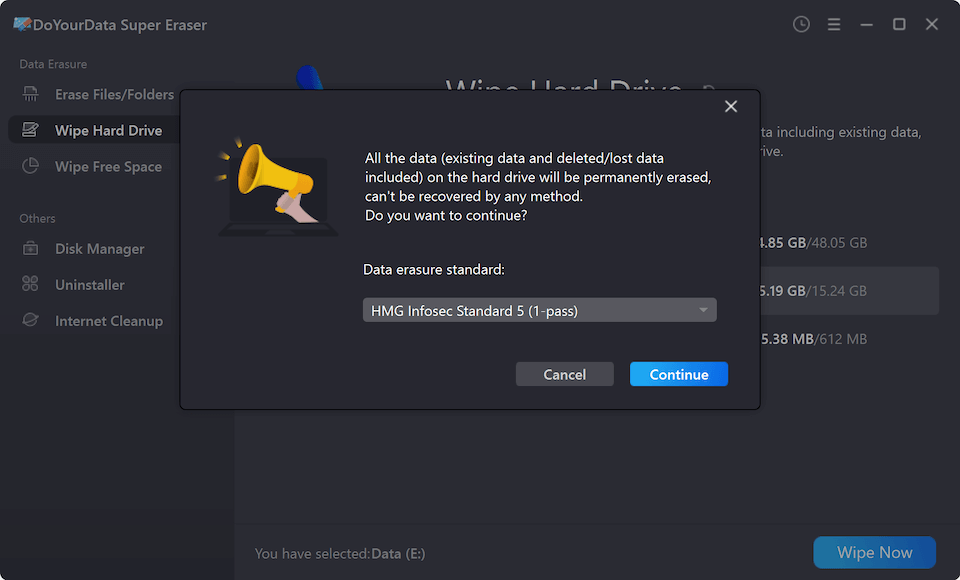
Step 3. At last, click on the Continue button to proceed. The software will then permanently wipe all the data on the drive you selected.
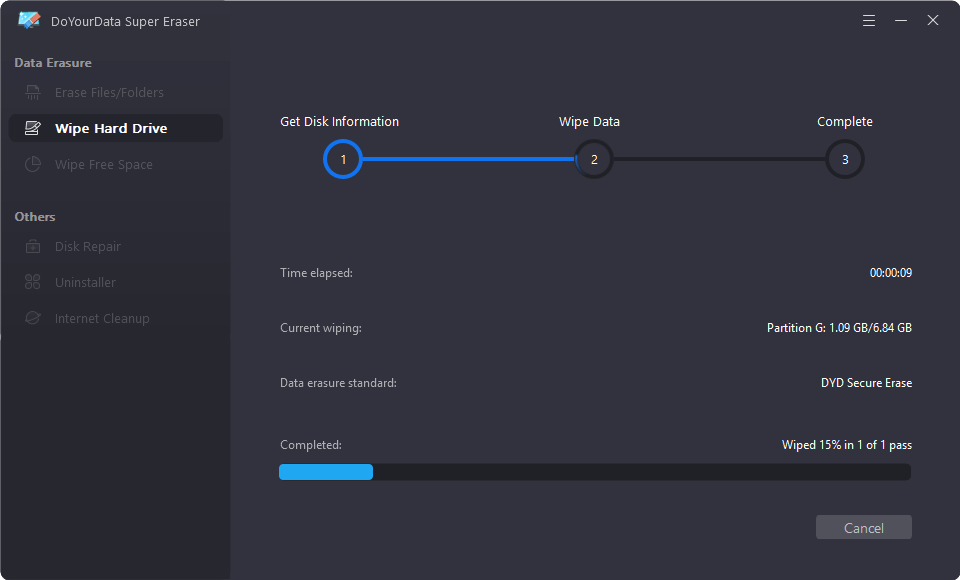
After the process is completed, the data on the drive should be gone forever. There will be no chance to recover the wiped data in any way.
After performing data wiping, it's essential to verify that the data is irretrievable. You can use file recovery tools to attempt recovery of the wiped data. If the data cannot be recovered, it indicates that the wiping process was successful.
🛠️ Tools for Verifying Data Wipe
Wiping data on Windows Server is a critical process for safeguarding sensitive information and ensuring compliance with data protection regulations. By understanding the methods available and following best practices, you can ensure that your data is securely erased and irretrievable. Whether using built-in tools, PowerShell commands, or third-party data wiping software, thorough data wiping helps protect your organization from potential data breaches and ensures that decommissioned servers are ready for safe disposal or repurposing.
DoYourData Super Eraser
DoYourData Super Eraser, the award-winning data erasure software, offers certified data erasure standards including U.S. Army AR380-19, DoD 5220.22-M ECE to help you securely and permanently erase data from PC, Mac, HDD, SSD, USB drive, memory card or other device, make data be lost forever, unrecoverable!
