Three Options to Permanently Wipe MacBook Data
To permanently wipe data on MacBook, there are multiple methods available. You can choose to wipe the entire drive with Disk Utility or Terminal commands. The professional data erasure tool DoYourData Super Eraser for Mac offers more options to wipe data flexibly on MacBook: Shred individual files/folders, wipe hard drive, or erase the free space to wipe deleted data.
![]() Updated by Shirly Chen on March 12, 2025
Updated by Shirly Chen on March 12, 2025
Quick Navigation:
- Permanently Wipe MacBook Data Permanently with Super Eraser
- Erase Drive and Wipe Data with Disk Utility
- Wipe Hard Drive with Terminal Commands
- Conclusion:
- FAQs about Permanently Wiping Data on MacBook
What if someone buys your old MacBook but there are some important files in the MacBook, and you don't want to other people see it? You may copy the data to another storage device and then delete the files in your MacBook. But deleting files in your MacBook is not enough yet. Since you need to permanently wipe the MacBook data before someone can recover the deleted data. How to permanently wipe MacBook data? In order to permanently wipe your MacBook data, you can use our special tool which is designed specifically to erase any files on your storage forever without having a chance to recover it back.
Permanently Wipe MacBook Data Permanently with Super Eraser
You must know that other people can easily recover the deleted or formatted files from your device. For instance, people can easily recover all the deleted/formatted files with Mac data recovery software. So they can easily get your private information by recovering the data from your old devices. The best way to avoid data leakage is permanently destroying the data. Before you sell, donate, give away your MacBook, you should permanently wipe the data on it. Here you can a special tool to permanently wipe and destroy existing and history data on the MacBook hard drive.
DoYourData Super Eraser for Mac
- Permanently wipe data from MacBook and other Mac computers.
- Securely erase files to avoid data recovery.
- Three options for data erasure on MacBook and other Macs.
Let us introduce you a sophisticated software tool to wipe your MacBook data permanently. Now, you can download DoYourData Super Eraser for Mac in order to wipe your data totally and permanently. So, you are no longer afraid of someone who may have a chance to get your data back. Super Eraser is really effective to destroy, erase, or wipe any files you want to erase permanently. It is also easy user interface which can be used by anyone without any guide. However, if you still need some instructions how to use the software to permanently wipe MacBook data, you can follow some instruction below. It offers three options to permanently wipe MacBook data.
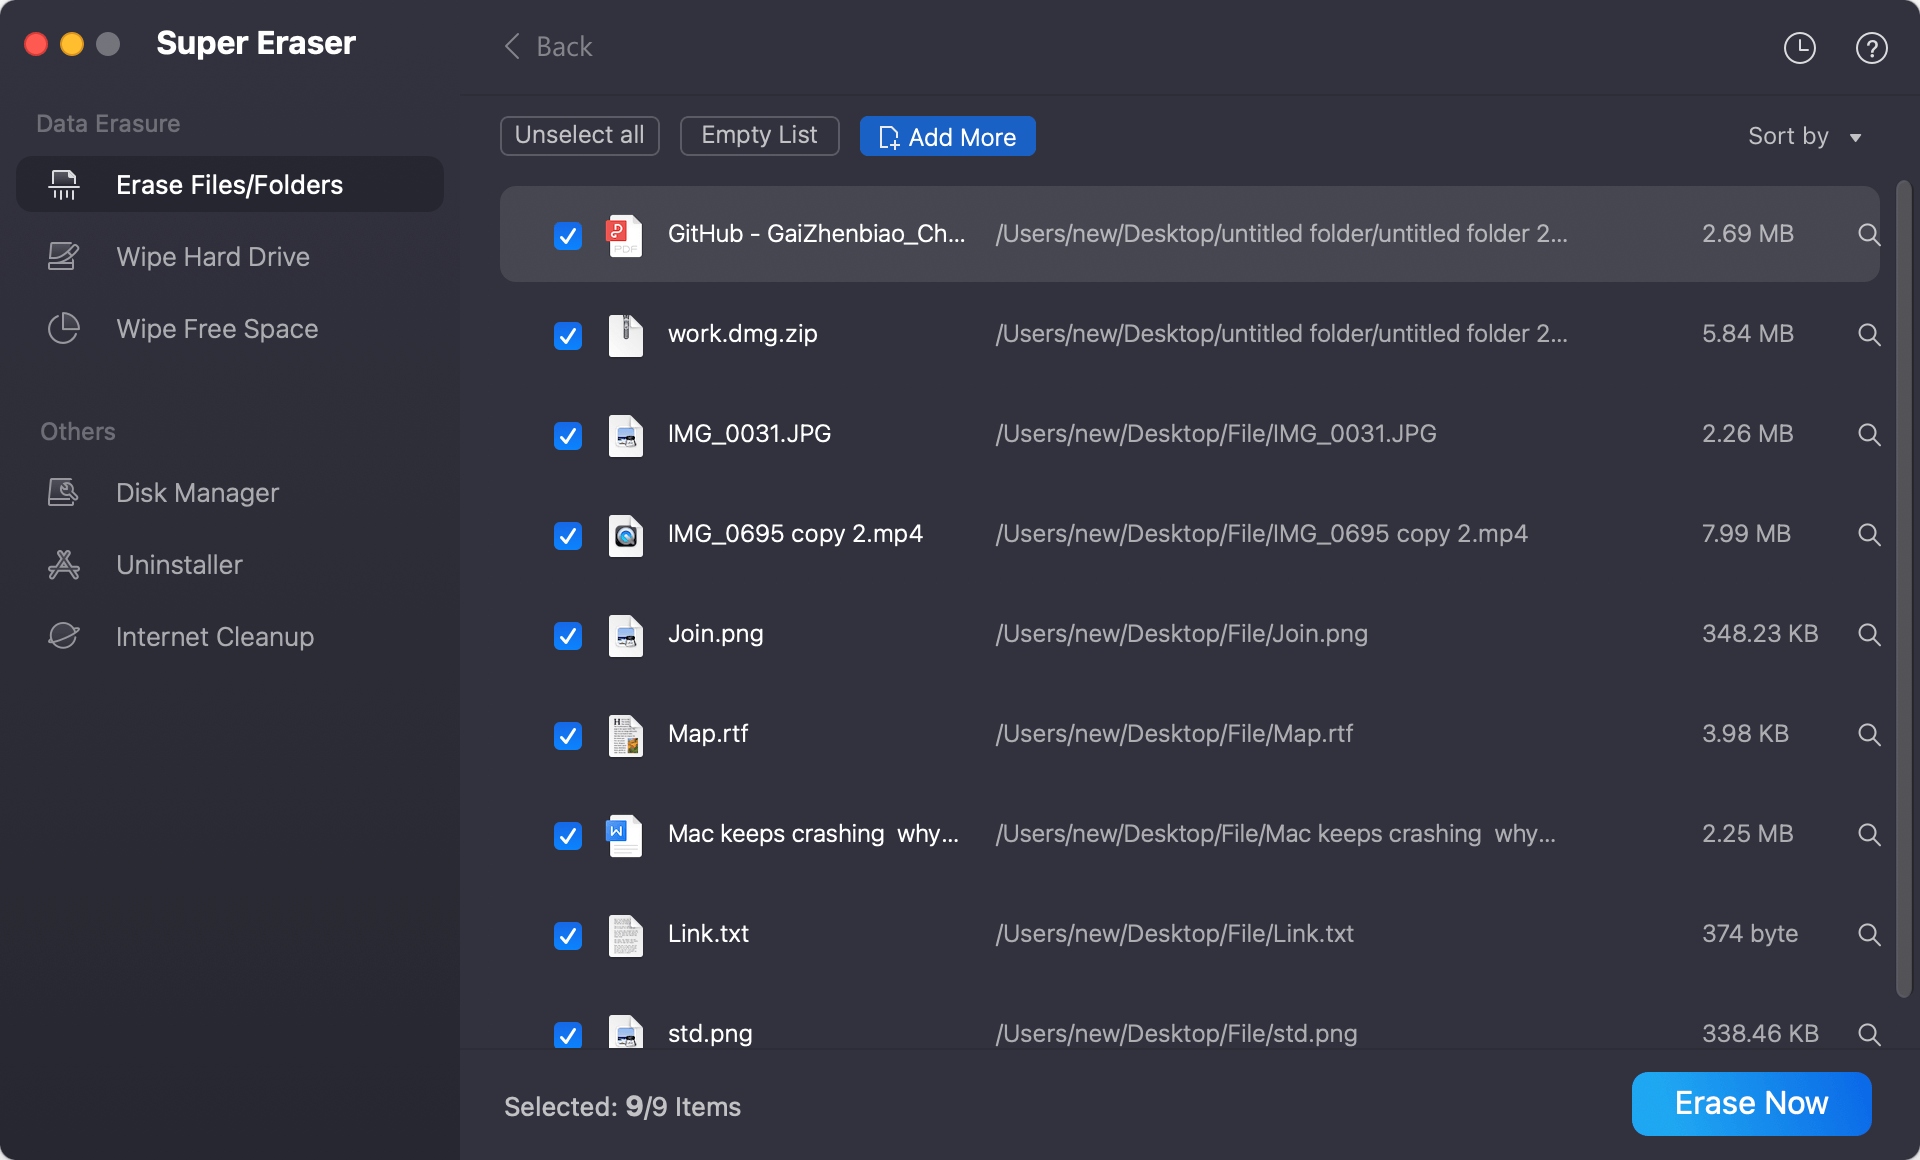
Option 1: Erase Selected Files/Folders on MacBook
In this mode, you will be given a chance to select some files/folders that you want to permanently wipe from your MacBook. This option is very effective for those who do not want to delete the whole files. After choosing some of the files, you can just click Erase Now.
Option 2: Wiping All Data from MacBook Volume
This mode is an instant way to erase the whole existing data and deleted data from your MacBook Hard Drive without having a chance to select some of the files. So, if you are sure that you want to erase the whole data, you can select this mode, but if you still have some files that you do not want to erase, you can ignore this mode. This mode is quite easy, you can just select the volume on your MacBook and then you can click Wipe Now.

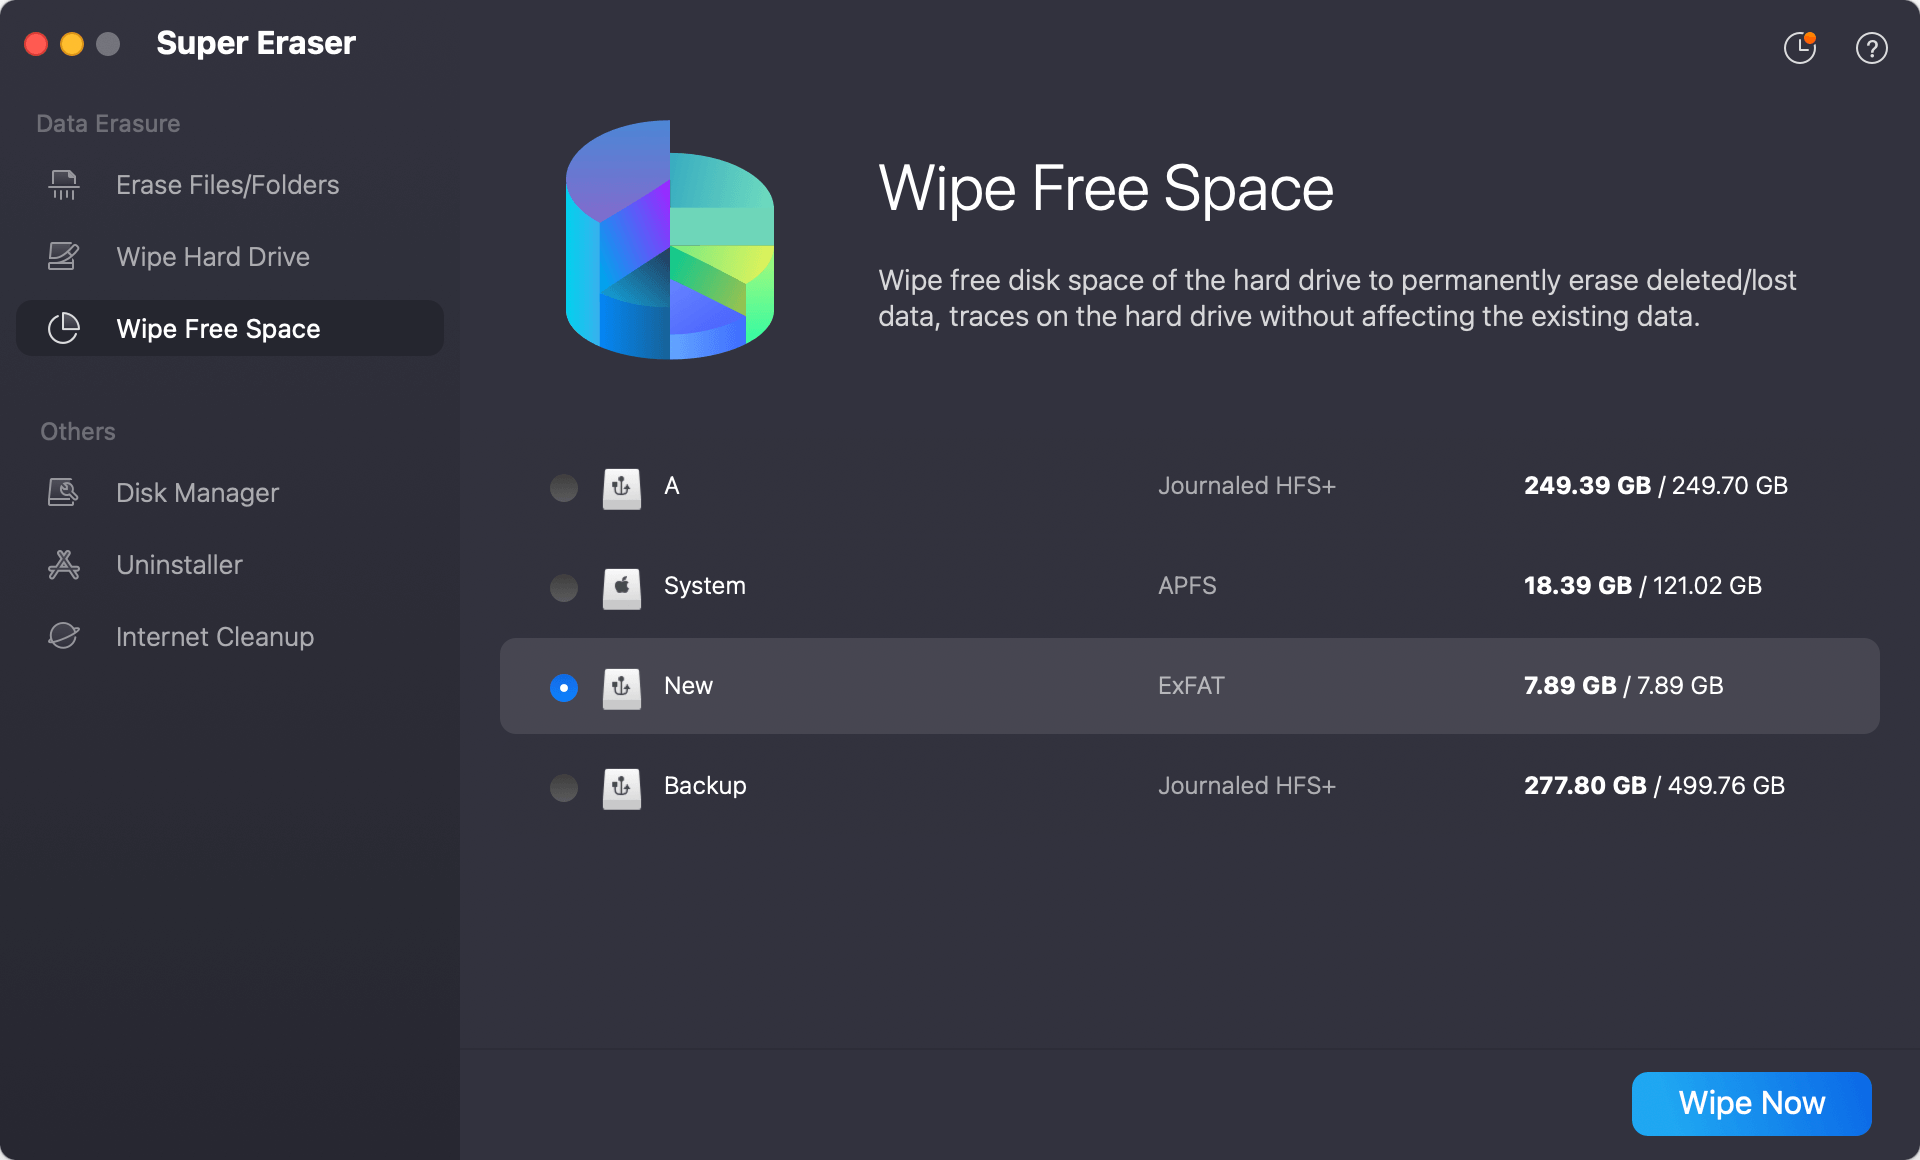
Option 3: Wipe Free Space on MacBook
The third option to permanently wipe MacBook data is by choosing the wipe unused space mode. For those who want to wipe the deleted files or history traces only, this option is perfect. Choosing this mode, it means that you still have a chance to save your existing files in your MacBook because this mode only will erase the lost data or deleted files permanently. You can just select the storage of your device and then click Wipe Now.
Once the data is erased by DoYourData Super Eraser for Mac, the data is gone forever. There is no way to recover the erased data. Before you sell or donate your MacBook, you can quickly and permanently erase your sensitive data.
Erase Drive and Wipe Data with Disk Utility
In additional to the third-party data erasure tools, there are still some other methods to wipe data. Here we will introduce a method to wipe data from a hard drive on MacBook without third-party tools.
macOS offers a built-in tool Disk Utility. You can use it to format a hard drive and set the security level to wipe the data in the meanwhile. Here is how to format and wipe data from a hard drive with the tool:
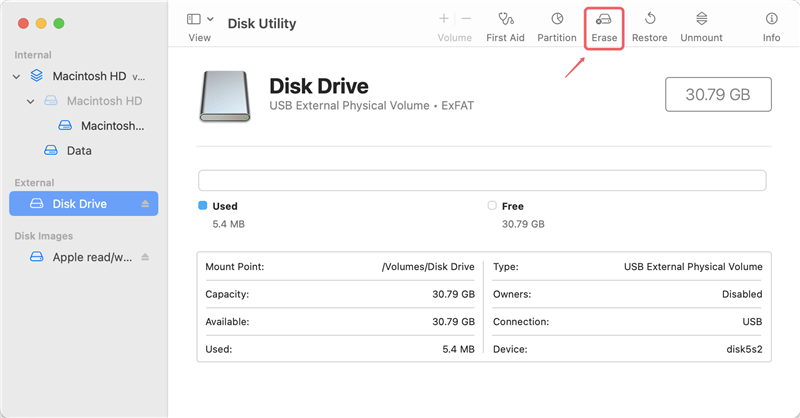
Step 1. Open "Applications" in Finder, find "Utilities" folder and start "Disk Utility" under that folder. You can also find it from Launchpad and then "Other" folder.

Step 2. Select the drive which you want to wipe and then click the "Erase" button at the tops of the window.
Step 3. You can set a new name and format for the drive if necessary. Otherwise, you can just leave them with the default settings.

Step 4. If you start to erase the drive now, it will only format the drive simply without wiping data. To wipe data while formatting the drive, it's needed to configure more settings by clicking the "Security Options" button.
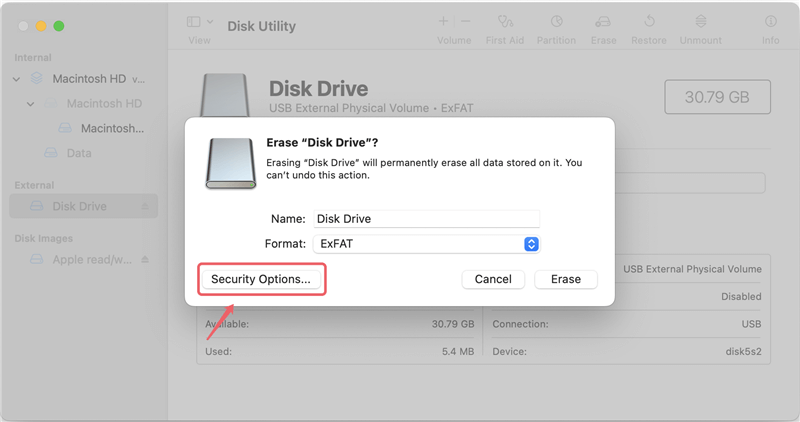
Step 5. If you want to make sure it's more safe, you can drag and set the level to "Most Secure" and of course it will take more time to finish the process. Then click "OK" button to save the settings.

Step 6. At last, click "Erase" button to format the drive and wipe data at the same time. It will take some time depending on the security options you set and the size of the drive.
In this way, you can wipe all data from a hard drive. If you only want to shred specified files or wipe the removed data, you need to search for other solutions.
Wipe Hard Drive with Terminal Commands
With commands, you can also wipe hard drive securely on MacBook. You need to do it in Terminal and here is how:
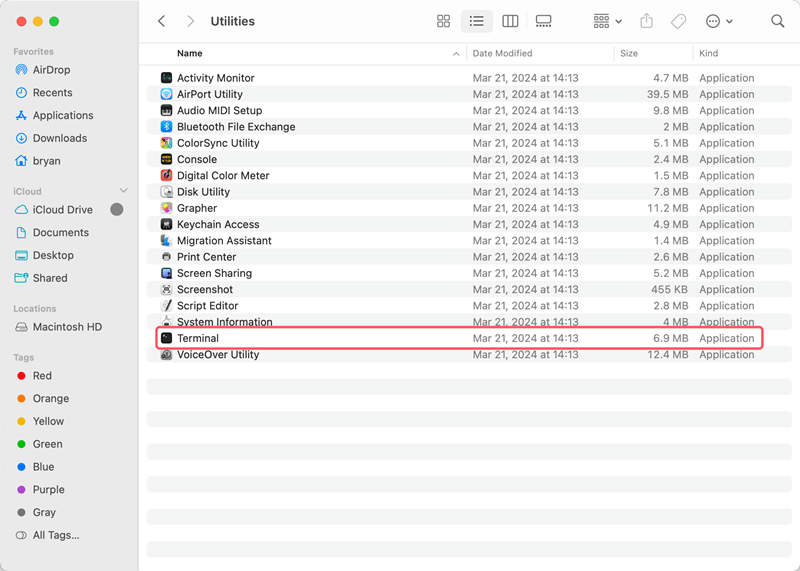
Step 1. Start Terminal from Applications and then Utilities folder. You can also press command + space keys, enter "terminal" to find and open the app.
Step 2. Use the following commands to wipe a hard drive:
diskutil list (Show the information of all disks connected to the Mac. Locate the one for the disk you want to wipe.)
diskutil unmountDisk /dev/diskX (Unmount the disk before erasing it. Replace the /dev/diskX with the one on your machine.)
diskutil secureErase N /dev/diskX (The number N can be replaced with 0, 1, 2, 3, 4)

You should be careful to wipe hard drive using Terminal commands on MacBook. Otherwise, the wrong drive might be wiped. If you are not familiar with commands, it's highly suggested to use data erasure tool with user-friendly interface.
Conclusion:
Permanently wipe data from hard drive on MacBook can keep you privacy information safe. If you need to wipe all data on a hard drive, you can choose Disk Utility or Terminal for advanced users. For the users who need more data erasure options, DoYourData Super Eraser for Mac should be a good choice. It can wipe files, removed data, or all data on a drive.
FAQs about Permanently Wiping Data on MacBook
- Use data wiping tool to wipe data securely and automatically.
- Format hard drive with security options configured in Disk Utility.
- Using commands to securely wipe hard drive with Terminal.
- Delete data and then manually copying useless data to overwrite the deleted data.
- Download and install DoYourData Super Eraser for Mac on the MacBook.
- Choose the "Wipe Hard Drive" option to erase an entire drive.
- Check and ensure to select the right hard drive for data wiping.
- Click "Wipe Now" and then select the data erasure standard.
- Start to wipe the hard drive data by clicking on "Continue" button.

DoYourData Super Eraser for Mac
DoYourData Super Eraser for Mac is a 100% safe, powerful and easy-to-use data erasure program. It offers certified data erasure standards including Peter Gutmann, U.S. Army AR380-19, DoD 5220.22-M ECE to permanently erase data from Macs and external devices, making data recovery be impossible.
Written & Updated by Shirly Chen
Shirly Chen has been writing data recovery, data erasure articles for DoYourData over 4 years. She has been working as a professional website content writer & editor for quite a long time. She also writes articles about disk clone, Mac optimization, disk backup, etc.