Quick Navigation:
- Overview – macOS Mojave
- Understanding the Need to Wipe USB Drives
- Preparing to Wipe a USB Drive on macOS Mojave
- Using Disk Utility to Wipe an USB Drive on macOS Mojave
- Using Terminal for Advanced Users to Format USB Drive on macOS Mojave
- Using DoYourData Super Eraser for Mac to Wipe USB Drive on macOS Mojave
- Verifying the Wipe Process
- Troubleshooting Common Issues
- Best Practices for USB Drive Management
- Conclusion
- FAQs About Wipe USB Drive on macOS Mojave?
In today's digital age, the importance of securely wiping USB drives cannot be overstated. Whether you're looking to sell, donate, or repurpose a USB drive, ensuring that your data is irretrievably erased is crucial to protecting your privacy. This article will provide a comprehensive guide to wiping a USB drive on macOS Mojave, including using built-in tools, advanced Terminal commands, and third-party data erasure software.
Overview – macOS Mojave
macOS Mojave, released on September 24, 2018, is the fifteenth major version of Apple's desktop operating system for Mac computers. This release brought several significant enhancements aimed at improving user experience and productivity. One of the standout features is the introduction of Dark Mode, a system-wide dark color scheme that provides a visually soothing experience, especially in low-light environments.
The Dynamic Desktop feature complements this by changing the desktop wallpaper to match the time of day, offering a dynamic and visually engaging background. Mojave also introduced Stacks, a feature that helps users keep their desktops organized by automatically grouping files based on file type, date, or tags. These visual and organizational improvements make it easier for users to manage their workspaces effectively.
Beyond the visual enhancements, macOS Mojave includes several practical features that streamline everyday tasks. The Finder received significant upgrades, including a new Gallery View for visually browsing files and Quick Actions in the Preview pane, allowing users to perform tasks like rotating images and creating PDFs without needing additional applications. Continuity Camera is another notable addition, enabling users to take photos or scan documents with their iPhone or iPad and have them instantly appear on their Mac.
Enhanced privacy and security measures in Mojave provide better control over app permissions and protect against tracking, reflecting Apple's commitment to user privacy. The redesigned Mac App Store, with its new look and editorial content, helps users discover new apps more easily. These enhancements collectively make macOS Mojave a robust and user-friendly operating system, setting a high standard for future macOS releases.
Understanding the Need to Wipe USB Drives
Data security is a significant concern for individuals and organizations alike. USB drives, being portable and often used for transferring sensitive information, are particularly vulnerable to data breaches. When you decide to part with a USB drive, simply deleting the files is not enough. Deleted files can often be recovered with ease using data recovery software. Properly wiping a USB drive ensures that all data is permanently removed, preventing unauthorized access.
Several scenarios necessitate wiping a USB drive:
- Selling or Donating: If you plan to sell or donate your USB drive, wiping it ensures that the new owner cannot recover your files.
- Repurposing: When reusing a USB drive for a different purpose, wiping it can prevent data corruption and ensure a clean start.
- Security Compliance: For organizations, wiping USB drives can be a part of data security policies and regulatory compliance.
Failing to wipe a USB drive properly can lead to serious risks, including identity theft, data breaches, and unauthorized access to confidential information.
Preparing to Wipe a USB Drive on macOS Mojave
Before wiping your USB drive, it is crucial to take a few preparatory steps:
- Backup Important Data: Ensure that all important data on the USB drive is backed up to another storage device or cloud service. Wiping a drive is irreversible, and you don't want to lose essential files.
- Connect the USB Drive: Insert the USB drive into an available USB port on your Mac. Make sure the drive is recognized and mounted correctly.
- Understand Disk Utility: Disk Utility is a built-in macOS application used for managing drives. Familiarizing yourself with its interface will make the wiping process smoother.
Using Disk Utility to Wipe an USB Drive on macOS Mojave
Disk Utility is a user-friendly tool that allows you to erase and format drives easily. Follow these steps to wipe your USB drive using Disk Utility:
Step 1. First of all, find and open Disk Utility on your Mac (Go to Launchpad, type Disk Utility in search box, then find and open Disk Utility), and connect the USB drive to your Mac.
Step 2. Find the USB drive in the sidebar, then select it. Ensure you select the correct drive to avoid accidentally erasing the wrong one.
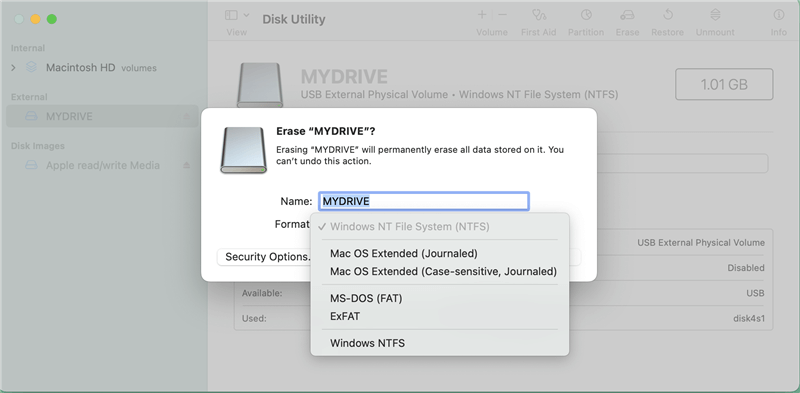
Step 3. Click the Erase button at the top of the Disk Utility window. In the dialog box, choose a name for the drive, select the desired format (e.g., ExFAT, MS-DOS (FAT), APFS, Mac OS Extended), and choose a scheme (GUID Partition Map is recommended for most uses).
Set Security Options:
- Click the "Security Options" button to choose the level of data erasure. Options range from a quick erase (least secure) to a thorough erase (most secure).
- For most purposes, a single pass is sufficient, but for highly sensitive data, choose multiple passes.
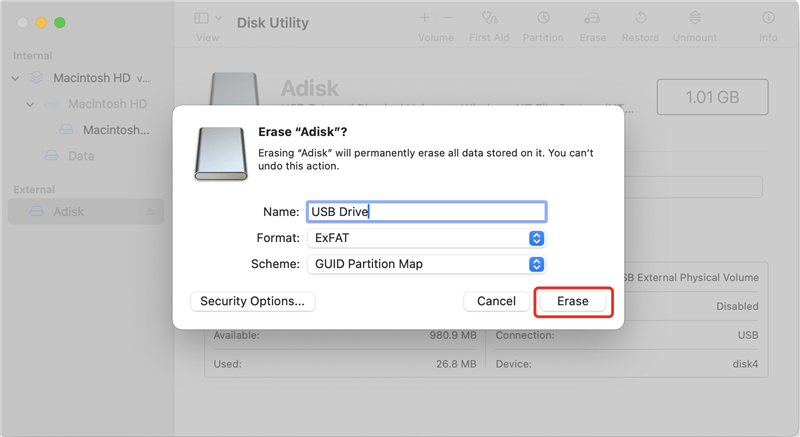
Step 4. Click "Erase" to begin the process. Disk Utility will format the drive and erase all data.
Monitor the progress and wait until the process is complete. This may take several minutes, depending on the drive's size and the chosen security options.
Using Terminal for Advanced Users to Format USB Drive on macOS Mojave
For advanced users comfortable with command-line interfaces, Terminal provides a powerful way to wipe USB drives. Follow these steps:
Step 1. Open Terminal:
- Navigate to Applications > Utilities > Terminal.
- Alternatively, use Spotlight by pressing Command + Space and typing "Terminal."
Step 2. Identify the USB Drive:
- Type diskutil list and press Enter. This command lists all connected drives.
- Locate your USB drive in the list and note its identifier (e.g., /dev/disk4).
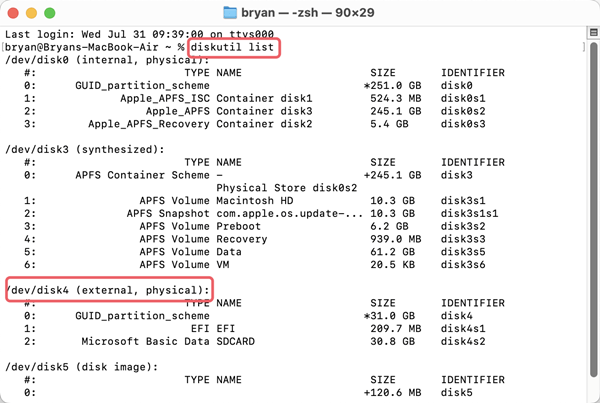
Step 3. Erase the Drive:
- Use the diskutil eraseDisk command to wipe the drive. The syntax is diskutil eraseDisk [format] [name] [identifier].
- For example, to format the drive as ExFAT and name it "MyDrive," type diskutil eraseDisk ExFAT MyDrive /dev/disk4 and press Enter.
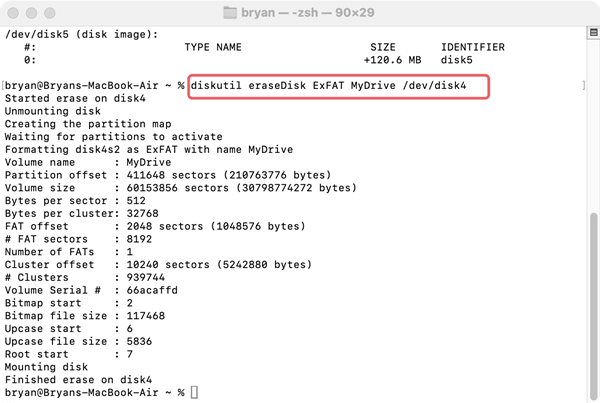
Step 4. Additional Commands:
- For a more thorough wipe, use the diskutil secureErase command. The syntax is diskutil secureErase [level] [identifier].
- Level options range from 0 (single-pass zero fill) to 4 (35-pass erase). For example, to perform a single-pass zero fill, type diskutil secureErase 0 /dev/disk4 and press Enter
Using DoYourData Super Eraser for Mac to Wipe USB Drive on macOS Mojave
Data recovery software can easily recover deleted or formatted data from USB drive on Mac. To prevent data recovery, you need special data erasure tool. Here, we strongly recommend DoYourData Super Eraser for Mac. It is fully compatible with macOS Mojave and other Mac operating systems. It can help you quickly and securely format/wipe USB drive in macOS Mojave.
Step 1. Click the Download button to download DoYourData Super Eraser for Mac, then click the .dmg file to install this data erasure application on your Mac.
Step 2. Open DoYourData Super Eraser for Mac, choose Wipe Hard Drive mode, select the USB drive and click on Wipe Now button.

Step 3. Choose a wanted data erasure standard, then click on Continue button.
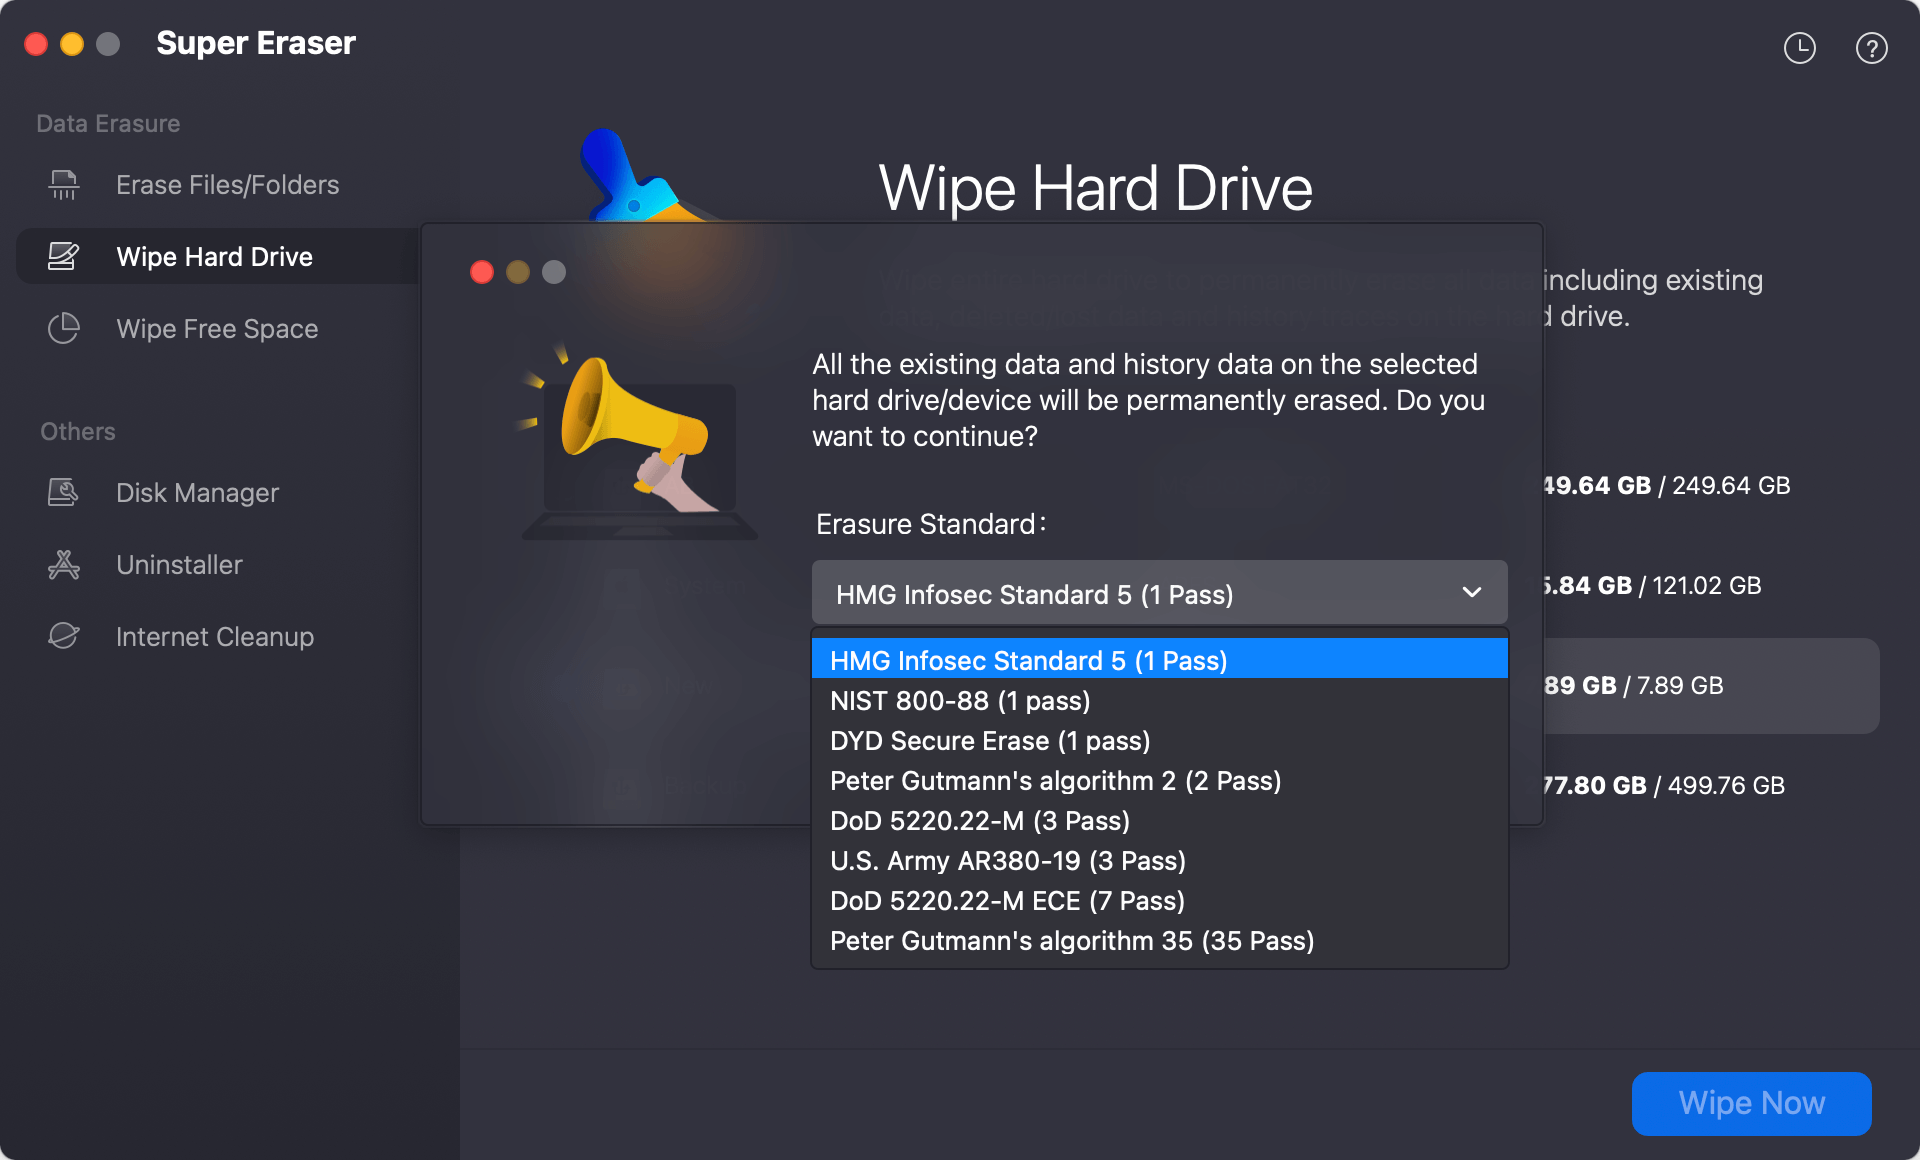
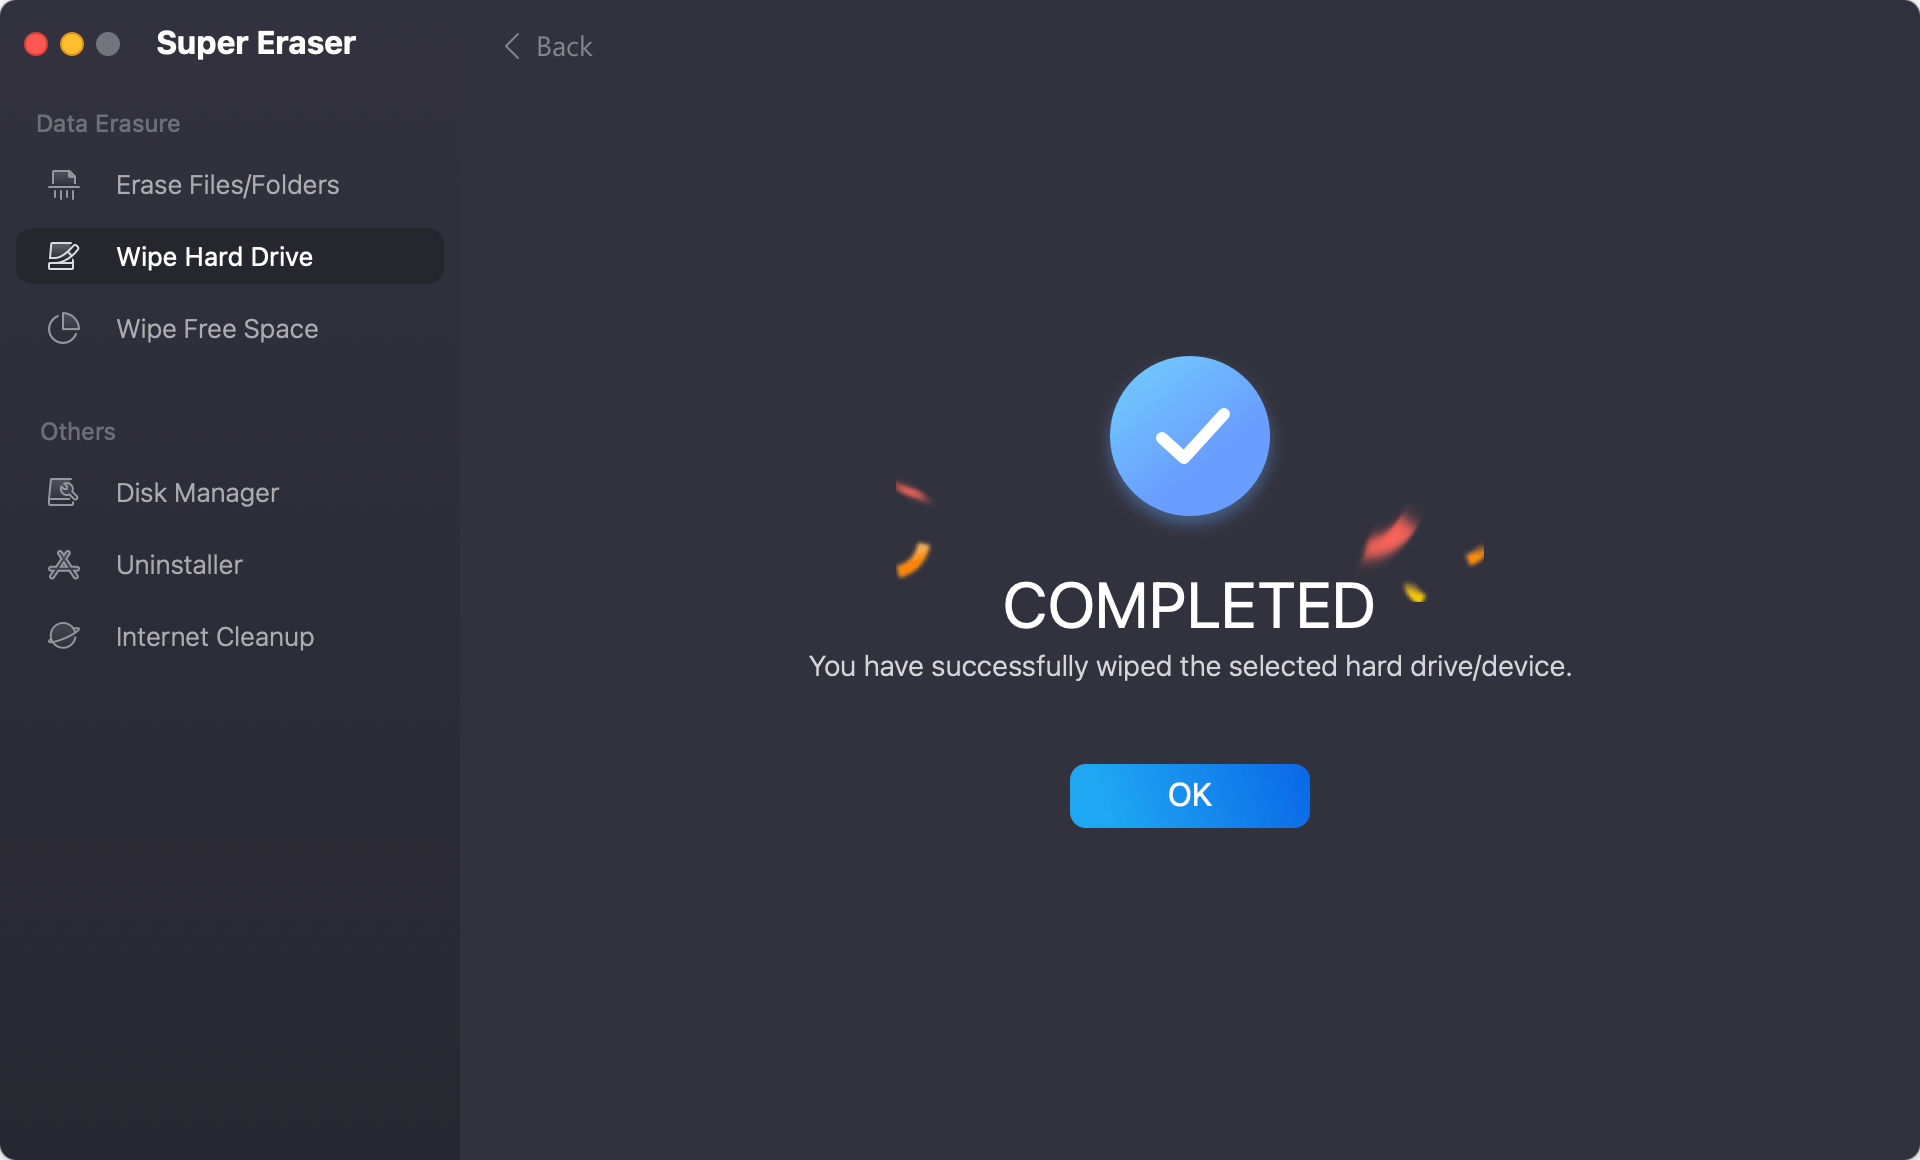
Step 4. Then DoYourData Super Eraser for Mac will format and wipe the USB drive. Once the process gets finished, all data stored on the USB drive is lost for good, cannot be recovered by any method.
Verifying the Wipe Process
After wiping your USB drive, it is essential to verify that all data has been securely erased. Here are some methods to check for residual data:
1. Using Disk Utility:
- Reopen Disk Utility and select the USB drive.
- Click "Info" to check the drive's status and ensure it is empty.
2. Using Third-Party Verification Tools:
- Applications like Do Your Data Recovery for Mac can also verify that the data has been wiped. Open the application and scan the USB drive for recoverable files.
3. Manual Check:
- Manually browse the USB drive in Finder to ensure no files or folders remain.
Troubleshooting Common Issues
Wiping a USB drive can sometimes encounter issues. Here are some common problems and solutions:
1. USB Drive Not Recognized by Disk Utility:
- Ensure the drive is properly connected and try using a different USB port.
- Restart your Mac and reopen Disk Utility.
2. Errors During Wipe Process:
- Verify that the drive is not write-protected. If it is, use Terminal to remove write protection.
- If the drive is corrupted, try using Disk Utility's "First Aid" feature before attempting to wipe it again.
3. Dealing with Write-Protected or Corrupted USB Drives:
- Use Terminal commands such as diskutil unmountDisk [identifier] and diskutil repairDisk [identifier] to address these issues.
Best Practices for USB Drive Management
To ensure your USB drives remain secure and functional, follow these best practices:
- Regular Backups: Regularly back up important data to avoid data loss.
- Use Encryption: Encrypt sensitive information stored on USB drives.
- Safe Removal: Always eject USB drives safely to prevent data corruption.
- Handle with Care: Protect USB drives from physical damage and extreme temperatures.
- Monitor for Issues: Regularly check USB drives for errors or signs of wear and replace them if necessary.
Conclusion
Securely formatting or wiping a USB drive on macOS Mojave is essential for protecting your data and ensuring privacy. By following the steps outlined in this guide, you can effectively erase all data from your USB drive, whether using Disk Utility, Terminal, or third-party tools. Adopting best practices for USB drive management will further enhance your data security and prolong the lifespan of your drives.
FAQs About Wipe USB Drive on macOS Mojave?
1. How to erase an USB flash drive on macOS Mojave with Disk Utility?
First of all, make a backup of your data stored on the USB drive, then follow these steps to erase an USB drive on macOS Mojave with Disk Utility.
- Open Disk Utility, select the USB drive.
- Click on Erase button.
- Give it a name and select a format, such as ExFAT or MS-DOS (FAT).
- Click on Erase button again.
- Click on Done button once the erasing process gets finished.
2. Is there any other tool can help to wipe USB drive on macOS Mojave?
While Disk Utility and Terminal are powerful tools, several third-party applications offer additional features and ease of use for wiping USB drives on macOS. Some popular options include:
DoYourData Super Eraser for Mac:
- Download and install DoYourData Super Eraser for macOS Mojave.
- Run DoYourData Super Eraser for Mac on your Mac computer.
- Choose Wipe Hard Drive mode.
- Choose the USB flash drive.
- Now, you can click on Wipe Now button to format and wipe the USB flash drive on your Mac.
CCleaner:
- Download and install CCleaner from the official website.
- Open CCleaner and navigate to the "Tools" section.
- Select "Drive Wiper," choose the USB drive, and select the desired wiping method (e.g., Simple Overwrite, Complex Overwrite).
- Click "Wipe" to begin the process.
Disk Drill:
- Download and install Disk Drill from the official website.
- Open Disk Drill and select the "Data Protection" tab.
- Choose the USB drive and select the "Erase" option.
- Follow the on-screen instructions to complete the wiping process.
SuperDuper!:
- Download and install SuperDuper! from the official website.
- Open SuperDuper! and select the USB drive as the source.
- Choose the "Erase, then copy" option and follow the on-screen instructions.
3. Can I recover formatted data from USB drive on macOS Mojave?
The data which is erased by Disk Utility or Terminal Commands is not lost for good and can be recovered by data recovery software. Follow the steps below to unformat USB drive on Mac:
- Download and install Do Your Data Recovery for Mac, open it.
- Select the formatted USB drive to start data recovery.
- Click on Scan button.
- Preview and recover lost files.
However, if the USB drive is wiped by DoYourData Super Eraser for Mac, all data stored on the USB drive is lost permanently, cannot be recovered by any data recovery method.

DoYourData Super Eraser for Mac
DoYourData Super Eraser for Mac is a 100% safe, powerful and easy-to-use data erasure program. It offers certified data erasure standards including Peter Gutmann, U.S. Army AR380-19, DoD 5220.22-M ECE to permanently erase data from Macs and external devices, making data recovery be impossible.