Quick Navigation:
- Knowing About Memory Cards for Cameras
- Preparing to Erase Your Digital Camera Card
- Erase Digital Camera Memory Card with Disk Utility
- Erase Digital Camera's Card with Terminal
- How to Recover Lost Data from Formatted or Erased Digital Camera Card on Mac?
- Format and Wipe Digital Camera Card with Mac Disk Wipe Software
- Other Tools to Help In Erasing Camera Memory Card on Mac
- Conclusion
Whether you're a professional photographer or love taking pictures for fun, digital cameras are essential for keeping memories alive. The memory card in your camera can get full over time, so you may need to delete pictures to make room for new ones. And if you are planning to sell, donate or give your camera away, you also need to wipe all data off the memory card and make sure your private images and videos can't be recovered by the next owner.
This detailed guide will show you how to erase your digital camera card on a Mac safely and effectively. We'll review everything you need to know, from the different kinds of memory cards to how to use Disk Utility, Terminal, data erasure application and other tools. If you do these things, you can ensure your memory card is formatted correctly and ready for new experiences.
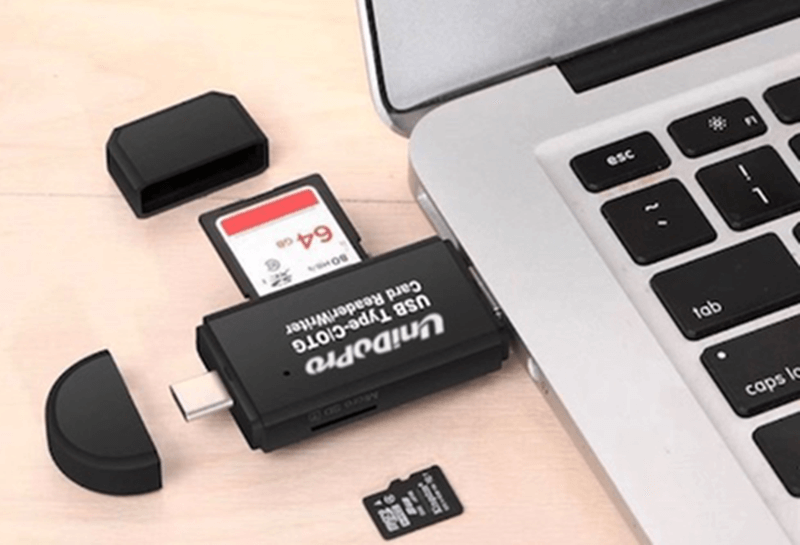
Knowing About Memory Cards for Cameras
Before we learn how to erase, it's helpful to know about the different kinds of memory cards used in digital cameras. The types most often seen are:
- SD (Secure Digital) Cards: Many small cameras and some DSLRs use them.
- CF (CompactFlash) Cards: This feature is often found in professional and high-end DSLR cameras.
- MicroSD Cards: These are often found in small gadgets like action cams and drones.
- XQD and CFexpress Cards: They are used in high-performance cameras because they can read and write quickly.
You can erase any card on a Mac if you have the right card reader.
Preparing to Erase Your Digital Camera Card
Step 1. Backup Your Data.
Ensure you have a backup of all the important data on your memory card before you erase it. You can move the pictures and movies to your Mac or an external hard drive. To back up your files, do these things:
- Connect the Camera/Card Reader to Your Mac: Connect your camera with a USB wire or put the card into a card reader that works with your Mac.
- Open Finder: Find the device connected in the "Devices" part of the Finder sidebar.
- Transfer Files: You can drag and drop the files from the card to a folder on your Mac or an external drive.
Step 2. Unmount the Memory Card.
Ensure the card is properly unmounted before you erase it to keep the data from getting damaged. To take the card off:
- Open Finder: In the Finder sidebar, find the linked memory card.
- Eject the Card: Click the eject icon next to its name to remove the memory card.
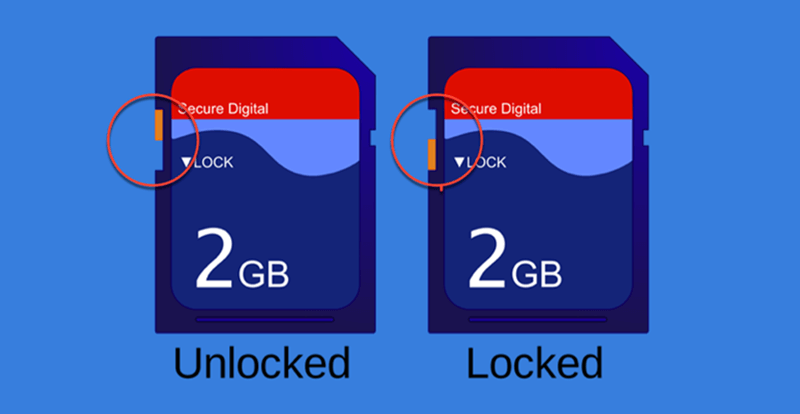
Step 3. Check for Write Protection.
Some SD cards have a switch that prevents data from being wiped or written over. Ensure this switch is not locked before you try to erase the card.
Erase Digital Camera Memory Card with Disk Utility
Step 1. Insert SD Card Into Your Mac.
Put the SD card into your Mac using an SD card reader or slot. Ensure the card is plugged in correctly and your computer can detect it.
Step 2. Open Disk Utility.
Mac OS has a Disk Utility program that lets you work with files and other storage media, such as SD cards. To open Disk Utility, go to Launchpad > Other > Disk Utility.
Step 3. Select the SD Card.
Within Disk Utility, you can see a list of all the files and drives that have been synced. Click on your card in the list on the left. Ensure you choose the right disk so you don't accidentally delete files from other drives.
Step 4. Erase the SD Card.
The Disk Utility window has an "Erase" button at the top. Once you've selected the SD card, click it to open the Erase box.
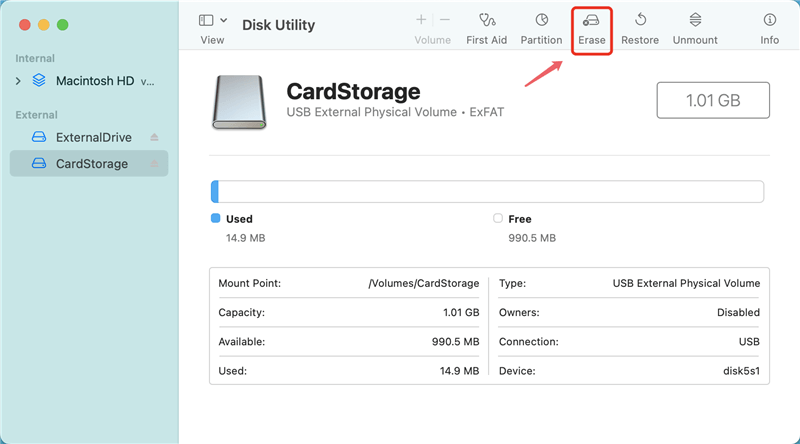
Step 5. Configure Erase Options.
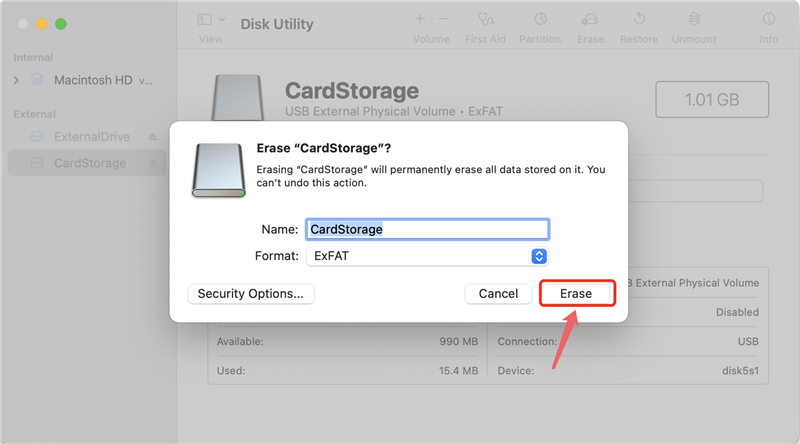
After clicking "Erase," you'll be asked to pick an SD card file system and give it a name.
- Name: Type in a new name for the SD card if you want to change its name.
- Format: If the SD card is larger than 32GB, choose ExFAT as the file system. If you plan to use a card with very old cameras or operating systems, or if the SD card is 32GB or less, choose MS-DOS (FAT) (FAT32).
- Choices for security: You can pick how many times to erase the info on the SD card.
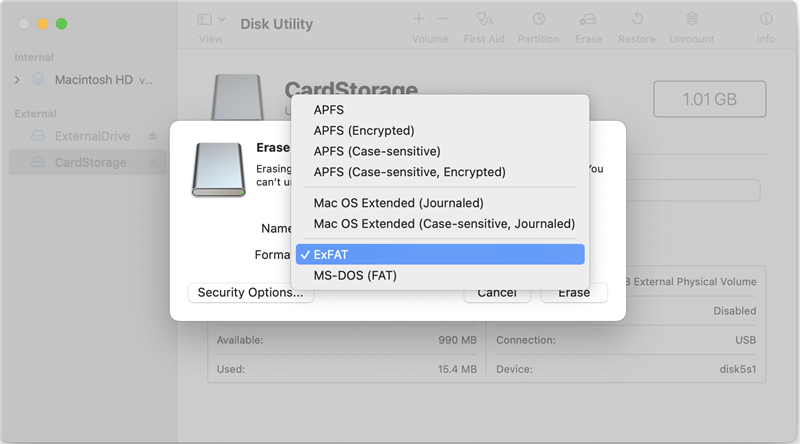
Step 6. Confirm Erase.
Make sure your settings are still correct. As soon as you're done, press the "Erase" button to begin the process.
Step 7. Wait for the Process to Complete.
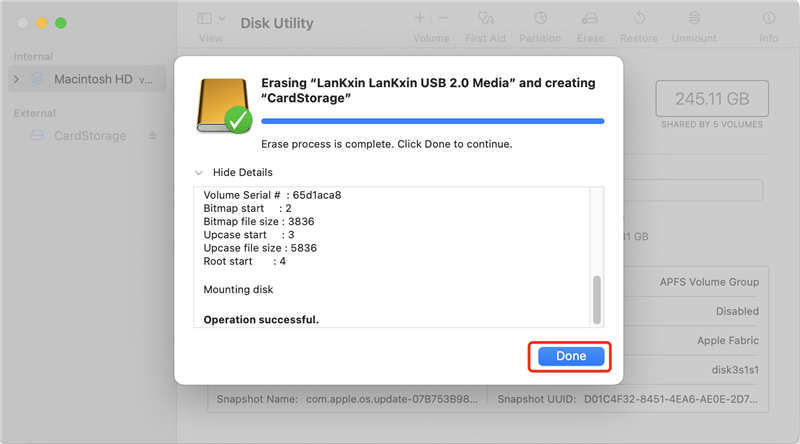
If your Mac is fast, erasing an SD card will take no time. However, getting rid of the bigger cards might take longer. A progress bar will show you how far along the process is. When it's done, Disk Utility will show a message saying so.
Step 8. Eject the SD Card.
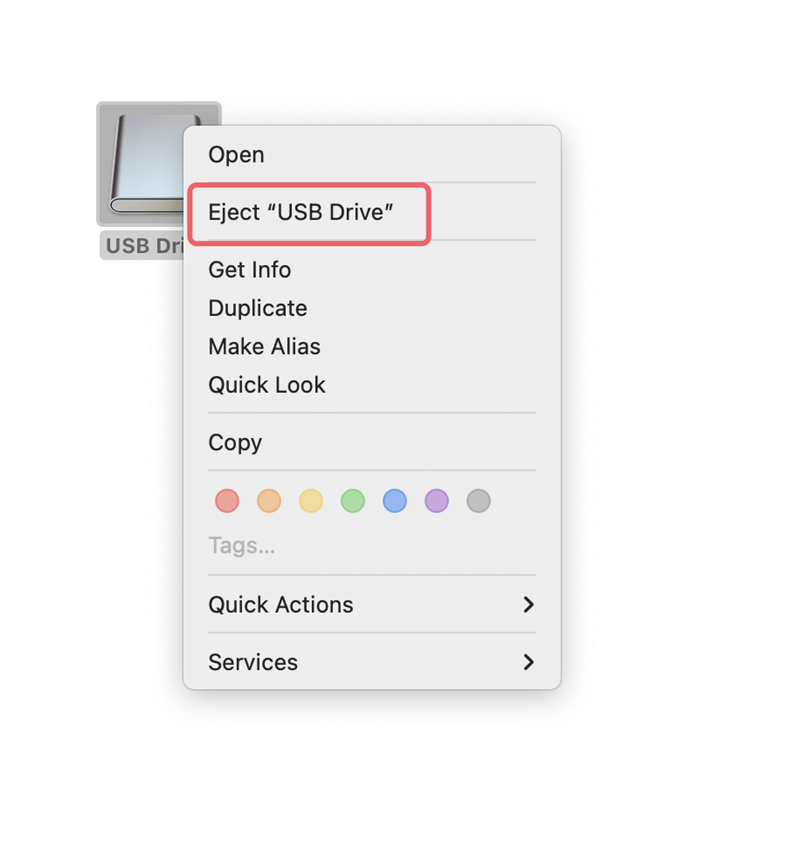
Once the SD card is clean, remove it from your Mac. The SD card icon on the screen can be dragged to the Trash or right-clicked, and "Eject" can be chosen.
Erase Digital Camera's Card with Terminal
The Terminal app has a command-line tool that advanced users can use to erase a memory card. Be careful because this method needs clear instructions:
Step 1. Open Terminal: You can get to Terminal by going to Applications > Utilities > Terminal.
Step 2. List All Drives: Type diskutil list and press Enter. This will show a list of all the linked drives.
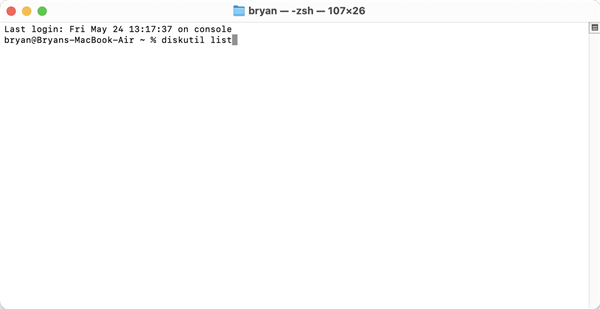
Step 3. Identify the Memory Card: Look for your card in the list (e.g., /dev/disk4).
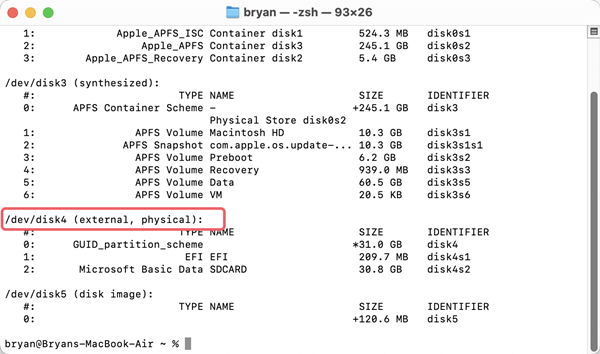
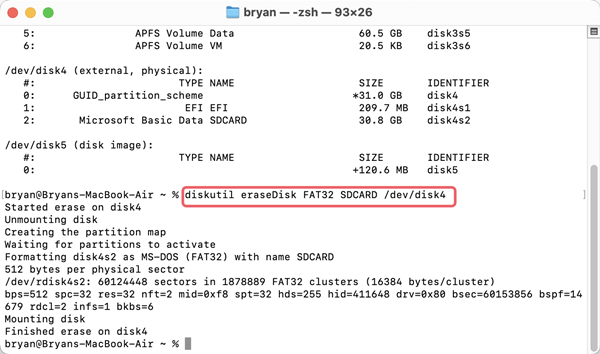
Step 4. Erase the Card: The diskutil eraseDisk command can erase the card. Take this command as an example: diskutil eraseDisk FAT32 SDCARD /dev/disk4. Change SDCARD to the name you want and /dev/disk4 to the identifier of your memory card.
How to Recover Lost Data from Formatted or Erased Digital Camera Card on Mac?
After formatting the digital camera card with Disk Utility or Terminal, the data stored on the card is deleted. However, the lost data is not lost for good! With right data recovery software, you can unformat the digital camera card and get all lost data back.
Step 1. Download and install the reliable Mac data recovery software - Do Your Data Recovery for Mac and make sure the digital camera card has been connected to the Mac.
Step 2. Open Do Your Data Recovery for Mac, select the formatted digital camera card, then click on Scan button.

Step 3. This Mac data recovery software will deeply scan the formatted digital camera card and find deleted files, formatted data, etc.

Step 4. Wait until the scan is completed, the Preview function allows you to preview the images, videos and documents. Then select the wanted files, click on Recover button to save them.

Format and Wipe Digital Camera Card with Mac Disk Wipe Software
Before you sell, donate or throw out your old digital camera, you'd better wipe digital camera’s storage memory card to destroy all the photos, videos etc. DoYourData Super Eraser for Mac is one of the best Mac disk wipe software and it can help you securely and permanently erase data from Mac internal drive, external HDD/SSD, memory card, digital camera, USB flash drive, etc.
With advanced technology, DoYourData Super Eraser for Mac is fully capable of permanently erasing files, wiping entire camera memory card on your Mac. It not only can erase existing files, but it also can wipe deleted/lost data.
- Erase data from SD card, memory card, SDHC card, micro card, mini card, etc.
- Permanently erase photos, videos, audio files, documents, and all other data.
- Support all popular Mac OS.
- Certified data erasure standards, including DoD 5220.22-M, HMG Infosec, NIST 800-88, U.S. Army AR380-19, Peter Gutmann's algorithm, etc.
Let's see how to use DoYourData Super Eraser to format and wipe digital camera's storage memory card on Mac:
Step 1. Download and install DoYourData Super Eraser on your Mac, then choose Wipe Hard Drive mode.
Step 2. Select the camera card, click on Wipe Now button.

Step 3. Select a wanted data erasure standard, click on Continue button.
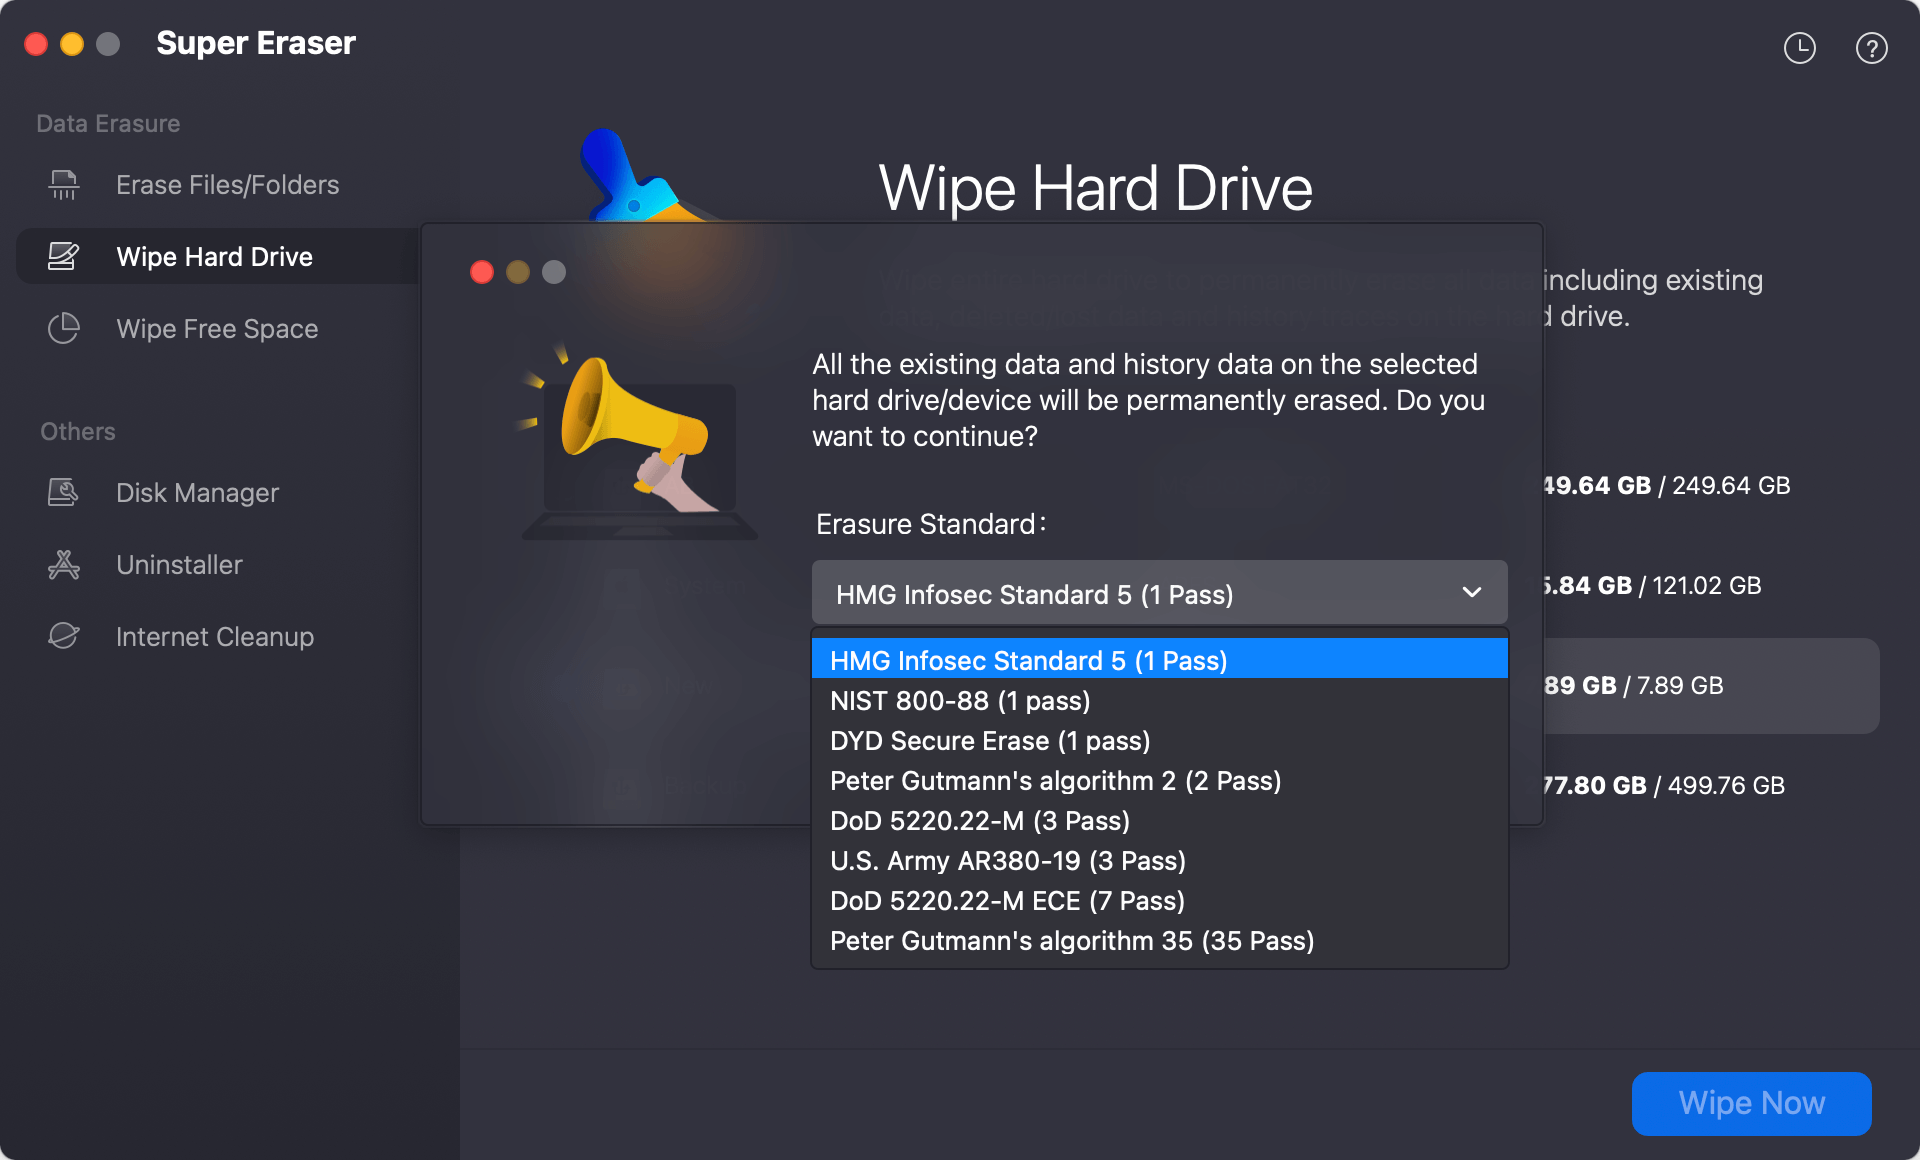
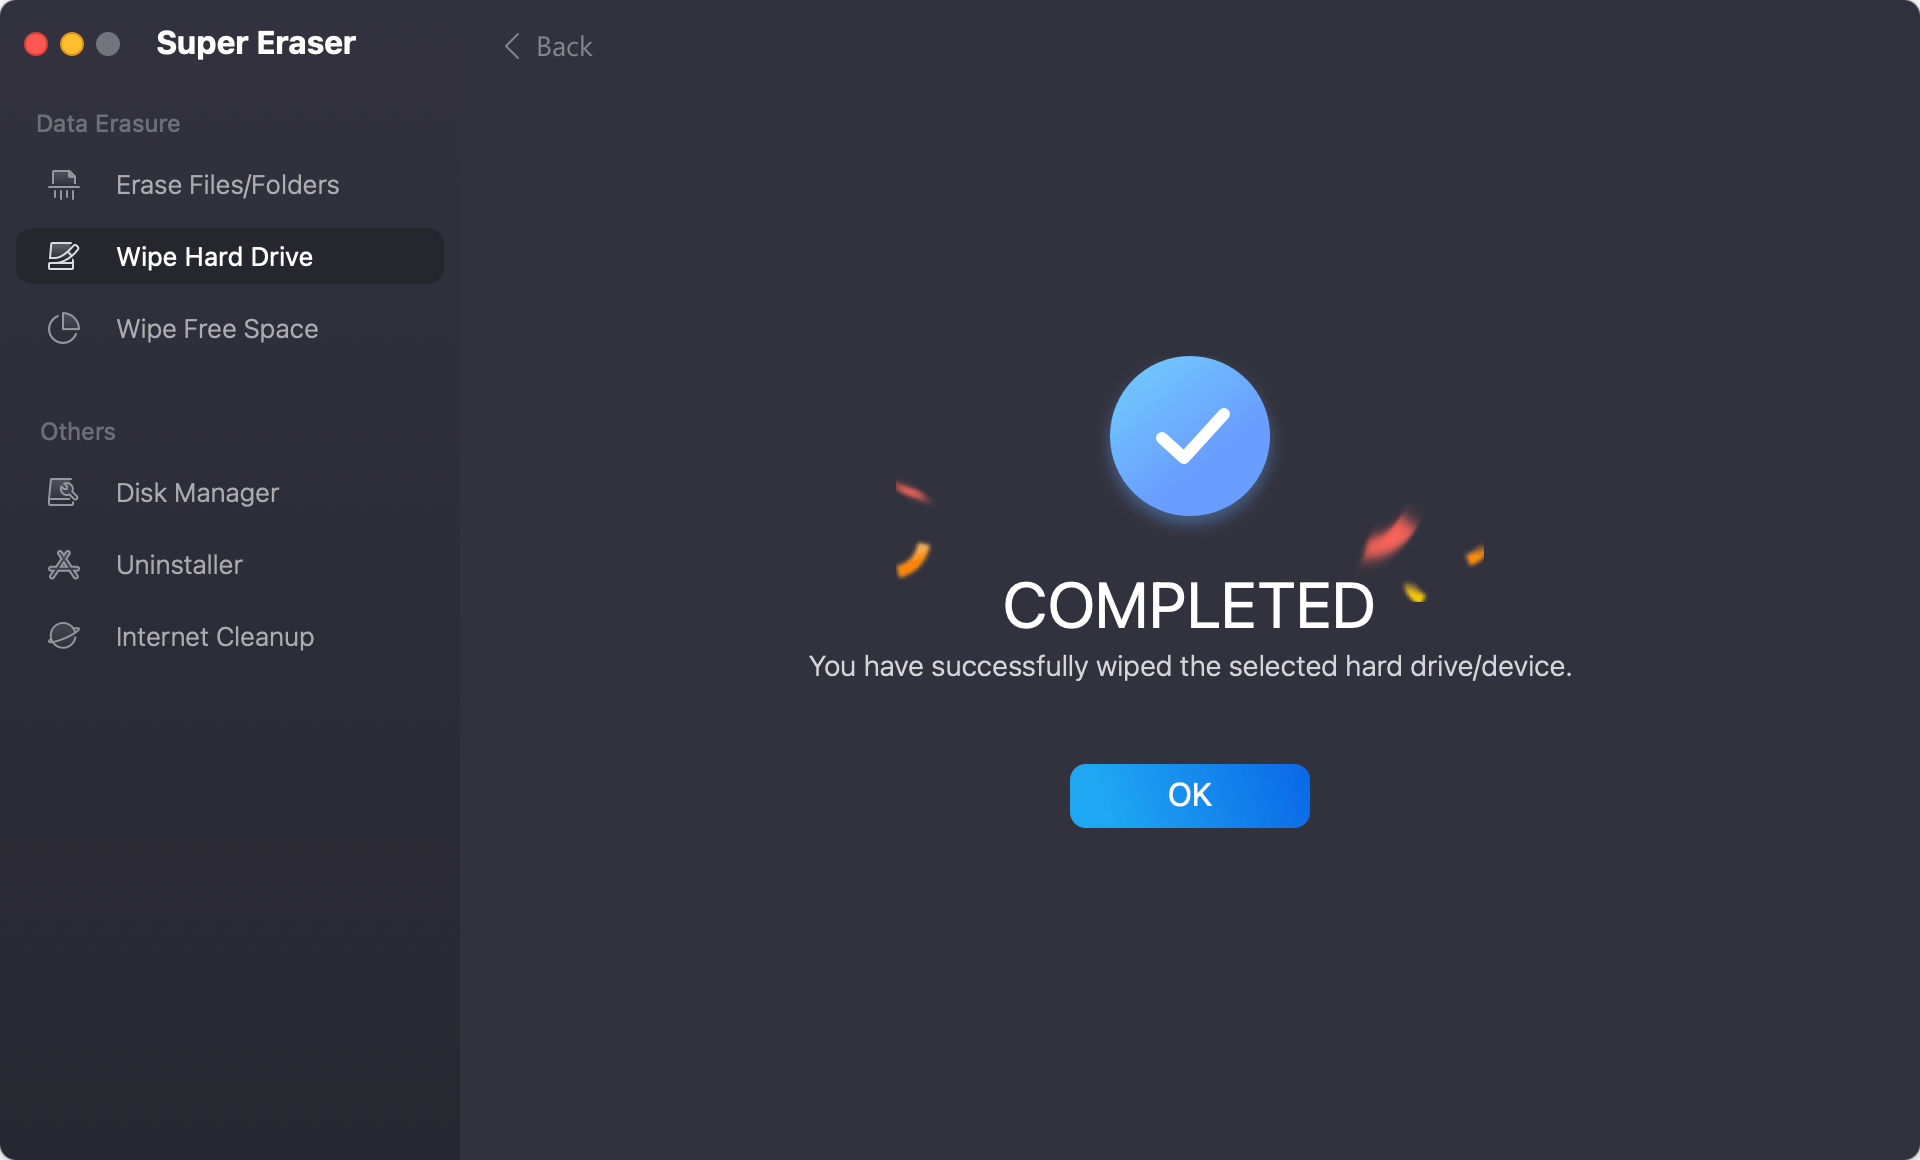
Step 4. Format and wipe the camera card and permanently erase all data from it.
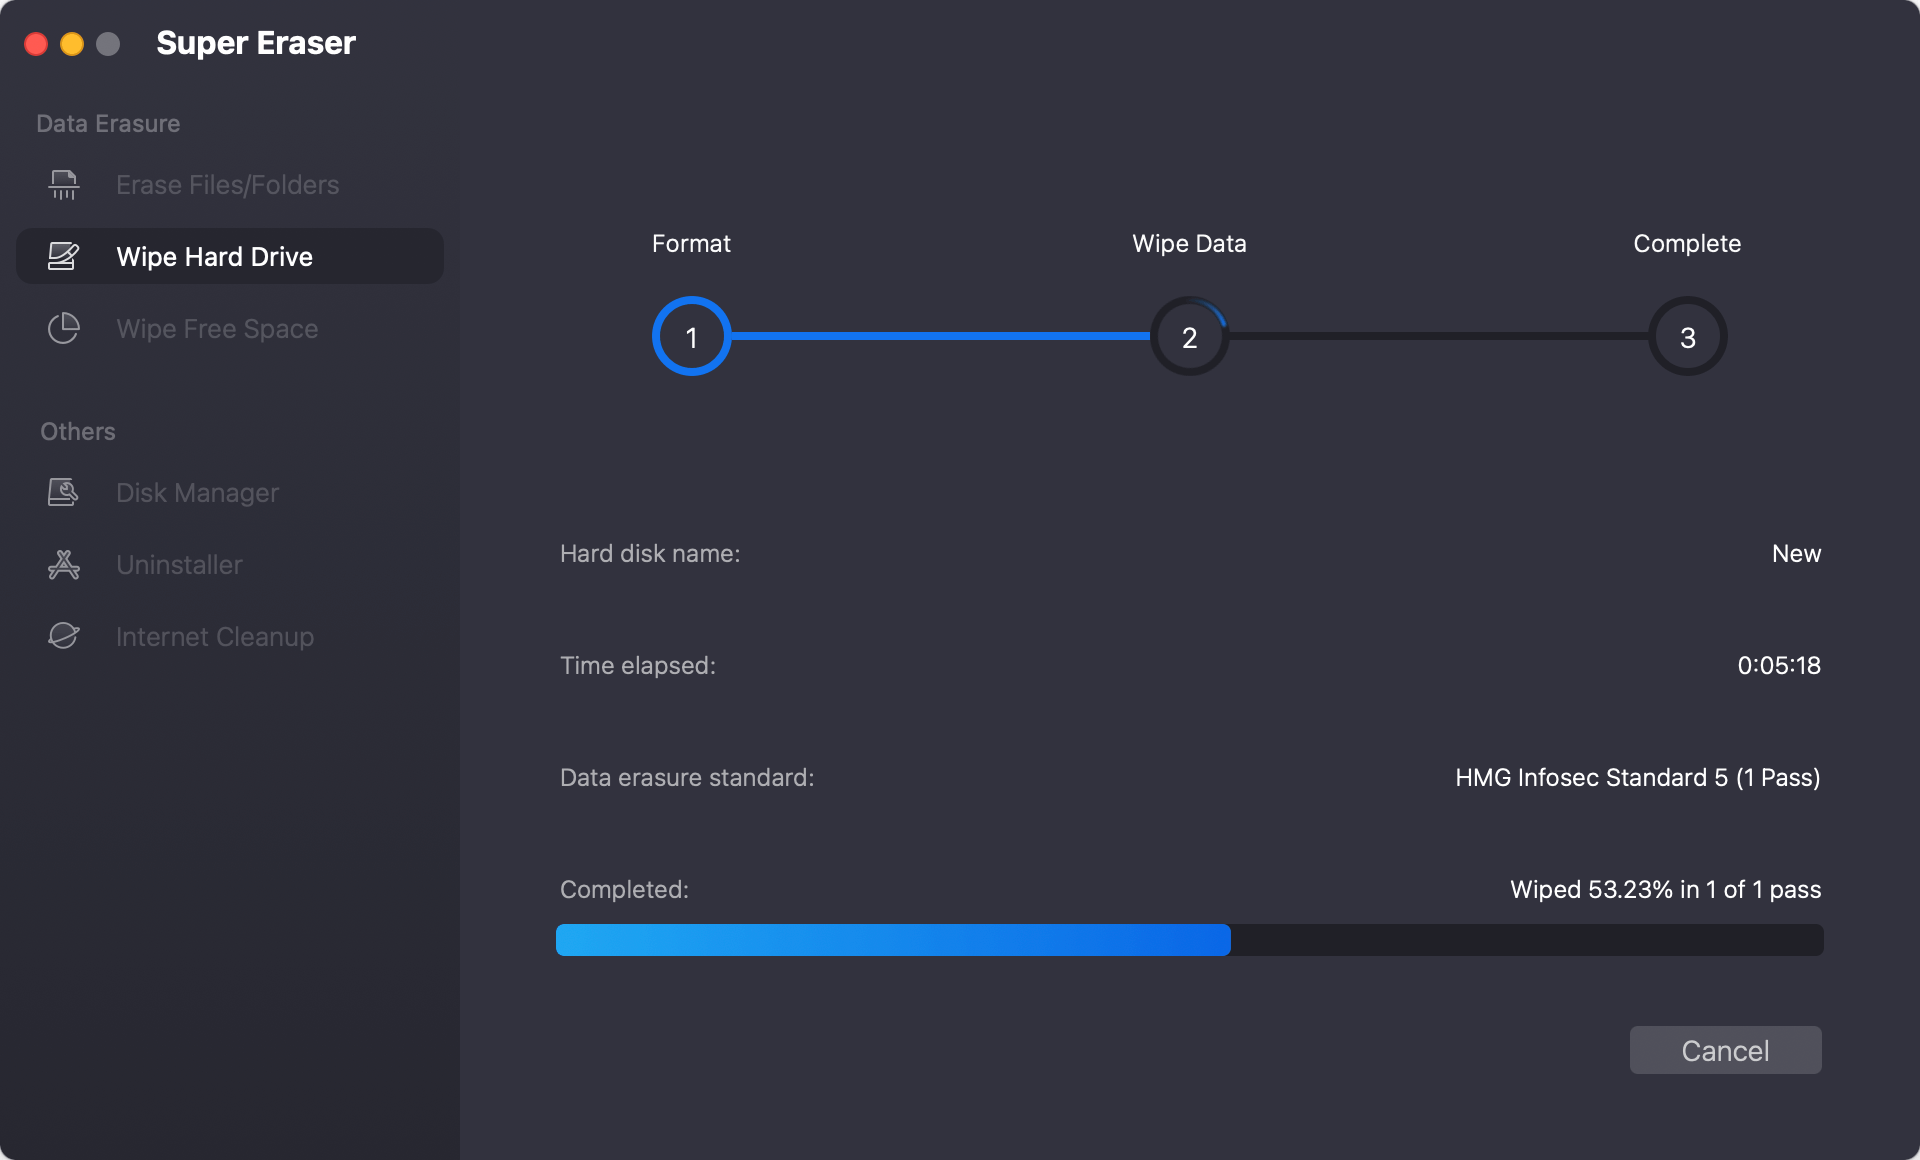
Once the process gets finished, all data stored on the camera cars is lost for good, no way to recover it.
Other Tools to Help In Erasing Camera Memory Card on Mac
- Do Your Data Recovery for Mac: Disk Manager can help you mount/unmount memory card on Mac, fix damaged memory card and erase/format memory card on Mac.
- MacClean360: It can erase and format digital camera memory card on Mac.
- SD Card Formatter: This tool can do quick format and full format on Mac. Just run it to help you format your camera memory card.
Conclusion:
When done right, erasing a digital camera card on a Mac is a simple process. If you follow the steps in this guide, your memory card will be made correctly and ready to use. Make sure you back up your files and handle the memory card carefully, whether you use Disk Utility, Terminal, or other software. By doing these things, you can keep the memory card in your digital camera in great shape to take pictures of new moments without worrying about losing or corrupting data.
And if you will sell, donate or dispose of an old camera card, you can use data erasure software - such as DoYourData Super Eraser for Mac, to securely wipe the card and permanently erase all data from it so that no file is recoverable.

DoYourData Super Eraser for Mac
DoYourData Super Eraser for Mac is a 100% safe, powerful and easy-to-use data erasure program. It offers certified data erasure standards including Peter Gutmann, U.S. Army AR380-19, DoD 5220.22-M ECE to permanently erase data from Macs and external devices, making data recovery be impossible.