
Make A Bootable Clone Before Upgrading macOS
Before upgrading macOS to a new version, you can make a full backup for your Mac with DoYourClone for Mac, Read more >>
For Mac users, it's excellent to update the macOS and enjoy the new feature on fall nearly each year. However, if there are something wrong with the macOS update, you may suffer data loss in such a case. To avoid data loss, it's better to create a full backup for the macOS update. If data loss happen without a backup, you can still try to recover the lost files with the reliable Mac data recovery software Do Your Data Recovery for Mac.
![]() Updated by Justin Kenny on September 12, 2024
Updated by Justin Kenny on September 12, 2024
Quick Navigation:
Every fall, Apple typically releases a new version of its Mac operating system. Numerous users will like to install new macOS to benefit from its new features. The OS update is free and, in most cases, ought to install without problems. However, there is always a potential that something will go wrong, and you will lose some data, just like anything else. If you experience issues with your macOS upgrade, we'll show you how to recover data after macOS update.
Once you've turned on the automatic update notification on your Mac, it will alert you each time Apple releases a new macOS version, regardless of how minor. You can install the most recent version of macOS by going to the Apple menu ![]() > System Settings (or System Preferences) > General
> System Settings (or System Preferences) > General ![]() > Software Update.
> Software Update.

Update Now denotes minor upgrades to the same version of the current operating system, for as from Monterey version 12.1 to Monterey version 12.2.
Upgrade Now offers the major upgrade to a new main version, such as from Catalina to Big Sur or Monterey, it is referred to as "Upgrade Now."
Both updating methods will keep Safari, Messages, Music, Photos, FaceTime, and the Calendar current. The entire process of downloading and installing the new version of the macOS on a Mac is predicted to take 35 minutes to several hours. It depends on how well-functioning and healthy your Mac disk is.
Although updating regularly is safe for your data, you should still make a backup before choosing either of the update options! Never put your faith in a machine to keep your data safe. Belief in oneself.
Make A Bootable Clone Before Upgrading macOS
Before upgrading macOS to a new version, you can make a full backup for your Mac with DoYourClone for Mac, Read more >>
We urge users to utilize Time Machine or a reputable third-party Mac backup program to create copies of the most critical files on their Mac. As mentioned, updating to a later primary edition of macOS has no effect on user data, but the update installation process occasionally goes wrong and harms the hard disc. Let you lose access to the data as a result.
Over 90% of the causes of unexpected data loss while a macOS update is insufficient free space on the internal hard drive, affecting roughly 27% of Mac users.
The other 10% of data loss situations are caused by macOS updates that are halted or fail due to different problems. Simply put, the following conditions are linked to negative responses to the question, "will macOS update delete everything?"
Congratulations if you successfully update to the new macOS version, but don't forget to create a backup before the next update. If you are the unfortunate user who cannot get the update, as it happens. No matter what led to the data loss, please keep it safe and refrain from writing new data to overwrite and damage the lost data. Here are some solutions to recover the lost data after macOS update.
Time Machine is a backup software that is built into the Mac OS and can be used to automatically backup your information to an external hard disc. Update on my Mac erased everything? You may retrieve lost images, iPhone photos, documents, calendars, and other items with Time Machine. However, only if, as I stated, you have backup files.
Hold down Command-R while restarting your Mac to enter Recovery Mode simultaneously. (Hold power button for Apple Silicon chip Mac.)
Click Continue after selecting Restore from Time Machine Backup.
Start Time Machine on your Mac, choose the files you want to restore and press the Space Bar to see a preview of the contents.
After a Mac update, click the Restore button to recover any missing data.

Most of the time, we are unable to identify the precise causes of missing files following a Mac update, and it might be challenging to locate the lost files, especially if you are not skilled with your Mac. In this situation, it is recommended that you carefully go through each folder on your Mac to locate the missing data.
The Apple Menu will appear when you click the Apple icon ![]() .
.
Go to Go>Go to Folder.
Input "~" and continue with Go.
After that, search through every folder and subfolder on your Mac to locate any wanted files.
If you have enabled iCloud Drive, the missing files after a macOS update are moved to your iCloud Drive, so you need to turn this feature off. This is one fantastic feature that macOS offers to its users.
Click Apple menu ![]() > System Settings (or System Preferences) > iCloud can be selected by clicking the Apple icon.
> System Settings (or System Preferences) > iCloud can be selected by clicking the Apple icon.
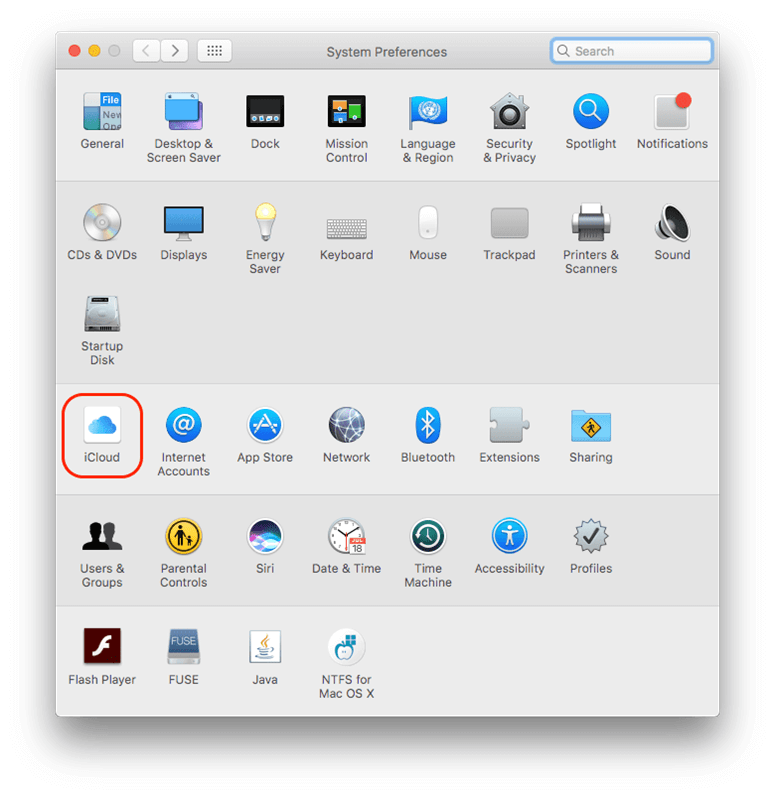
Select Options from the iCloud Drive menu.
Ensure Desktop & Document Folders are not selected in the box before it. Then press "Done."

Then, after signing into your iCloud account, download any necessary iCloud Drive files to your Mac.
Don't be shocked if it's suggested that you do it. Yes, I am confident you know which account to use and how to log in, but occasionally, a macOS update will wipe the user account profile while keeping the home folder, which is why your stuff may be missing. You must add your previous profile and log in again in this situation.
"Log out xxx" can be chosen by clicking the Apple icon.
It is advised to try on all registered accounts on your Mac before logging in with the previously used account to see whether the files can be located.
Click the Apple icon ![]() , select System Settings (or System Preferences, then Users & Groups.
, select System Settings (or System Preferences, then Users & Groups.
If you cannot log in using your previous account, go to Apple ![]() > System Settings (or System Preferences > Users & Groups and enter your password to unlock the padlock. This will allow you to add your previous account precisely as you did before. After that, log in to access the missing files.
> System Settings (or System Preferences > Users & Groups and enter your password to unlock the padlock. This will allow you to add your previous account precisely as you did before. After that, log in to access the missing files.

If no backups were created before macOS update and cannot find the missing files with the above methods, then the files should be just lost during the macOS update process. You can also contact the Apple Support team in such a case. It's not most minor way to restore data after a mac update erased your files. They are professionals and you need to follow the instructions on the contact page by filling out an online form, calling, or sending an email.
However, mot users would not want to do that complex procedure and wait. If you urgent to get back the missing files, there is another way to recover the data. You can find a professional data recovery software to recover the lost files quickly by yourself.
The best way to recover lost data on Mac disk is to use data recovery software. Do Your Data Recovery for Mac is a powerful Mac data recovery application. It supports to recover deleted, formatted and lost data on Mac whether your Mac is an Intel chip Mac or an Apple Silicon chip Mac.
After downloading and install the software on your Mac, you can follow the steps below to recover lost data on Mac after a macOS update:
Step 1. Open Do Your Data Recovery for Mac, the software will list all the storage devices connected to the Mac. And then select the Mac disk to start data recovery.

Step 2. Click on Scan button to scan the disk to find lost data. The software will deeply scan the Mac disk and try to find any possible missing files.

Step 3. Once the process gets finished, you can check and preview all the found files. Select the wanted files among the found files and save them to another drive.

🎯Note: After data loss, don't keep using the Mac and avoid writing new data to the Mac drive. Otherwise, it will cause further damaged to the lost files. Also, ensure to save the recovered files to another drive.
You must try several methods to recover the missing data after a macOS update if you unfortunately suffer data loss. Whether the problem is simple or complex depends on your chosen solution. If you have backed up your Mac, you can locate the missing files using Time Machine, another online storage service, or with a third-party backup software. If not, you are advised to utilize the most acceptable data recovery software, ensuring that most of the missing information can be recovered.
1. Will macOS update delete everything?
Normally, macOS update will not delete your data on Mac. However, if there are some issues happen, like hard disk space insufficient, update interrupted, sudden power off, it will cause damage to the system and cause data loss.
2. How to restore macOS from Time Machine backup?
With available Time Machine backup, it will be simple to restore the macOS.
3. How to clone macOS and crate a bootable copy before updating?
Before updating macOS, it's highly suggested to create a bootable clone backup for your Mac in case there are issues during system update. You can use DoYourClone for Mac which can create complete and bootable copy of your macOS. Only a few steps are needed to create bootable clone with the software:
4. How to recover lost data with software after macOS update?
Lost data during macOS update can still be recovered with software if you don't have backup for your system and data. Do Your Data Recovery for Mac is an effective software which can recover lost data after macOS update. You can follow the steps to recover data with the software.
Do Your Data Recovery for Mac
Do Your Data Recovery for Mac, one of the best Mac data recovery software, can help you easily and completely recover deleted, formatted or lost files from Mac HDD/SSD, external HDD/SDD, USB drive, memory card, digital camera, or other storage devices.
Written & Updated by Justin Kenny
Justin Kenny is a writer & editor of DoYourData. He joined DoYourData in 2016 and focuses on writing articles about Windows data recovery, Mac data recovery, external device data recovery, hard drive clone, data erasure, Mac cleanup, computer issue fixes, etc. He is a super fan of Apple devices and is big on testing new digital device and system utility software.