How to Make A Bootable Clone Before Upgrading to macOS Sequoia?
Before upgrading to macOS Sequoia, you can make a full backup for your Mac. DoYourClone for Mac, a powerful disk cloning program, can clone everything from your Mac to an external hard drive and create a full bootable clone backup. It supports to create bootable clone backup for macOS Sequoia, Sonoma, Ventura, Monterey, Big Sur, etc.
![]() Updated by Anderson on February 28, 2024
Updated by Anderson on February 28, 2024
Quick Navigation:
- Why Create A Bootable Clone Before Upgrading to macOS Sequoia?
- What You Need to Create Mac Bootable Clone Backup?
- Step-by-Step Guide to Make Full Bootable Clone Before Upgrading to macOS Sequoia
- Troubleshooting Tips
- Conclusion
- FAQs About Creating Bootable Clone Before Upgrading to macOS Sequoia
The next version of Apple's popular operating system, macOS Sequoia, is said to have a lot of cool new features and make things run faster. But before you start the upgrade, you need to make sure your present system is safe by making a bootable copy of it. This copy is like a safety net; it lets you go back to the old version of macOS if something goes wrong after the change.
The detailed information in this guide will help you make a bootable copy of your current macOS system before you start the macOS Sequoia upgrade. We'll talk about the tools you'll need, the different ways to clone, and how to fix problems so the process goes smoothly.
Why Create A Bootable Clone Before Upgrading to macOS Sequoia?
A bootable clone is the exact copy of your Mac's hard drive that can recover your system if something goes wrong while upgrading. Here are some important reasons to make a copy that can start up:
- Data Security: Make sure that all of your info is safe.
- System Restoration: This makes it easy to return to the old method if the upgrade doesn't work.
- Convenience: You can keep working on the cloned drive while you figure out what went wrong with the change.
- Peace of Mind: You feel confident about the change when you have a backup.
What You Need to Create Mac Bootable Clone Backup?
Get the following tools and supplies ready before you begin:
- External Hard Drive: It should have enough space to hold your Mac's info.
- Cloning Software: DoYourClone for Mac, Donemax Disk Clone for Mac, SuperDuper! and Carbon Copy Cloner (CCC).
- Time and Patience: Sometimes, it takes a while to clone because of how much data is on the drive.
Step-by-Step Guide to Make Full Bootable Clone Before Upgrading to macOS Sequoia
1. Prepare External HDD or SSD
Connect the External Hard Drive: Use a USB, Thunderbolt, or FireWire port on your Mac that works with the drive to connect it.
Format the Drive: You can open Disk Utility by going to Applications > Utilities. From the list on the left, choose the external drive. Then, click "Erase." As the format, pick APFS or Mac OS Extended (Journaled); and as the method, pick GUID Partition Map. To erase the drive, click "Erase."
2. Choose and Install Cloning Software
DoYourClone for Mac, Carbon Copy Cloner (CCC) and SuperDuper are well-known and effective cloning programs. We'll use DoYourClone for Mac as an example here.
DoYourClone - Reliable Disk Clone Software
- Create bootable clone backup for macOS or OS X.
- Clone hard drive on Mac.
- Create disk image backup on Mac.
3. Create Bootable Clone Backup
DoYourClone for Mac is one of the best disk cloning programs. It can securely and easily clone all data including operating system, apps, user data and settings from Mac internal disk to the external hard drive, making a full bootable clone backup.
Step 1. Open DoYourClone for Mac, choose Clone OS mode. The internal disk has been selected as the source drive, you just need to select the external hard drive as the destination drive.
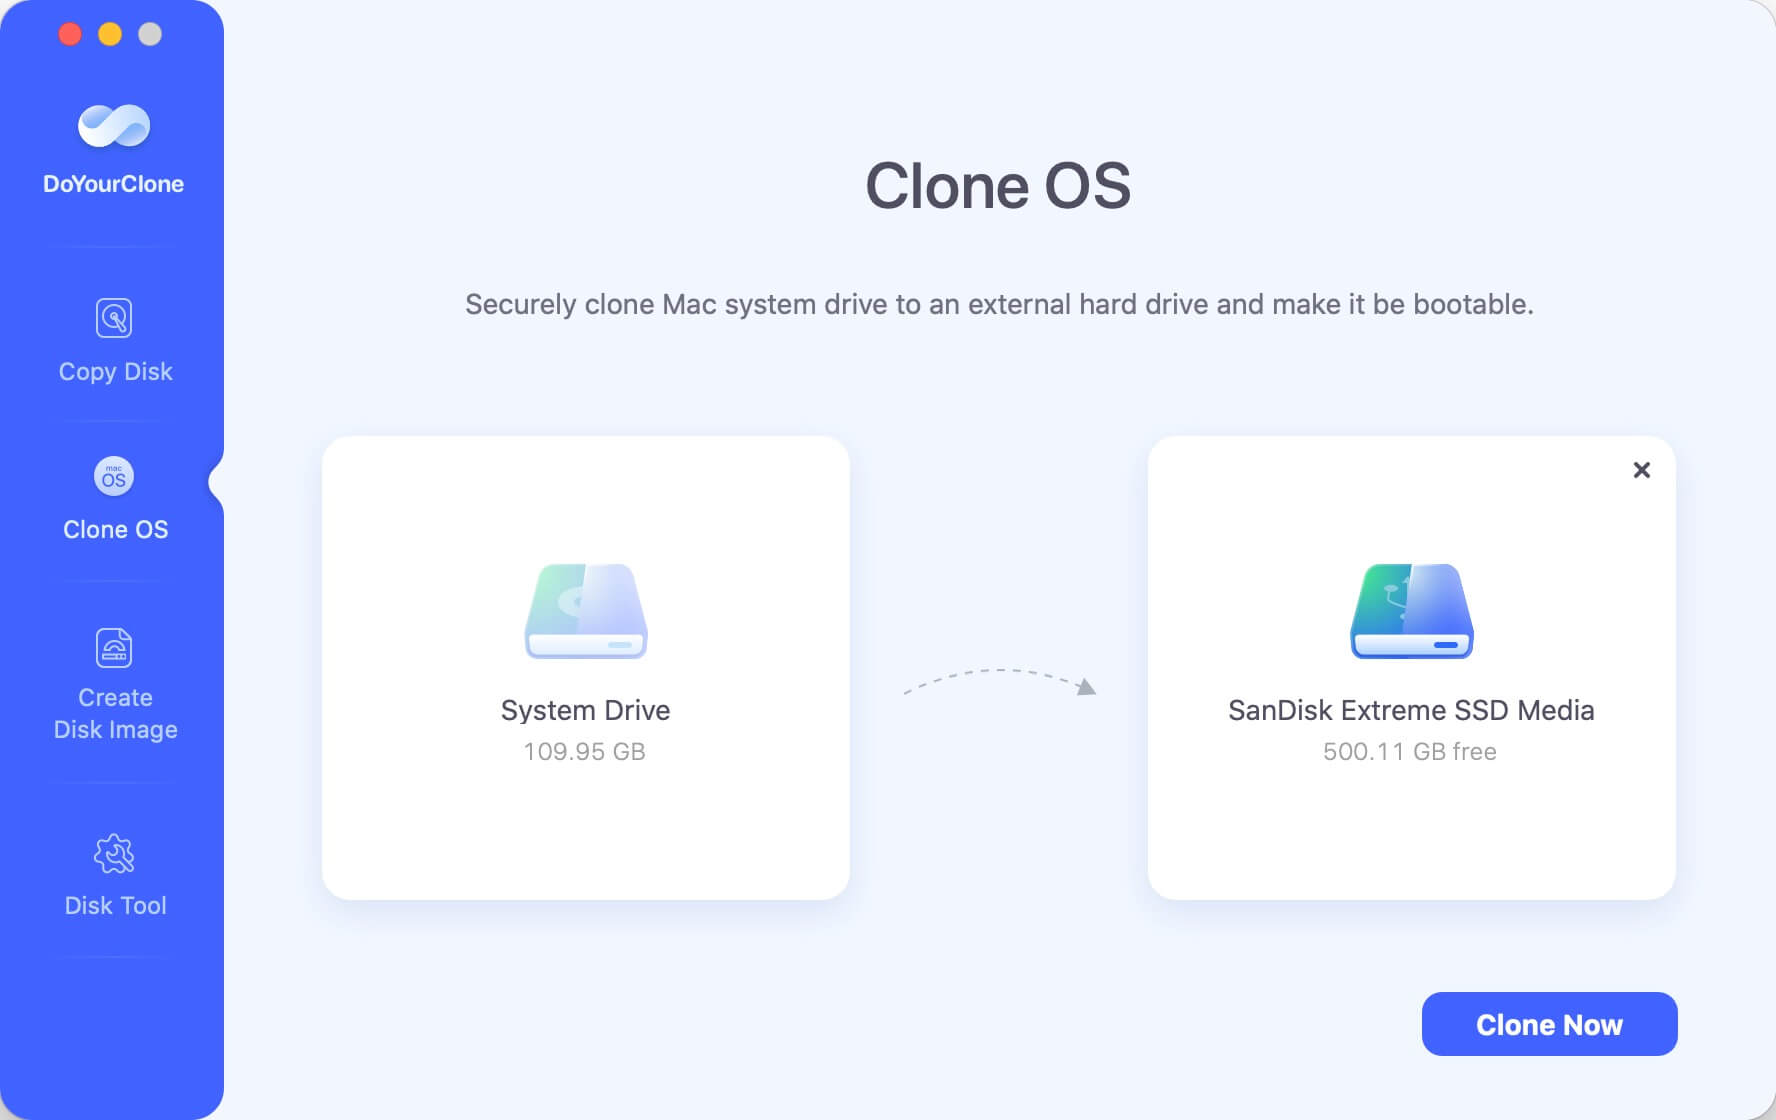
Step 2. Click on Clone Now button to completely clone all data from the Mac internal disk to the external hard drive. Once the process gets finished, you can open the external hard drive and check the cloned data.

4. Verify the Clone
Boot from the Clone:
- Restart the Mac while holding down the Option key. It makes the Startup Manager run. If you are using an Apple silicon Mac, just restart the Mac, press and hold Power button until it boots into macOS Recovery mode.
- There will be a list of bootable drives on your Mac.
- Find the drive that has your working copy on it. It could have the name of your external drive or the name you picked for the copy.
- Use the arrow keys on your computer to choose the bootable clone drive, then press Enter.
- The clone should make your Mac startup. You'll see your familiar macOS surroundings if everything goes well.
Check Data Integrity:
- Check all your files and programs to ensure they are there and working.
- Run a few programs from the cloned drive to ensure they work correctly.
5. Proceed with the macOS Sequoia Upgrade
Now that you have a clone that can be confirmed to boot, you can move on to the macOS Sequoia upgrade. How to do it:
- Download macOS Sequoia: Go to the Mac App Store and download the macOS Sequoia software.
- Start the Installation: To start the process, follow the steps shown on the screen. During the process, your Mac will restart.
- Monitor the Upgrade: Ensure your Mac is plugged in, and don't stop the update process.
6. Post-Upgrade Steps
Once you've upgraded to macOS Sequoia, do the following to finish setting up:
- Update Software: Install any changes available for your apps to ensure they work with the new macOS.
- Restore Data: You can restore particular data from your bootable copy if necessary.
- Test System Stability: Use your Mac regularly for a few days to ensure everything is fine.
Troubleshooting Tips
Here are some things you can try if you run into problems during the cloning or upgrading process:
Clone Verification Issues:
- If the clone doesn't start up, try the process again.
- Ensure there is enough room on the external drive and it is formatted correctly.
Upgrade Problems:
- You can boot from the clone and try the upgrade again if it doesn't work the first time.
- Before trying to upgrade again, make sure that the hardware or program is still compatible.
Data Loss:
- To get back any lost info, use the clone.
- Back up important files often, even after the change.
Conclusion:
Making a bootable copy of your data before upgrading to macOS Sequoia protects it and gives you a backup if something goes wrong during the change. If you follow this guide, you can make an exact copy of your system that can be booted.
It will let you get back to normal quickly if you need to. This part of getting ready is necessary for the upgrade to go smoothly and without problems. If you take the time to do this, you can enjoy the advanced features of macOS Sequoia, knowing you have a backup in case something goes wrong.
FAQs About Creating Bootable Clone Before Upgrading to macOS Sequoia
1. How to create a full bootable clone backup before or after upgrading to macOS Sequoia?
DoYourClone for Mac is a powerful disk cloning program and it supports to create full bootable clone backup for macOS Sequoia, Sonoma, Ventura, Monterey, Big Sur and other macOS versions.
- Download and install DoYourClone for Mac.
- Connect an external hard drive to your Mac.
- Open DoYourClone for Mac, choose Clone OS mode.
- Select the external hard drive as the destination drive.
- Click on Clone Now button.
- Clone all data from Mac internal disk to the external hard drive.
2. What is the best disk cloning software for cloning data before upgrading to macOS Sequoia?
Here is the list of top 5 disk cloning software for macOS Sequoia and other macOS versions:
- DoYourClone for Mac
- SuperDuper!
- Carbon Copy Cloner
- Donemax Disk Clone for Mac
- AweClone for Mac
3. How to recover lost data after upgrading to macOS Sequoia?
If you have lost data due to macOS Sequoia upgrade, you can use Mac data recovery software to get the lost data back.
- Download and install Do Your Data Recovery for Mac.
- Open this Mac data recovery software, select the internal disk.
- Click on Scan button.
- Preview and recover lost files.
DoYourClone for Mac
DoYourClone for Mac, one of the best Mac disk cloning software, can help you clone HDD, SSD, external storage device on Mac, upgrade HDD to SSD, create full disk image backup, etc. It also can clone everything from your Mac to an external HDD/SSD and create a full bootable clone backup. 100% safe and easy-to-use.
Written & Updated by Anderson
Anderson is a big fan of computer technology. He joined DoYourData in 2018 and has been writing 200+ articles about disk clone, data recovery, computer technology, data erasure, Mac system optimization, etc. He loves music, movie, and reading. In his spare time, he’s studying music and playing tennis.