
Quick Navigation:
- Understanding Duplicates and Deletion on Mac
- Quick Check Before Recovery
- Using Built-in Mac Tools for Recovery
- Using Third-Party Recovery Software
- Preventive Measures and Best Practices
- Conclusion
Accidentally deleting files or folders on your Mac can be frustrating, especially if those files were duplicates that you thought were unnecessary but turned out to be crucial. Deleting duplicate files is a common task for Mac users to free up space, but the process can sometimes lead to unintended deletions, resulting in the loss of important data. In this article, we will explore several ways to recover deleted duplicate files or folders on a Mac, including quick checks, using built-in tools, and using third-party software solutions.
Understanding Duplicates and Deletion on Mac
What are duplicate files and folders?
Duplicate files and folders are identical copies of the same data stored in multiple locations on your computer. These duplicates can accumulate over time due to various reasons:
- Backups and syncs: When you back up or sync your data, files may get duplicated.
- Multiple downloads: Downloading the same file multiple times or saving attachments from emails can create duplicates.
- Copy and paste errors: Sometimes, while organizing files, you may accidentally copy and paste the same files into multiple folders.
While duplicates can be harmless, they can consume valuable disk space, slow down your system, and make it difficult to locate the right file.
How duplicate files and folders are deleted?
Duplicate files and folders can be deleted in a variety of ways, either intentionally or accidentally. Understanding these scenarios can help you avoid accidental deletions in the future.Here are some common scenarios:
🧑💻Manual deletion: Users may manually delete what they perceive to be unnecessary duplicates, sometimes without realizing that the files are needed elsewhere or that the duplicates contain unique content.
🧹Automatic clean-up tools: Tools designed to optimize your Mac's storage might automatically identify and delete what they classify as duplicate files. While these tools are often useful, they can sometimes mistakenly delete files that should have been retained.
🗑️Emptying the trash: When users empty the Trash on their Mac, all files within it are permanently deleted, including any duplicates that may have been placed there unintentionally.
⚠️System errors: Although rare, system errors or crashes can sometimes result in the unintended deletion of duplicate files and folders.
Quick Check Before Recovery
Before diving into more advanced recovery methods, you should perform some quick checks to see if the deleted duplicates can be easily recovered.
Check the Mac Trash
The first place to look for deleted files on your Mac is the Trash bin. When you delete a file, it is usually moved to the Trash rather than being permanently deleted. Here's how to check:
1. Click on the Trash icon located in the Dock.
2. Use the search bar at the top-right corner to find the files by name or file type.
3. If you find the deleted duplicates, right-click on them and select Put Back to restore them to their original location.

If the files have been emptied from the Trash, move on to other recovery methods.
Check recent backups
If you regularly back up your Mac using Time Machine or other backup software, you might be able to recover the deleted duplicates from your backups.
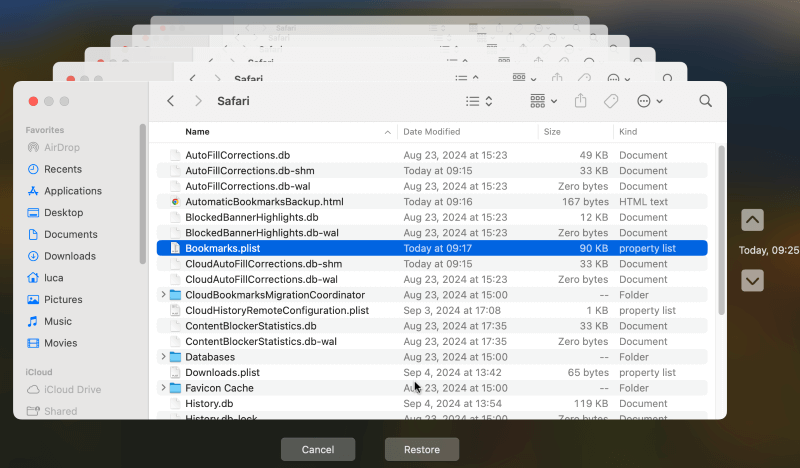
1. Click on the Time Machine icon in the menu bar and select Browser Time Machine Backups (or Enter Time Machine).

2. Use the timeline on the right side to navigate through different backup points. You can search for the files or navigate to the folder where the files were located.
3. Once you find the deleted duplicates, click Restore to recover them to their original location.
If you do not use Time Machine or another backup tool, continue to the next section.
Using Built-in Mac Tools for Recovery
Using Mac Terminal commands
If the quick checks did not yield results, you can use Terminal, a powerful command-line tool, to recover deleted files. Here are some steps:
1. You can find Terminal in the Utilities folder within Applications.
2. If you suspect that the files were moved or renamed rather than deleted, use Terminal commands to search and recover them. For example:
Enter the command sudo find /PATH -name "FileName" to search for the file.
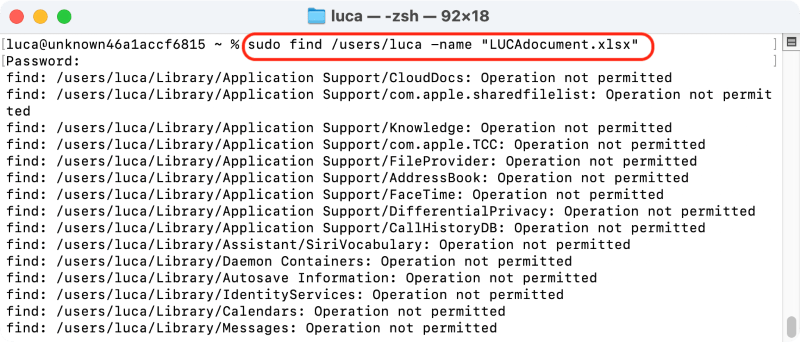
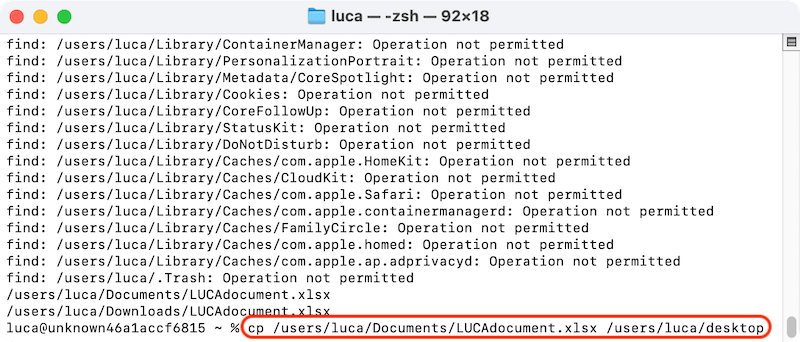
3. Use the command cp /PathToFoundFile /DestinationPath to copy the file back. Or use the command mv /PathToFoundFile /DestinationPath to move the file back.
Utilizing the Finder search function
Finder is another tool you can use to locate files that might have been moved or renamed.
1. Open Finder, and in the search bar, enter the name or file type of the deleted duplicate.
2. Make sure to select "This Mac" to expand the search scope to the entire computer.

3. Check the file locations to see if they were moved or renamed.
If you still cannot find the files, using third-party recovery software might be your best option.
Recovering from iCloud
If you use iCloud to sync files across your devices, there's a chance that your deleted duplicates may still be recoverable from iCloud Drive. iCloud keeps deleted files for up to 30 days before permanently removing them.
To recover deleted duplicates from iCloud:
1. Open a web browser and go to the iCloud website. Log in with your Apple ID.
2. Click on "iCloud Drive." In the bottom-right corner of the screen, click on "Recently Deleted."
3. Browse the list to find the duplicate files or folders you wish to recover. Select the files and click Recover.
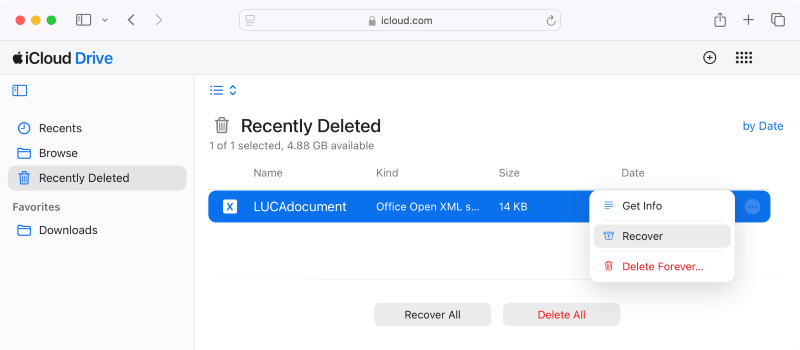
The files will be restored to your iCloud Drive and will sync back to your Mac.
Using Third-Party Recovery Software
When built-in tools fail to recover deleted files, third-party recovery software can offer a more comprehensive solution. These programs are designed to scan your hard drive at a deeper level to find and recover deleted files, even if they are no longer visible in the Finder or Trash. Do Your Data Recovery for Mac is the best one to recover deleted or lost files on Mac.
Overview of this popular Mac data recovery software
🔺A popular data recovery tool that supports recovering various file types and is compatible with Mac.
🔺Known for its user-friendly interface and powerful recovery capabilities, this tool supports file recovery from different devices and storage types.
🔺As a Powerful recovery tool, it offers advanced scanning options to recover lost data in different data loss scenarios.
Do Your Data Recovery
- Most effective data recovery software for Mac.
- Recover deleted or lost data in different data loss situations.
- Support different storage devices and file types.
Step-by-step guide to using the recovery tool
Here's a general guide for using the Mac data recovery tools:
Step 1. Download and run the software: Download the data recovery software and install it on your Mac. Run the software and then select the drive where the files were deleted.

Step 2. Run a scan: Click the Scan button and the software will start to scan the drive you selected. The software will deeply scan the drive to find all the deleted files.

Step 3. Review the results: Once the scan is complete, review the list of found files. Also, the software will display previews to help you identify the correct files.

Step 4. Recover the files: Select the files you wish to recover and click the Recover button, choose a destination for them.
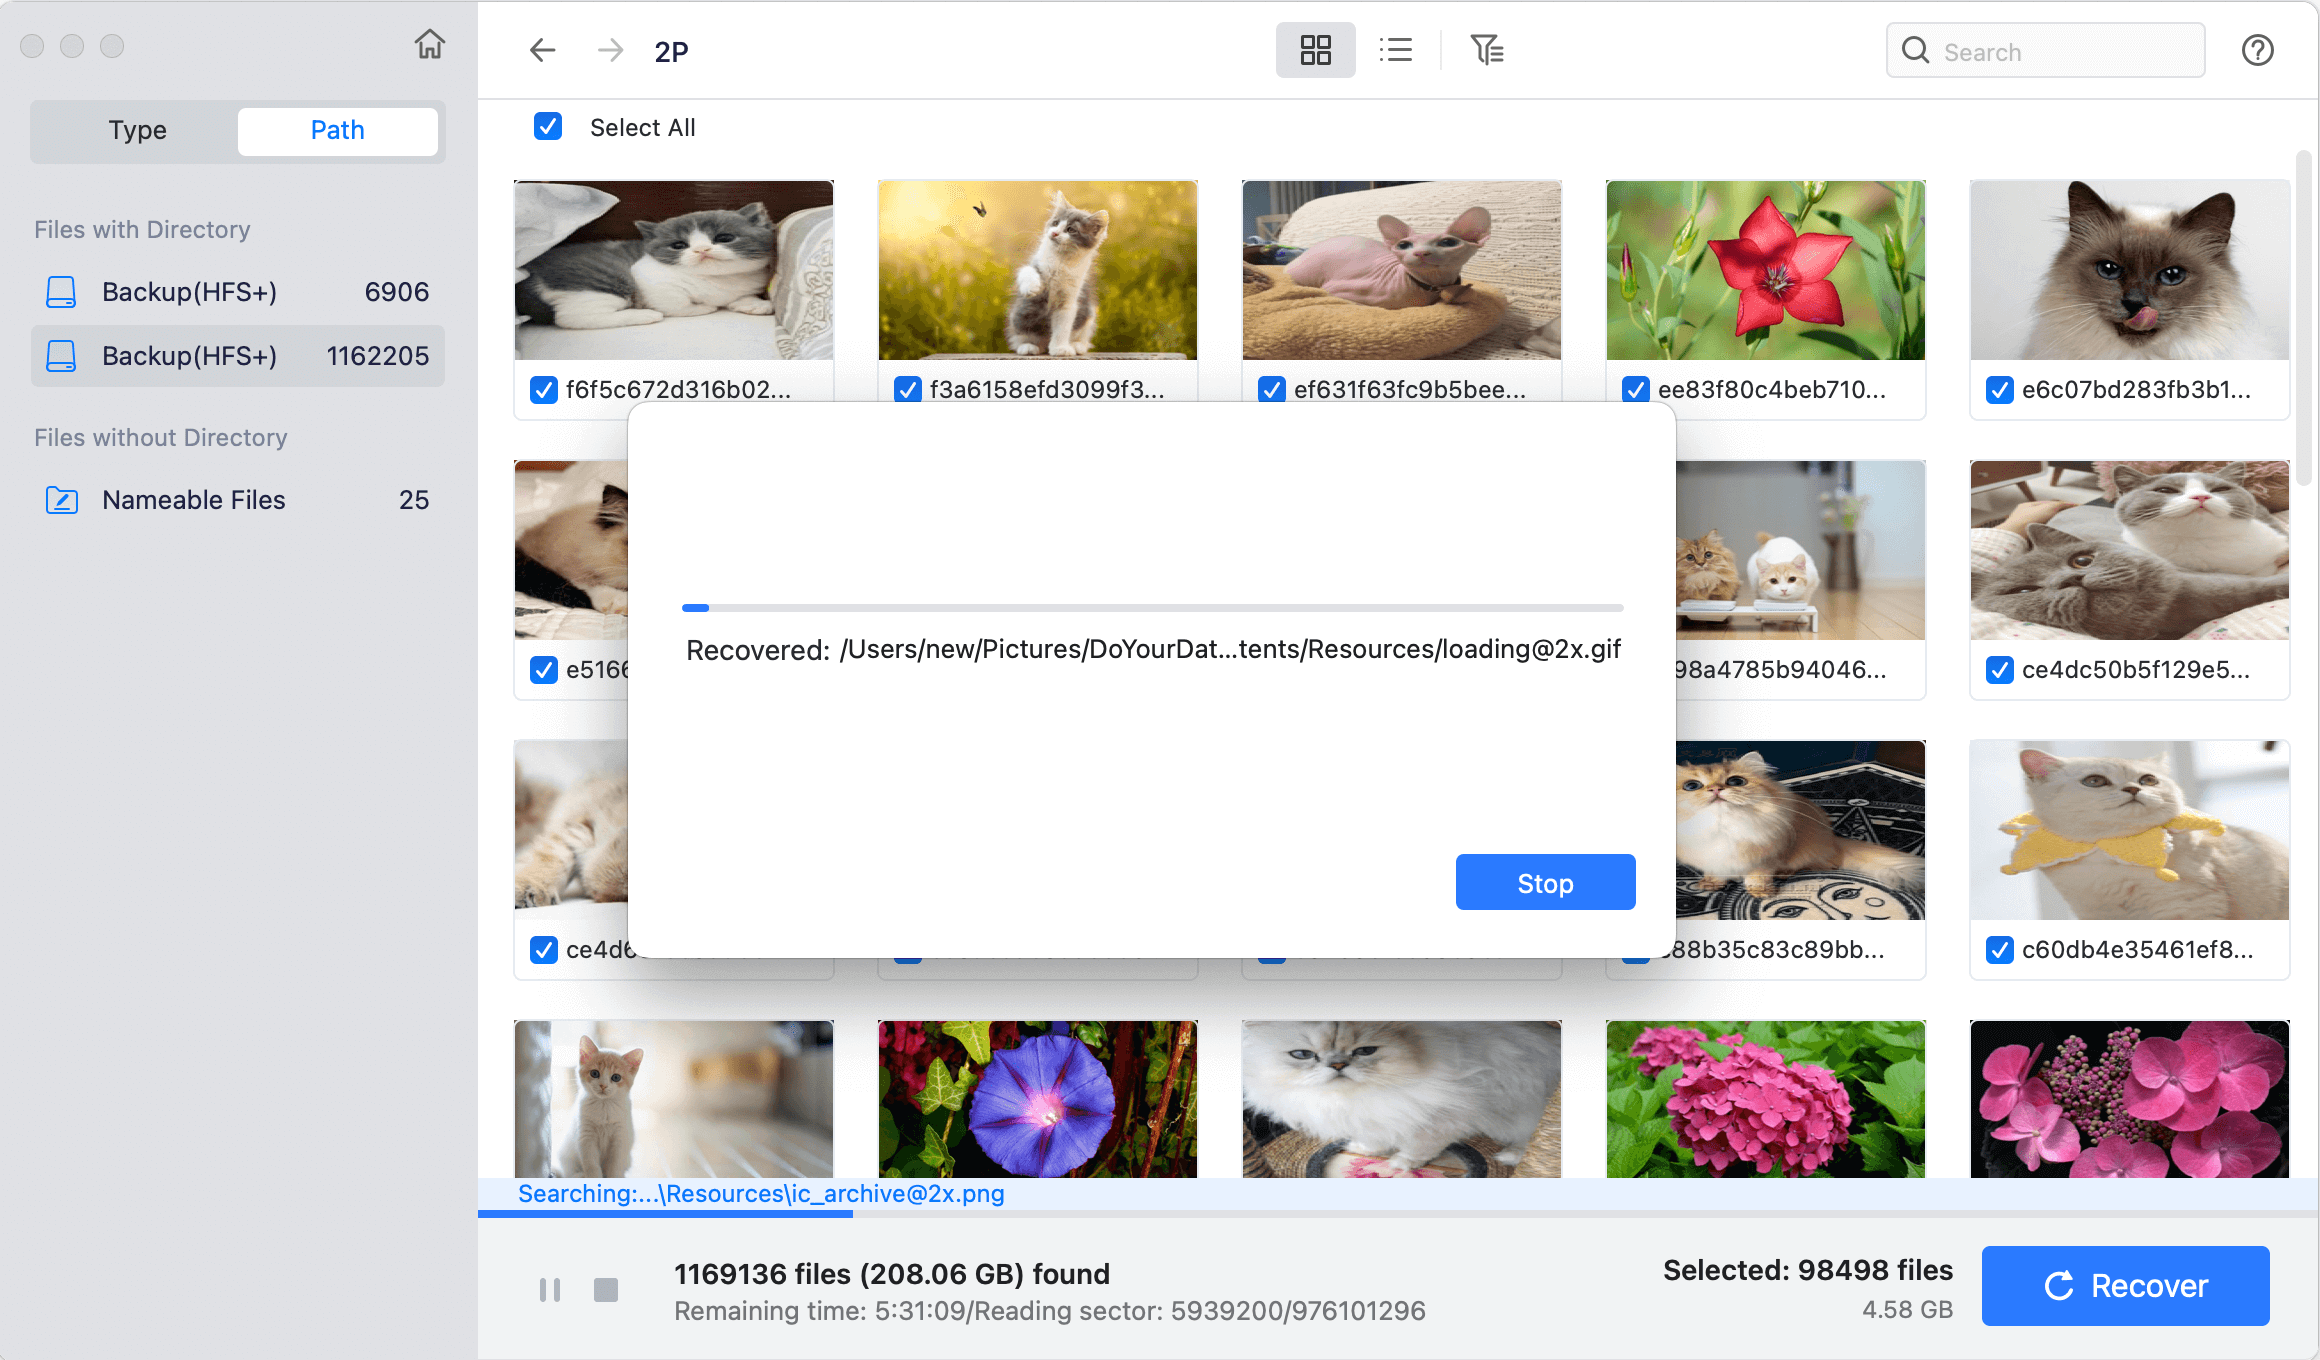
👀 Note: It's advisable not to save recovered files to the same drive to avoid overwriting.
Preventive Measures and Best Practices
Preventing data loss is always better than recovering lost files. Here are some preventive measures to consider:
- Use Time Machine, cloud backups or backup app - Regular backups using Time Machine or cloud services like iCloud, Dropbox, or Google Drive ensure you always have a copy of your important files. Set up automatic backups to keep your data secure. You can also use third-party app to clone or back up files, like DoYourClone for Mac.
- Review duplicates before deletion - When using duplicate file finder tools, always review the list of detected duplicates carefully. Many tools offer a preview feature that allows you to check file contents before deletion.
- Adjust settings to avoid accidental deletion - Most tools have settings that allow you to customize how duplicates are detected and handled. Adjust these settings to prevent accidental deletions.
- Create a system for file organization - Develop a consistent naming convention and file organization system to avoid duplicates. Regularly clean up your files and folders to reduce clutter and prevent unnecessary duplicates.
- Use tags and smart folders - Use macOS's built-in tags and smart folders to organize and locate files efficiently. This can help you keep track of duplicate files and manage them better.
Conclusion
Accidentally deleting duplicate files or folders on a Mac can be a stressful experience, but with the right tools and techniques, recovery is often possible. Start by checking the Trash bin and recent backups, then use built-in tools like Terminal and Finder. If these methods don't work, turn to third-party Mac data recovery software for a more in-depth solution. Finally, adopting preventive measures like regular backups and careful file management can help minimize the risk of accidental deletions in the future.
By following these steps, you can recover your lost files and protect your valuable data, ensuring your Mac runs smoothly and efficiently.
Do Your Data Recovery for Mac
Do Your Data Recovery for Mac, one of the best Mac data recovery software, can help you easily and completely recover deleted, formatted or lost files from Mac HDD/SSD, external HDD/SDD, USB drive, memory card, digital camera, or other storage devices.