How to Create Bootable Clone Backup for Mac?
Clone everything (macOS, apps, settings, user files including) from Mac internal disk to an external HDD/SSD and make a bootable clone backup. Read more >>

Quick Navigation:
"Hi, I am a video editor. Last night, I saved 5 videos on my MacBook's desktop and the I checked software update and found a new OS update, clicked update. This morning, when the update was completed, I found all the videos were gone and I could not find them in trash bin or any other folder on my Mac. What should I do? How to recover lost videos from Mac?" - Monica

Many people edit their videos on a Mac because it has high-quality video editing software. Video editing on a Mac is a great tool, but it's easy to delete clips by mistake or get them lost in the shuffle while moving them to an external disk. Without a doubt, data loss will occur.
Many customers believe the films are permanently erased from the Mac after being emptied from the Trash. The good news is that you may use the methods provided in this article to retrieve the videos you accidentally erased on your Mac.
Data loss on Mac would happen in some cases, like deleted files, formatted drive, or lost files due to system updates, file system corruption, etc. However, the lost data is not gone forever in most cases, there is chance to recover the files. Here are the reliable methods which will help you retrieve the lost files.
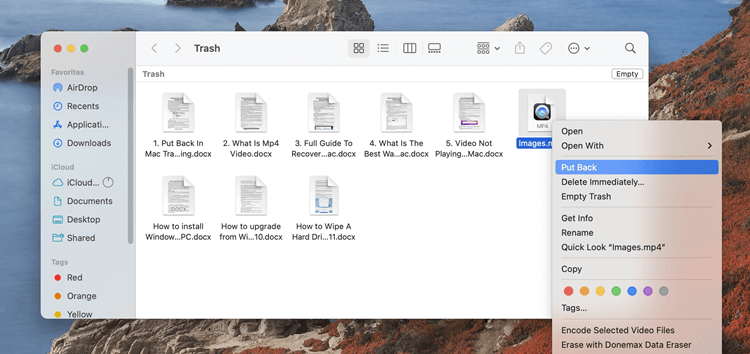
When you remove a video or other file, the first place you should look is the Trash Bin. Here are the measures you should take to retrieve a video from the Trash:
To open Trash, choose it from the dock and click the Trash Bin icon.
Find the lost video that you need to restore. The trash container's contents may be categorized in several ways.
Select Put Back from the menu when you right-click the file you want to restore. There will be no delay in returning the file to its previous location.

If you're using iCloud to back up your videos and accidentally delete one, don't worry. There's still a possibility you may find it in the Recently Deleted album on your computer. If you remove anything from iCloud, it will remain there for 30 days. To get them back, try these steps:
Visit iCloud.com from your web browser and sign in.
On the iCloud website, choose Photos.
Find the deleted videos you wish to retrieve by clicking their thumbnails in the Recently Deleted section on the left sidebar. When you're done, choose Recover from the window's upper right menu.

The iPhoto library on a Mac running Mac OS X Mavericks (version 10.9) or earlier may allow you to recover movies you accidentally erased. The Photos program, which replaced iPhoto in OS X Yosemite (10.10), is used by most Mac users. Therefore we've opted to include instructions for recovering lost videos from it.
To get your videos back from iPhoto, do as follows:
Launch the iPhoto program > Choose Trash from the side menu. You will see all the recently deleted files.
Simply right-click the videos you wish to restore and choose Put Back from the menu.

To retrieve lost video clips from your Photos collection, do as the following steps:
Click and open the Photos app from Dock. Select Recently Deleted from the list of options on the left sidebar.

Check and choose the deleted video(s) you want to restore in the right side. Then click on the Recover button to restore the video(s).
Data recovery software is a good method to recover deleted, formatted or lost files on Mac. When you can’t find lost videos in Trash or backup location, just try data recovery software. Do Your Data Recovery for Mac is a perfect data recovery application for both Windows OS and Mac OS. It can help you securely recover any type of lost file from HDD, SSD, USB flash drive, SD card, etc.
When you find your videos are lost, don't save new data to your Mac. Immediately download Do Your Data Recovery for Mac and install it on your Mac:
After installing the software, just take a few steps to get lost videos back.
Step 1. Open Do Your Data Recovery for Mac and then select the hard drive where you lose your videos. If you want to recover lost videos from an external device, just connect it to your Mac.

Step 2. Click on Scan button. It will deeply scan the selected hard drive and find all recoverable files including video files.

Step 3. Once the scan is complete, you will be given the option to Recover all or Review what was detected. When using the latter, you may refine your search for specific data by clicking the filter button next to the Search box. It is possible to categorize all the retrieved data. To find your videos faster, you may sort by video type.
Select the videos you want to recover and then click on Recover button to save the videos.

If you have backed up your Mac with Time Machine before the videos be deleted, just try to recover lost videos from Time Machine backup. Here you can follow the below procedure to do that:
Click Apple menu and click System Settings or System Preferences > Open Time Machine > Make sure the Show Time Machine in the menu bar option is checked > Click on the Enter Time Machine (or Browse Time Machine Backups) button from Mac menu bar.
Then you can check all Time Machine backups, select a backup which contains your lost videos, select the videos and click on Restore button.

Some users may back up Mac data using a third-party data backup or disk cloning software. If so, just open the backup disk to find the lost videos and recover them with the specified backup tool.
We are all vulnerable to data loss, and it always seems to strike when we least expect it. Therefore, you should frequently back up your Mac to avoid any unwelcome surprises. For example, DoYourClone for Mac can help in easily creating a bootable clone backup for Mac.
How to Create Bootable Clone Backup for Mac?
Clone everything (macOS, apps, settings, user files including) from Mac internal disk to an external HDD/SSD and make a bootable clone backup. Read more >>
You may avoid future anxiety by always having a backup, whether it's using iCloud, Time Machine, or some other methods. Even if you weren't expecting data loss, you might get back even erased videos on a Mac using data recovery software.
Before you sell or donate a Mac, it's important and necessary to delete your private videos permanently. As you've seen, the deleted or lost videos on Mac can be recovered by data recovery software, if you don't permanently delete the personal files before delivery the Mac to another one, it's easy to suffer data leakages. So, what is the right way to shred a video file on Mac permanently?
Data erasure software can help you securely and permanently erase data on Mac so that the data is gone forever and becomes unrecoverable.
DoYourData Super Eraser for Mac can help you securely and easily delete videos permanently from Mac. Just download and install the software on your Ma, run the software and select the first mode Erase Files/Folders, add the video files to the erasure list and click on Erase Now button to permanently erase the selected videos.

📌 Note: Once the videos are erased by DoYourData Super Eraser for Mac, the videos are lost forever, can't be recovered by any data recovery method. So, ensure to choose the correct files to erase.
It's important to backup your data or clone Mac regularly to keep your videos or other files safe. Also, it's essential to check twice before you delete videos or do other operations which will cause data being removed. After deleting videos, it's better to keep the deleted items in Trash in case you still need some deleted files.
Data loss may still happen on Mac in some case due to some unexpected or unintentional wrong manipulation to devices. If you cannot find the deleted/lost videos in Trash or any backup, there is still a chance to salvage the files with the reliable data recovery software Do Your Data Recovery for Mac.
1. Any reliable procedure to find deleted videos on Mac?
To find deleted videos on Mac, please do as follows:
2. How to recover deleted videos with data recovery software?
To recover deleted videos effectively, please ensure to avoid adding new data to the drive where you deleted the videos. Then download and install the software Do Your Data Recovery for Mac on your computer. Then recover the deleted files in 3 steps with the software.
3. How to ensure deleted videos cannot be recovered in any way?
The deleted videos on Mac can be recovered with data recovery software even if the Trash is emptied. To ensure the deleted videos cannot be recovered, you can write new random files to fully occupy the free space of the disk after deleting videos. Of course, there is another easy way, shred the videos files with data erasure software DoYourData Super Eraser for Mac. You can do as follows to shred videos permanently on Mac:

Do Your Data Recovery for Mac
Do Your Data Recovery for Mac, one of the best Mac data recovery software, can help you easily and completely recover deleted, formatted or lost files from Mac HDD/SSD, external HDD/SDD, USB drive, memory card, digital camera, or other storage devices.
