Quick Navigation:
- About the iMac Pro: A Technological Marvel
- Why Data Loss in iMac Pro?
- How to Recover Lost Data from iMac Pro?
- Preventing Future Data Loss on iMac Pro
- Conclusion
- FAQs About iMac Pro Data Recovery
The iMac Pro, an iconic product by Apple, represents the pinnacle of the all-in-one desktop experience, merging the sleek design that Apple is known for with the powerful capabilities typically reserved for high-end workstations. Since its introduction, the iMac Pro has been revered by professionals in various technical fields. However, even with its robust capabilities, like any other computer, the iMac Pro is not immune to data loss. This article delves into the iMac Pro's features and specifications and explores methods for recovering lost data from this advanced machine.
About the iMac Pro: A Technological Marvel
The iMac Pro was first introduced in December 2017 as Apple's most powerful all-in-one desktop computer designed specifically for professional users. It was built with power users in mind, offering top-of-the-line specifications to cater to the needs of professionals working in demanding fields such as video editing, 3D rendering, and scientific computation.

Key Features and Specifications:
The iMac Pro stands out due to its impressive technical specifications and powerful hardware. Here's an overview of what made it a favorite among professionals:
- Processors: At its heart, the iMac Pro is powered by Intel Xeon W processors with options ranging from 8 to 18 cores. This multi-core processor ensures that the machine can handle intensive tasks simultaneously without compromising on performance.
- Graphics: Equipped with Radeon Pro Vega 56 or 64 graphics, the iMac Pro delivers exceptional graphical performance. This makes it ideal for video editing, 3D modeling, and other graphics-intensive tasks.
- Memory: The iMac Pro supports up to 128GB of ECC (Error-Correcting Code) memory, ensuring that data integrity is maintained even in memory-intensive applications. This massive memory capacity allows users to work with large datasets, complex projects, and high-resolution video files with ease.
- Storage: The device comes with SSD storage options ranging from 1TB to 4TB. SSDs are known for their speed and reliability, which significantly reduces loading times and enhances the overall user experience.
- Display: The iMac Pro features a stunning 27-inch 5K Retina display with support for one billion colors. This display offers exceptional color accuracy, making it ideal for professionals in the creative industry who require precise color representation.
- Connectivity: The iMac Pro is equipped with four Thunderbolt 3 ports, four USB 3 ports, an SDXC card slot, and a 10Gb Ethernet port. This wide range of connectivity options ensures compatibility with various peripherals and fast data transfer speeds.
- Design: In true Apple fashion, the iMac Pro boasts a sleek and elegant design. Its space gray finish and minimalist aesthetic make it a beautiful addition to any workspace. Despite its powerful internals, the iMac Pro remains incredibly thin and compact.
Target Audience:
The iMac Pro is designed for professionals who require a high-performance machine capable of handling demanding workloads. This includes video editors, 3D animators, software developers, music producers, and engineers. Its high-end specifications make it suitable for tasks that require significant processing power, memory, and graphical capabilities.
Discontinuation:
In March 2021, Apple officially discontinued the iMac Pro, signaling a shift in its product strategy towards more modular and flexible solutions like the Mac Pro and the introduction of Apple's own M1 silicon-based computers. Despite its discontinuation, the iMac Pro remains a powerful and relevant machine for many professionals. However, like all computers, it is susceptible to data loss due to various reasons, which brings us to the next section.
Why Data Loss in iMac Pro?
Data loss is an unfortunate reality that can affect anyone, regardless of the type of computer or the level of care taken to prevent it. The iMac Pro, despite its advanced technology and reliable storage solutions, is not immune to data loss. There are several common scenarios in which data loss can occur:
- Deletion by Mistake
- Formatting Errors
- File System Corruption
- Hardware Failures
- Malware or Virus Attacks
- Operating System Errors
How to Recover Lost Data from iMac Pro?
Losing important data can be stressful, but there are various ways to recover lost files from an iMac Pro. These methods range from simple built-in solutions to more advanced recovery techniques using third-party free data recovery software.
1. Check the Trash Bin
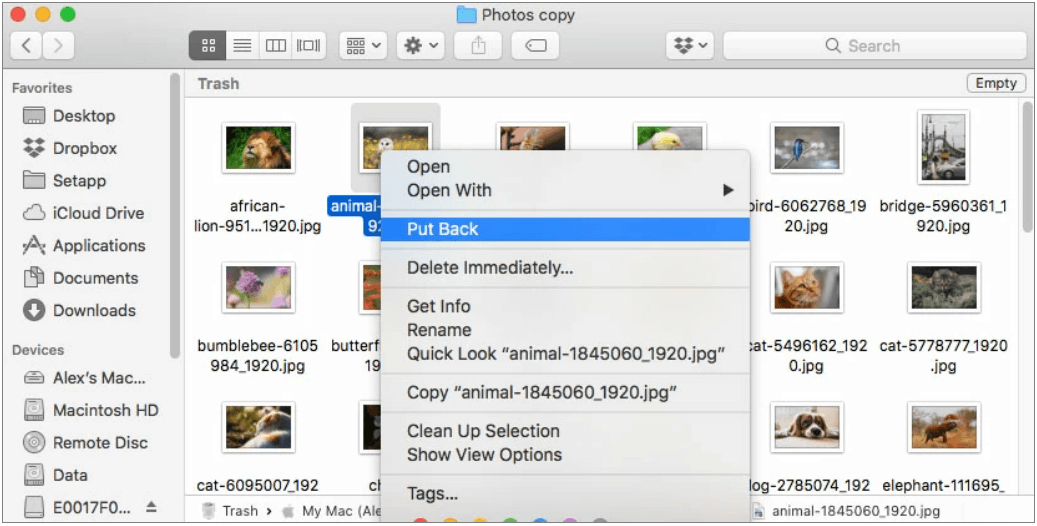
The first step in recovering deleted files is to check the Trash bin. When files are deleted, they are usually moved to the Trash bin, where they remain until the bin is emptied. To recover a file from the Trash:
- Open the Trash bin by clicking its icon in the Dock.
![Recover Lost Data from iMac Pro]()
- Look for the file you wish to recover.
- Right-click on the file and select "Put Back" to restore it to its original location.
![Recover Lost Data from iMac Pro]()
This method is the simplest and should always be the first step when trying to recover deleted files.
2. Use Time Machine Backup
The built-in backup feature of macOS, Time Machine, backs up your data to an external disk automatically. You can quickly retrieve deleted data if you have Time Machine enabled:
- Attach the backup Time Machine drive to your iMac Pro.
- Click on the folder containing the misplaced file.
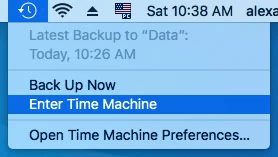
- To access the Time Machine, click on its icon in the menu bar and choose "Enter Time Machine."
![Recover Lost Data from iMac Pro]()
- On the right side of the screen, use the timeline to navigate to a point before the file was deleted.
- Select the file and click "Restore" to recover it.
![Recover Lost Data from iMac Pro]()
Time Machine is an excellent tool for recovering lost data, provided that regular backups have been maintained.
3. Use macOS's Recovery Mode
If your iMac Pro has experienced a severe issue such as a corrupted file system or macOS errors, you may need to use Recovery Mode. Here's how:
- Press and hold the Command and R keys while restarting your iMac Pro until the Apple logo or a spinning globe appears.
- Your Mac will enter Recovery Mode as a result, allowing you to use Disk Utility and other utilities.
- Select your primary drive from the list on the left when you launch Disk Utility.
- Click on "First Aid" to check and repair any disk errors that may be causing data loss.
- If the errors are repaired, your files may become accessible again.

Recovery Mode is a powerful tool for fixing disk errors and recovering lost files, but it should be used with caution.
4. Use Terminal App
If you've accidentally deleted files and they are still in the Trash, you can restore them using Terminal. This method is particularly useful if you're unable to access the Trash through the Finder.
- Open Terminal by searching for it in Spotlight.
- Navigate to the Trash Directory:
cd ~/.Trash
- List the Files in Trash:
Ls
![Recover Lost Data from iMac Pro]()
This command will display all the files currently in the Trash.
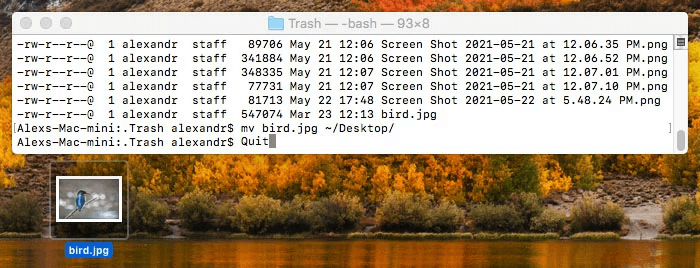
- Move Files Back to Original Location: To restore a specific file, use the mv (move) command:
mv filename /path/to/restore
![Recover Lost Data from iMac Pro]()
Replace filename with the name of the file you wish to restore, and /path/to/restore with the directory where you want to move the file back.
For example, if you want to restore a file called document.txt to the Desktop:
mv document.txt ~/Desktop/
5. Use Third-Party Data Recovery Software
If the above methods do not recover your lost files, third-party data recovery software can be a viable option. These tools are designed to scan your iMac Pro's storage for recoverable files, even in cases of severe data loss.
Do Your Data Recovery for Mac Free is a comprehensive data recovery tool that supports macOS and can recover files from both internal and external drives. It offers a user-friendly interface and supports a wide range of file types.
Do Your Data Recovery for Mac
- Recover lost data from iMac Pro's internal drive, HDD, SSD, USB drive, camera, SD card, etc.
- Recover deleted, formatted or inaccessible data.
- 100% safe and easy-to-use data recovery software for iMac Pro.
Step 1. Download and install this free iMac Pro data recovery software, then run it. Select the drive where you lose your files to start data recovery.

Step 2. Click on Scan button to deeply scan the drive and find all recoverable files including images, videos, documents, folders, emails, archives, etc.

Step 3. Once the scan is completed, you can preview all recoverable files. Then select the wanted files, click on Recover button to save them.

6. Consult a Professional Data Recovery Service
If all else fails, or if your iMac Pro has suffered a severe hardware failure, consulting a professional data recovery service may be necessary. These services specialize in recovering data from damaged or failed drives, often using advanced techniques that are not available to the average user. However, professional data recovery can be expensive, so it's generally considered a last resort.
Preventing Future Data Loss on iMac Pro
While it's important to know how to recover lost data, preventing data loss in the first place is even more crucial. Here are some tips to help protect your data on the iMac Pro:
- Regular Backups: The most effective way to prevent data loss is by maintaining regular backups. Use Time Machine or another backup solution to ensure that your data is regularly saved to an external drive or cloud storage. If you want to create a bootable clone for your iMac Pro, just use disk cloning software to clone everything from the internal drive to an external hard drive.
- Use a UPS: A Uninterruptible Power Supply (UPS) can protect your iMac Pro from power surges and outages, which can cause data corruption or hardware damage.
- Install Antivirus Software: Although macOS is known for its security, installing reputable antivirus software can provide an extra layer of protection against malware and viruses.
- Be Cautious with Software Installations: Only install software from trusted sources to avoid potential conflicts or malware infections that could lead to data loss.
- Use Disk Utility Regularly: Running Disk Utility's First Aid function periodically can help identify and repair disk errors before they lead to data loss.
- Enable FileVault: FileVault encrypts your entire drive, protecting your data from unauthorized access. However, be sure to remember your password and recovery key, as losing them can result in data loss.
Conclusion
The iMac Pro remains a powerful and reliable machine, even after its discontinuation. However, like all computers, it is not immune to data loss. Understanding the potential causes of data loss and knowing how to recover lost files are crucial skills for any iMac Pro user. By utilizing built-in tools like Time Machine and Recovery Mode, third-party data recovery software, or professional services, you can often recover lost data and prevent future incidents. Regular backups, careful usage, and preventive measures are key to safeguarding your data and ensuring that your iMac Pro continues to serve you well in your professional endeavors.
FAQs About iMac Pro Data Recovery
1. What is the best data recovery software for iMac Pro?
Data recovery software can help you recover permanently deleted, formatted or lost data from your iMac Pro:
- Do Your Data Recovery for Mac Free
- PhotoRec
- Cisdem Data Recovery for Mac
- Free Any Data Recovery for Mac
- Stellar Data Recovery for Mac
2. How to recover permanently deleted files from iMac Pro?
Follow these steps to recover lost data from iMac Pro:
- Download and install Do Your Data Recovery for Mac.
- Open this iMac Pro data recovery software, select the internal disk.
- Click on Scan button.
- Preview and recover lost files.
3. How to recover erased hard drive on iMac Pro?
You can use iMac Pro data recovery software to deeply scan the erased hard drive and then find all deleted or lost files.

DoYourData Super Eraser for Mac
DoYourData Super Eraser for Mac is a 100% safe, powerful and easy-to-use data erasure program. It offers certified data erasure standards including Peter Gutmann, U.S. Army AR380-19, DoD 5220.22-M ECE to permanently erase data from Macs and external devices, making data recovery be impossible.


