Home > Hard Drive Solutions for Mac
Can Mac Recognize NTFS Drive? Can Mac Mount NTFS Drive or Read-Write It?
Since macOS Ventura, macOS even can not mount NTFS drive any more. If you want to use an NTFS drive on Mac, just download and install an NTFS driver for Mac. DoYourData NTFS for Mac offers quick way to help to recognize, mount, read-write NTFS drives on Mac.
![]() Updated by Justin Kenny on August 21, 2023
Updated by Justin Kenny on August 21, 2023
Quick Navigation:
- #1 Mac can recognize NTFS drive, but can’t write data to it
- #2 Can we make NTFS drive be read-write on Mac?
- #3 Enable NTFS drive Read and Write on Mac
Mac can recognize NTFS drive, but can’t write data to it
Microsoft's NTFS (New Technology File System) is the standard file format for all Windows PC storage media. Compared to other file systems, such as FAT, it provides significant advantages regarding data transmission speed, stability, and disk space utilization. Unfortunately, it's not compatible with macOS.
Using an NTFS hard drive with macOS will cause a few issues. When you attach an NTFS hard disk to your Mac, the option to mount or unmount it will appear in the Finder's main menu. Your Mac OS will identify it, no doubt.
The data in an NTFS hard drive can be seen on a Mac, but you won't be able to make any changes or remove them since the disk is read-only on the Mac. A Mac can open NTFS files without cost. A Mac can only read NTFS files; creating new ones is impossible.
Can we make NTFS drive be read-write on Mac?
You have read-only access to the NTFS disk and can only view files there. On a Mac, you won't be able to write or change files on NTFS drives, but that is not immutable. You can attempt several approaches to try to alter it.
Enable NTFS drive Read and Write on Mac
1. Format NTFS to FAT32 or ExFAT
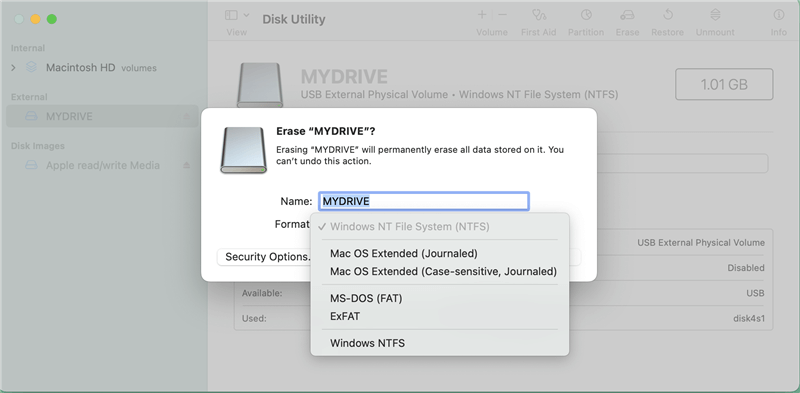
Formatting the NTFS file system to be compatible with macOS is the quickest and easiest approach to make NTFS files readable and writable on a Mac. FAT is compatible with Windows and Mac, so it is the format of choice for this device. External hard drives formatted in NTFS can be converted to APFS, Mac OS Extended, etc., exclusively for Mac computers.
Select Disk Utility in the Utilities menu after clicking Finder. Open Disk Utility.
You may erase an NTFS hard drive by selecting it in the left pane, then clicking "Erase" in the toolbar.
Choose the Microsoft DOS File Allocation Table (FAT) or ExFAT in the new window. Hold tight while finishing formatting.
2. Bootcamp
Apple's Bootcamp is a Windows emulator for Mac computers. That's why it may be used to access and modify files on NTFS drives. It will download everything that is required to operate on a Mac. Unfortunately, it's incompatible with Big Sur and Monterey on macOS, while with 10.15 Catalina and earlier versions.
All previous Time Machine backups will also be removed. If you need to read or write NTFS on a Mac, be sure you haven't recently used Time Machine to back up any crucial data. Putting in Bootcamp will allow you to use Windows on your Mac. After that, data stored on NTFS may be read and written to easily.
3. Upload NTFS Files to Cloud
Users need to be able to read and write to an NTFS hard disk on a Mac. If you need more time to test the methods above to read and write NTFS on Mac, you can always upload NTFS files from a Windows PC to cloud storage and then access them from a Mac.
Popular cloud storage services include Dropbox, Google Drive, and iCloud. It's true that NTFS, a file system used by Windows, is difficult to access on a Mac. Once you choose your path, though, the issue will be easily resolved. You'll need persistence and perseverance to figure things out.
4. Turn on the Terminal's NTFS Hard Drive Writing Capability
By running a command in the Terminal, Mac users may activate NTFS support for writing. Apple still needs to introduce official support for NTFS writing. Because of this, enabling NTFS to write through Terminal is not without risk and may lead to disk damage and data loss. You should create a backup of the NTFS hard disk before enabling NTFS to write in Terminal.
Find Terminal in the list of applications under Utilities in the Finder menu.
Press Enter after typing the sudo nano /etc/fstab.
To log in to a Mac, type the password and hit Enter.
Press Enter after entering LABEL=DRIVENAME. Replace DRIVENAME with the actual name of the hard disk formatted as NTFS.
To open a new window, hit Control + O. Then type Control-X.
Select "Go" > "Go to Folder" in Finder. To access an NTFS disk, enter /Volumes/NAME (where NAME is the drive's name). After that, your Mac can read and write to NTFS drives.
5. Install a NTFS for Mac driver
If you want a quick way to enable read-write for NTFS drive on Mac, you can install an NTFS driver on Mac. This tool can help you enable NTFS read-write on Mac, mount/unmount NTFS drive.
Step 1. Download and install DoYourData NTFS for Mac. Then open it.
Step 2. Connect the NTFS drive to your Mac, select it.
Step 3. Click Enable Writable. Then you can use the NTFS drive as a read-write drive without limitation.

Conclusion:
Macs can theoretically open, edit, and create files saved in the NTFS format. Free NTFS drivers, affordable NTFS drivers, and Apple's inherent NTFS compatibility are all viable alternatives to wiping all data before switching file systems.
It takes extra effort, but the required NTFS drivers and Apple's NTFS support are free to mount an NTFS disk on a Mac in read-write mode. They pose a high risk and are highly erratic.
DoYourData NTFS for Mac is an easy-to-use NTFS for Mac tool. It supports to mount/unmount NTFS drive on Mac and quickly enable writable for NTFS drive on Mac.
Written & Updated by Justin Kenny
Justin Kenny is a writer & editor of DoYourData. He joined DoYourData in 2016 and focuses on writing articles about Windows data recovery, Mac data recovery, external device data recovery, hard drive clone, data erasure, Mac cleanup, computer issue fixes, etc. He is a super fan of Apple devices and is big on testing new digital device and system utility software.