Quick Navigation:
- Importance of External Hard Drives for Data Storage
- 9 Methods to Fix the WD External Hard Drive Not Showing Up Issue?
- Recover Lost Data from Unrecognized/Formatted or Initialized WD External Hard Drive
- Conclusion
- FAQs About Fixing Unrecognized/Not Detected WD External Hard Drive
Note: This article applies to solving WD external hard drive not showing up or not detected on Windows 11/10/8.1/8/7/Vista/Server. If you are a Mac user, go to this page: Fix WD external hard drive not showing up on Mac.
WD external hard drives are a popular choice for expanding storage and backing up important data. However, users often encounter issues where their WD external hard drive is not recognized or detected by their Windows PC. This can be frustrating, leading to concerns about data loss and the inability to access files.

Importance of External Hard Drives for Data Storage
External hard drives provide a convenient and efficient solution for storing large amounts of data. They are essential for:
- Backing up important files: Protecting data against accidental loss or system failures.
- Expanding storage capacity: Offering additional space for multimedia files, software, and documents.
- Portability: Easily transporting data between different computers or locations.
Understanding the causes and solutions for detection issues can help users restore functionality and ensure their data remains secure.
9 Methods to Fix the WD External Hard Drive Not Showing Up Issue?
After investigating extensive user reports and references, we have compiled 10 effective solutions to address the "WD external hard drive not detected on the PC" issue. You can try these methods sequentially until you successfully resolve the error.
Method 1: Change the USB Port/Cable
Connection issues such as faulty USB hubs, cables, dead ports, or mismatched USB interfaces are common culprits. Here's how to address them:
- Reconnect your WD hard drive using a different USB port or a new cable.
- Use a different USB hub or plug the WD hard drive directly into your computer.
- Ensure compatibility: Make sure the computer's USB ports match the disk interface (e.g., USB 3.0 WD hard drive should connect to a USB 3.0 port).
- Power supply: If your WD hard drive has a separate power cable, connect it directly to a wall socket to prevent current loss.
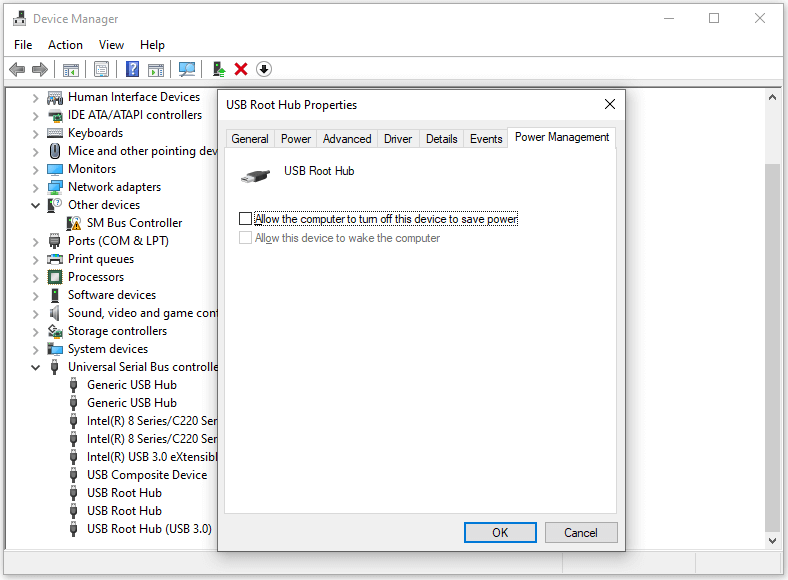
Method 2: Turn USB Root Hub On
If Method 1 doesn't resolve the issue, try enabling the USB Root Hub. Here's how:
- Press the Windows + X keys simultaneously to open the Quick Link menu and select Device Manager.
- Expand Universal Serial Bus controllers.
- Right-click USB Root Hub and select Properties.
- Go to the Power Management tab, uncheck "Allow the computer to turn off this device to save power".
- Repeat these steps for all USB Root Hubs.
- Restart your PC and check if the WD external hard drive appears.
![Fix Unrecognized WD External Hard Drive]()
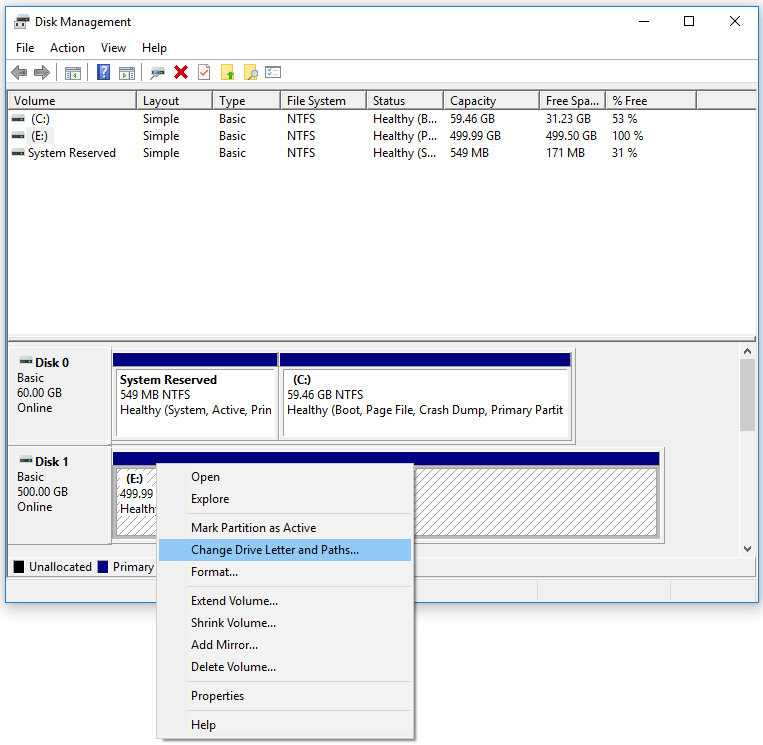
Method 3: Assign or Change the Drive Letter
Sometimes, the WD external hard drive may be hidden on your computer, and assigning or changing the drive letter can help make it visible. Here's how to do it:
- Open the Quick Link Menu: Press Windows + X and select Disk Management from the menu.
- Locate Your External Hard Drive: Find your WD external hard drive in the list.
- Change Drive Letter:
- Right-click on the external hard drive and select Change Drive Letter and Path.
- Click Add or Change, then assign a new letter that isn't already in use on your PC.
- Set Partition as Active: Ensure the partition is marked as Active.
- Confirm and Restart: Click , then restart your PC and check if the WD external hard drive is now detected.
![Fix Unrecognized WD External Hard Drive]()
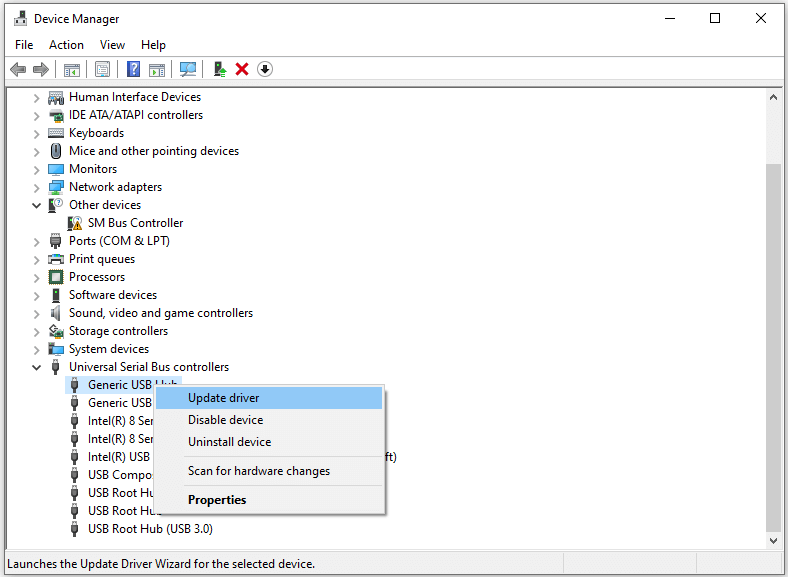
Method 4: Update/Uninstall USB Port and WD External Hard Drive Drivers
Outdated or corrupted USB controllers and WD external hard drive drivers can cause the "WD external hard drive not showing up" issue. Try updating the related drivers first, and if that doesn’t work, reinstalling them might help. Here's how:
- Open Device Manager: Press Windows + X and select Device Manager.
- Expand Universal Serial Bus Controllers: Locate and expand the Universal Serial Bus controllers category.
- Update Drivers:
- Right-click on each USB driver and select Update driver.
- Choose Search automatically for drivers and follow the on-screen instructions to complete the update process.
- Update WD External Hard Drive Driver:
- Under Disk drives, find your WD external hard drive, right-click it, and select Update driver.
- Again, choose Search automatically for drivers and follow the prompts.
If updating the drivers doesn't resolve the issue, try uninstalling them:
- Uninstall Drivers: Right-click on the USB and WD drivers and select Uninstall device.
- Restart Your PC: Reboot your computer, and Windows will automatically reinstall the drivers. Check if the WD external hard drive is now detected.
![Fix Unrecognized WD External Hard Drive]()
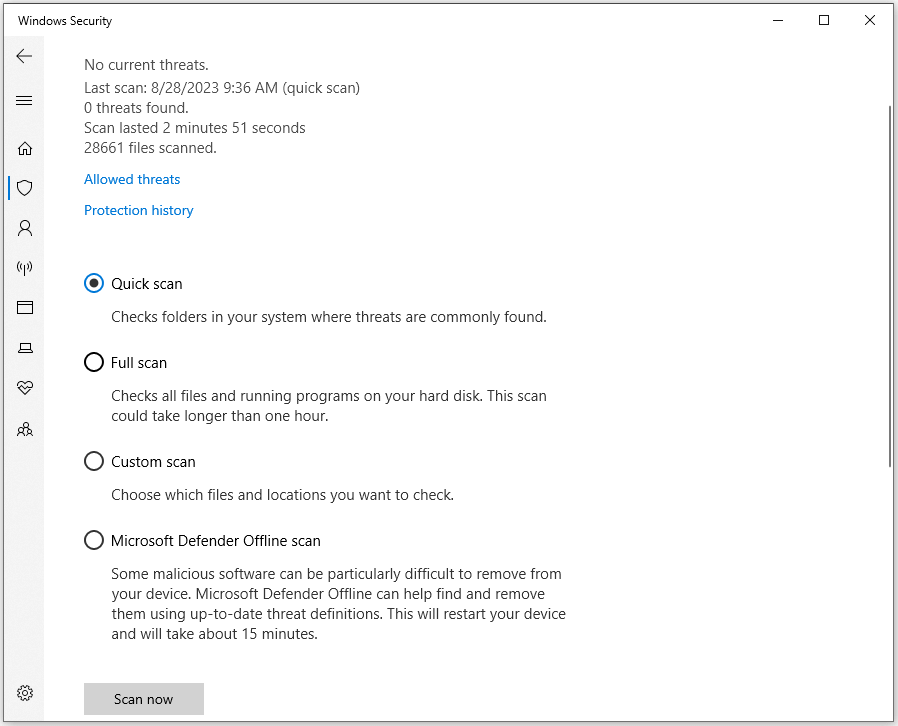
Method 5: Scan for Virus or Malware
A virus or malware infection can also cause the WD external hard drive to not show up. To address this, scan your PC for viruses and malware. Here's how:
- Open Settings: Press Windows + I to open the Settings window.
- Navigate to Windows Security: Go to Update & Security > Windows Security.
- Access Virus & Threat Protection: Click on Virus & threat protection.
- Select Scan Options: Click Scan options in the pop-up window.
- Choose a Scan Type: Select a virus scanning option that suits your needs and click Scan now.
- Complete the Scan: Wait for the scanning process to finish.
![Fix Unrecognized WD External Hard Drive]()
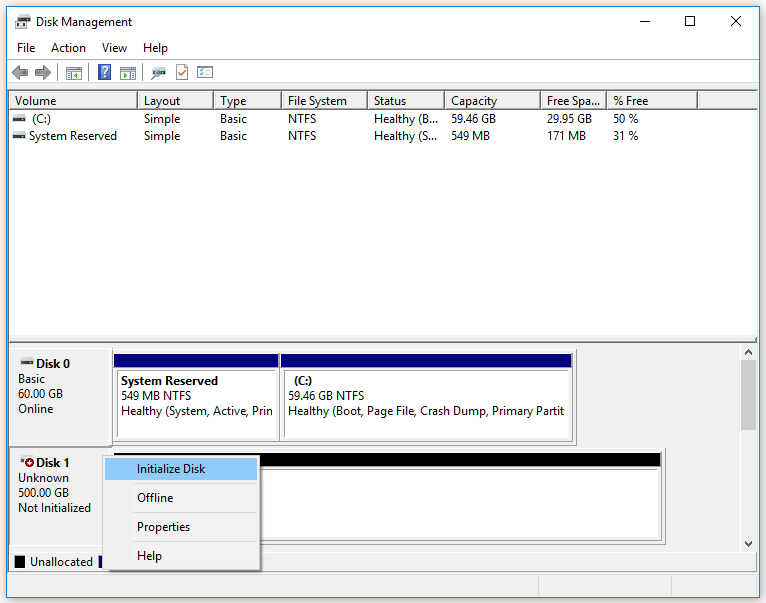
Method 6: Initialize WD Hard Drive in Disk Management
If you're encountering the "WD external hard drive not showing up" issue for the first time, it may not have been initialized. You can resolve this by initializing the drive and creating a new partition. Here's how:- Open Run Window: Press Windows + R simultaneously to open the Run window.
- Launch Disk Management: Type diskmgmt.msc and click OK.
- Locate the Drive: In the Disk Management window, find the new WD external hard drive that is not showing up.
- Initialize the Disk:
- If the drive shows as Not Initialized, right-click on the disk and select Initialize Disk.
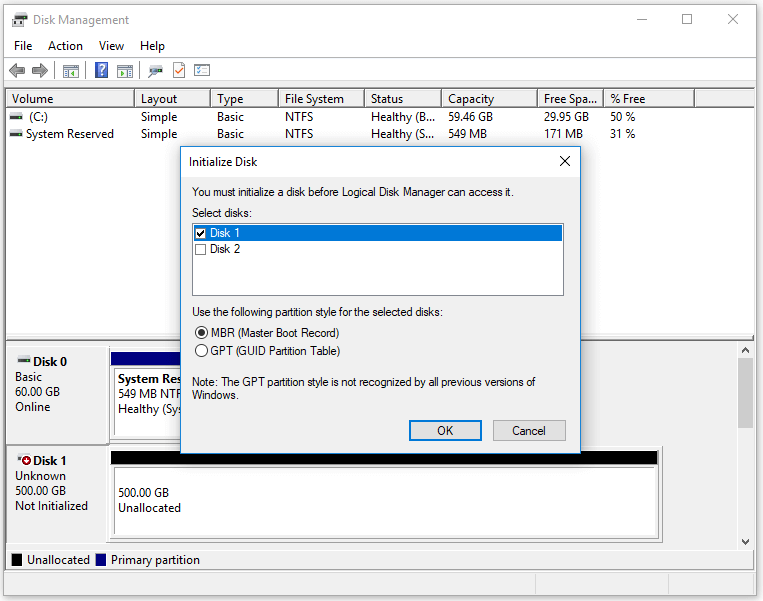
- Follow the prompts to initialize the disk, selecting the partition style (MBR or GPT) as needed.
After initializing the drive, create a new partition and format it. This should resolve the issue and make the WD external hard drive visible on your PC.
![Fix Unrecognized WD External Hard Drive]()
- Choose the partition style MBR or GPT as per your requirements for your WD drive and click OK to initialize the drive.
![Fix Unrecognized WD External Hard Drive]()
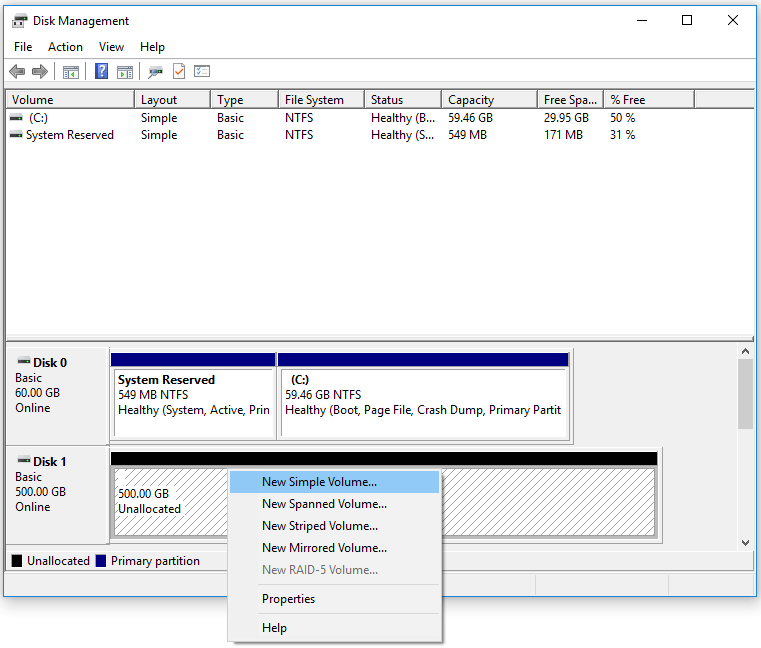
- After initializing the SSD successfully, you need to create and format a new partition. Right-click the unallocated space on the WD drive and select New Simple Volume.
![Fix Unrecognized WD External Hard Drive]()
Method 7: Format WD External Hard Drive to a Compatible File System
If your WD external hard drive is formatted to a file system that Windows cannot recognize or if the file system is corrupted, formatting it to a compatible file system might resolve the WD external hard drive not showing up issue. Before formatting, you can use CHKDSK to check and fix errors. Here's how to proceed:
Step 1: Run CHKDSK
- Open Run Window: Press Windows + R, type cmd, then press Ctrl + Shift + Enter to run Command Prompt as administrator.
- Run CHKDSK: Type chkdsk /f X: and press Enter (replace X: with the drive letter of your WD external hard drive).
- Wait for Completion: Allow CHKDSK to scan and fix any errors on the drive.
Step 2: Format the Drive Using Command Prompt
If the issue persists, use Command Prompt to format the drive to NTFS or FAT32:
- Open Command Prompt as Administrator: Press Windows + X, select Command Prompt (Admin) or Windows PowerShell (Admin).
- Enter DiskPart: Type diskpart and press Enter.
- List and Select the Drive:
- Type list disk and press Enter to view all available drives.
- Identify your WD external hard drive and type select disk X (replace X with the disk number) and press Enter.
- Clean and Create Partition:
- Type clean and press Enter to wipe the drive.
- Type create partition primary and press Enter to create a new partition.
- Format the Drive:
- Type format fs=ntfs and press Enter to format the drive to NTFS. For FAT32, use format fs=fat32.
- Assign a Drive Letter: Type assign and press Enter to assign a drive letter to the new partition.
Step 3: Restart and Verify
- After formatting, restart your PC and check if the WD external hard drive is now recognized.
Method 8: Disable USB Selective Suspend
If you're using a laptop and have USB Selective Suspend enabled for power saving, it might cause the "WD external hard drive not showing up" issue. Disabling this feature could resolve the problem. Here's how to do it:
- Open Control Panel: Press Windows + S, type control panel, and press Enter.
- Navigate to Power Options:
- Set View by to Category.
- Select Hardware and Sound.
- Choose Power Options.
- Change Plan Settings:
- Click on Change plan settings next to your current power plan.
- Click Change advanced power settings.
- Disable USB Selective Suspend:
- Scroll down and expand USB settings.
- Expand USB selective suspend setting.
- Set both On Battery and Plugged In to Disabled.
- Apply Changes: Click Apply and then OK.
After disabling USB Selective Suspend, restart your laptop and check if the WD external hard drive is detected.
Method 9: Change Registry Settings
Some users have found success in fixing the "WD external hard drive not detected" issue by modifying the Windows Registry. Here's how to do it:
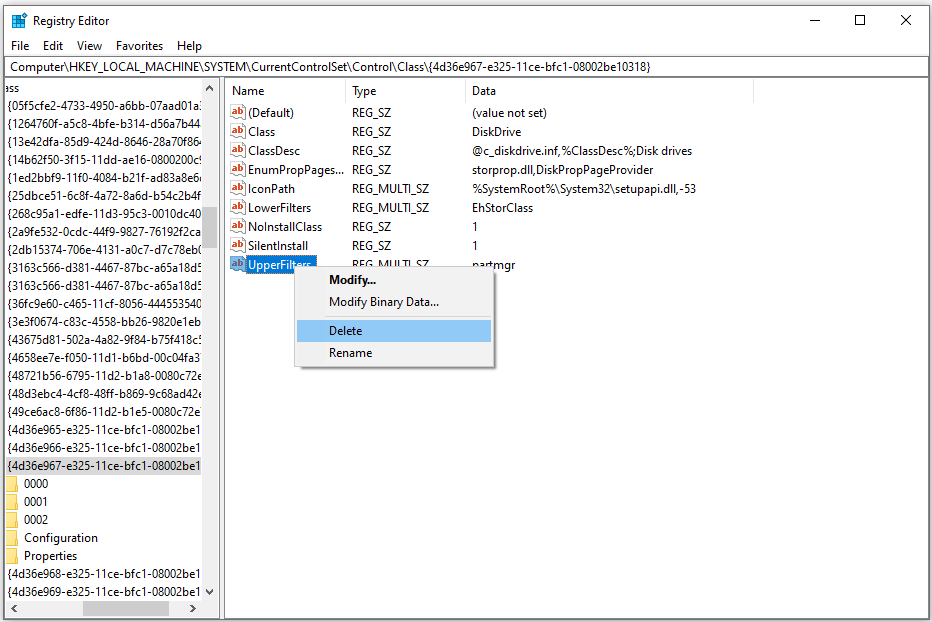
- Open Registry Editor: Press Windows + S, type regedt32, and press Enter. Click Yes in the User Account Control (UAC) prompt.
- Navigate to the Correct Registry Key:
- Go to: HKEY_LOCAL_MACHINE\SYSTEM\CurrentControlSet\Control\Class\{4D36E967-E325-11CE-BFC1-08002BE10318}
- Modify Filters:
- Look for any entries named UpperFilters or LowerFilters on the right side.
- If present, right-click on each entry and select Delete.
- Restart and Retry:
- Close the Registry Editor and restart your PC.
- Check if the WD external hard drive is now recognized.
Proceed with caution when editing the Registry, as incorrect changes can affect system stability.
Recover Lost Data from Unrecognized/Formatted or Initialized WD External Hard Drive
Data recovery software can help you export data from unrecognized WD external hard drive to your computer or recover deleted/formatted data from your WD external hard drive.
Step 1. Download and install the best data recovery program - Do Your Data Recovery on your computer and connect the WD external hard drive to the same computer.
Step 2. Open Do Your Data Recovery, from the drive list, select the unrecognized or formatted WD external hard drive.

Step 3. Click on Scan button. Do Your Data Recovery will deeply scan the WD external hard drive and find all recoverable files including deleted/formatted files, existing files, inaccessible files, etc.
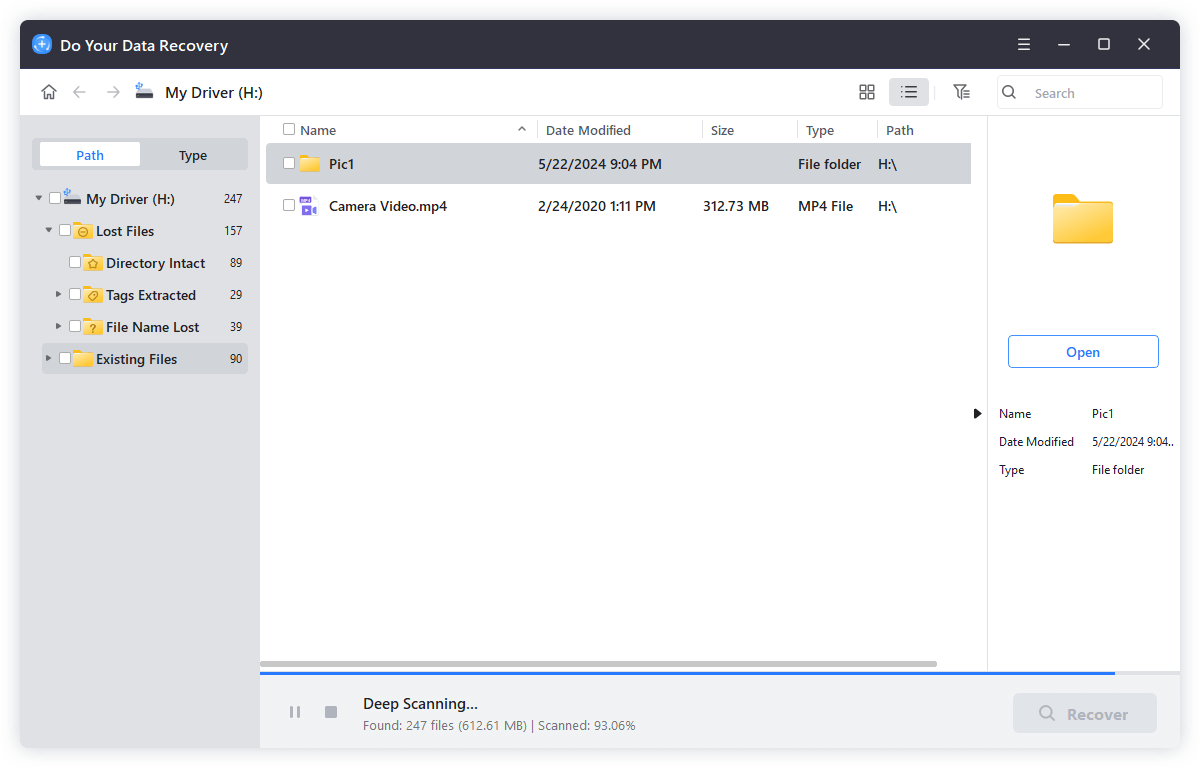
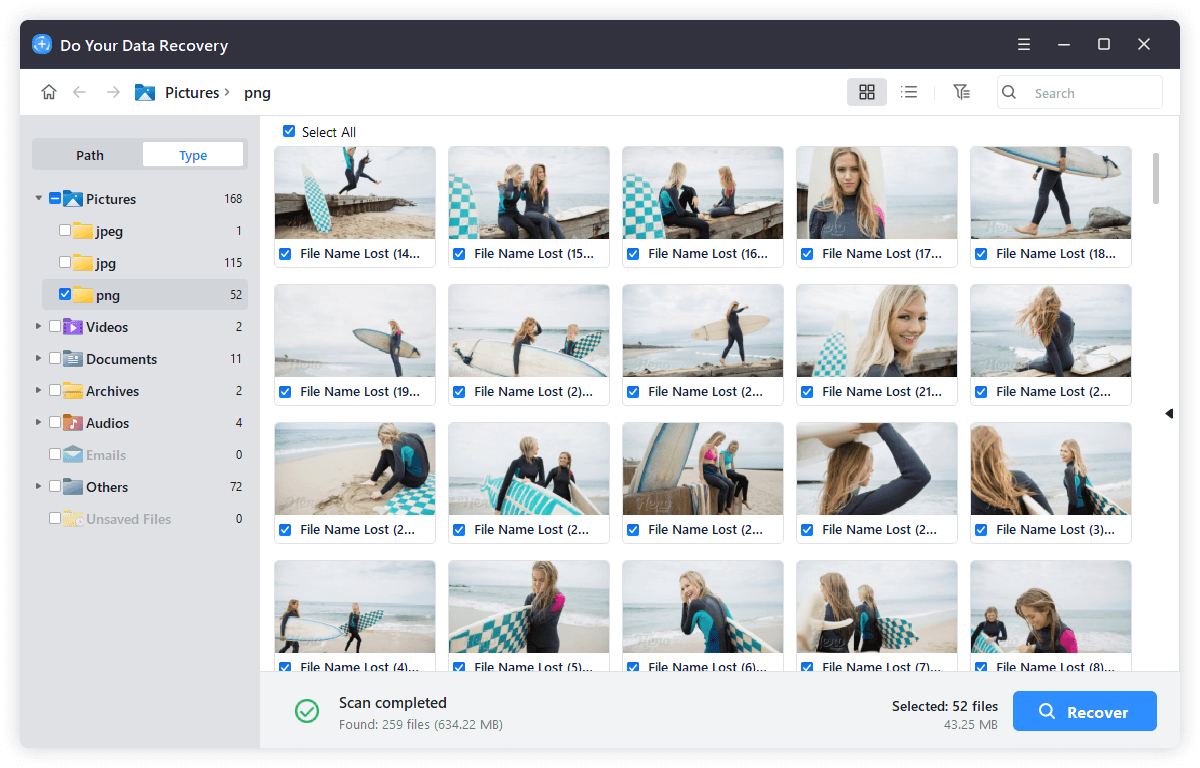
Step 4. Once the scan is completed, select the wanted files and click on Recover button. Select a location to save the recovered files.
Conclusion
If your WD external hard drive is not showing up or being detected on your Windows PC, several potential solutions can help resolve the issue. From basic troubleshooting steps like checking connections and changing USB ports to more advanced solutions such as updating drivers, initializing the drive, and modifying registry settings, each method addresses different possible causes.
FAQs About Fixing Unrecognized/Not Detected WD External Hard Drive
1. How to fix WD external hard drive not showing or not recognized issue?
You can easily fix unrecognized WD external hard drive by using Disk Management or third-party disk formatting tools.
Key Steps to Try:
- Change USB Ports/Cables: Ensure proper connectivity and compatibility.
- Turn USB Root Hub On: Prevent power-saving features from disabling the drive.
- Assign or Change Drive Letter: Make the drive visible in Windows Explorer.
- Update/Uninstall Drivers: Fix issues with outdated or corrupted drivers.
- Scan for Virus/Malware: Eliminate potential infections affecting drive visibility.
- Initialize the Drive: Prepare a new or uninitialized drive for use. Create a new volume.
- Format to a Compatible File System: Resolve file system corruption or compatibility issues.
- Disable USB Selective Suspend: Prevent power-saving settings from interfering.
- Modify Registry Settings: Correct registry issues that may hide the drive.
By methodically applying these solutions, you can troubleshoot and hopefully resolve the issue with your WD external hard drive. If the problem persists after trying all these methods, it may be worth consulting a professional for further assistance or considering the possibility of hardware failure.
2. How to recover lost data from a WD external hard drive?
Data recovery program can help you recover lost data from your WD external hard drive:
- Download and install Do Your Data Recovery on your computer.
- Open Do Your Data Recovery, select the WD external hard drive.
- Click on Scan button to deeply scan the drive.
- Preview and recover lost files after scanning.
Do Your Data Recovery can help you export files from unrecognized/inaccessible WD external hard drive to your computer, recover lost data from initialized or formatted WD external hard drive, etc.
3. How to fix and wipe a WD external hard drive before selling or disposing of it?
DoYourData Super Eraser is a powerful disk wipe software. It can help you fix and wipe a damaged WD external hard drive.
Step 1. Download and install DoYourData Super Eraser, and connect the WD external hard drive to your computer.
Step 2. Open DoYourData Super Eraser, then choose Wipe Hard Drive mode, select the WD external hard drive, click on Wipe Now button.

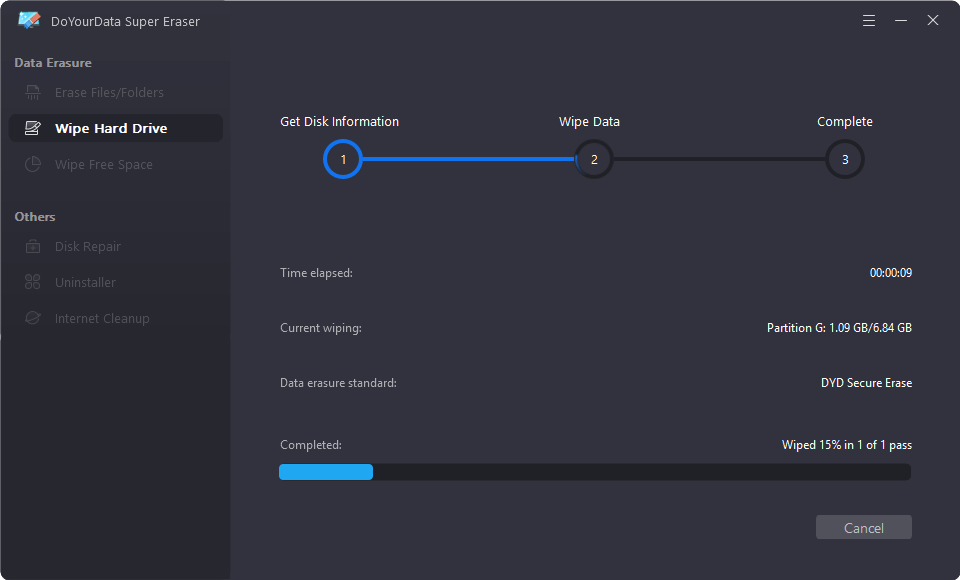
Step 3. Select a data erasure standard, click on Continue button to fix and wipe the WD external hard drive.
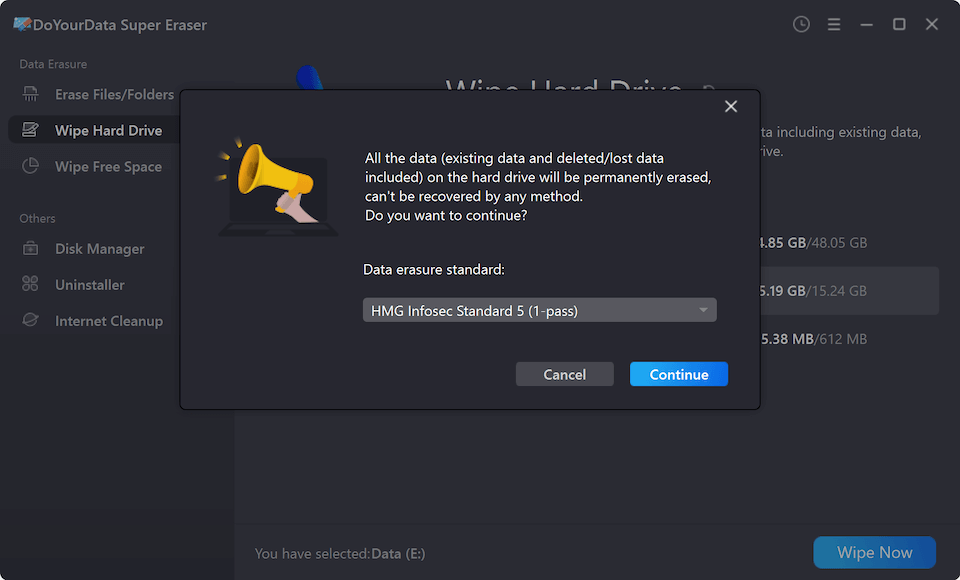
All data stored on the WD external hard drive will be permanently erased, no way to recover it.
4. What is the best WD external hard drive repair tool?
Here are some tools can help you repair damaged or unrecognized WD external hard drive:
- Disk Management
- Do Your Data Recovery
- Windows Disk Checker
- DoYourData Super Eraser
- Command Prompt
