Quick Navigation:
- Why Wipe Windows Server 2019 Hard Drives?
- 3 Methods to Wipe a Hard Drive on Windows Server 2019
- Post-Wipe Considerations
- Reinstalling Windows Server 2019 (optional)
- Advanced Wiping Techniques
- Conclusion
Data security is vital especially regarding private data kept on servers. Windows Server 2019 is a powerful OS that often stores important data. Properly wiping the hard drive is important when taking hardware offline or reusing it. Deleting or formatting the drive is insufficient; data can often be restored with the professional data recovery tools.

Securely Wiping a hard drive deletes all of its data, so it can't be recovered. It protects your company from possible security breaches and aligns with rules like GDPR or HIPAA. This guide will show you the steps, tools, and best practices to erase a hard drive on Windows Server 2019 safely. You can be sure that your data is deleted permanently.
Why Wipe Windows Server 2019 Hard Drives?
Data security is among the most important things for businesses and groups to worry about. Servers often hold private data, such as banking records, intellectual property, customer information, and other important files. To avoid data breaches, it's important to ensure that all data on a server is safely erased when it's no longer needed or when its lifecycle ends.
To wipe a hard drive on Server 2019, here are some important reasons:
- Prevent Data Breaches: It is very important to ensure that data can't be recovered to protect against possible breaches.
- Regulatory Compliance: Many fields are controlled by strict data protection laws, like GDPR, HIPAA, and others, that require safe data erasure.
- Disposal of Assets: It is important to delete data from hardware being taken down so it doesn't get into the wrong hands.
- Server Repurposing: Wiping the hard drive ensures that no old data can be accessed after a server is moved to a different job or department.
- Clean Up Virus: If the drive was infected by virus and cannot be removed easily, it's a good way to fix it by erasing the drive completely.
- Fix bugs: Erase the hard drive to remove software bugs or system issues with the computer.
3 Methods to Wipe a Hard Drive on Windows Server 2019
There are different solutions for hard drive wiping on Windows server 2019, ranges from the system built-in features to third-party data erasure software. Here we will introduce these methods and show you how to operate step by step.
߷ Wipe the hard drive securely in Windows Server 2019 with software
How do I use Windows Server to wipe or remove a hard drive? The most easy and secure way is using a professional data wiping software. Fortunately, DoYourData offers such an easy-to-use and professional tool which works well in data erasure on Windows Server 2019.
You can easily wipe a hard drive in Windows Server 2019 with the software as the following steps:
Step 1: Get the data erasure software for Windows Server 2019.
To begin with, download DoYourData Super Eraser and install it on your Windows Server 2019. Then, run it on the Server.
DoYourData Super Eraser
- Excellent data wiping software for Windows Server 2019.
- Wipe hard drive, free space, or shred files permanently.
- Erase data from USB flash drive, SSD, HDD, SD card, etc.
Step 2: Pick "Wipe Hard Drive" as the disk wipe mode.
DoYourData Super Eraser has various data-erasing tools that can help you delete data from Windows Server 2019 for good. If you want to wipe an hard drive in Windows Server 2019, pick the second mode and click Wipe Hard Drive to erase the hard drive.

Step 3. Select the data erasure standard.
Click the Wipe Now button and then you will be asked to select a data erasure algorithm to wipe the hard drive securely.
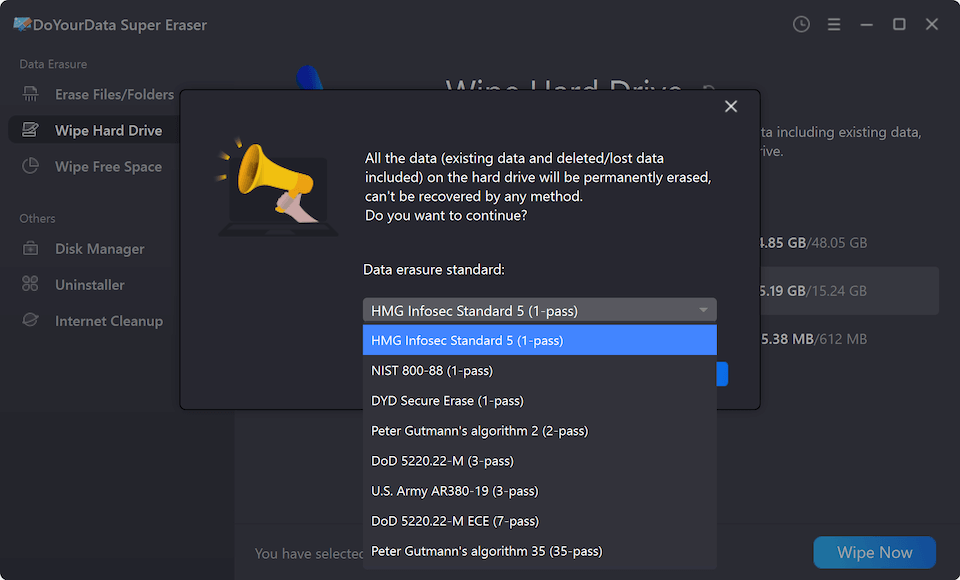
Step 4: Start to wipe the hard drive in Windows server 2019.
After confirming the data sanitation algorithm, just click on the Continue button, the software will start to wipe the data from the selected hard drive permanently.
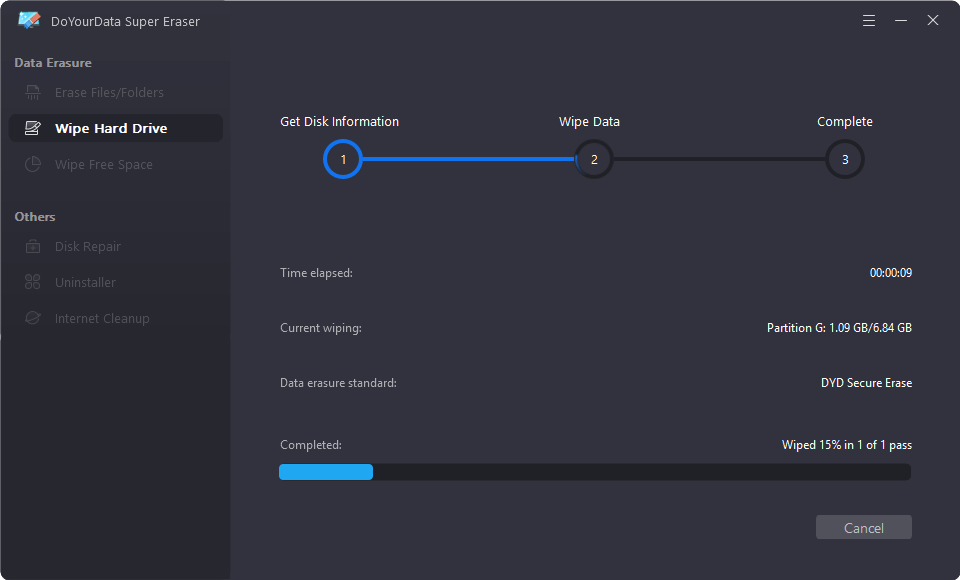
All the information on the chosen hard drive will be erased forever, and no data recovery software or service will be able to get it back anyway. DoYourData Super Eraser will then format the hard drive you chose. All you have to do is set the hard drive back to its original settings.
߷ Erase A hard drive via Diskpart in Command Prompt
To begin, you can use the Command Prompt to do that. You can use CMD to control your disk using different command lines. You can use it for free on a Windows Server computer. Here are some things you can take.
Step 1: Type cmd and click "Run as administrator".
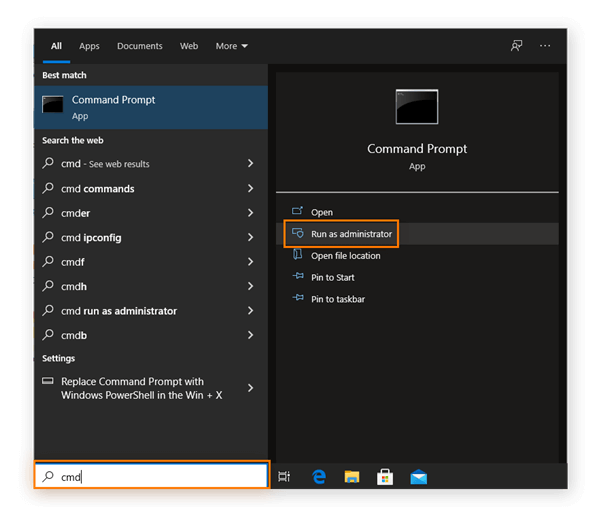
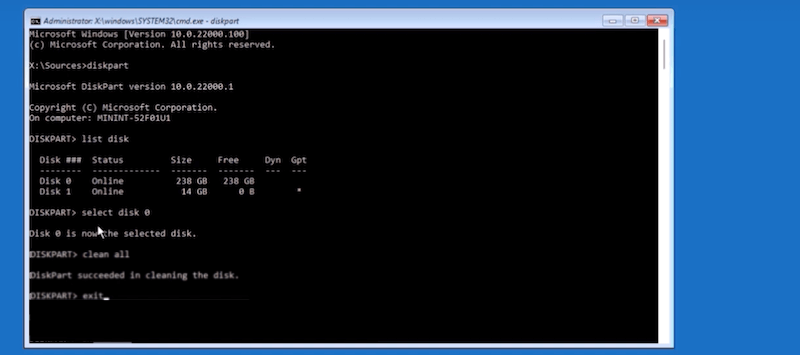
Step 2: Type diskpart and press Enter.
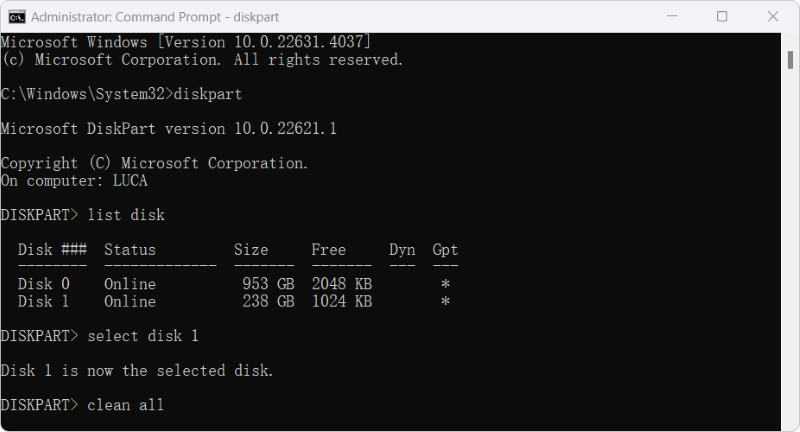
Step 3: Type the following instructions and press Enter when you're done.
- list disk
- select disk # (replace the # to the correct disk number in your case)
- clean all
![wipe hard drive on Windows Server 2019]()
߷ Wipe Windows Server 2019 system drive with installation media
With the above methods, you can easily wipe a non-system hard drive in Windows Sever 2019. However, you cannot format a system drive directly with these methods. If you want to wipe the system drive of Windows Server 2019, how to do that?
The installation media is a good option if you want to restart Windows Server 2019 or wipe a server system drive clean before using it for something else.
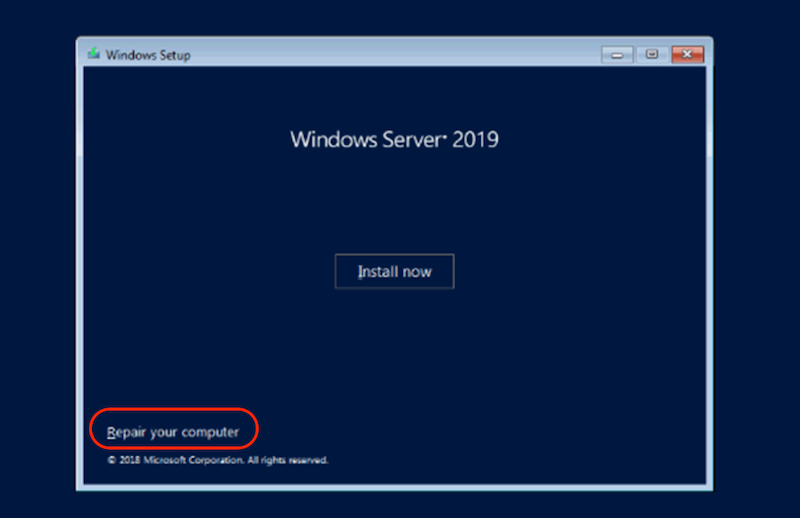
Step 1. Use Windows Server 2019 installation disks (DVD or USB) to start the Server.
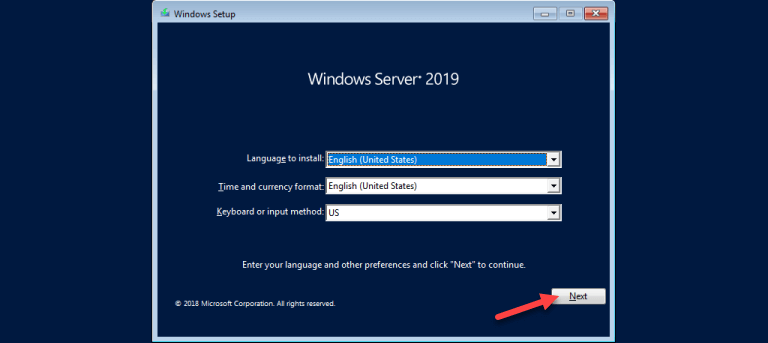
Step 2. Pick the language you want to use, then click "Next."For computer help, click "Repair your computer."
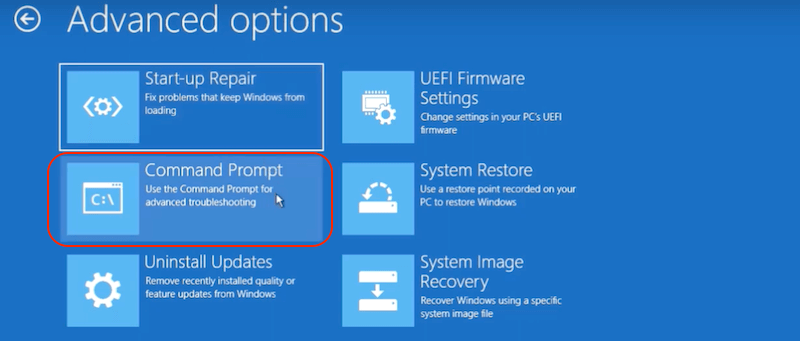
Step 3. You will be asked to choose an option. Pick Troubleshoot to continue.

Step 4. then pick "Command Prompt."
Step 5. To erase the drive, use the Diskpart tool, as shown above.
Post-Wipe Considerations
As soon as the hard drive has been erased, it would help if you did a few key things to make sure the process worked and all the data was safely removed:
- Verify the Wipe: Use Diskpart or other third-party tools to ensure the drive is empty. Diskpart and other tools can be found here.
- Document the Process: If compliance standards say so, write down the date, the method used, and any unique numbers that are important about the wiping process.
- Physical Destruction (Optional): To protect private data, you might want to damage the drive directly after wiping it, like shredding or degaussing it.
Reinstalling Windows Server 2019 (optional)
After wiping the system drive of the server, the next step that makes sense is reinstalling Windows Server 2019. That is because the server hardware will be used again. The installation method can be summed up in a few words:
Step 1. Use the Windows Server 2019 startup media to start up the Server. Follow the on-screen directions to choose your language, time, and keyboard, click Next button to continue.
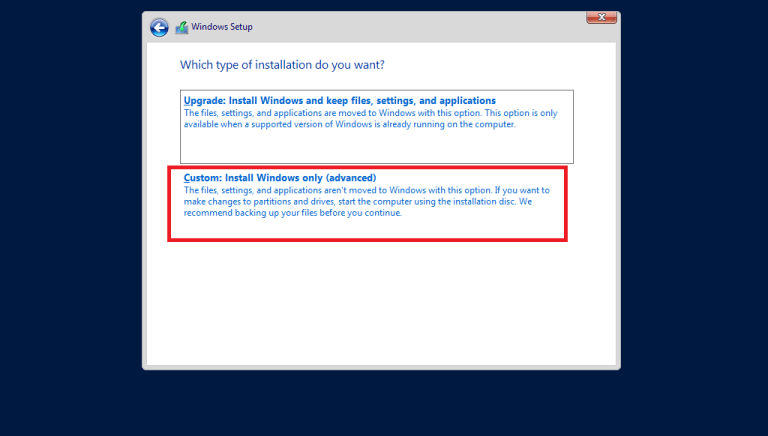
Step 2. Click the Install Now button and start the installing process. When you are asked to select a type of the installation, just pick "Custom: Install Windows only (advanced)."
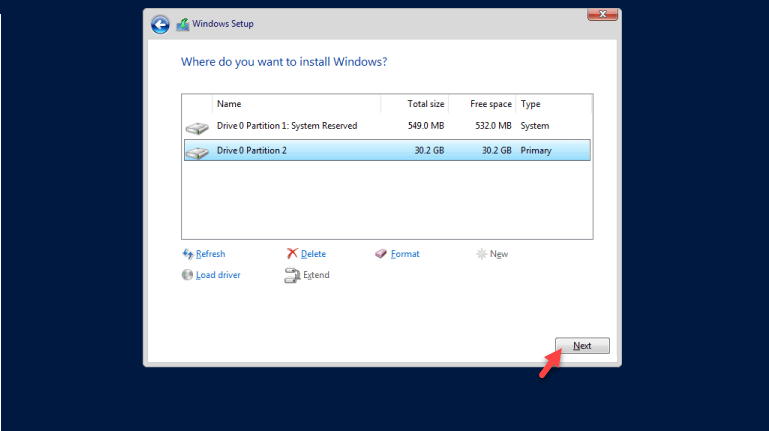
Step 3. Choose to put on the disk that has been erased.
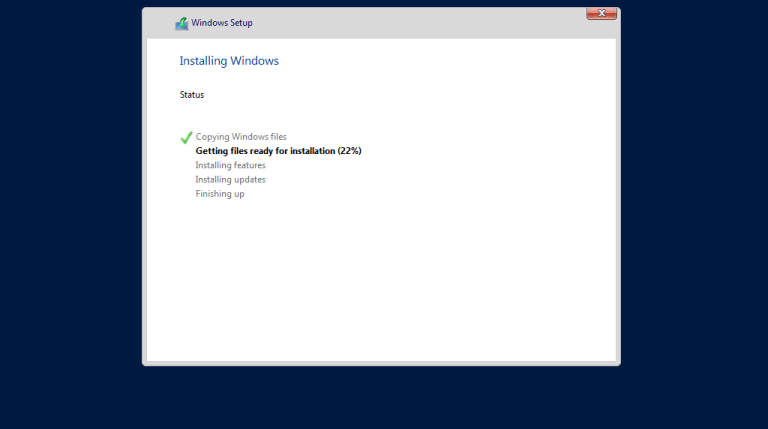
Step 4. Then the Windows Server 2019 installing process will start and take some time.
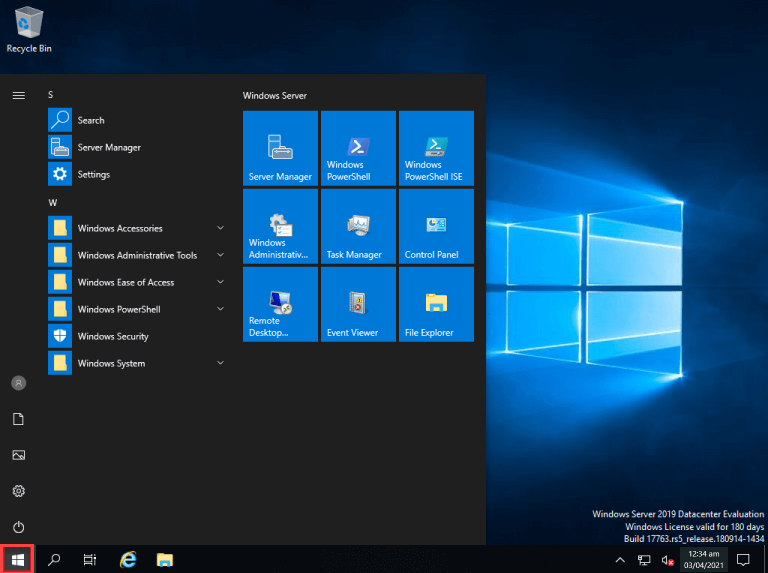
Step 5. Once the installing process is done, it will restart and you need to set up the Server as needed. After that, you can boot into the fresh new copy of Windows Server 2019.
Advanced Wiping Techniques
Advanced wiping methods may be needed, especially when working with sensitive data or specific compliance rules. Some of these methods are:
- Multiple Pass Wiping: Using different patterns to overwrite data repeatedly to ensure that even the smallest pieces of data are lost.
- Custom Scripting: To handle complicated wiping situations on multiple computers or drives, write your own PowerShell scripts or use other automation tools.
- Network-Based Wiping: Network-based wiping solutions let managers wipe multiple servers at once from a central console. That is useful for large data centers.
Conclusion
In Windows Server 2019, wiping a hard drive is necessary to protect private data and ensure rules are followed. Whether getting rid of old hardware, reusing a server, or getting ready for a new installation, safely erasing data prevents people from accessing it without permission and prevents possible security breaches.
You can be sure that all evidence of data will be deleted if you follow the steps in this guide, whether you use built-in tools or third-party data wiping software. Remember that properly destroying data is an important part of your total security plan. It makes you feel relaxed that your information has been deleted.
DoYourData Super Eraser
DoYourData Super Eraser, the award-winning data erasure software, offers certified data erasure standards including U.S. Army AR380-19, DoD 5220.22-M ECE to help you securely and permanently erase data from PC, Mac, HDD, SSD, USB drive, memory card or other device, make data be lost forever, unrecoverable!
