Quick Navigation:
- Why Permanently Erase Data?
- How to Permanently Erase Data from an External Hard Drive?
- Best Practices Before Selling an External Hard Drive
- Conclusion
- FAQs About Wiping an External Hard Drive before Selling
When selling an external hard drive, ensuring that all your data is permanently erased is crucial to protect your personal information. Simply deleting files or formatting the drive isn't enough to ensure data security. This article will guide you through understanding data erasure, methods for securely erasing data, and best practices before selling your external hard drive.
In an era where data breaches and identity theft are prevalent, protecting your personal information is paramount. When selling or disposing of an external hard drive, it's essential to ensure that all data is completely and irretrievably erased. Failure to do so could lead to significant risks, including unauthorized access to sensitive information, identity theft, and financial loss. This article explores the importance of data security, methods for permanent data erasure, and best practices to ensure your data remains secure.
Why Permanently Erase Data?
When you delete files from your external hard drive, they are typically moved to the recycle bin or trash. Even when you empty the recycle bin, the data isn't actually removed from the hard drive; instead, the space it occupied is marked as available for new data. This means that until new data overwrites it, the old data can potentially be recovered by someone with the right tools.
Privacy Risks
Selling or disposing of an external hard drive without properly erasing its contents can lead to serious privacy breaches. Personal information such as financial records, emails, or personal photos could fall into the wrong hands. Identity theft and unauthorized access to your personal accounts are just some of the risks associated with inadequate data removal.
Legal Implications
In some cases, you might be legally responsible for the data that remains on the drive, especially if it contains confidential or proprietary information. Companies dealing with sensitive client information or intellectual property need to take extra precautions to ensure compliance with data protection regulations.
How to Permanently Erase Data from an External Hard Drive?
1. Using Built-in Tools
Both Windows and macOS offer built-in tools for formatting or erasing external hard drives. While these tools are useful for preparing a drive for new use, it's important to note that formatting alone may not be sufficient to completely remove all data. Here's a more detailed guide on how to use these built-in tools effectively:
Windows: Formatting an External Hard Drive
Step 1. Connect the Drive:
Plug the external hard drive into your computer using the appropriate USB port. Ensure the drive is properly connected and recognized by the system.
Step 2. Open Disk Management:
Right-click on the Start button (or press Win + X on your keyboard) and select "Disk Management" from the context menu. This will open the Disk Management utility, which allows you to manage all disks connected to your computer.
Step 3. Select the Drive:
In the Disk Management window, locate your external hard drive from the list of available disks. It will usually be listed as "Disk 1," "Disk 2," etc., along with its size and current status.
Step 4. Format the Drive:
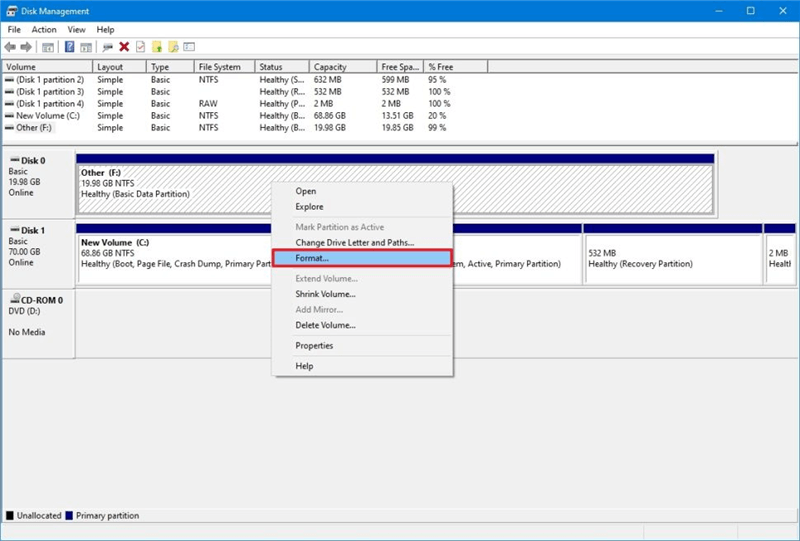
Right-click on the external hard drive and select "Format" from the context menu. This will open the Format dialog box.
- File System: Choose the file system you want to use. Common options include NTFS (for Windows-only use) and exFAT (for compatibility with both Windows and macOS).
- Allocation Unit Size: The default setting is typically fine for most uses, but you can adjust it if needed.
- Volume Label: Enter a name for the drive if you wish.
- Quick Format: If you select the Quick Format option, the process will be faster, but it will only remove the file system table without overwriting the data. For a more thorough process, uncheck Quick Format to perform a full format, which involves scanning the drive for bad sectors and writing zeros to all sectors.
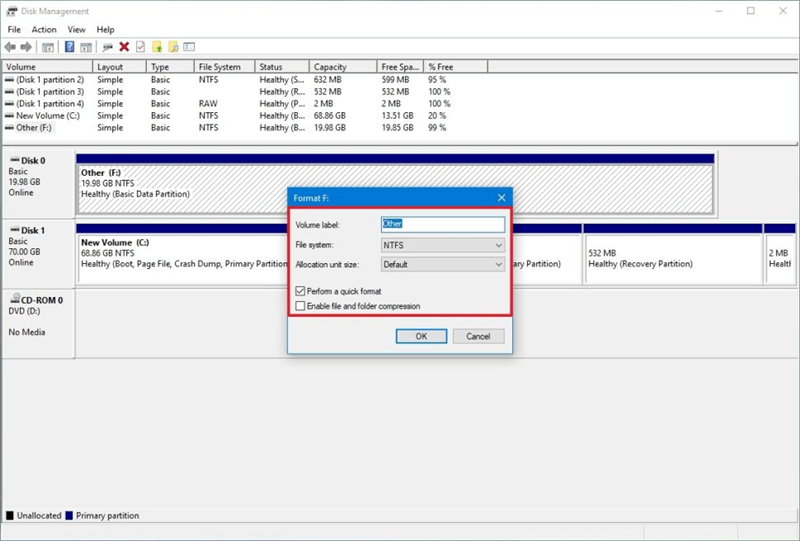
Click "OK" to start the formatting process. Depending on the size of the drive and whether you selected a quick or full format, this may take some time.
Limitations:
Data Recovery: Even with a full format, data recovery tools can sometimes retrieve information. To ensure that data is completely erased, consider using dedicated data erasure software.
macOS: Erasing an External Hard Drive
Step 1. Connect the Drive:
Plug the external hard drive into your Mac using a USB or Thunderbolt port. Make sure the drive is detected by your computer.
Step 2. Open Disk Utility:
Go to Applications > Utilities > Disk Utility. You can also find Disk Utility by using Spotlight Search (Command + Space) and typing Disk Utility.
Step 3. Select the Drive:
In Disk Utility, you'll see a list of all connected drives and volumes on the left side. Select your external hard drive from this list. Be careful to choose the correct drive, as selecting the wrong one could result in data loss.
Step 4. Erase the Drive:
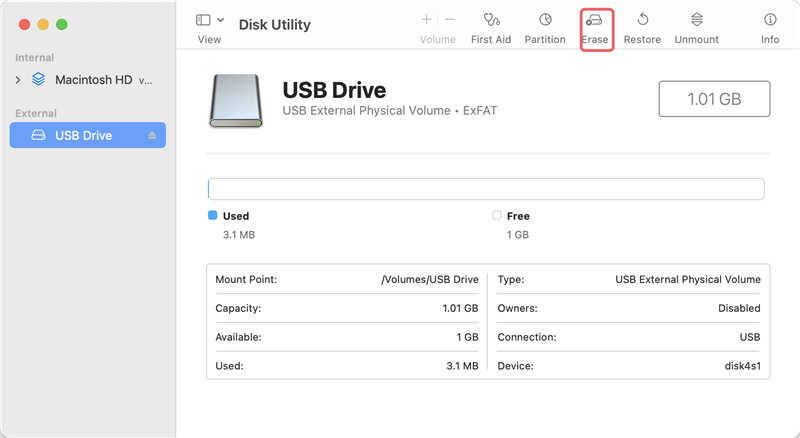
Click the Erase button at the top of the window. This will open the Erase dialog box.
- Name: Enter a new name for the drive if you want.
- Format: Choose the file system format:
- APFS (Apple File System): Best for macOS drives, especially those using SSDs.
- Mac OS Extended (Journaled): Suitable for traditional spinning hard drives and older macOS versions.
- ExFAT: If you need the drive to be compatible with both macOS and Windows, choose ExFAT.
- MS-DOS (FAT): Another option for cross-platform compatibility, though it has limitations with file sizes.
- Scheme: Choose "GUID Partition Map" for modern Macs or "Master Boot Record" if you need compatibility with older systems or Windows.
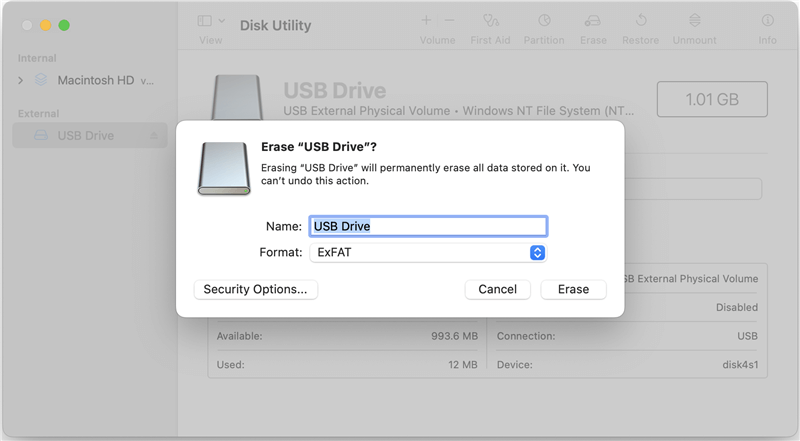
Click "Erase" to start the process. Disk Utility will format the drive according to your selected options. The time required will depend on the drive's size and the selected format.
Limitations:
Data Recovery: Like in Windows, while Disk Utility will format the drive, traces of the original data may still be recoverable with specialized software. For complete data destruction, using third-party data erasure tools or physical destruction methods is recommended.
2. Using Third-Party Data Erasure Software
For more thorough data erasure, third-party data erasure software offers advanced features designed to securely wipe all data.
DoYourData Super Eraser is a reliable data erasure program. It supports to securely and permanently erase data from HDD, SSD, USB drive, memory card, digital camera, RAID, etc. Once the data is erased by DoYourData Super Eraser, the data is lost for good, cannot be recovered by any method.
DoYourData Super Eraser
- Permanently erase all data including existing data, previously deleted/formatted/lost data, hidden data from external HDD, SSD, SD card, USB drive, etc.
- Certified data erasure standards including HMG Infosec, NIST 800-88, Peter Gutmann's algorithm, DoD 5220.22-M, etc.
- 100% safe data erasure program.
Follow these steps to securely wipe everything from the external hard drive before you sell or donate it:
Step 1. Download and install DoYourData Super Eraser on your computer, open it. Choose Wipe Hard Drive mode, select the external hard drive and click on Wipe Now button.

Step 2. Select a data erasure standard, then click on Continue button.
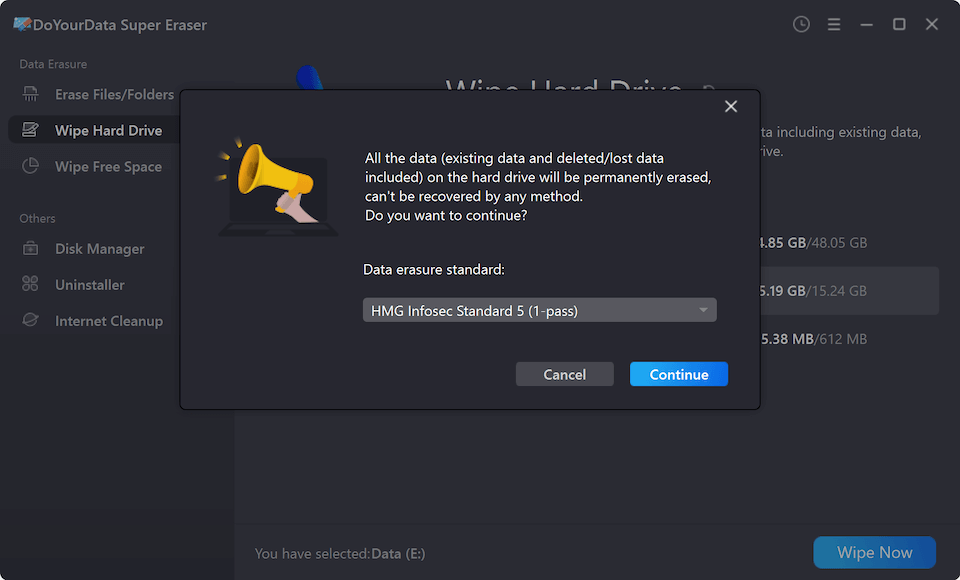
Step 3. Securely and permanently erase all data from the external hard drive.
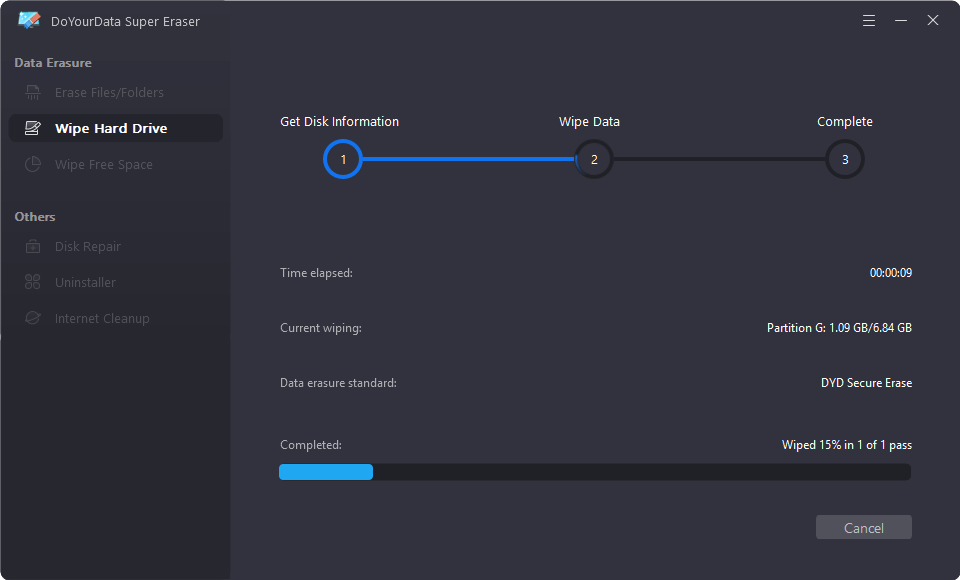
3. Factory Reset (For SSDs)
If you are dealing with a solid-state drive (SSD) rather than a traditional hard disk drive (HDD), a factory reset can be an effective way to erase data. SSDs use a different technology for data storage, and factory resetting is often a built-in feature.
- Use the Manufacturer's Software: Many SSD manufacturers provide their own data management software. Download and install the software from the manufacturer's website.
- Select the Secure Erase Option: The software should have an option for secure erasure or factory reset. Follow the instructions to perform the erase.
- Verify the Erasure: After the process is complete, it's a good idea to verify that the drive has been erased using a data recovery tool.
Verifying Data Erasure
After erasing the data, it's crucial to verify that it has been permanently removed. Here's how to ensure that your data is truly gone:
Using Recovery Tools:
Tools like Do Your Data Recovery Free or TestDisk can scan your external hard drive to check for recoverable data. If these tools cannot find any files, it's a good indication that the data has been successfully erased.
Perform a Quick Check:
After erasure, you can try to copy files to the drive or use a recovery tool to confirm that no remnants of your previous data exist. A successful verification process will provide peace of mind before selling the drive.
Best Practices Before Selling an External Hard Drive
1. Backing Up Important Data
Before erasing your external hard drive, ensure that you have backed up any important data. Transfer valuable files to another secure location, such as a different hard drive, cloud storage, or an external backup device.
2. Reformatting the Drive
After erasing the data, you may want to reformat the drive to prepare it for sale. This will ensure that the drive is in a fresh state, ready for the new owner to use. Follow the formatting instructions for your operating system (Windows or macOS) to complete this step.
3. Clean the Drive
Physically clean the external hard drive to make it look presentable. Wipe off any dust or fingerprints and ensure the drive is in good working condition. A well-maintained drive is more appealing to potential buyers.
4. Include Accessories and Documentation
If you have the original packaging, cables, or documentation for the external hard drive, consider including them with the sale. This can increase the drive’s value and make it more attractive to buyers.
Conclusion
Protecting your personal information is essential when selling an external hard drive. Simply deleting files or formatting the drive is not sufficient to ensure data security. Using built-in tools, third-party software, or physical destruction methods can help you permanently erase data and prevent unauthorized access. Verifying the erasure process and following best practices before selling will ensure that your data remains secure and your drive is ready for a new owner. By taking these steps, you can confidently sell your external hard drive, knowing that your personal information is safe and secure.
FAQs About Wiping an External Hard Drive before Selling
1. I have formatted the external hard drive, is the data lost for good?
No, the formatted data is not lost for good. Data recovery software can deeply scan the external hard drive, find and recover all formatted data from it.
2. How to permanently erase data from an external hard drive?
Data erasure program, such as DoYourData Super Eraser, can help you securely and permanently erase all data from the external hard drive:
- Download and install DoYourData Super Eraser.
- Open DoYourData Super Eraser, select the external hard drive.
- Click on Wipe Now button to wipe all data from the drive.
3. What is the best external hard drive data erasure program?
Here is the list of top 5 data erasure program for erasing data on external hard drive:
- DoYourData Super Eraser
- DBAN
- CCleaner (only wipe free space)
- AweEraser
- Donemax Data Eraser
DoYourData Super Eraser
DoYourData Super Eraser, the award-winning data erasure software, offers certified data erasure standards including U.S. Army AR380-19, DoD 5220.22-M ECE to help you securely and permanently erase data from PC, Mac, HDD, SSD, USB drive, memory card or other device, make data be lost forever, unrecoverable!