Quick Navigation:
- About Memory Stick Data Loss
- Step-by-Step Guide to Recover Lost Data from a Memory Stick on Mac
- Conclusion
- FAQS About Memory Stick Data Recovery on Mac
Imagine this: You've been working on a crucial project, and all your important files are stored on a memory stick. You plug it into your Mac, only to find that some or all of your files are missing or have been accidentally deleted. The panic that follows can be overwhelming, especially when you realize how critical those files are. Fortunately, recovering deleted data from a memory stick on a Mac is often possible. In this article, we will explore the recovery process, providing both technical details and practical advice to help you retrieve your lost files.

About Memory Stick Data Loss
What Is a Memory Stick?
A memory stick is a type of flash memory used for data storage in various devices such as cameras, phones, and computers. Originally developed by Sony, the term "Memory Stick" often refers to several types, including:
- Memory Stick PRO: Provides faster data transfer speeds and higher capacity compared to the original Memory Stick.
- Memory Stick Micro (M2): A smaller version used in mobile devices.
- Memory Stick Duo: A compact version compatible with some Sony devices.
Memory sticks are a popular option for data storage and transfer because of their portability and simplicity of usage.
How Data Is Stored and Deleted
Memory sticks use NAND flash memory, which stores data in memory cells. The data is not instantly destroyed by the system when a file is removed. Rather, it designates the file's storage location as open to receiving new data. The actual file remains on the memory stick until new data overwrites it. If the deleted files haven't been overwritten yet, this feature allows for their recovery.
How Deleted Files Remain Recoverable
When you remove a file from a memory stick, the actual data stays on the memory stick until it is replaced by new data, but the file's metadata is deleted from the file system's index. This means that unless new files have been written to the memory stick, the deleted files can often be recovered using the right tools.
Why Immediate Action Is Crucial
Immediate action is essential for successful data recovery. Continued use of the memory stick can lead to new data overwriting the space where the deleted files were stored. Once overwritten, the chances of recovery decrease significantly. To maximize your chances of recovery, stop using the memory stick immediately and start the recovery process as soon as possible.
Step-by-Step Guide to Recover Lost Data from a Memory Stick on Mac
Preliminary Steps Before Data Recovery
Before you begin the recovery process, consider the following preliminary steps to maximize your chances of successful data recovery:
- Stop Using the Memory Stick: Continued use of the memory stick can overwrite the data, making recovery more difficult.
- Examine for Physical Damage: Look for any obvious indications of physical harm on the memory stick. In the event of significant damage, expert assistance might be required.
- Verify the Issue: Ensure that the issue is not related to the USB port or cable by testing the memory stick on another computer or port.
Using Built-In macOS Tools
Time Machine:
You might be able to retrieve files that were stored on the memory stick if you backed up it using Time Machine. Here's how:
- Connect Your Time Machine Backup Drive: Make sure your Time Machine backup drive is connected to your Mac.
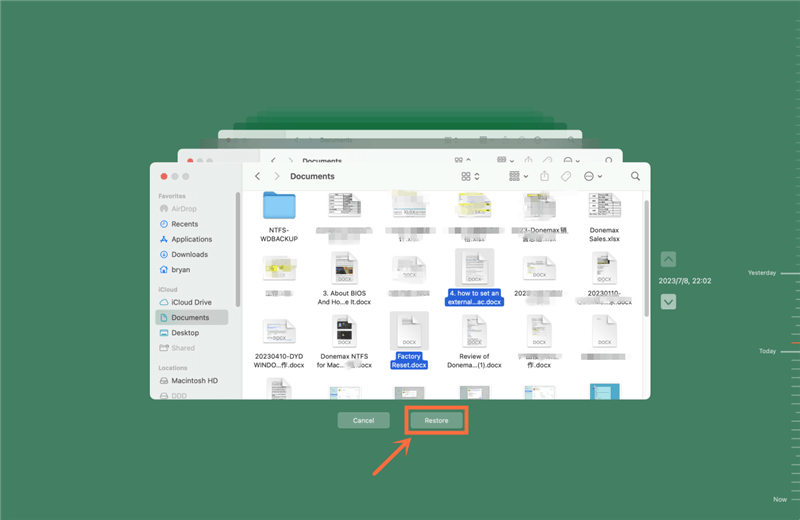
- Open Time Machine: Choose "Enter Time Machine" or "Browse Time Machine Backups" after clicking the Time Machine icon in the menu bar.
- Navigate to the Backup Date: Use the timeline on the right side of the screen to go back to the date when the files were still present on the memory stick.
- Locate and Restore Files: Locate the files you wish to restore, pick them, and then click "Restore" to get the data back.

Trash:
If the files were recently deleted, they might be in the Trash. Here's how to check:
- Open Finder: Click on the Finder icon in the Dock.
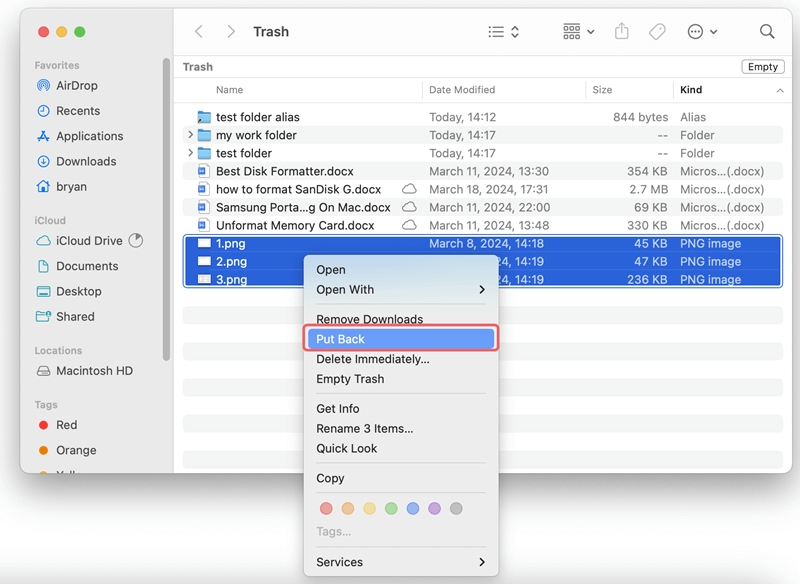
- Check the Trash: In the Finder sidebar, click on Trash to see if the deleted files are there.
- Restore Files: If you find the files, right-click on them and select Put Back to restore them to their original location.

Disk Utility:
Disk Utility is a built-in macOS application that can help with file system repairs and disk management. Here's how to use it:
- Open Applications
- Move to Utilities and then open Disk Utility
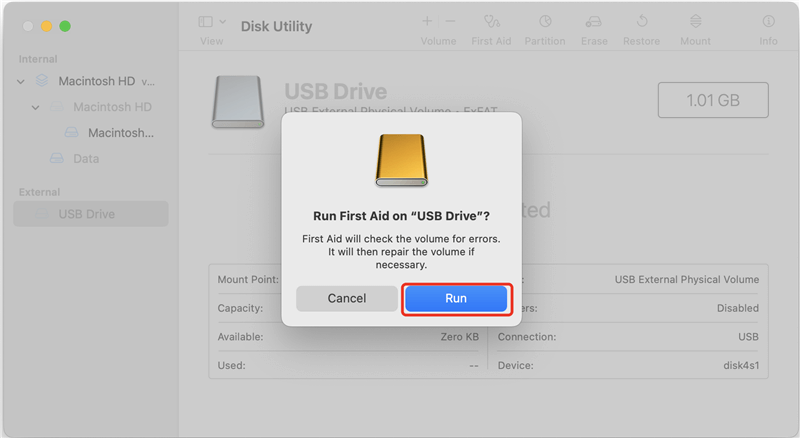
- Select the Memory Stick: In Disk Utility, select the memory stick from the list of available drives.
- Run First Aid: Click on the First Aid tab and then click Run. This tool will check for file system errors and attempt to repair them.

Using Third-Party Recovery Software
If you can't restore lost files from you memory stick with macOS's built-in tools, you can use third-party memory stick data recovery software. Do Your Data Recovery for Mac is a powerful data recovery program. It can help you recover all lost data from your memory stick on Mac.
Step 1. Download and install Do Your Data Recovery for Mac on your Mac and connect your memory stick to your Mac.
Do Your Data Recovery for Mac
- Recover permanently deleted files from your memory stick on Mac.
- Recover formatted memory stick on Mac.
- Recover corrupted data from memory stick on Mac.
Step 2. Download and install Do Your Data Recovery for Mac, run it, select the memory stick to start data recovery.

Step 3. Click on Scan button to deeply scan the memory stick and find all deleted or lost files.

Step 4. Once the scan is completed, you can preview all recoverable files. Then select the wanted files and save them.

More Data Recovery Tools for Data Recovery from Memory Stick on Mac:
Disk Drill:
- Download and Install Disk Drill: Download the software from its official website and install it on your Mac.
- Launch Disk Drill: Open Disk Drill and select your memory stick from the list of available drives.
- Scan the Memory Stick: Click the "Search for lost data" button to start scanning the memory stick for recoverable files.
- Once the scan is finished, you will see two options i.e. "Review Found Items" or "Recover All". You can choose the one according to your needs.
- If you choose the first option, review the list of files and restore which you want. Disk Drill automatically previews the highlighted file, but you can manually check any file by clicking the eye icon next to its filename.
- Once you are satisfied with your choice, click the "Recover" option. You'll be prompted to select a location for the restored files in a dialog window. Disk Drill offers a list of suggested disks and folders, but by selecting the "Choose folder..." option, you can manually select the location. To conclude the recuperation, click "Next" after you're done.
- Preview and Recover Files: Disk Drill will show a list of recoverable files when the scan is finished. Click "Recover" after previewing the files and choosing the ones you want to recover.
Donemax Data Recovery:
- Download and Install Donemax Data Recovery: Obtain this software from its official website and install it.
- Launch the Software: Launch Donemax Data Recovery and select your memory stick from the list of available drives.
- Scan for Lost Data: Click "Scan" to search for deleted files on the memory stick.
- Recover Files: Examine the list of files that can be recovered, pick the ones you require, and then click "Recover."
Stellar Data Recovery:
- Download and Install Stellar Data Recovery: Get Stellar Data Recovery from its official website and install it on your Mac.
- Run the Program: Open Stellar Data Recovery and select your memory stick for scanning.
- Perform a Scan: Click "Scan" to search for deleted files on the memory stick.
- Recover Your Files: After the scan, Stellar Data Recovery will show a list of recoverable files. Select the files you want and click "Recover."
Professional Data Recovery Services
If software tools are unable to recover your files or if the memory stick is physically damaged, consider professional data recovery services. These services can be expensive but offer advanced techniques for recovering data from damaged or severely corrupted memory sticks.
Manual Data Recovery Techniques
For advanced users, manual data recovery techniques can be an option, particularly when dealing with corrupted files or partitions. These methods often require more technical knowledge and may involve:
- Using Terminal Commands: macOS Terminal commands can help access and recover files in certain situations. Commands like fsck (file system consistency check) can be used to repair file system issues.
- Recovering from a Disk Image: Creating a disk image of the memory stick and attempting recovery from the image can sometimes yield better results, particularly if the stick is physically damaged.
Tips for Successful Data Recovery
Do's and Don'ts
- Do: Act quickly and avoid using the memory stick to prevent overwriting.
- Do: Use reliable recovery software or professional services if needed.
- Don't: Attempt DIY fixes that could cause further damage.
- Don't: Use the memory stick for new data until recovery is complete.
Preventive Measures:
To minimize the risk of future data loss, follow these preventive measures:
- Regular Backups: Regularly back up important files to external drives or cloud storage.
- Proper Handling: Handle memory sticks with care to avoid physical damage. Always eject them properly before removal.
- Use Quality Memory Sticks: Invest in high-quality memory sticks from reputable brands to reduce the risk of data loss.
Lessons Learned:
- Act Quickly: Immediate action increases the chances of successful recovery.
- Know Your Tools: Familiarize yourself with recovery software and best practices to handle data loss effectively.
Conclusion
Recovering data from a memory stick on a Mac can be a daunting task, but with the right approach, it is often possible to retrieve your valuable files. By understanding how memory sticks work, using built-in and third-party recovery tools, and considering professional help if necessary, you can improve your chances of a successful recovery. Remember to act quickly, handle your memory stick with care, and use preventive measures to avoid future data loss.
FAQS About Memory Stick Data Recovery on Mac
1. How to recover deleted or formatted data from a memory stick on Mac?
Mac data recovery software can deeply scan the memory stick and find all recoverable files:
- Download and install Do Your Data Recovery for Mac and connect the memory stick to your Mac.
- Open Do Your Data Recovery for Mac, select the memory stick to start data recovery.
- Click on Scan button to deeply scan the memory stick.
- Preview and recover lost files after scanning.
2. How to unformat a memory stick on Mac?
Run Do Your Data Recovery for Mac to deeply scan the formatted memory stick and recover all erased files.
3. How to repair a damaged memory stick on Mac?
First of all, you can use Disk Utility to repair the damaged memory stick. If Disk Utility does not work, you can run Do Your Data Recovery for Ma, choose Disk Manager to mount the memory stick and repair it.

Do Your Data Recovery for Mac
Do Your Data Recovery for Mac, one of the best Mac data recovery software, can help you easily and completely recover deleted, formatted or lost files from Mac HDD/SSD, external HDD/SDD, USB drive, memory card, digital camera, or other storage devices.