The reliable Mac data recovery software to recover deleted or lost files.
Free TrialMalware and Viruses can create many issues for your Mac, including the inability to visit websites, external hard not showing, performance shutdowns, etc.
Luckily, you don't need to install third-party Anti-Malware programs; you must take care of what kind of applications you're installing.
Mac has various malware defenses that protect your system from significant malware attacks. Apart from Gatekeeper, Apple comes with XProtect, which protects your Mac from malware attacks.
You need to know more about XProtect to understand the things it could do to prevent you from a virus attack. This post discusses enabling, disabling, and accessing the XProtect current version.
XProtect Overview
XProtect, also termed File Quarantine' is nothing but an anti-malware technology on your Mac that tends to detect malware by using YARA signatures.
Not to forget that XProtect is a built-in tool introduced in 2009 alongside Mac OS X 10.6 Snow Leopard.
Unlike other Anti-virus software that tends to check for threats consistently, XProtect executes when:
- You launch the downloaded app the first time
- You change the app in the file system
- XProtect's signatures are updated
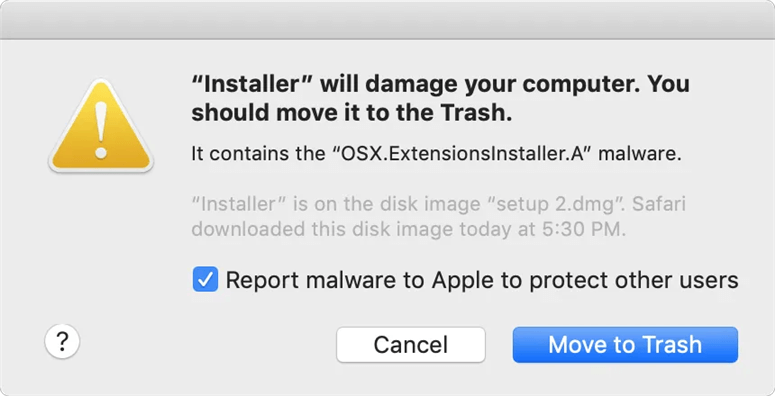
XProtect tends to check for virus threats whenever you launch an app or file downloaded via the File Quarantine-aware application. If XProtect detects the suspicious activity, it will block that file that asks you to move that file to the Trash folder.
Even if it doesn't notice any suspicious activity, a pop-up message appears telling you from where the application has been downloaded.
How to enable XProtect on your Mac?
XProtect is a default tool, as it detects and blocks the malware that might be causing issues for your Mac.
Like other Anti-virus software, you must update the XProtect's definition to detect new malware on your Mac.
The good thing is that XProtect tends to get updated automatically, meaning you don't need to do much to update the XProtect.
You'll need to follow the guide below to ensure that XProtect is enabled on your Mac and gets updated automatically.
Step 1. After starting your Mac, you'll need to navigate to Apple Logo and select the System Preferences icon.
Step 2. You'll need to tap the Advanced icon after hitting the Software Update option in this phase.
Next, you'll need to ensure that the Install system data files and security updates box is checked.

How to assess the XProtect version on Mac?
If you want to know about the current version XProtect has been using, and when it was last updated, you'll need to follow the step-by-step guide below.
Step 1. Navigate to About This Mac after hitting the Apple Menu icon.
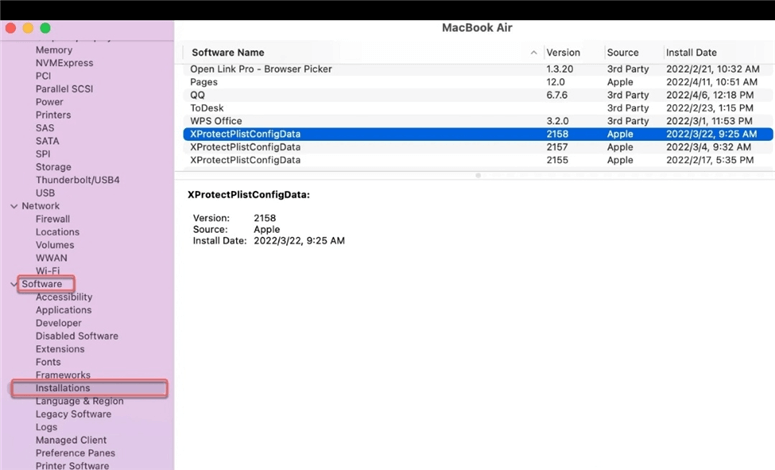
Step 2. In this phase, you must click the System Report icon and then navigate to the Installation icon after hitting the Software option.
Step 4. You'll need to tap the Software Name icon to sort it by name.
Step 5. Watch out for XProtectPlistConfigData; this way, you'll be able to check the current version of XProtect.
How to View XProtect on your Mac?
Suppose you're looking to access the list of checks macOS does on malicious applications when launching a downloaded file. In that case, you'll need to follow the guide below on your OS X El Capitan or Later.
Step 1. To begin with, you must visit the Macintosh HD icon and then navigate to Apple/ System/Library icon/CoreServices and then XProtect.bundle. Now, you'll need to choose Show Package Contents after clicking the XProtect.bundle icon.
Step 2. Tap the Contents/Resources icon and launch the XProtect.plist file after hitting the Space bar icon.
Can you disable XProtect on your Mac?
You shouldn't disable XProtect on your Mac, as doing so could end up installing malware on your device if XProtect isn't implied to block threats.
However, if you want to turn it off for some reason, you can do it by following the guide below.
Step 1. Launch Mac and then navigate to the Software Update icon after hitting System Preferences. You'll need to uncheck the box next to Install system data field and security updates after tapping Advanced icon.
Step 2. After disabling the XProtect, you'll need to ensure that you don't open and download executable files on your Mac.
Suppose there is nothing meaningful you want to do after disabling the XProtect. In that case, you should enable it as soon as possible.
FAQs
1. How can I find XProtect on my Mac?
Finding XProtect is easy on Mac as you'll only need to visit Macintosh HD, Library, Apple icon/ System/Library icon/Core services, and XProtect.bundle. Now, you'll also be able to see the latest version of XProtect.
2. Can I download XProtect on my Mac?
Many people tend to ask this question, but you don't need to get the XProtect tool downloaded on your Mac. XProtect is a built-in tool automatically updated and enabled on your Mac.
3. Does my Mac contain XProtect?
If you're using macOS 1.6 or later, you'll be able to prevent your Mac from malware attacks. However, suppose XProtect doesn't work on your Mac. In that case, you might consider using other anti-virus services to protect your Mac.
4. What to do when Xprotect services take high CPU usage?
Whenever you tend to install a new macOS update, XprotectServices takes the high CPU usage in your Activity Monitor.
You might fix this issue by restarting your Mac or rebooting your device in Safe Mode to delete caches.
Final Words
You might have to install some applications on your Mac, which could affect your computer as some software contains malware.
To make your Mac function properly, you'll need to ensure that the computer isn't affected by these malicious attacks. Mac has a built-in tool, XProtect, to eliminate the malware attack.
This guide has all the essential information about XProtect that will help you know the role XProtect plays in fighting against malware attacks.
DoYourData Products
DoYourData Super Eraser for Mac
Permanently shred files or wipe hard drive to prevent data recovery on Mac.
Free TrialClone HDD, SSD, Mac OS, external disk, USB drive, and more under Mac OS.
Free TrialWritten & Updated by Justin Kenny
Justin Kenny is a writer & editor of DoYourData. He joined DoYourData in 2016 and focuses on writing articles about Windows data recovery, Mac data recovery, external device data recovery, hard drive clone, data erasure, Mac cleanup, computer issue fixes, etc. He is a super fan of Apple devices and is big on testing new digital device and system utility software.