Quick Navigation:
- What is a Samsung Portable SSD?
- Why Wipe Samsung portable SSD on Mac?
- How to Wipe a Samsung portable SSD on Mac?
- Method 1: Using Disk Utility [Data can be recovered]
- Method 2: Using Terminal [Data can be recovered]
- Method 3: Using Mac Disk Wipe Software [Data is lost for good]
- Conclusion
- FAQs About Wiping Samsung Portable SSD on Mac
If you want to sell, repurpose, or safely delete your info, you must wipe the Samsung Portable SSD on a Mac. Deleting files is not enough; they can often be found again with the right tools. If you wipe your SSD correctly, all of its data will be erased, saving your privacy and important data.
This detailed guide will show you how to properly erase the Samsung Portable SSD using different macOS options. You'll find clear instructions and helpful tips to help you finish the job confidently, no matter how much tech knowledge you have.
You'll know how to delete data from your SSD safely. It will keep your data safe from people who shouldn't have access to it and prepare the drive for its next use.

What is a Samsung Portable SSD?
A Samsung Portable SSD is a fast external storage device that is easy to use, lasts a long time, and works well. Because they use NAND flash memory, these drives can read and transfer data faster than regular hard drives.
Due to their small size, they are easy to carry and perfect for people who are always on the go. Samsung has many models, such as the T3, T5, T7, T9 and X5. Each one has a different amount of storage space and speed needs.
The T5 is known for being fast and portable simultaneously, while the T7/T9 has even better performance and security features. The X5, made for workers, uses Thunderbolt 3 technology to send and receive data quickly. Overall, Samsung movable SSDs are good options for people who need movable storage.
Why Wipe Samsung portable SSD on Mac?
There are several reasons why it's important to wipe an SSD:
- Data security: Permanently deleting data stops people who aren't supposed to have access from getting to it, so bad people or software can't retrieve private information.
- Privacy Protection: Wiping your SSD before selling or giving it away will eliminate your files and information, keeping your privacy safe.
- Performance Maintenance: SSDs can get broken data over time, which can slow them down. Wiping the drive can help it stay as fast and efficient as possible.
- Prepare for New Use: Wiping your SSD gives you a clear beginning if you want to use it for a different project or person. It makes it easier to start over without old data taking up space on the drive.
- Compliance with Regulations: Businesses often must wipe SSDs to ensure they follow data protection rules and regulations. It prevents private customer or company data from being accidentally deleted.
- Preventing Data Leakage: Wiping the drive lowers the chance of data loss, especially in places where private data is stored.
- Long-Term Storage: Wiping SSDs that aren't being used can help them last longer by keeping useless data on them and causing wear on the cells.
Note: The deleted or formatted data is not lost for good and can be recovered by data recovery software. To permanently erase data from your Samsung portable SSD, you need special disk wipe tools.
How to Wipe a Samsung portable SSD on Mac?
Before you wipe your Samsung portable SSD on Mac, make a backup of your important data. You can copy the files from the Samsung portable SSD to your Mac, or clone the Samsung portable SSD to another drive.
Method 1: Using Disk Utility [Data can be recovered]
A built-in app in macOS called Disk Utility makes managing and erasing storage drives easy. Here's what you need to do to use Disk Utility to wipe the Samsung Portable SSD:
Step 1. Connect the SSD: Use the right USB connection to connect the Samsung Portable SSD to the Mac.
Step 2. Open Disk Utility: Find Disk Utility by going to Applications > Utilities > Disk Utility.
Step 3. Pick out the SSD: Find the Samsung Portable SSD in the Disk Utility window's sidebar and click on it.
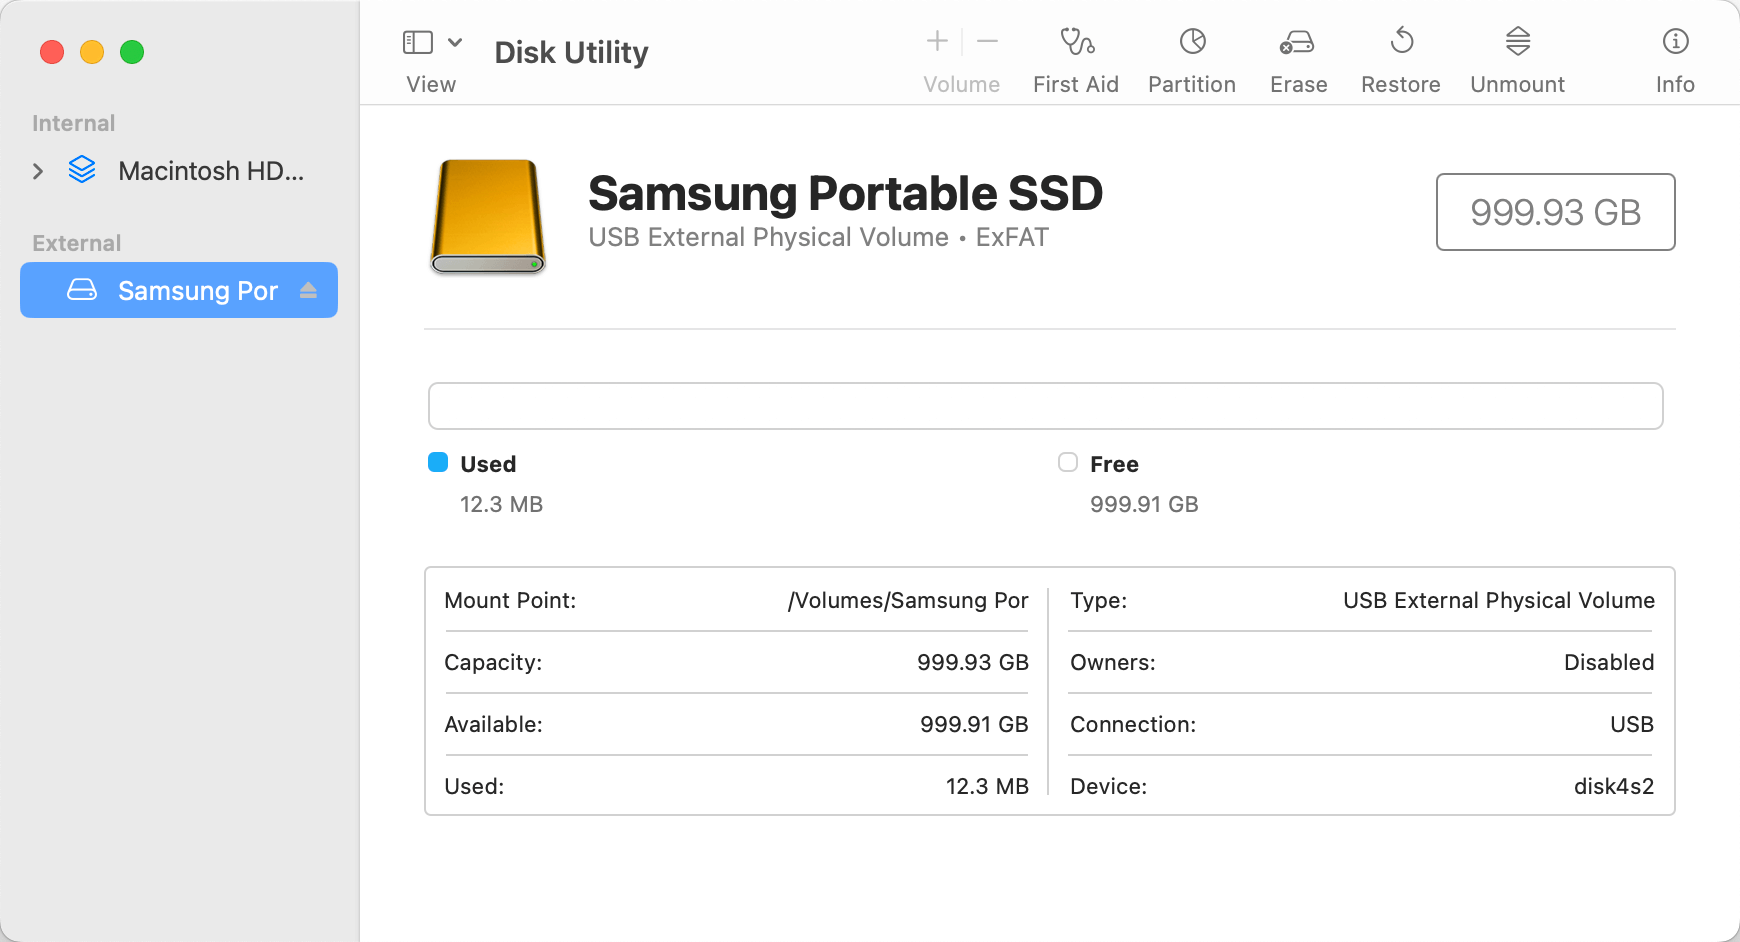
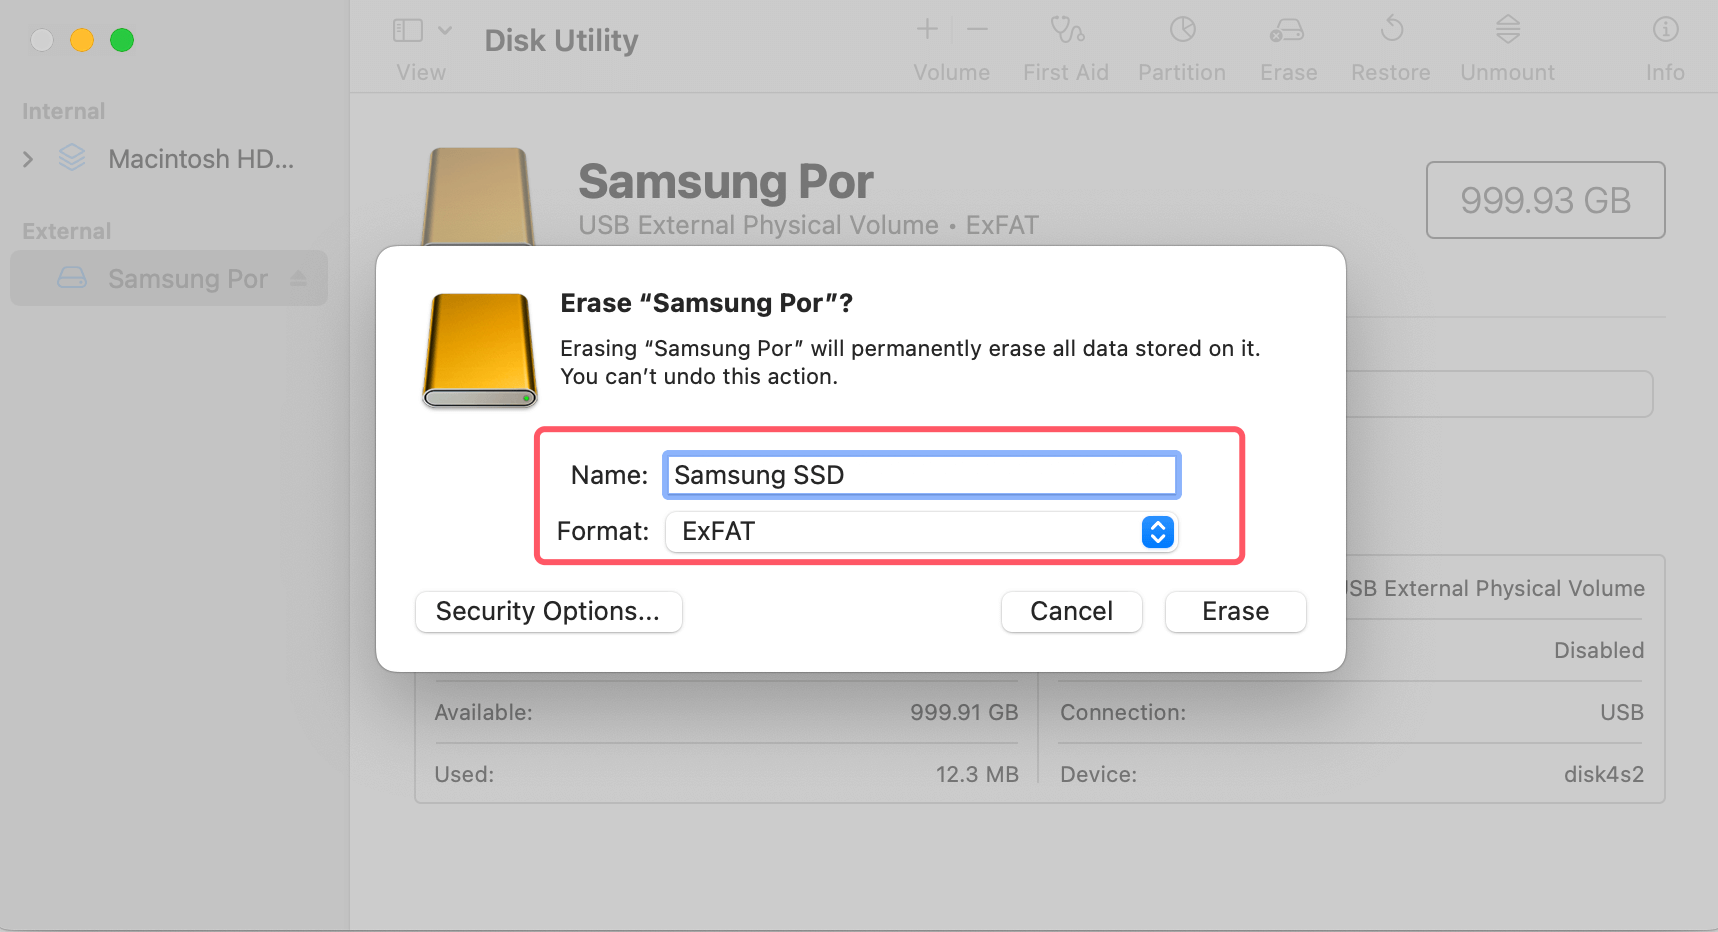
Step 4. To erase the SSD, Open Disk Utility and click the Erase button in the window. A dialogue box will appear, allowing you to set the remove settings.
- Name: Enter a new name for your drive.
- Format: Choose a format (e.g., APFS or Mac OS Extended, ExFAT).
- Scheme: Select GUID Partition Map.
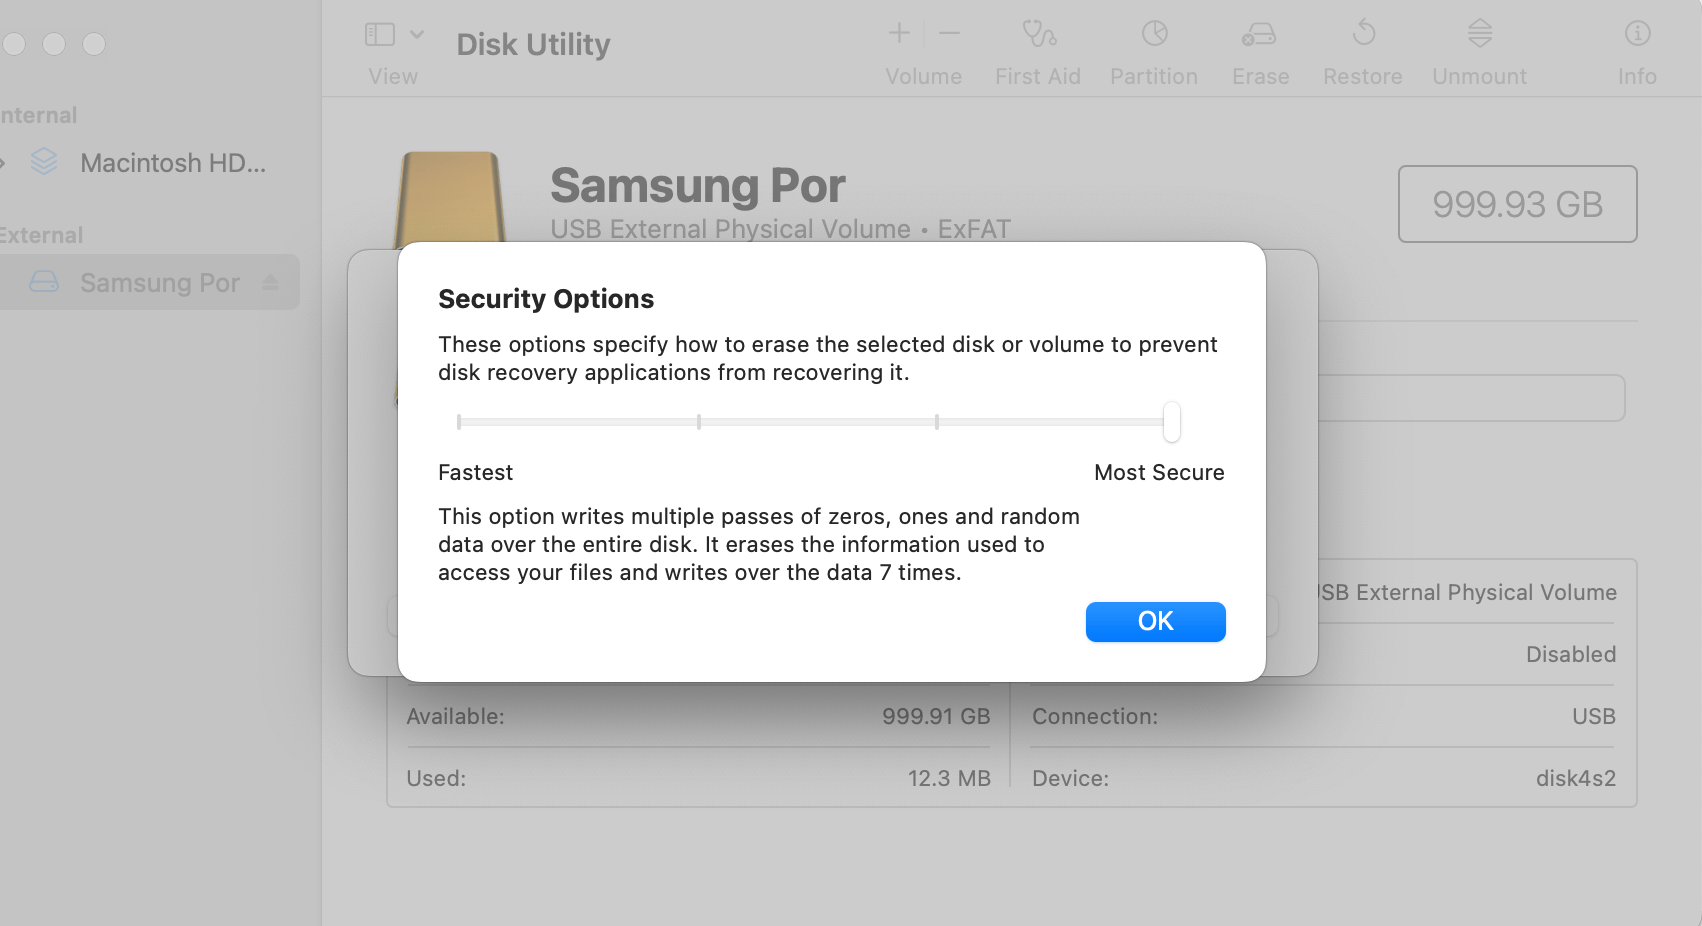
Step 5. Security Options: Click Security Options and select the security level you want for the erase process. It will take longer, but the process will be more successful at erasing data if the security level is raised.
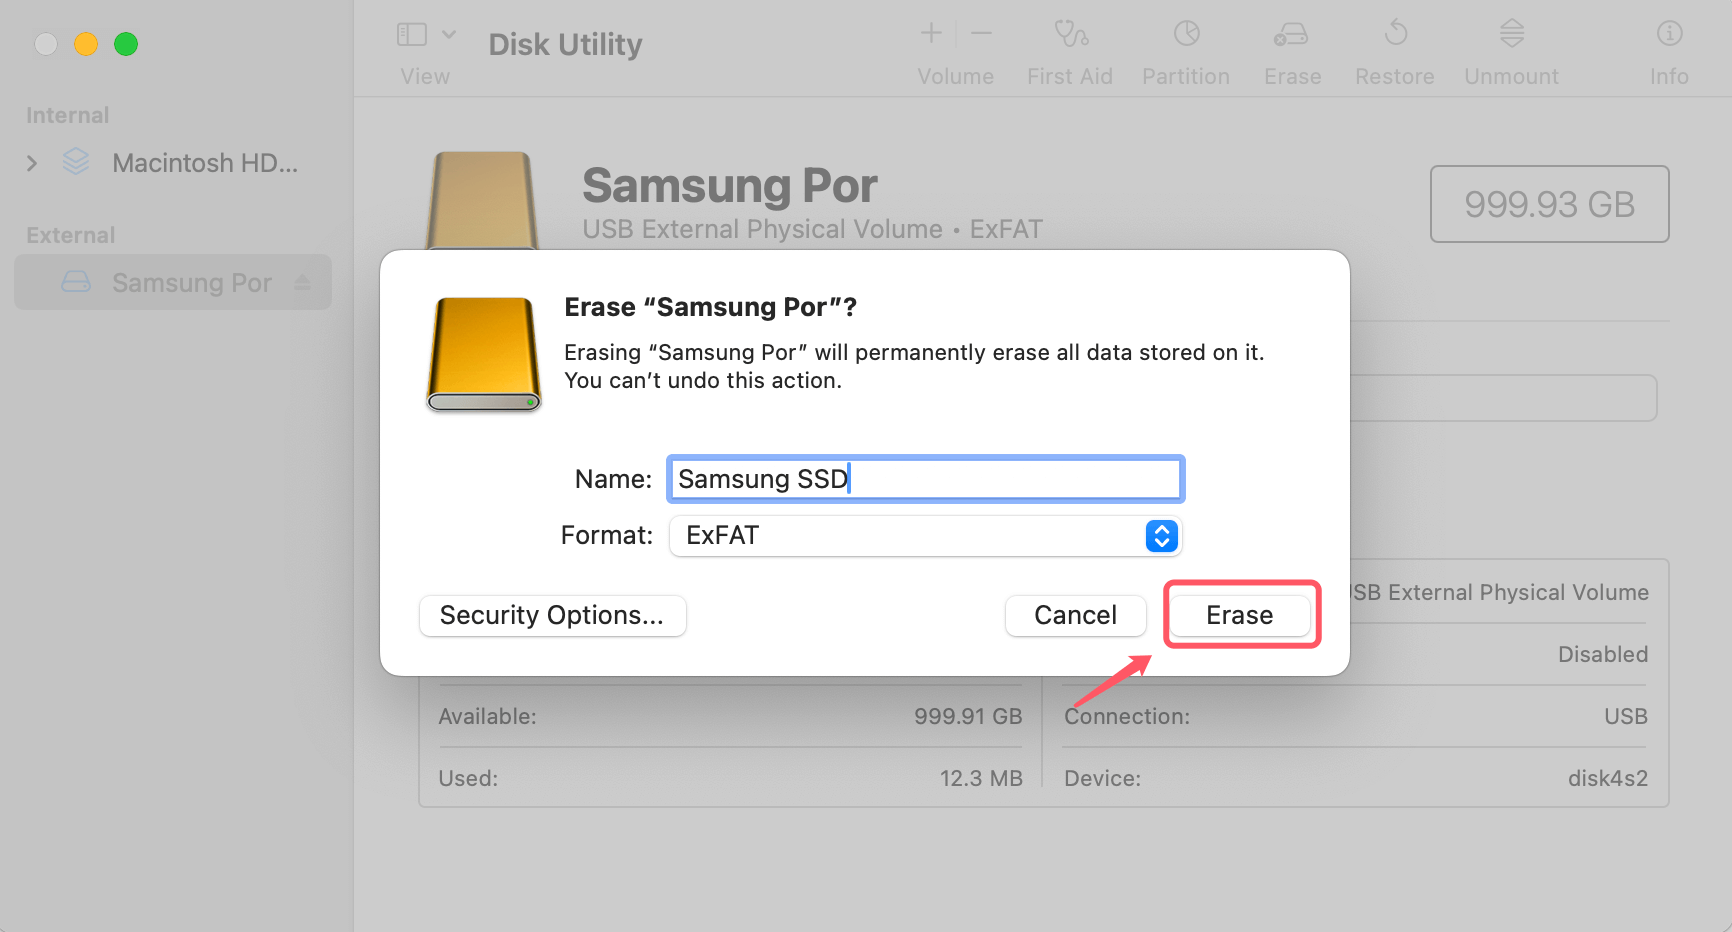
Step 6. Erase: To begin, click "Erase." Disk Utility will start erasing your SSD, and the screen will let you see how things are going.
Step 7. Completion: Once the process ends, your SSD will be clean and ready to use. It's safe to remove the drive now.
Method 2: Using Terminal [Data can be recovered]
The terminal has a command-line tool that lets advanced users erase the SSD in a more hands-on way. Here's how to use Terminal to erase the Samsung Portable SSD:
Step 1. Open Terminal: Find Applications > Utilities > Terminal and click on it to open Terminal.
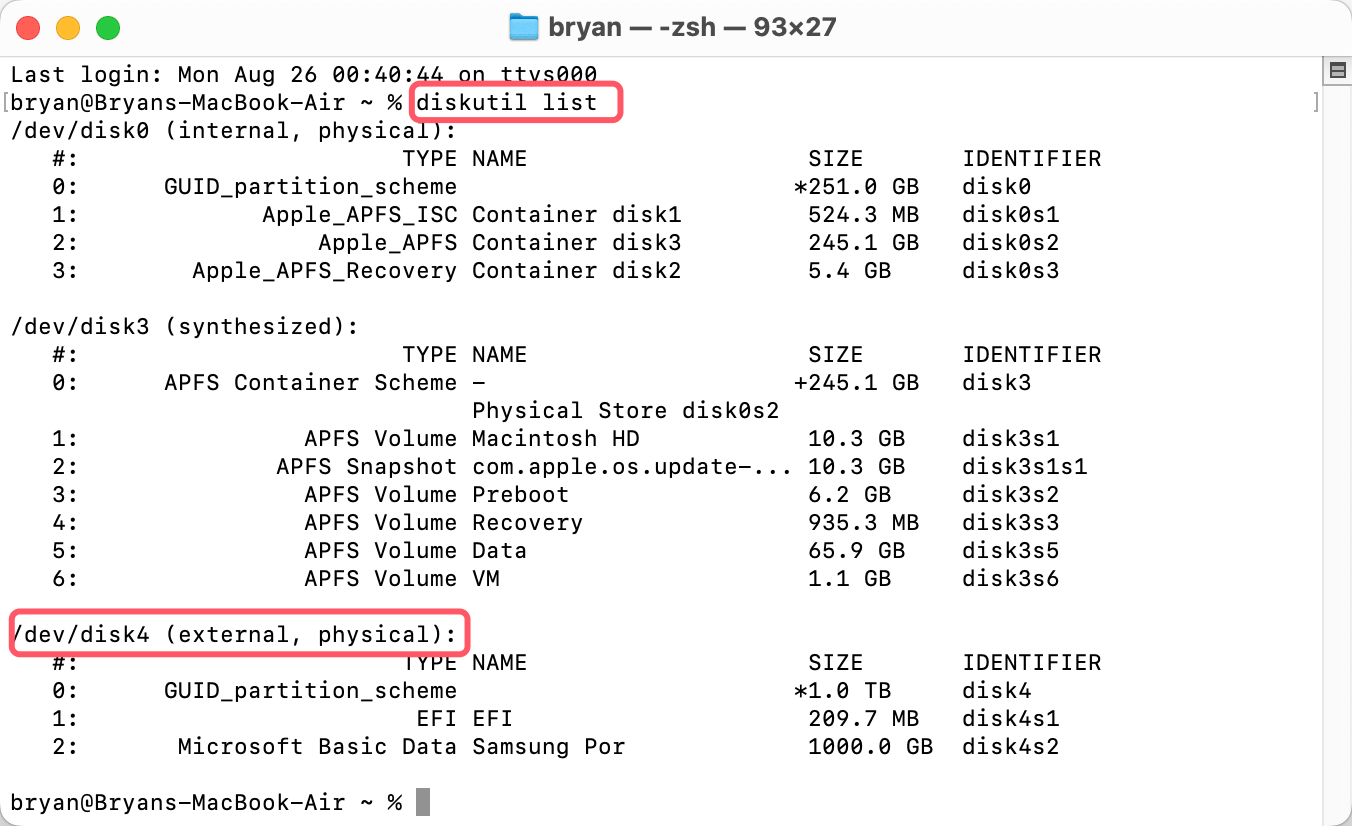
Step 2. Identify the SSD: Type diskutil list and press Enter. This program shows a list of all the connected drives and their names. Find the Samsung Portable SSD and write down its name (for example, disk4).
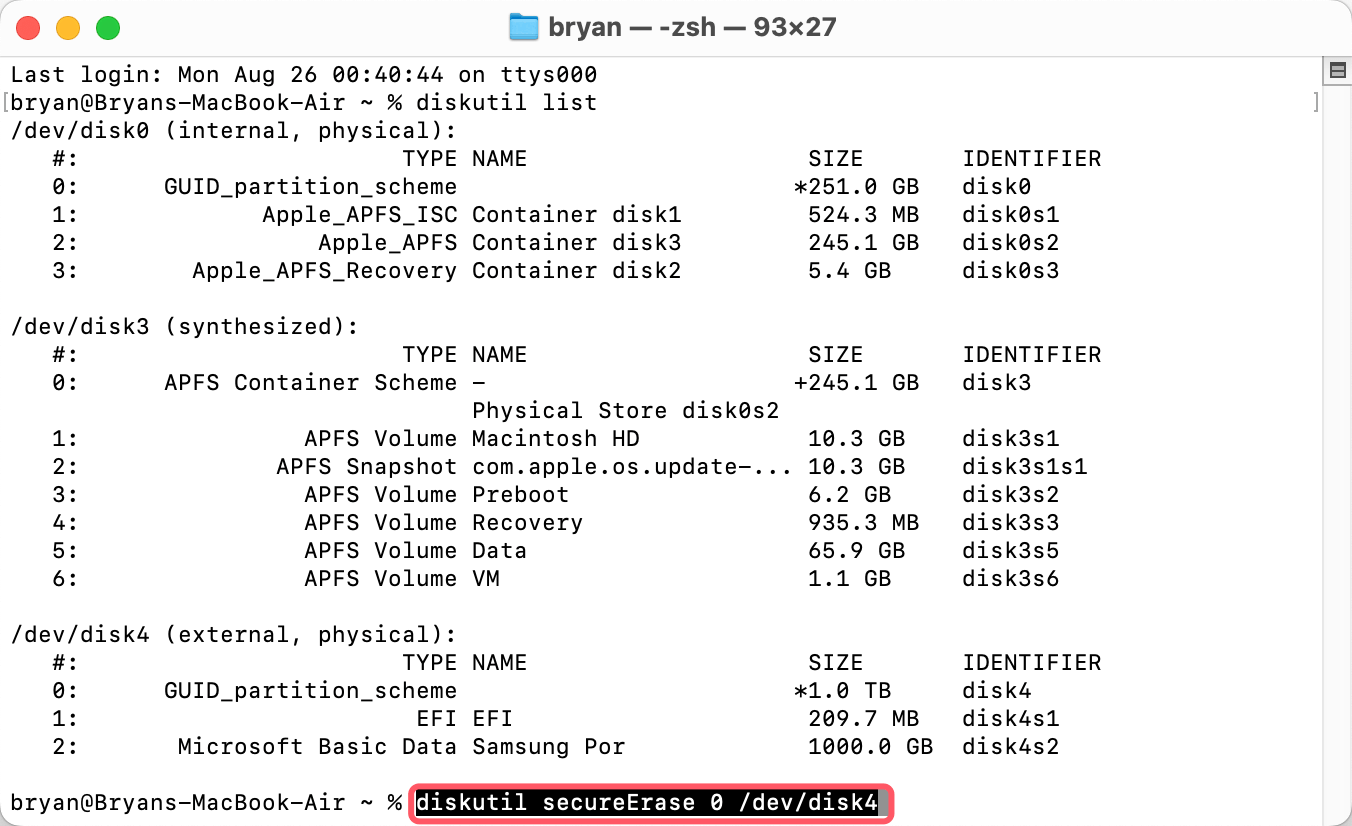
Step 3. Erase the SSD: To erase the SSD, use the script diskutil safely. As an example:
diskutil secureErase 0 /dev/disk4
In place of disk4, put the right name for your drive. You can set the amount of security by adding a number (0 to 4) to the "secureErase" option.
Step 4. Confirm the Erase: The terminal will request approval before proceeding with the erase. To be sure, type "y" and press "Enter."
Step 5. Monitor Progress: The Terminal will show details about the progress. When the process is complete, your SSD will be safely erased.
Note: The data which is erased by Disk Utility or Terminal commands is not lost for good and can be recovered by data recovery software.
Method 3: Using Mac Disk Wipe Software [Data is lost for good]
If you will sell, donate or dispose of your Samsung Portable SSD, you can use Mac disk wipe software to wipe it and permanently erase all data from it, no trace left behind.
Step 1. Download the best Mac disk wipe software - DoYourData Super Eraser for Mac. Install it on your Mac and make sure your Samsung Portable SSD is connected to the Mac.
Step 2. Open DoYourData Super Eraser for Mac, then choose Wipe Hard Drive mode. This mode will securely and permanently erase all data (including existing data, deleted/formatted/lost data, hidden data) from a drive, ensure no data is recoverable.
Step 3. Select the Samsung Portable SSD, click on Wipe Now button.

Step 4. Select a data erasure standard (such as HMG Infosec, NIST 800-88, Peter Gutmann's algorithm, DoD 5220.22-M, U.S. Army AR380-19), then click on Continue button.
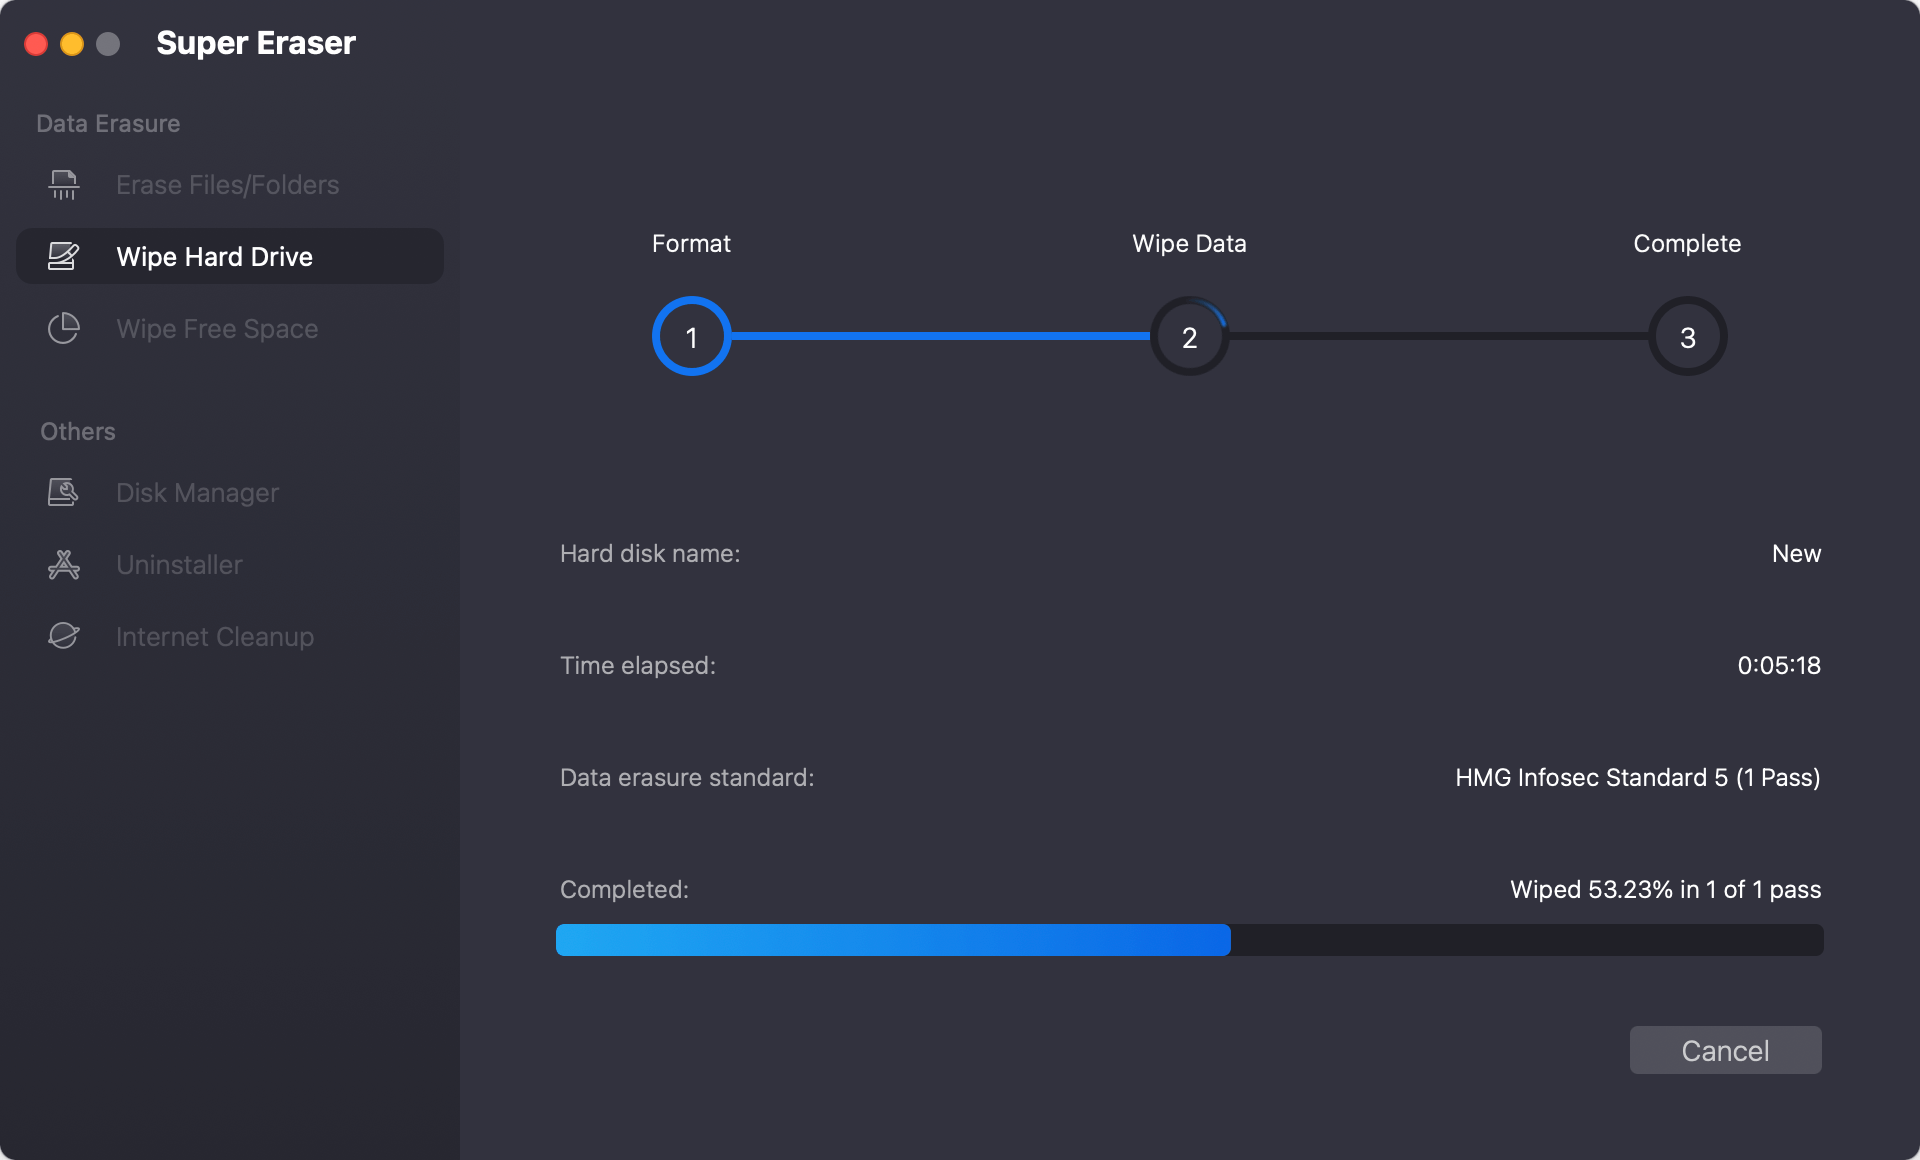
Step 5. It will format and wipe the Samsung Portable SSD, permanently erasing all data from it.

Note: Once the data is erased by DoYourData Super Eraser for Mac, the data is lost for good, cannot be recovered by any data recovery method.
Conclusion:
To wipe the Samsung Portable SSD on a Mac, you can use Disk Utility, Terminal, or disk wipe software. Each method safely deletes your data, protecting your privacy and reworking the drive for use. Before you wipe, always ensure you have a copy of any important items.
You can safely and effectively erase your SSD using the easy-to-use Disk Utility, the powerful command line of Terminal, or the handy Mac disk wipe software. By following the steps in this guide, you can be sure that your data is cleared safely and that your SSD is ready for its next job.
FAQs About Wiping Samsung Portable SSD on Mac
1. How to format a Samsung Portable SSD for Mac?
Disk Utility can help you quickly format a Samsung Portable SSD for Mac:
- Go to Launchpad > Other > Disk Utility, open Disk Utility.
- Select the Samsung Portable SSD.
- Click Erase, select a file system such as APFS, Mac OS Extended, ExFAT.
- Click Erase again.
- Once the process gets finished, click Done.
2. How to wipe a Samsung Portable SSD on Mac?
You can use DoYourData Super Eraser for Mac to wipe a Samsung Portable SSD on Mac:
- Make a backup of your Samsung Portable SSD data.
- Download and install DoYourData Super Eraser for Mac, open it.
- Choose Wipe Hard Drive mode, select the Samsung Portable SSD.
- Click on Wipe Now button.
- Select a data erasure standard, click on Continue button.
- Wipe the Samsung Portable SSD.
3. What is the best tool for wiping a Samsung Portable SSD on Mac?
Here are some tools you can try:
- Disk Utility
- Terminal
- DoYourData Super Eraser for Mac
- Donemax Data Eraser for Mac
- AweEraser for Mac
4. Is it possible to recover the lost data after wiping a Samsung Portable SSD on Mac?
No, once the data stored on your Samsung Portable SSD is erased by DoYourData Super Eraser for Mac, the data is lost for good, cannot be recovered by any method.

DoYourData Super Eraser for Mac
DoYourData Super Eraser for Mac is a 100% safe, powerful and easy-to-use data erasure program. It offers certified data erasure standards including Peter Gutmann, U.S. Army AR380-19, DoD 5220.22-M ECE to permanently erase data from Macs and external devices, making data recovery be impossible.