Quick Navigation:
When you wipe a hard drive on OS X 10.11 El Capitan, all your data is erased for good, and the drive is ready for a new start. That might be needed for several reasons, like when you want to sell or give away your Mac, fix problems that won't go away, or start over with a blank page. By safely wiping the drive, all personal information is erased and can't be recovered normally.
This complete guide will show you how to wipe your hard drive on OS X 10.11 El Capitan safely and effectively. You'll know how to do everything you need to know to safely complete this important task, from getting ready for the wipe to using Disk Utility, setting up erase options, reinstalling the OS, and starting over with your Mac.
![Permanently Erase Data in OS X 10.11 El Capitan]()
Before Wiping Hard Drive on OS X 10.11 El Capitan
- Backup Your Data: Make sure you back up any data you want to keep before you wipe your hard drive. Your important pictures, documents, apps, and files can be saved in the cloud, with Time Machine, or on an external drive. Once the drive is erased, this info can't be added back.
For example, you can use Mac disk cloning program to clone everything from your Mac to an external hard drive and create a full bootable clone for OS X 10.11 El Capitan.
- Deauthorize Your Computer: If you use iTunes, deauthorize your Mac to avoid later problems. In the iTunes menu, open Account and then click on Authorizations. Finally, click on Deauthorize This Computer.
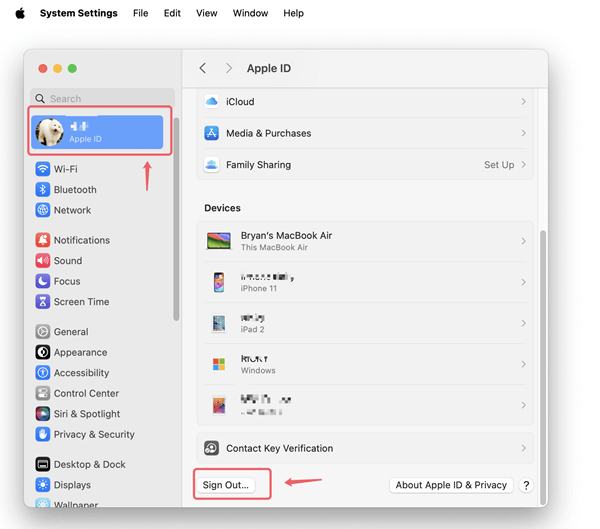
How to Disable All Accounts and Wipe Data Before Selling Mac
Follow these steps to back up your data, sign out of all accounts, wipe all data from the hard drive, reinstall macOS, etc.
Step-by-Step Guide to Factory Reset Mac OS X 10.11 El Capitan
Step 1. Boot into Recovery Mode
Start up your Mac in Recovery Mode before you can wipe your hard drive. How to do it:
- Turn Off Your Mac: Select "Shut Down" from the Apple menu.
- Power On and Enter Recovery Mode: Press and hold the Command and R keys as soon as you turn on your Mac. Hold the keys until you see the Apple sign or a spinning globe.
Step 2: Access Disk Utility
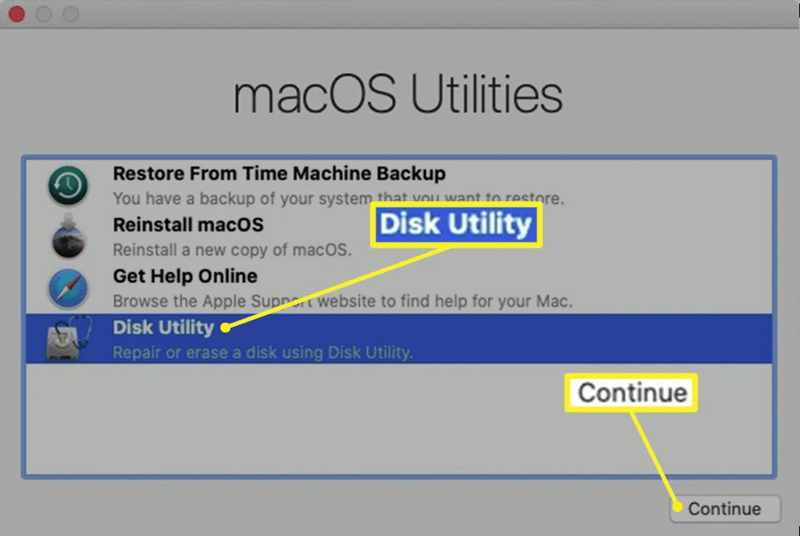
The macOS Utilities window will show up once you are in Recovery Mode. You can use this to get to Disk Utility and start cleaning.
- Select Disk Utility: Click Disk Utility in the macOS Utilities window, then click Continue.
![erase hard drive on OS X 10.11 El Capitan]()
Step 3: Select the Drive to Erase
Disk Utility shows you drives and files you can use. Most of the time, the internal drive called "Macintosh HD" or something similar is the right one to choose.
- Choose the Drive: Pick the drive you want to delete from the list on the left. Ensure you pick the right drive so you don't accidentally delete the wrong one.
Step 4: Erase the Drive
Since you've already chosen the file, you can erase it. All the information on the drive will be erased after this step.
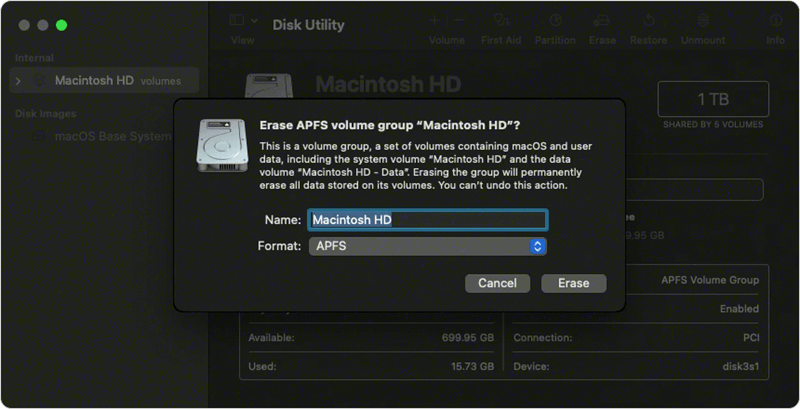
- Click Erase: Click the Erase button at the top of the Disk Utility window once the right drive has been chosen.
- Configure Erase Options: A new window will ask how you want to delete the drive. The following information is what you need to give:
- Name: Give the drive a new name. Like, you could give it the name "Macintosh HD" again.
- Format: If you want to add macOS El Capitan again, pick Mac OS Extended (Journaled).
- Scheme: Pick out the GUID Partition Map.
- Security Options: If unsure if your data can be recovered, click Security Options to change how completely the drive is erased. You can make things safer by moving the scale to the right. The safest choice overwrites the data seven times, making it almost hard to return.
- Erase: After setting up the choices, click the "Erase" button to start the process. Dos will format and erase the drive. How long this takes will depend on the drive size and the security settings you choose.
![erase hard drive on OS X 10.11 El Capitan]()
Step 5: Reinstall macOS
Before you can use your Mac again, you must restart macOS after you erase the drive. While you were still in Recovery Mode:
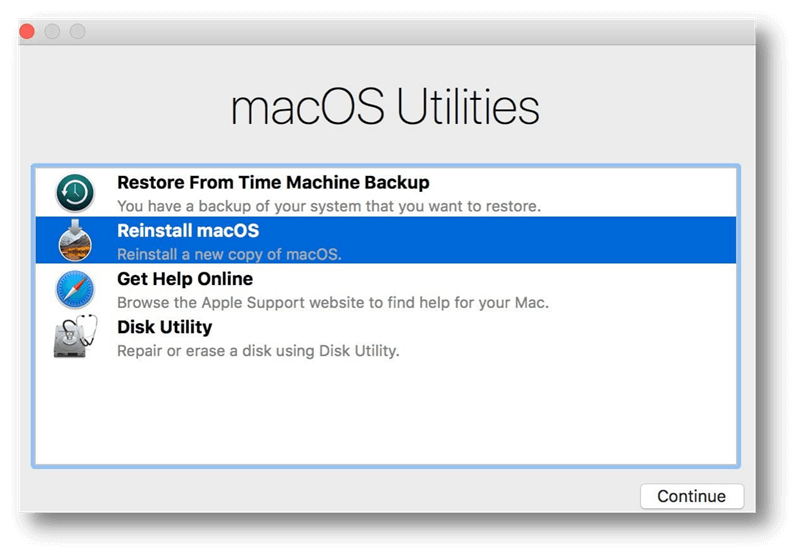
- Return to macOS Utilities: If you want to return to the macOS Utilities window, close Disk Utility.
- Reinstall macOS: Choose to reinstall macOS, then click Continue. To reinstall macOS El Capitan, follow the steps shown on the screen. As you go through this process, Apple's servers will download the files you need and install a new copy of the operating system on your empty drive.
![erase hard drive on OS X 10.11 El Capitan]()
Please note that the data which is erased by Disk Utility is not lost forever and can be recovered by data recovery software.
If you have lost data due to factory reset OS X 10.11 El Capitan, just follow these steps to get all erased or lost data back:
Step 1. Download and install Do Your Data Recovery for Mac, then open it.
Step 2. Open Do Your Data Recovery for Mac, select the internal drive, click on Scan button.
![wipe data on Mac OS X 10.11 El Capitan]()
Step 3. Deeply scan the drive and find all recoverable files.
![wipe data on Mac OS X 10.11 El Capitan]()
Step 4. Preview and recover lost files after scanning.
![wipe data on Mac OS X 10.11 El Capitan]()
Post-Wipe Setup:
When the setup is done, your Mac will restart and ask you to set up your system. It's a lot like setting up your Mac the first time you got it. Here are the steps you need to take:
- Select Your Country and Language: Pick your country or area and the language you want to use.
- Connect to Wi-Fi: Pick a Wi-Fi station to link to the internet.
- Sign In with Your Apple ID: Set up an Apple ID before you use iCloud, iTunes, or any other Apple tool. You can set it up later if you don't want to.
- Transfer Information: You can move files from a backup or another Mac during setup. At this point, you can get your files back if you have a Time Machine backup.
- Create a Computer Account: Make an account and password for your Mac.
- Set Up iCloud Keychain: To set up iCloud Keychain, do what it says.
Additional Tips and Considerations:
- Secure Erase: For extra safety, especially if you're giving or selling your Mac, you should use the Security Options in Disk Utility to erase it more completely. It makes sure that the next user can't get back your info.
- Firmware Password: If you're worried about security, you can set a software password. That makes things even safer by allowing everyone to enter a password before they can boot from a different drive or get to Recovery Mode.
- Software Updates: Make sure your machine is up to date after reinstalling macOS. To get any changes, go to the Apple menu, choose App Store, and click the changes tab.
- Data Restoration: If you backed up your info, be careful when you restore it. If you have a Time Machine backup, you can use Migration Assistant. If not, you can hand-copy your files from an external drive or the cloud.
How to Permanently Erase Data in OS X 10.11 El Capitan?
Before you sell or donate your old Mac, you should securely and permanently wipe all your private data. DoYourData Super Eraser for Mac is a powerful data erasure program. It can help you securely and permanently erase data in OS X 10.11 El Capitan.
DoYourData Super Eraser for Mac
- Securely wipe hard drive on OS X 10.11 El Capitan.
- Wipe all existing and deleted data in OS X 10.11 El Capitan.
- Certified data erasure standards including HMG Infosec, NIST 800-88, Peter Gutmann's algorithm, DoD 5220.22-M, U.S. Army AR380-19, etc.
After factory reset your Mac and reinstalling OS X, just wipe free disk space to permanently erase all deleted/lost data from the Mac drive.
Step 1. Download and install DoYourData Super Eraser for Mac on your Mac, open it, then choose Wipe Free Space mode.
![wipe data on Mac OS X 10.11 El Capitan]()
Step 2. Select the internal disk, such as Macintosh HD, then click on Wipe Now button.
![wipe data on Mac OS X 10.11 El Capitan]()
Step 3. Select a data erasure standard, then click on Continue button to securely wipe free disk space of the disk and erase all deleted/erased/lost data from it, leave no trace for data recovery.
![wipe data on Mac OS X 10.11 El Capitan]()
It also offers other modes to securely and permanently erase data in Mac OS X 10.11 El Capitan:
- Erase Files: Some sensitive files should be permanently destroyed if you are going to give your Mac to other people. This mode will help you permanently erase files or folders under OS X 10.11 El Capitan. The steps are very easy: add files or folders you want to erase -> click on "Erase Now" to erase them.
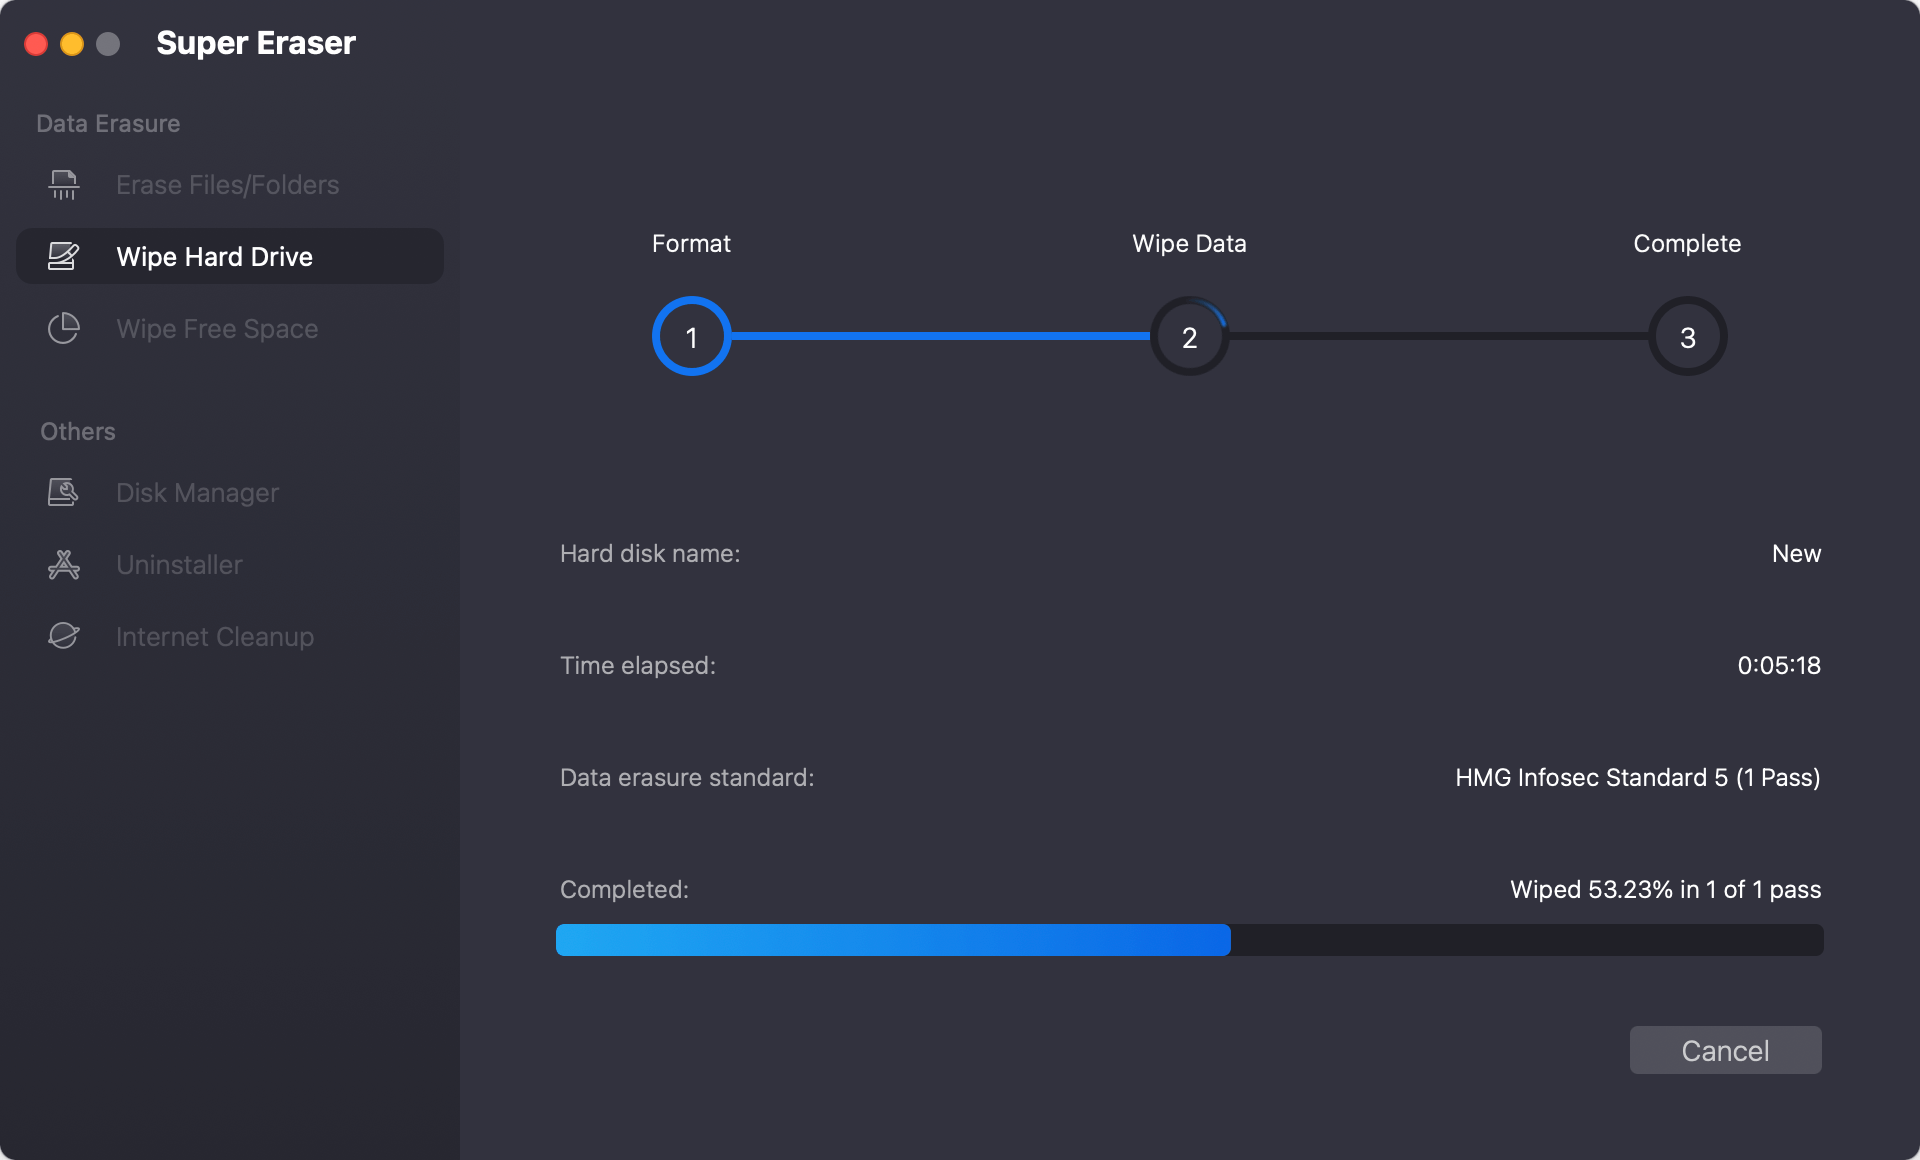
- Wipe Hard Drive: When you are going to resell, donate or throw away your old hard drive, you'd better use this mode to permanently erase all the existing and preciously existing data under OS X 10.11 El Capitan. It will destroy all the data on the selected hard drive under OS X 10.11 El Capitan, including the existing data and deleted/lost data.
Conclusion:
On Mac OS X 10.11 El Capitan, wiping a hard drive is a simple process, but you must pay close attention to ensure that all your data is deleted safely and the system is loaded correctly. You can be sure that you will protect your personal information and get your Mac ready for a new start if you follow the steps in this guide. A clean slate can make a big difference in your computer experience, whether you're fixing problems, selling your device, or just starting over.
DoYourData Super Eraser for Mac
DoYourData Super Eraser for Mac is a 100% safe, powerful and easy-to-use data erasure program. It offers certified data erasure standards including Peter Gutmann, U.S. Army AR380-19, DoD 5220.22-M ECE to permanently erase data from Macs and external devices, making data recovery be impossible.
