Quick Navigation:
- Why Reformat a USB Flash Drive?
- Back Up USB Flash Drive before Reformatting
- How to Reformat USB Flash Drive on Mac?
- Troubleshooting Common Issues:
- Maintaining Your USB Flash Drive
- Conclusion
Reformatting a USB flash drive on a Mac is important for handling data and ensuring it works with all your devices. Reformatting can give you a fresh start, whether fixing a drive that won't work, getting it ready to work with a new system, or organizing your files. You can reformat your USB flash drive on a Mac by following the steps in this guide.
The steps cover different formatting choices to meet your needs. By learning the basics of reformatting, getting ready, and following a step-by-step method, you can ensure your USB flash drive works well and is compatible with other devices. Reformatting helps keep your drive healthy and working well, whether you only use it on macOS or multiple devices.
Why Reformat a USB Flash Drive?
Reformatting can fix problems like damaged files, drives that can't be read, or sudden disconnections.
♻️ Change File System: File systems can be used with various operating systems. After reformatting, you can pick the best one.
🚀 Improve Performance: Files can get broken up over time. Reformatting brings the info together and speeds up access.
🧹 Clear Space: Clean the drive to get the most out of the space it has.
👨🔧 Fix drive issues: If the USB flash drive is inaccessible or the file system is corrupted, reformatting it could fix the problem.
Common File Systems
Different file types are used to reformat the USB:
- APFS (Apple File System): It works better on macOS and has more advanced tools, such as encryption.
- Mac OS Extended (HFS+) is a traditional file system for macOS that works with older versions of the OS.
- exFAT: It works with macOS and Windows and can be used on multiple devices.
- FAT32 is an older file system that works with most devices but can only handle files less than 4GB in size.
Back Up USB Flash Drive before Reformatting
Before you start, make sure you have a copy of any important data on the USB flash drive, as reformatting will delete all the files already on it.
Copy Files to Your Mac:
1. Connect the flash drive to your Mac.
2. Start up Finder and look for your USB drive in the window.
3. You can add the files from the USB drive to a Mac folder by dragging and dropping them.
Use Time Machine:
1. Add another hard drive to your Mac.
2. System Settings is where you can open Time Machine.
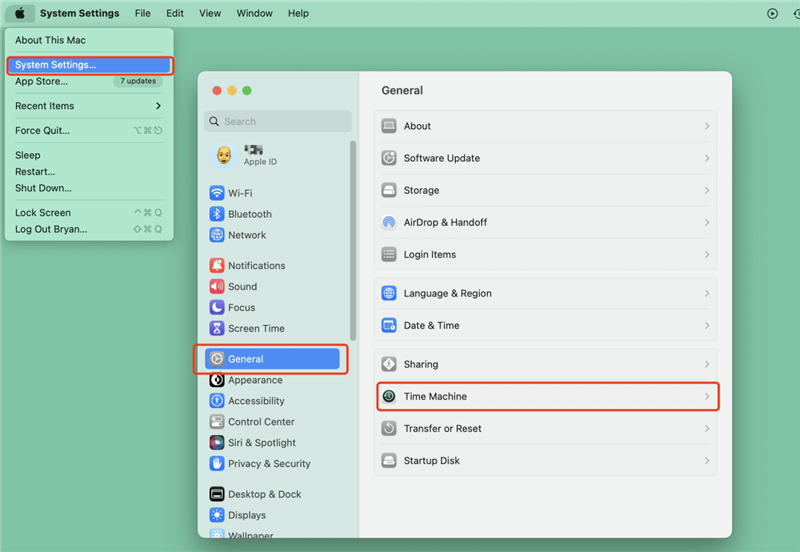
3. Choose a drive to save the backup data from the USB flash drive.
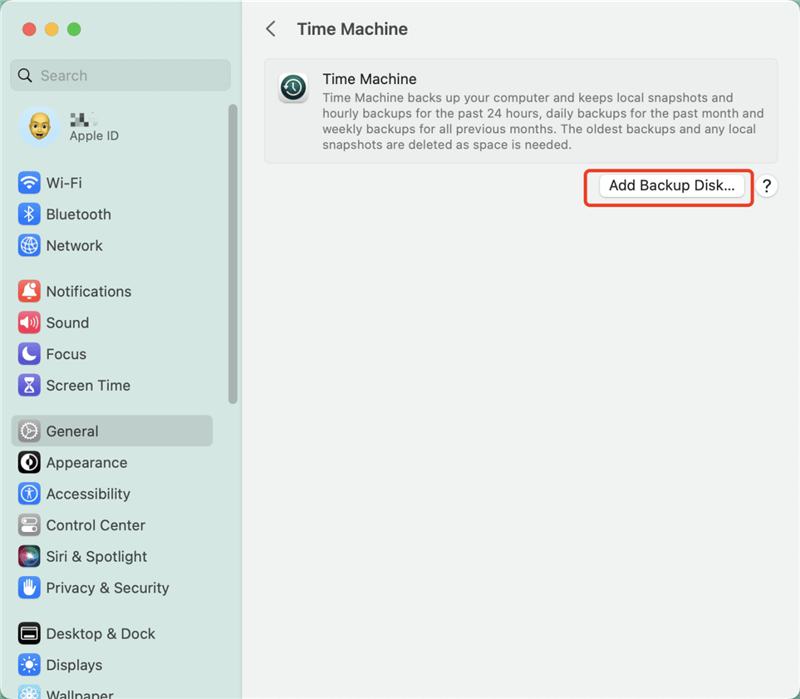
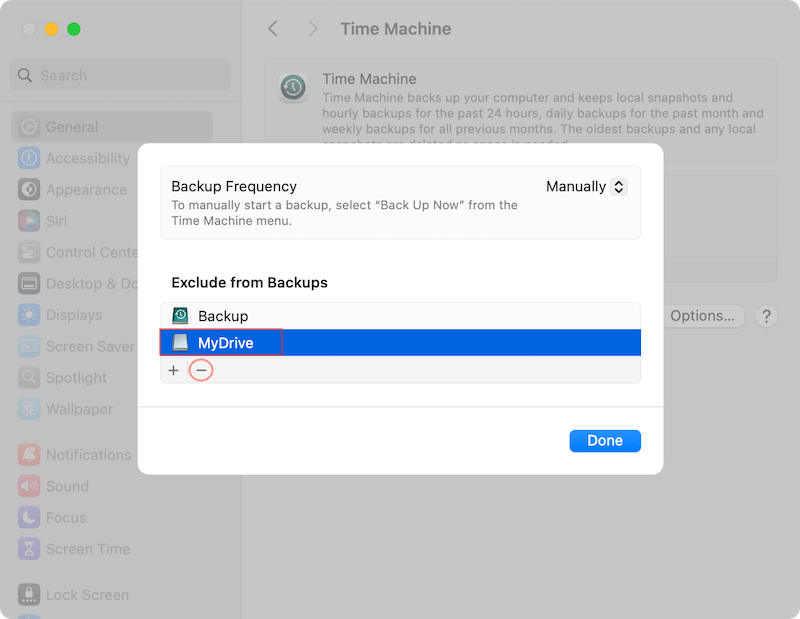
4. Click the Options to change the backup settings.
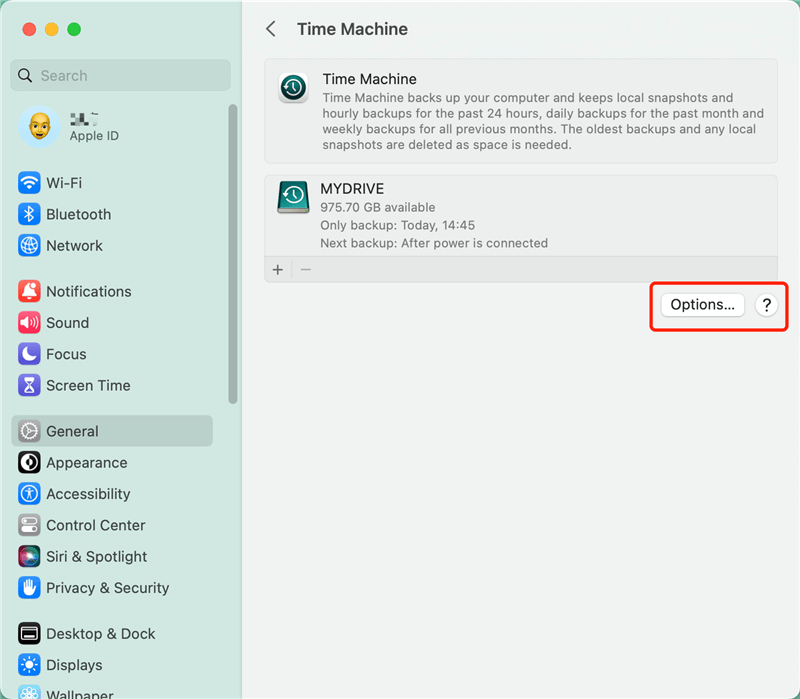
5. Under Exclude from Backups, remove the USB flash drive from the list, then the USB flash drive data will be backed up.
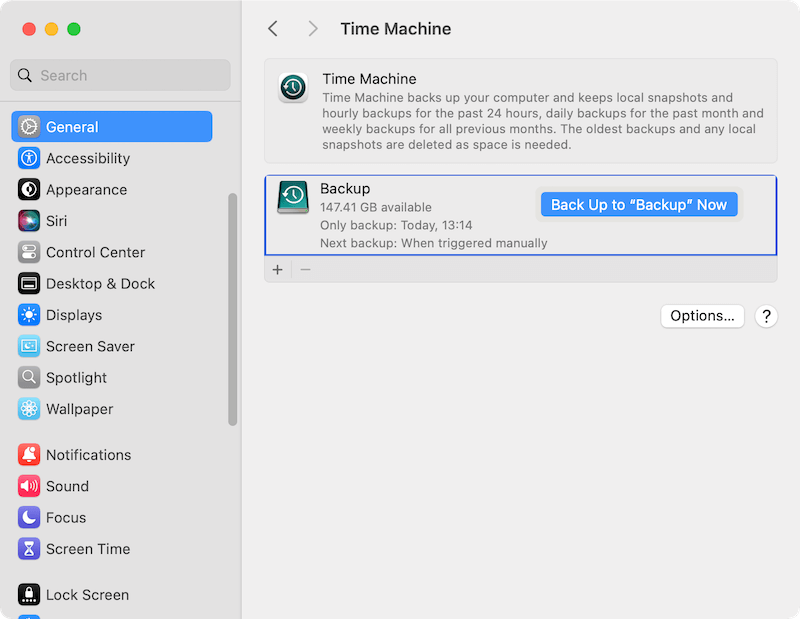
6. Right click the backup drive and click Back Up to "BackupDrive" Now to make a copy of your files, including those on your USB flash drive.
How to Reformat USB Flash Drive on Mac?
There are different methods you can use to reformat a USB flash drive on Mac, including Disk Utility, Terminal, or third-party software. Here we will introduce these methods and show the steps to reformat USB flash drive.
Method 1. Reformat USB flash drive in Disk Utility
Step 1: Connect the USB Flash Drive
Connect your USB flash drive to a Mac that has a USB port. Make sure that Finder can see and recognize the drive.
Step 2: Open Disk Utility
Open Finder. Select Utilities from the list of Applications. The program will start up when you double-click Disk Utility.

Step 3. Select the USB flash Drive
You can see a list of all the connected drives in Disk Utility. In the toolbar, find your USB flash drive and click on it.
Step 4: Erase the USB flash Drive
To reformat the USB flash drive, click on the Erase tab at the top of the page.
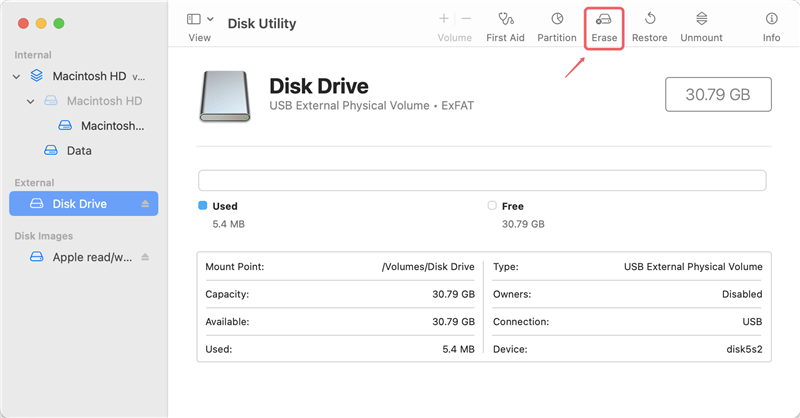
There are different file systems you can choose to format the USB flash drive in the "Erase" box. From the drop-down box, choose a file system, such as APFS, Mac OS Extended, exFAT, or FAT32. In the Name field, give your USB flash drive a new name.

To safely delete the drive, click the "Security Options" button. Pick the amount of security that fits your needs, like "Fastest" or "Most Secure."

Step 5: Erase and Reformat
To start the process of reformatting, click the Erase button. An approval window will show up. Confirm your decision to move forward. The drive will be erased and reset. That could take a while.
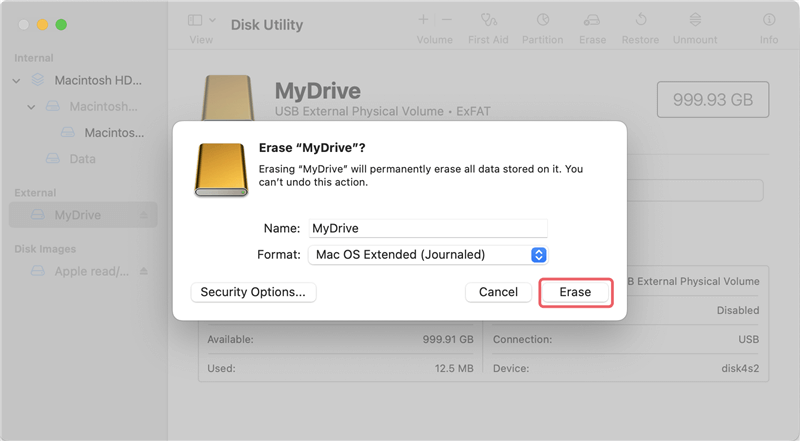
You will see a message that says the process is finished once it's done. You can click Done button to close it.

Step 6: Verify the Reformatting
Check the USB flash drive and confirm if it's reformatted successfully, here is how: Shut down Disk Utility. Open Finder and look in the sidebar for the USB drive you just formatted. Make sure the drive is empty and ready to go.
Method 2. Reformat USB Flash Drive in Terminal
Terminal is another system built-in utility which can be used to reformat USB flash drive. It would be complex and only applicable for the users who are familiar with command lines. Here are the steps to reformat USB flash drive in Terminal on Mac:
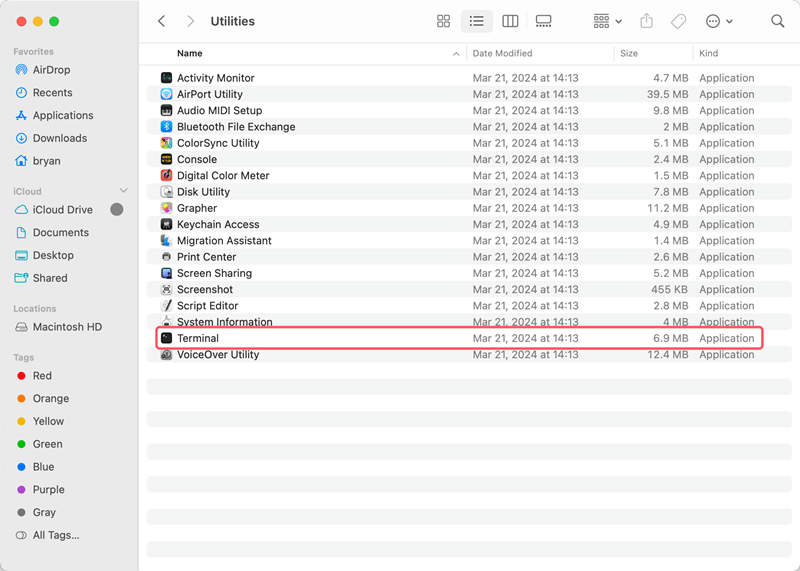
Step 1. Open Terminal from Utilities folder under Applications folder.
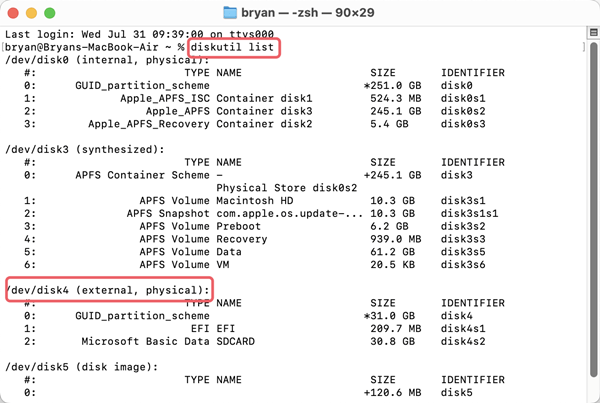
Step 2. First, enter the following command to list and locate the drive information about the USB flash drive.
diskutil list
Step 3. Reformatting the USB flash drive with the following command:
diskutil eraseDisk ExFAT MyDrive /dev/diskX
You can change the file system ExFAT and MyDrive to another one as you want. Also, ensure to replace the X with the correct disk number on your Mac.
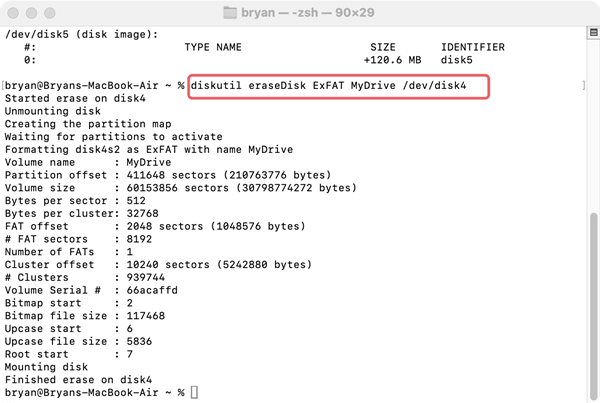
After the commands are executed successfully, you can first close Terminal windows and go to Finder to check if the USB flash drive is reformatted successfully. Please note that with the methods above to formatting the USB flash drive, there is a chance to recover the data from the reformatted USB flash drive. If you want to ensure the data will be wiped permanently, you can choose a third-party data erasure tool instead.
Method 3. Reformat and Wipe USB Flash Drive with Software
If you want to reformat a USB flash drive and permanently wipe all the data on the drive, it's essential to use a reliable data wiping software. The simple formatting process with the system built-in tools will not guarantee the data is gone for good.
The professional data sanitation tools can ensure the data on a USB flash drive or any other drives be overwritten multiple passes. In this way, the data will not be recovered in any way. It's necessary if you need to wipe sensitive or privacy information on USB flash drive.
DoYourData Super Eraser for Mac is a reliable software that stands out among the data wiping tools in the market. It's equipped with international data sanitation algorithms, like DoD 5220.22-M, NIST 800-88, U.S. Army AR380-19, Peter Gutmann's algorithm, HMG Infosec Standard 5, etc.
DoYourData Super Eraser for Mac
- Professional data erasure software for macOS.
- Wipe data with international data wiping algorithms.
- Easy-to-use with simple and intuitive interface.
Also, the software is designed as simple as possible. Any user can easily handle it to wipe data from different devices in any scenarios. Here we will show you how to wipe and reformat a USB flash drive with this software:
Step 1. Connect your USB flash drive to the Mac and run the software DoYourData Super Eraser for Mac from launchpad. To wipe and format the USB flash drive, you need to select the mode Wipe Hard Drive.

Step 2. Click Wipe Now button and then you can choose a data erasure standard (algorithm) from the drop down list in the popup window.
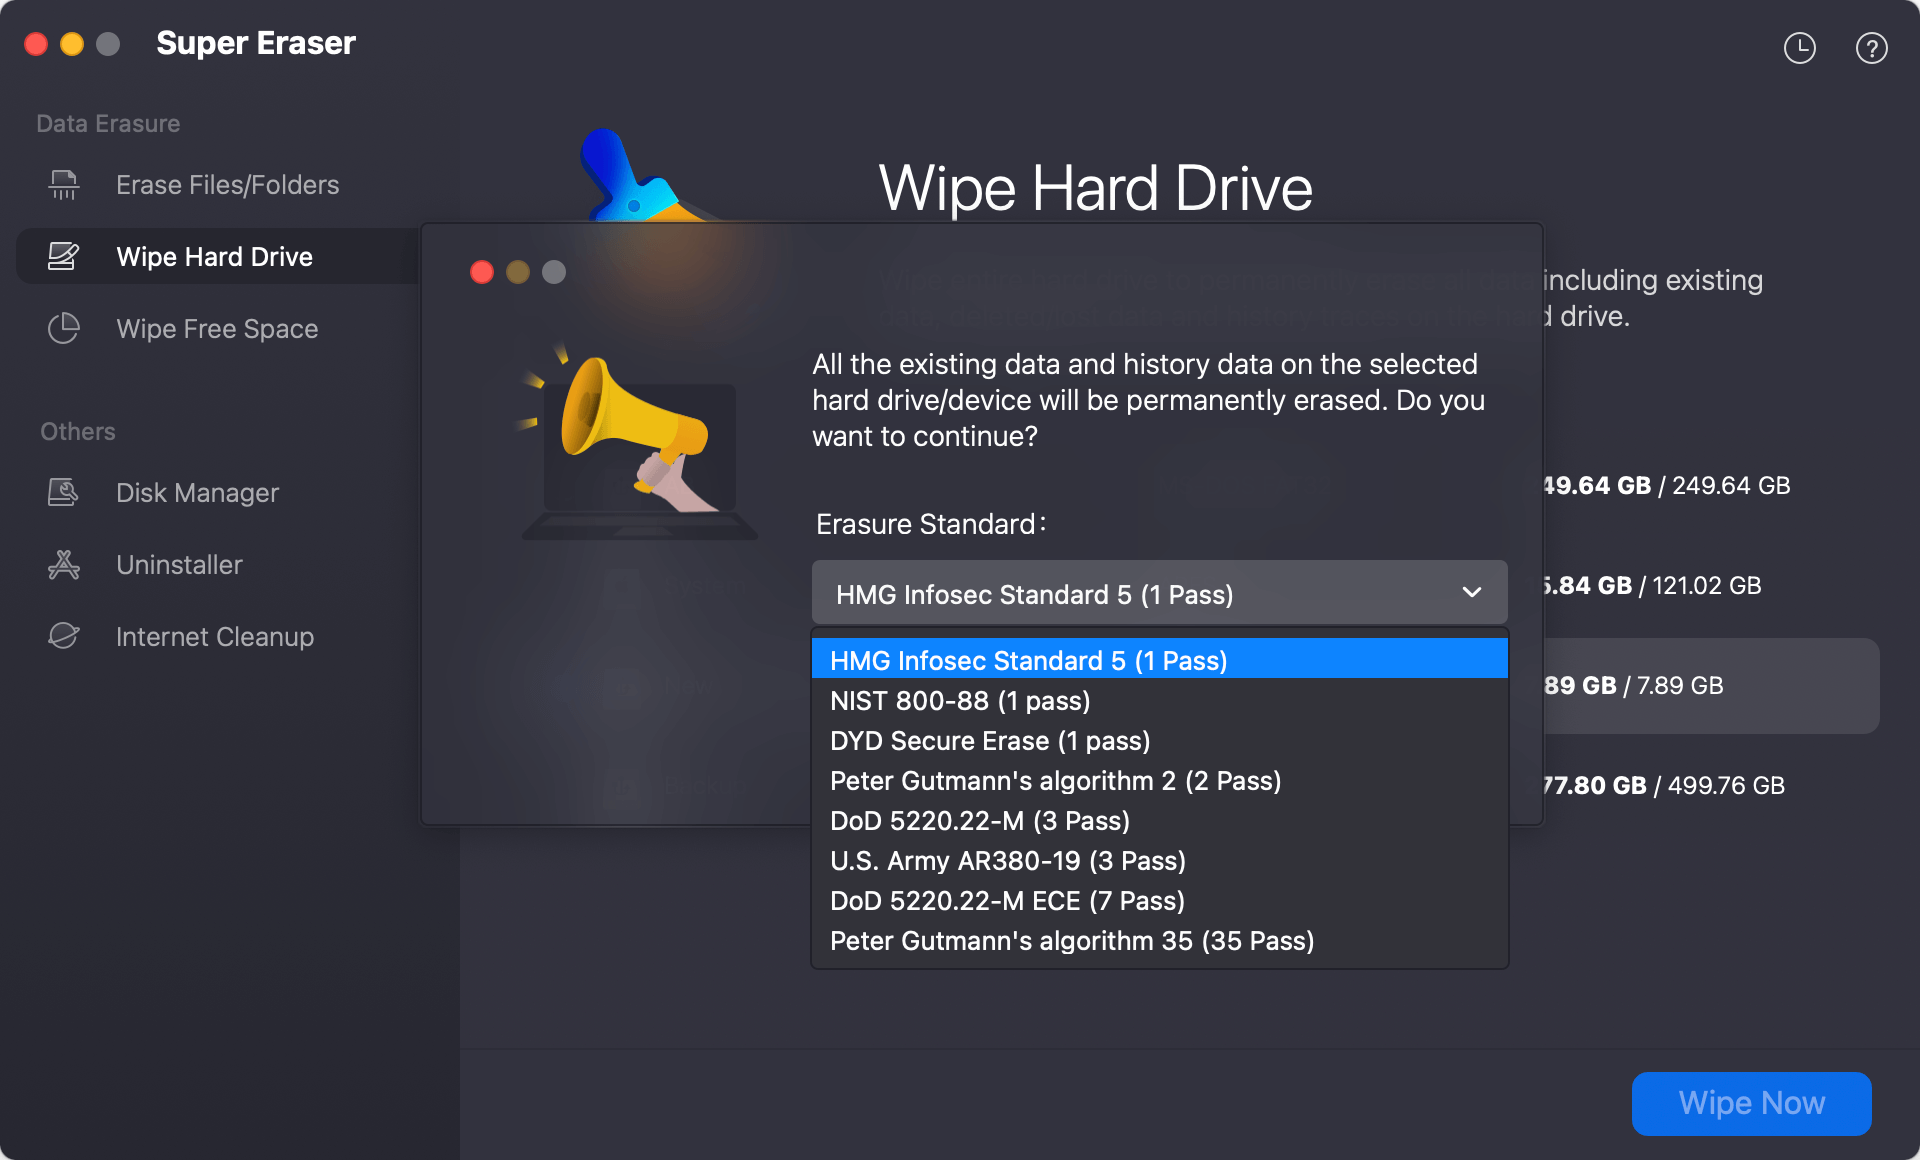
Step 3. After confirming the data erasure algorithm, just click the Continue button and the software will proceed and wipe all data from the USB flash drive and format it.
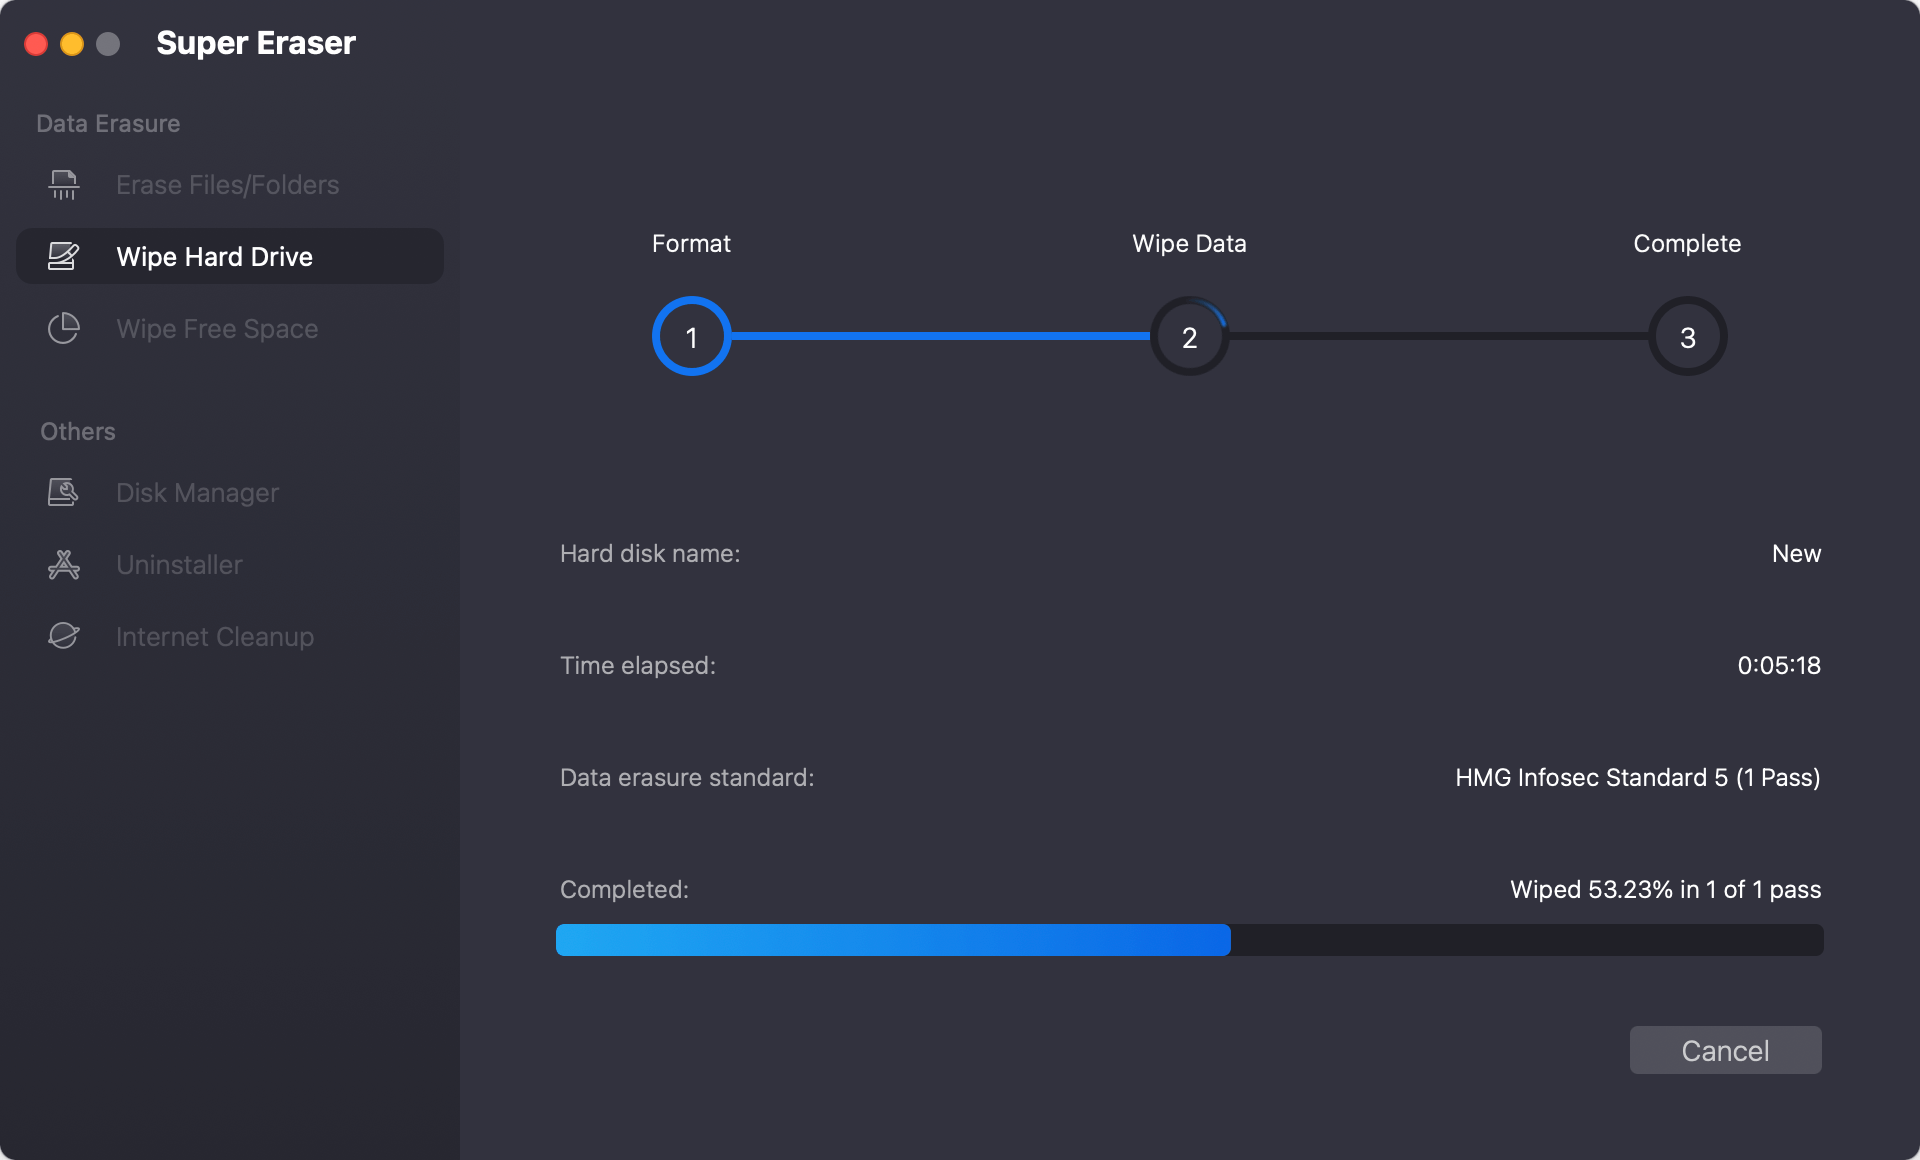
Once the data wiping process is done, all the data on the USB flash drive is gone for good. No data on the drive could be recovered in any way. Also, the drive is reformatted and you can reuse it.
Troubleshooting Common Issues:
You could face problems during or after reformatting, even if well-prepared. Here are some usual issues and how to fix them:
USB Drive Not Recognized ⚠️
- Check Connections: Make sure the USB drive is plugged correctly.
- Try Another Port: On your Mac, use a different USB port.
- Restart Mac: To get a new link, restart your computer.
- Use Another Computer: Connect the USB drive to a different Mac or PC.
Disk Utility Errors ⚠️
- Reformat in Safe Mode: Restart up your Mac hold Power button, after seeing the startup disk, hold Shift key and then click "Continue in Safe mode". Try formatting it again with Disk Utility in Safe mode.
- Use Terminal: If you want to erase and format the drive, use Terminal tools like diskutil.
- Third-Party Tools: If Disk Utility doesn't work, try using third-party disk control tools.
Data Recovery ⚠️
If you formatted a USB drive in Disk Utility or Terminal by mistake and didn't save a copy of important files, data recovery software might be able to help you recover them. Do Your Data Recovery for Mac, Donemax Data Recovery for Mac, and Stellar Data Recovery are all well-known choices.
Maintaining Your USB Flash Drive
After you reset your USB flash drive, do these things to keep it working well and make it last longer:
🛠️ Regular Backups
- Frequent Backups: Ensure you back up your important info often to avoid losing it.
- Use Multiple Locations: Keep saves on different devices or in the cloud for extra safety.
🛠️ Safe Ejection
- Eject Properly: Before removing the USB drive from the port, always use Finder to "eject" it.
- Avoid Disconnections: Stop disconnections from happening by mistake while data is being sent.
🛠️ Keep Software Updated
- Update macOS: For the newest benefits and safety, ensure your operating system is always up to date.
- Firmware Updates: Try updating the software on your USB drive by going to the business website that made it.
🛠️ Monitor Drive Health
- Check for Errors: Occasionally, check for and fix disk problems with Disk Utility.
- Replace When Needed: If the drive is worn out or makes many mistakes, you might want to get a new one.
Conclusion
Reformatting a USB flash drive on a Mac is an easy and effective way to fix problems, make it run faster, and ensure it works with various devices. Following this complete guide, you can easily reformat your drive with Disk Utility, Terminal, or the software DoYourData Super Eraser for Mac, choose the right file system, and keep it healthy.
For life and dependability, it's important to do regular backups, make sure the disk is ejected correctly, and keep the software up to date. Reformatting gives your USB flash drive a clean slate so it can be used reliably and efficiently on various systems, whether you're fixing problems or getting it ready for new uses.

DoYourData Super Eraser for Mac
DoYourData Super Eraser for Mac is a 100% safe, powerful and easy-to-use data erasure program. It offers certified data erasure standards including Peter Gutmann, U.S. Army AR380-19, DoD 5220.22-M ECE to permanently erase data from Macs and external devices, making data recovery be impossible.