Erase Fusion Drive on Mac: A Comprehensive Guide
In 2012, Apple introduced iMac and Mac mini with a new storage option: the Fusion drive. A Fusion drive is actually two drives: a 128 GB SSD (Solid State Drive) and a standard 1 TB or 3 TB platter-based hard drive. The Fusion drive combines the SSD and the hard drive into a single volume that the OS sees as a single drive. In this article, we will show you how to erase Fusion drive on Mac.
![]() Updated by Shirly Chen on August 8, 2024
Updated by Shirly Chen on August 8, 2024
Quick Navigation:
- Understanding the Fusion Drive
- Preparing to Erase the Fusion Drive on Mac
- Step-by-Step Guide to Erasing the Fusion Drive
- Permanently Erase Data from Fusion Drive on Mac
- Conclusion
A Fusion Drive combines the speed of a Solid-State Drive (SSD) with the capacity of a Hard Disk Drive (HDD), providing an efficient and large storage solution. However, there are times when you might need to erase your Mac Fusion Drive, whether for selling your Mac, fixing performance issues, or simply starting fresh. This article will guide you through the process, ensuring that you can safely and effectively erase your Fusion Drive and reinstall macOS.

Understanding the Fusion Drive
A Fusion Drive is Apple's innovative solution that combines a Solid-State Drive (SSD) with a traditional Hard Disk Drive (HDD) to create a single logical volume with the advantages of both storage technologies. This setup aims to provide high performance while maintaining ample storage capacity, making it an attractive option for many Mac users.
Components and Functionality:
Solid-State Drive (SSD): The SSD component of a Fusion Drive offers fast data access speeds due to its flash memory technology. Unlike traditional HDDs, SSDs have no moving parts, which allows them to access data almost instantaneously. This speed is particularly beneficial for tasks that require rapid data retrieval, such as booting the operating system, launching applications, and accessing frequently used files.
Hard Disk Drive (HDD): The HDD component provides larger storage capacity at a lower cost per gigabyte compared to SSDs. HDDs use spinning disks (platters) to read and write data, which makes them slower than SSDs but more cost-effective for storing large amounts of data that do not require frequent access.
macOS Management of Data: macOS manages the Fusion Drive by automatically and intelligently moving data between the SSD and HDD based on usage patterns. Frequently accessed files and applications are stored on the SSD to take advantage of its speed, while less frequently accessed data is moved to the HDD. This dynamic allocation ensures that the system operates efficiently, delivering faster performance for common tasks while providing ample storage space for larger files and archives.
CoreStorage Technology: The Fusion Drive utilizes Apple's CoreStorage technology to create a single logical volume that spans both the SSD and HDD. CoreStorage is a logical volume manager that combines the two physical drives into one virtual drive, making it seamless for the user. This abstraction allows macOS to handle data management automatically without user intervention.
Benefits and Drawbacks:
Benefits:
- Speed: By leveraging the fast read and write speeds of the SSD, the Fusion Drive significantly improves the overall performance of the system. Boot times are reduced, applications launch more quickly, and frequently used files are accessed with minimal delay.
- Capacity: The inclusion of an HDD provides large storage capacity, allowing users to store extensive libraries of files, such as photos, videos, and documents, without worrying about running out of space.
- Cost-Effectiveness: Combining an SSD with an HDD is more cost-effective than using a large-capacity SSD alone. This hybrid approach delivers the performance benefits of an SSD while keeping costs lower by using the cheaper HDD for bulk storage.
Drawbacks:
- Complexity: The Fusion Drive's reliance on two different types of storage adds complexity to the system. Managing the data between the SSD and HDD requires sophisticated algorithms and seamless integration by macOS, which can occasionally lead to issues.
- Failure Points: Since the Fusion Drive consists of two physical drives, it has more potential points of failure compared to a single drive system. If either the SSD or HDD fails, it can complicate data recovery efforts and potentially lead to data loss.
- Performance Degradation: Over time, as the SSD fills up, macOS may need to move data more frequently between the SSD and HDD, which can lead to performance degradation. Additionally, if the SSD is overloaded with too much data, its performance can suffer, negating some of the speed benefits.
- Data Migration: When replacing or upgrading a Fusion Drive, migrating data can be more complicated due to the integrated nature of the two drives. This complexity can make upgrades and repairs more challenging compared to systems with a single type of storage.
Understanding these components and how macOS manages them provides a clearer picture of the Fusion Drive's capabilities and limitations. While it offers a balanced solution for performance and storage needs, it's essential to be aware of the potential complexities and failure points that come with this hybrid storage setup.
Preparing to Erase the Fusion Drive on Mac
Before you proceed with erasing your Fusion Drive, it's crucial to prepare adequately to avoid data loss and ensure a smooth process.
Backup Your Data
Backing up your data is essential. Use Time Machine to create a complete backup of your system, or manually copy important files to an external drive or cloud storage service. This step ensures that you can restore your data after the erasure process.
Check macOS Version
Ensure your Mac is running the latest version of macOS. Keeping your operating system up to date can help prevent compatibility issues during the erasure and reinstallation process.
Gather Necessary Tools
Prepare the tools you'll need for the process. These include a bootable macOS installer (either on a USB drive or accessible through the internet), a reliable internet connection, and your Mac's power adapter to prevent any interruptions during the process.
Step-by-Step Guide to Erasing the Fusion Drive
Follow these detailed steps to erase your Fusion Drive and prepare your Mac for a fresh start.
Boot into macOS Recovery Mode
- Restart your Mac.
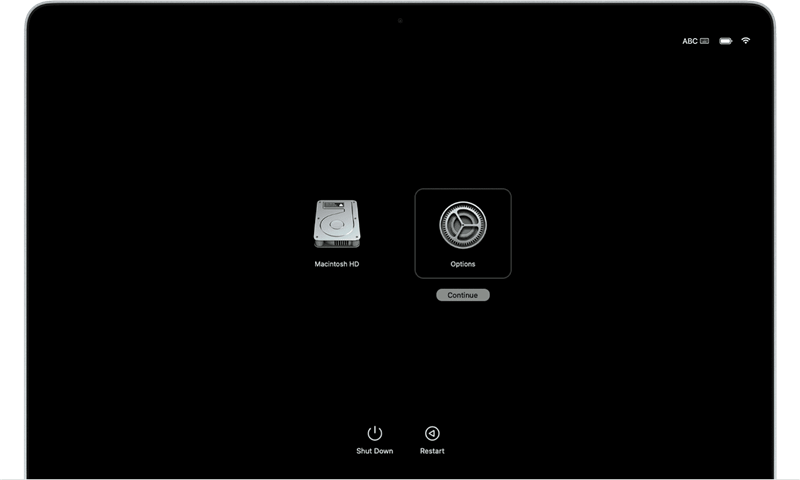
- Immediately press and hold Command + R until the Apple logo or a spinning globe appears. (If you are a Mac with Apple silicon, restart the Mac, press and hold Power button until you see startup drive and Options. Then select Options, click on Contibue button.)
- Release the keys when you see the macOS Utilities window.
Use Disk Utility
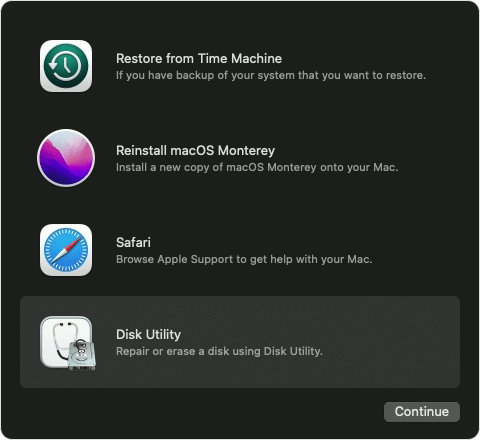
- In the macOS Utilities window, select Disk Utility and click Continue.
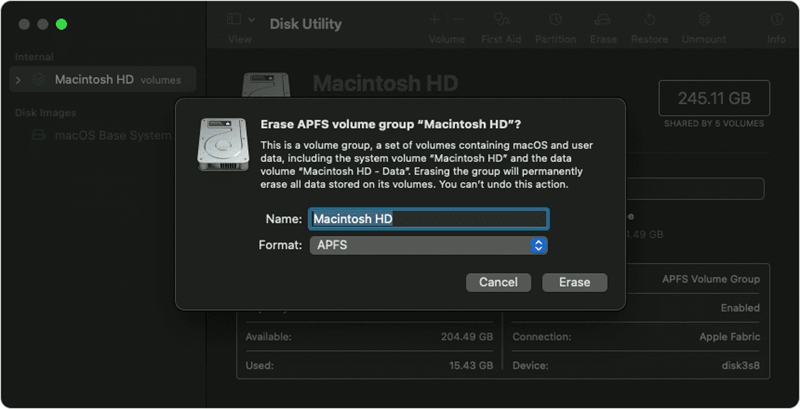
- In Disk Utility, select the Fusion Drive from the sidebar.
- Click the Erase button in the toolbar.
- Enter a name for the drive, choose the desired format (APFS is recommended for macOS 10.13 or later), and click Erase.

Partition and Format Options
When erasing your Fusion Drive, you may need to reformat and partition it. Choose the APFS format for newer macOS versions (10.13 or later) or HFS+ (Mac OS Extended) for older versions. Ensure you select the GUID Partition Map scheme for compatibility.
Reinstalling macOS
After erasing the Fusion Drive, you'll need to reinstall macOS.
Follow these steps to complete the process.
Install macOS
- In the macOS Utilities window, select Reinstall macOS and click Continue.
- Follow the on-screen instructions to complete the installation.
- After installation, your Mac will restart and display the setup assistant.
You also can reinstall macOS via USB installer.
Download macOS Installer
If you have a bootable USB installer, plug it into your Mac. Alternatively, you can download the macOS installer from the App Store or directly from Apple's website if your Mac is connected to the internet.
Set Up Your Mac
Follow the setup assistant to configure your Mac. You can restore your data from a Time Machine backup or manually transfer your files from an external drive or cloud storage. Reinstall your applications and adjust your settings as needed.
Troubleshooting Common Issues
During the erasure and reinstallation process, you might encounter some issues. Here are solutions to common problems.
Fusion Drive Not Detected
If Disk Utility does not detect your Fusion Drive, restart your Mac and re-enter Recovery Mode. Ensure the Fusion Drive is correctly connected and try again. If the problem persists, seek professional assistance.
Erasure Process Fails
If the erasure process fails, restart your Mac and try again. Make sure you have selected the correct drive and format. If the issue continues, use Terminal in Recovery Mode to manually erase the drive (more on this below).
Reinstallation Problems
If you encounter problems during the macOS reinstallation, ensure your internet connection is stable. If using a bootable USB installer, verify that it is correctly formatted and contains the latest macOS version. Restart your Mac and try the installation again.
Alternative Methods and Considerations
For advanced users, there are alternative methods to erase and reconfigure your Fusion Drive.
Using Terminal for Advanced Users
- Boot into macOS Recovery Mode and open Terminal from the Utilities menu.
- Use the diskutil command to identify and erase your Fusion Drive. For example:
diskutil list
diskutil coreStorage list
diskutil coreStorage deleteVolume <volumeUUID>
diskutil coreStorage deleteGroup <groupUUID> - Replace <volumeUUID> and <groupUUID> with the appropriate values from the list commands.
Professional Help
If you are uncomfortable performing these steps or encounter persistent issues, seek professional help from Apple Support or an authorized service provider. They can ensure the process is completed correctly and safely.
Permanently Erase Data from Fusion Drive on Mac
Formatting a Fusion Drive is simple, but if you also want to permanently erase data from the Fusion Drive, it becomes complicated. Disk Utility can help you format Fusion Drive on Mac, other disk management tools including MacClean360 also can help you format Fusion Drive, but please note that the formatted data can be recovered by data recovery software. If you want to permanently erase data from Mac's Fusion drive, you need special data erasure tool.
Download Fusion Drive data erasure tool for Mac:
DoYourData Super Eraser for Mac is a ideal tool for formatting and wiping Fusion Drive on Mac. It offers certified data erasure standard to help in securely and permanently erasing data from Fusion drives or other drives on Mac. Once the data is erased by DoYourData Super Eraser for Mac, the data is gone forever, can't be recovered by data recovery software.
DoYourData Super Eraser for Mac
- Permanently delete files and folders from Fusion drive on Mac.
- Wipe HDD/SSD, USB drive, digital camera, SD card on Mac.
- Wipe free disk space of the Fusion drive to permanently erase all deleted/formatted/lost data.
This data erasure software offers three modes to help wiping data from Fusion drive:
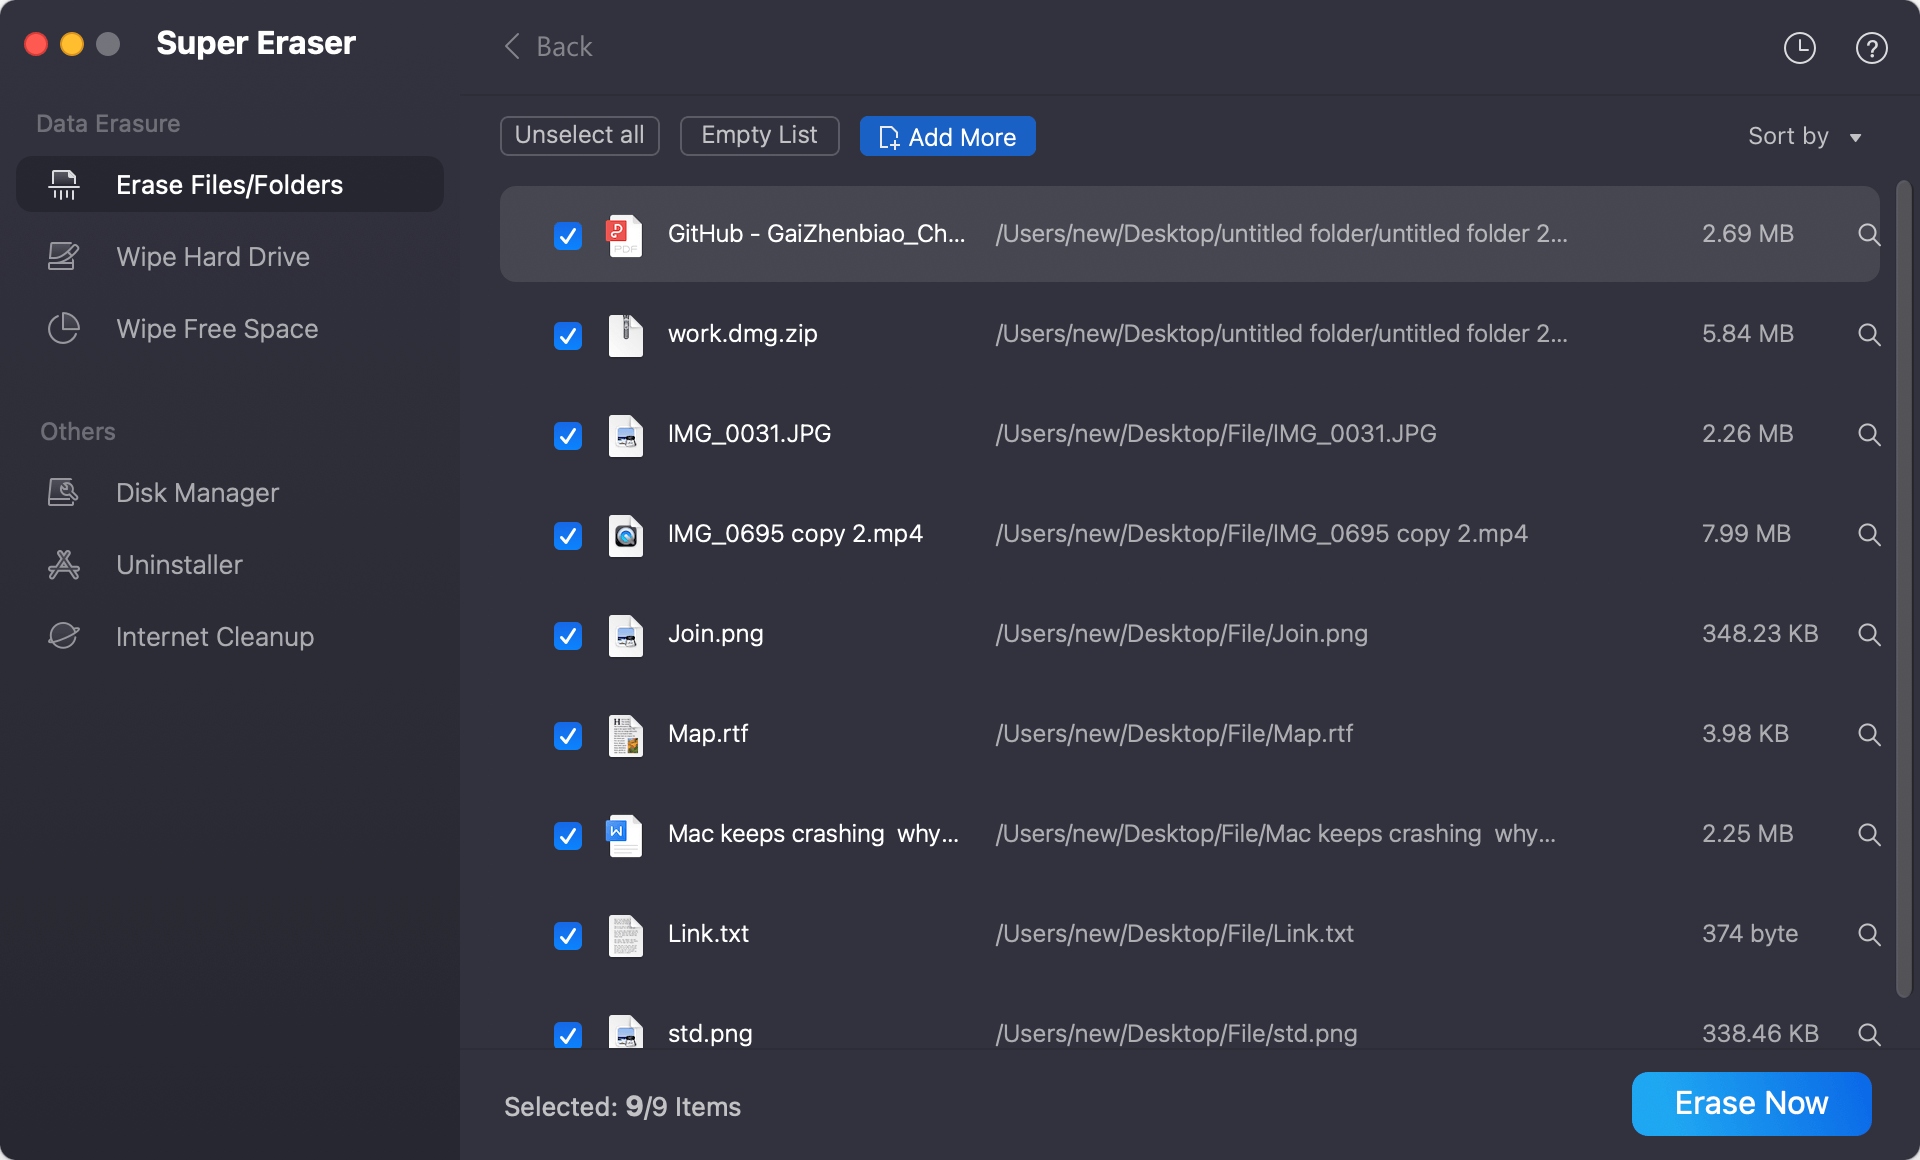
Mode 1. Shred files and folders on Fusion drive.
This mode can help you selectively shred files/folders from Fusion Drive. Just add files from Fusion Drive to the erasure list, and then permanently erase them by clicking on Erase Now button.
Mode 2. Wipe hard drive on Mac.
Securely wipe a hard drive to permanently erase all data including existing data and deleted/lost data from the drive.

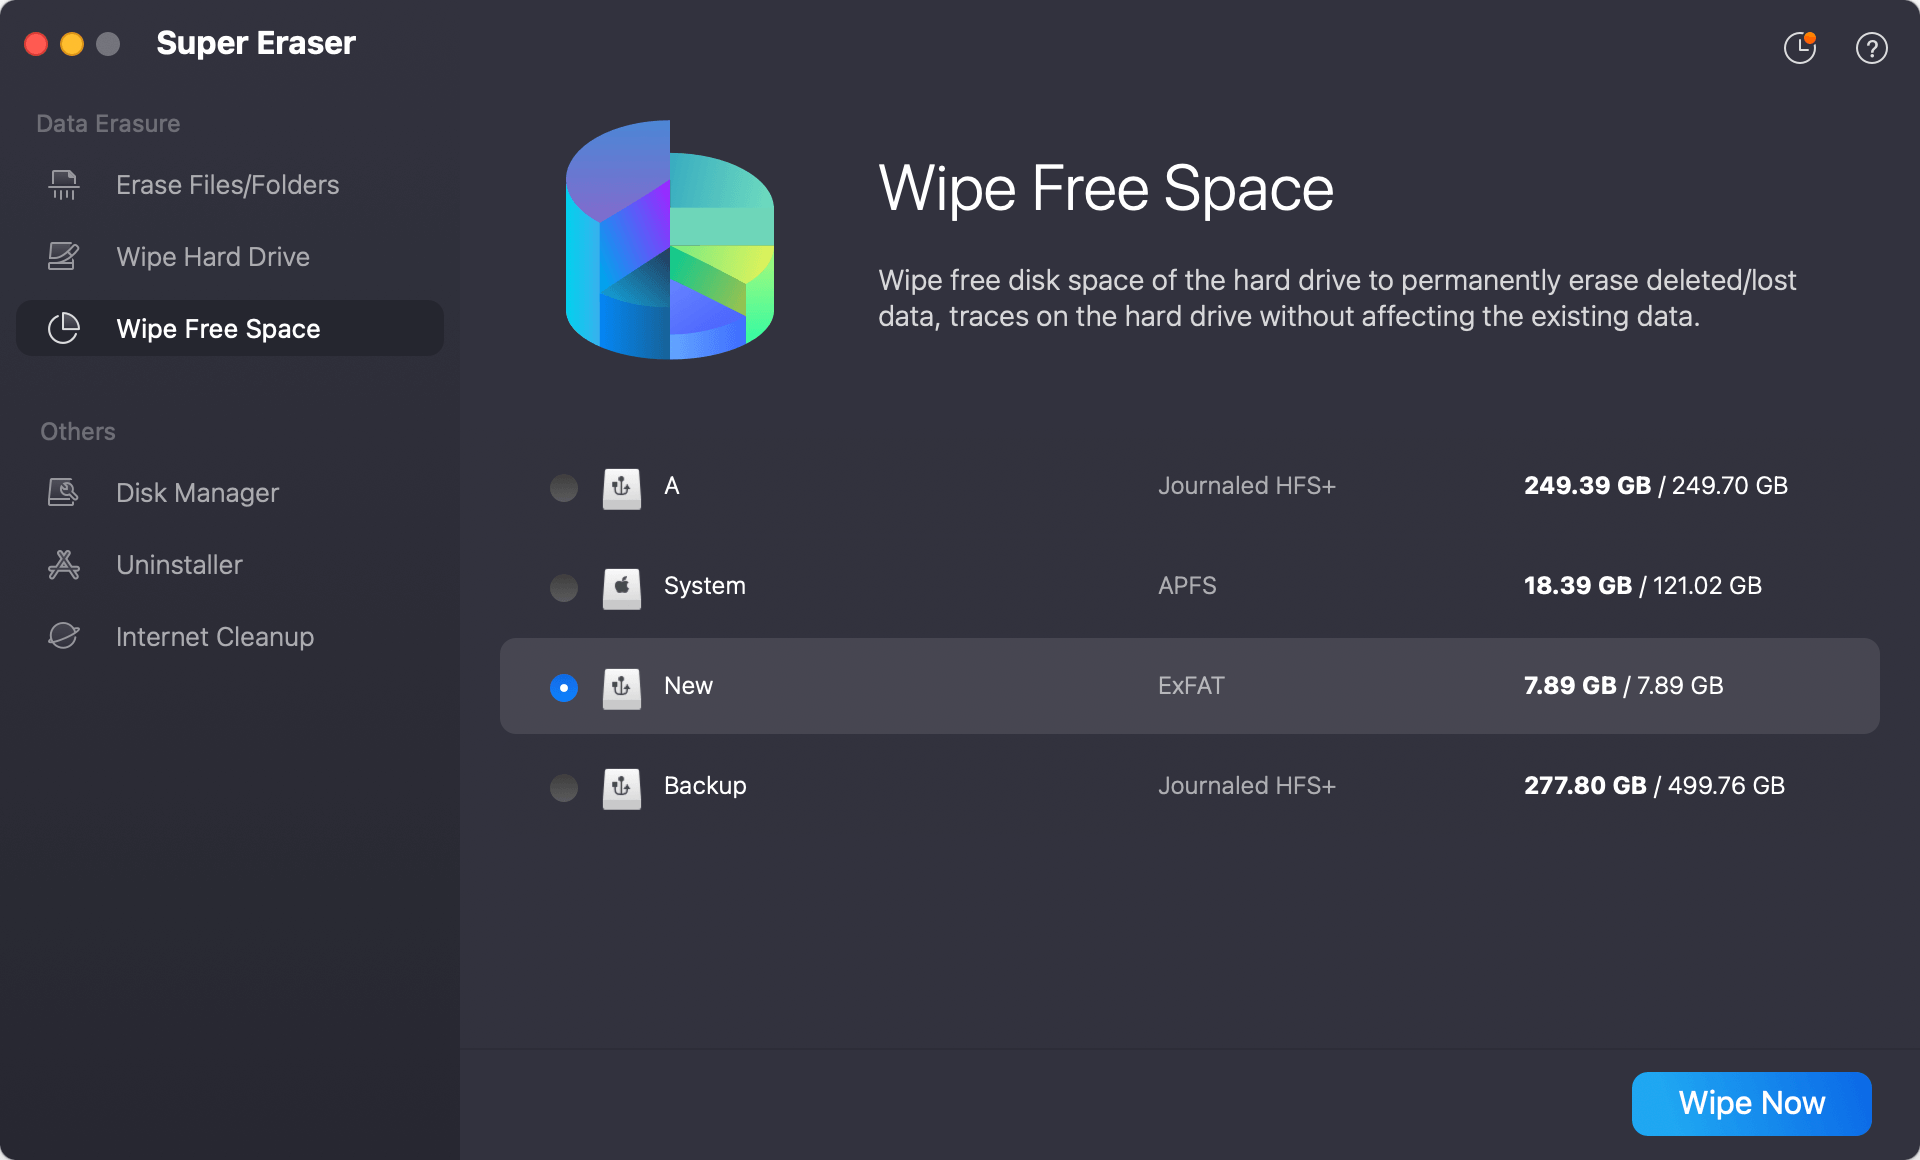
Mode 3. Wipe deleted data on Fusion Drive.
Wipe free disk space mode is able to wipe the free disk space of the Fusion Drive and it will permanently erase all already deleted/lost data on the Fusion Drive without affecting the existing data on the Fusion Drive.
DoYourData Super Eraser for Mac offers military & government data erasure standards including HMG Infosec, NIST 800-88, Peter Gutmann's algorithm, DoD 5220.22-M, U.S. Army AR380-19 to help you securely and permanently erase data from Fusion Drive before you sell or donate your Mac machine. It is 100% safe data erasure program and won't cause any damage to your Fusion Drive.
Conclusion
Erasing a Fusion Drive on a Mac involves several steps, but with careful preparation and following the outlined process, you can achieve a clean slate for your system. Remember to back up your data, follow the steps meticulously, and seek help if needed. By doing so, you can enjoy a fresh start with your Mac, free of any previous issues or data clutter.
If you will sell or donate your Mac, you can use DoYourData Super Eraser for Mac to securely and permanently erase all sensitive data from your Mac's Fusion drive.

DoYourData Super Eraser for Mac
DoYourData Super Eraser for Mac is a 100% safe, powerful and easy-to-use data erasure program. It offers certified data erasure standards including Peter Gutmann, U.S. Army AR380-19, DoD 5220.22-M ECE to permanently erase data from Macs and external devices, making data recovery be impossible.
Written & Updated by Shirly Chen
Shirly Chen has been writing data recovery, data erasure articles for DoYourData over 4 years. She has been working as a professional website content writer & editor for quite a long time. She also writes articles about disk clone, Mac optimization, disk backup, etc.