How to Format or Wipe HDD on Mac?
Disk Utility is able to quickly format a HDD to APFS/HFS/ExFAT/FAT32, etc. But, the formatted data is not lost for good and can be recovered by data recovery software. If you will sell, donate or dispose of the old HDD, you can use data erasure software - such as DoYourData Super Eraser for Mac to wipe the HDD and permanently erase all data from it. Now, learn how to format or wipe HDD on your Mac.
![]() Updated by Shirly Chen on June 17, 2024
Updated by Shirly Chen on June 17, 2024
Quick Navigation:
- What Is Formatting?
- What Is Wiping?
- Why Format or Wipe an HDD on Mac?
- Format HDD on Mac with Disk Utility
- Wipe HDD on Mac with Data Erasure Software
- Conclusion
A hard disk drive (HDD) format or wipe on a Mac can seem difficult, especially if you have never done it before. It's important to know how to properly format or wipe an HDD, whether getting a new drive ready to use, fixing problems that won't go away, or ensuring that all of your personal information is deleted before selling or giving away your Mac.
With clear steps, this guide will walk you through each step, making the process easy and stress-free. You'll learn to use the Disk Utility and more powerful data erasure tool to handle your disk drives. Let's get started and take charge of your storage needs to keep your info safe and efficient.

What Is Formatting?
Setting up a new file system is part of formatting a hard drive. It lets the operating system read and write to the disk. During this process, all the data on the drive is erased, leaving it empty. Apple File System (APFS), Mac OS Extended (HFS+), ExFAT, and FAT32 are some of the different types of file systems.
Each is good for a different set of tasks. For example, APFS works best with SSDs and macOS 10.13 or later. ExFAT and FAT32, on the other hand, can be used with Windows. Formatting is often done when putting in a new drive, using an old one for something else, or fixing disk problems that won't go away.
What Is Wiping?
When you wipe a hard drive, also called "secure erase," you overwrite the drive's data with patterns of random data or zeroes. It is more thorough than cleaning. This process ensures that deleted data can't be retrieved, which is crucial for keeping private data safe.
Wiping is essential to ensure personal data stays confidential when selling, donating, or disposing of a computer. There are different types of wiping, from a simple "zeroing" in one pass to more secure "multiple passes."
Why Format or Wipe an HDD on Mac?
For many reasons, formatting or cleaning an HDD is very important. First, the formatting gets a new or used drive ready by setting up a compatible file system for saving data and ensuring that your macOS works well with it. It's also a good way to fix problems that won't go away, like corrupted files or system failures, because it gives you a fresh start that can fix many issues.
It would help if you wiped an HDD for data protection, especially when using secure erase methods. If you're selling, donating, or getting rid of a computer, you should ensure that no one else can access your personal and private information. When you use secure wiping, you delete current data, making it very hard to return.
Formatting or wiping can also help improve drive performance and make more room available by removing files and programs you don't need. Anyone who uses a Mac should know how to reset or wipe an HDD. It can help you set up a new drive, fix problems, or keep your data safe.
Why Do Hackers Value the Data on Your Drive?
Hackers are interested in the information on your drive because it often has private and sensitive financial and personal data that can be used for bad things. Personal information like names, addresses, social security numbers, and login information can be stolen, who can then use it to commit scams or open accounts in your name.
Financial information, like bank account numbers, can be stolen and used to buy things without permission. Hackers can also use your information to get into and take over your online accounts, which is another privacy and security breach.
Even harmless information can be useful when combined with other information to make a full profile for more focused attacks. That is why it's so important to safely erase data from your drive before throwing it away; this stops hackers from getting your personal information and using it badly, which keeps you from losing money or having your identity stolen.
Format HDD on Mac with Disk Utility
Using Disk Utility on a Mac to format an HDD is simple. To help you through it, here are the steps:
Step 1: Open Disk Utility.
Double-click on Disk Utility after going to Applications > Utilities. You can also press Cmd + Space to open Spotlight and type "Disk Utility" followed by Enter.
Step 2: Select the Drive.
Find your HDD in the list on the left side of the Disk Utility window. It's important to choose the drive itself, not just a folder inside it.
Step 3: Initiate the Erase Process.
At the top of the Disk Utility, click the "Erase" button.
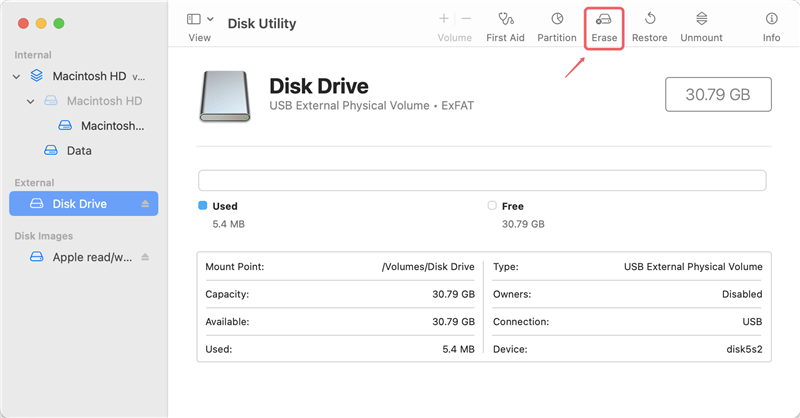
Step 4: Configure Erase Settings.
There will be a dialogue box that asks you to add information:
- Name: Give your HDD a name.
- Format: Pick the file system you want, like APFS, Mac OS Extended, or exFAT.
- Security Options: Choose how to erase the HDD.

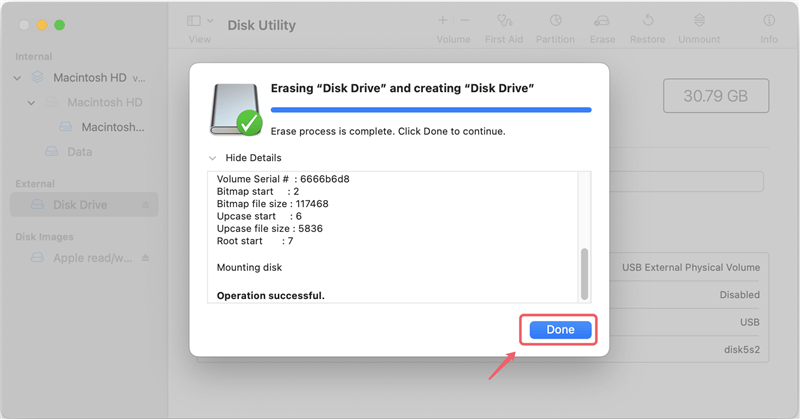
Step 5: Erase the Drive.
Once you're done setting things up, click the "Erase" button. Now, Disk Utility will make changes to the drive. The time this takes may vary on the HDD's size.
Step 6: Completion.
Disk Utility will let you know when the process is complete. Then click "Done" to finish. Now that your HDD has been cleaned, you can use it.
Note:
- The data which is erased by Disk Utility is not lost forever. Data recovery software is able to completely recover all lost data from the erased HDD.
- If the HDD is the internal drive of your Mac, you need to boot the Mac into macOS Recovery mode, then choose Disk Utility and use it to format the HDD.
- If you want to use the external HDD on both Windows and macOS, just format the HDD to ExFAT which is compatible with Windows and macOS.
Wipe HDD on Mac with Data Erasure Software
If you will sell or donate the HDD/Mac, just try data erasure software. It can securely and permanently erase data from HDD, SSD, memory card, digital camera, USB flash drive on Mac. Once the data is erased by data erasure software, the data is lost for good, cannot be recovered by any method.
DoYourData Super Eraser for Mac is one of the best Mac data erasure software apps. It offers certified data erasure standards (such as Peter Gutmann, U.S. Army AR380-19, DoD 5220.22-M ECE) to help Mac users to shred files, wipe hard drive, wipe free disk space, etc.
DoYourData Super Eraser for Mac
- Best Mac HDD or SSD data eraser, 100% safe and easy-to-use.
- Securely format and wipe HDD on Mac to erase all data permanently.
- Wipe free disk space of HDD to permanently erase all deleted/lost data.
Let's see how to use DoYourData Super Eraser for Mac to wipe HDD on Mac:
Step 1. Connect the HDD to the Mac and open DoYourData Super Eraser for Mac.

Step 2. Choose Wipe Hard Drive mode, then select the HDD, click on Wipe Now button.

Step 3. Select a wanted erasure standard, then click on Continue button to wipe the HDD.
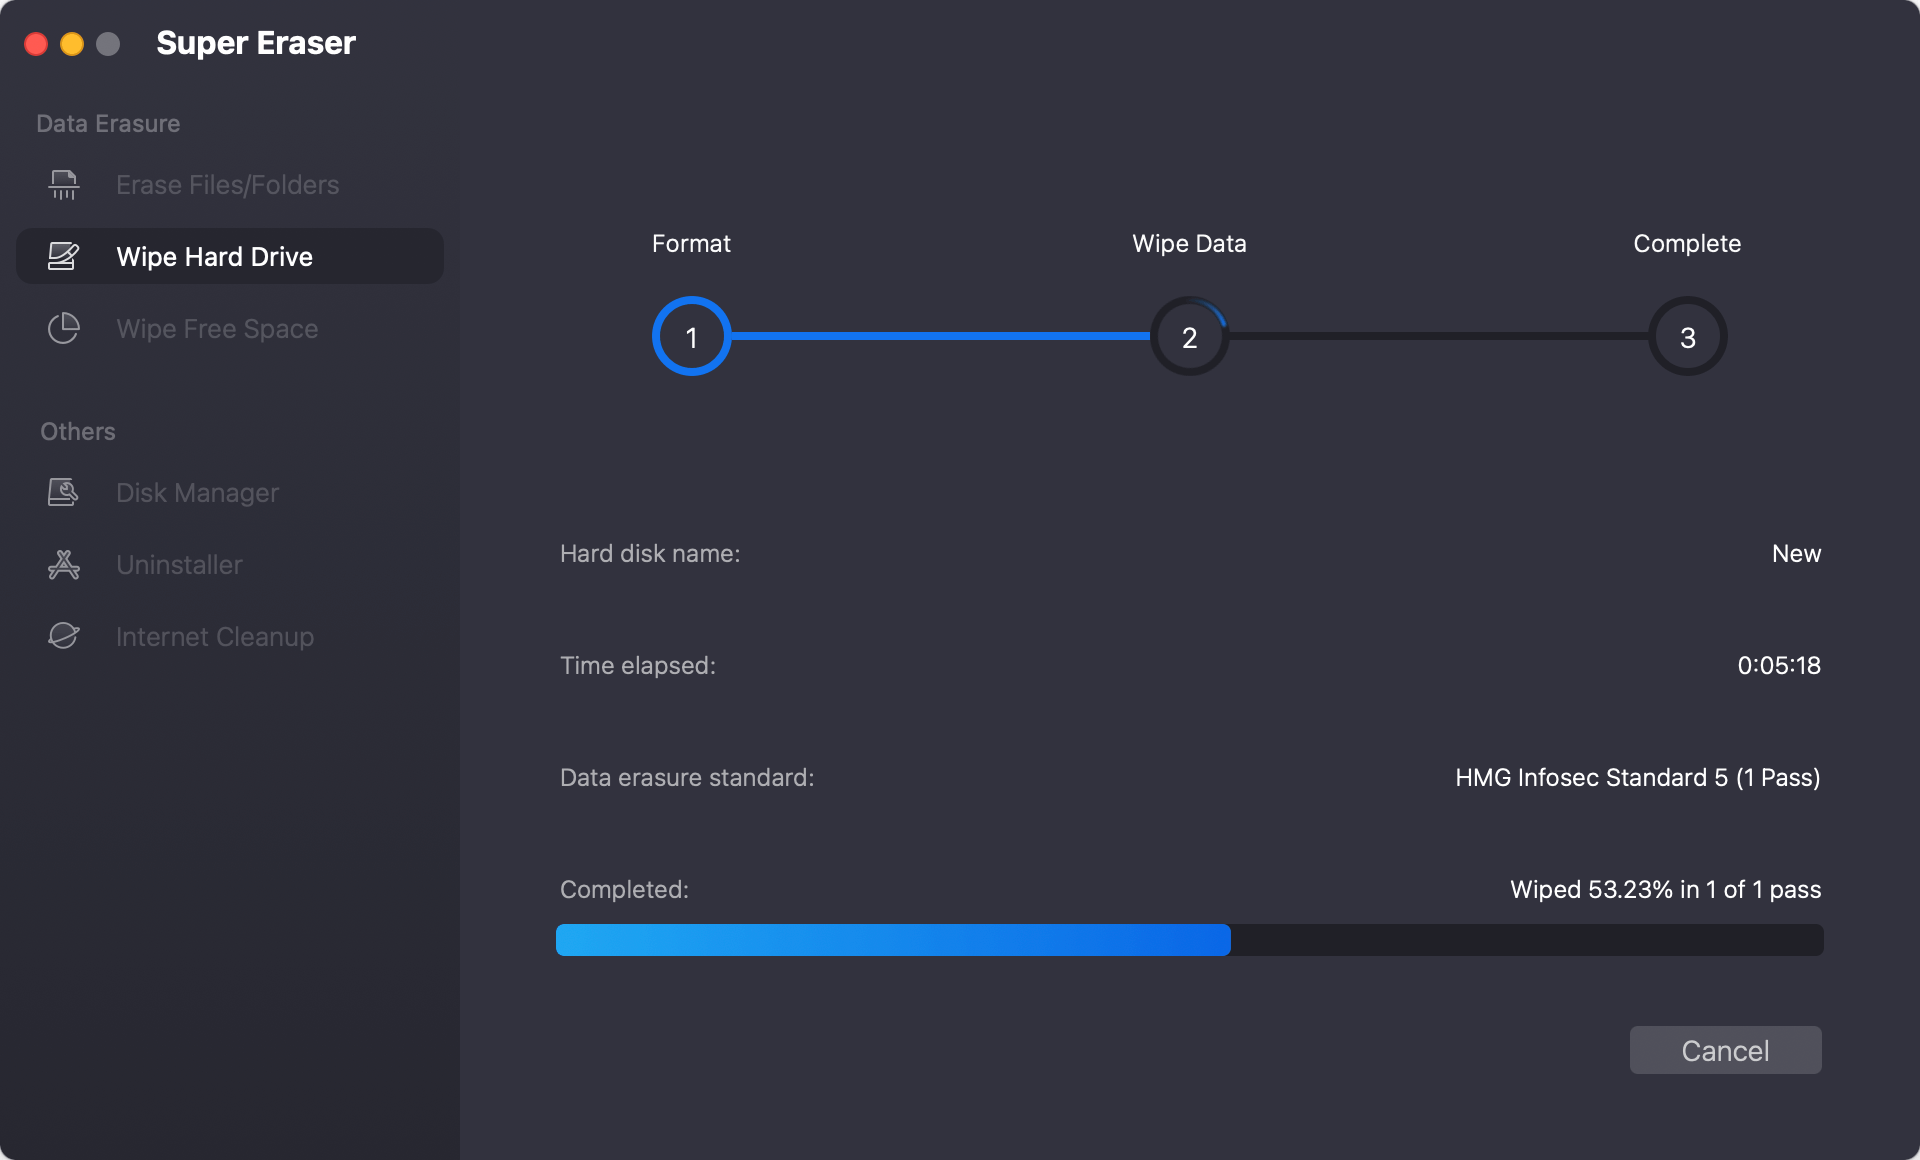
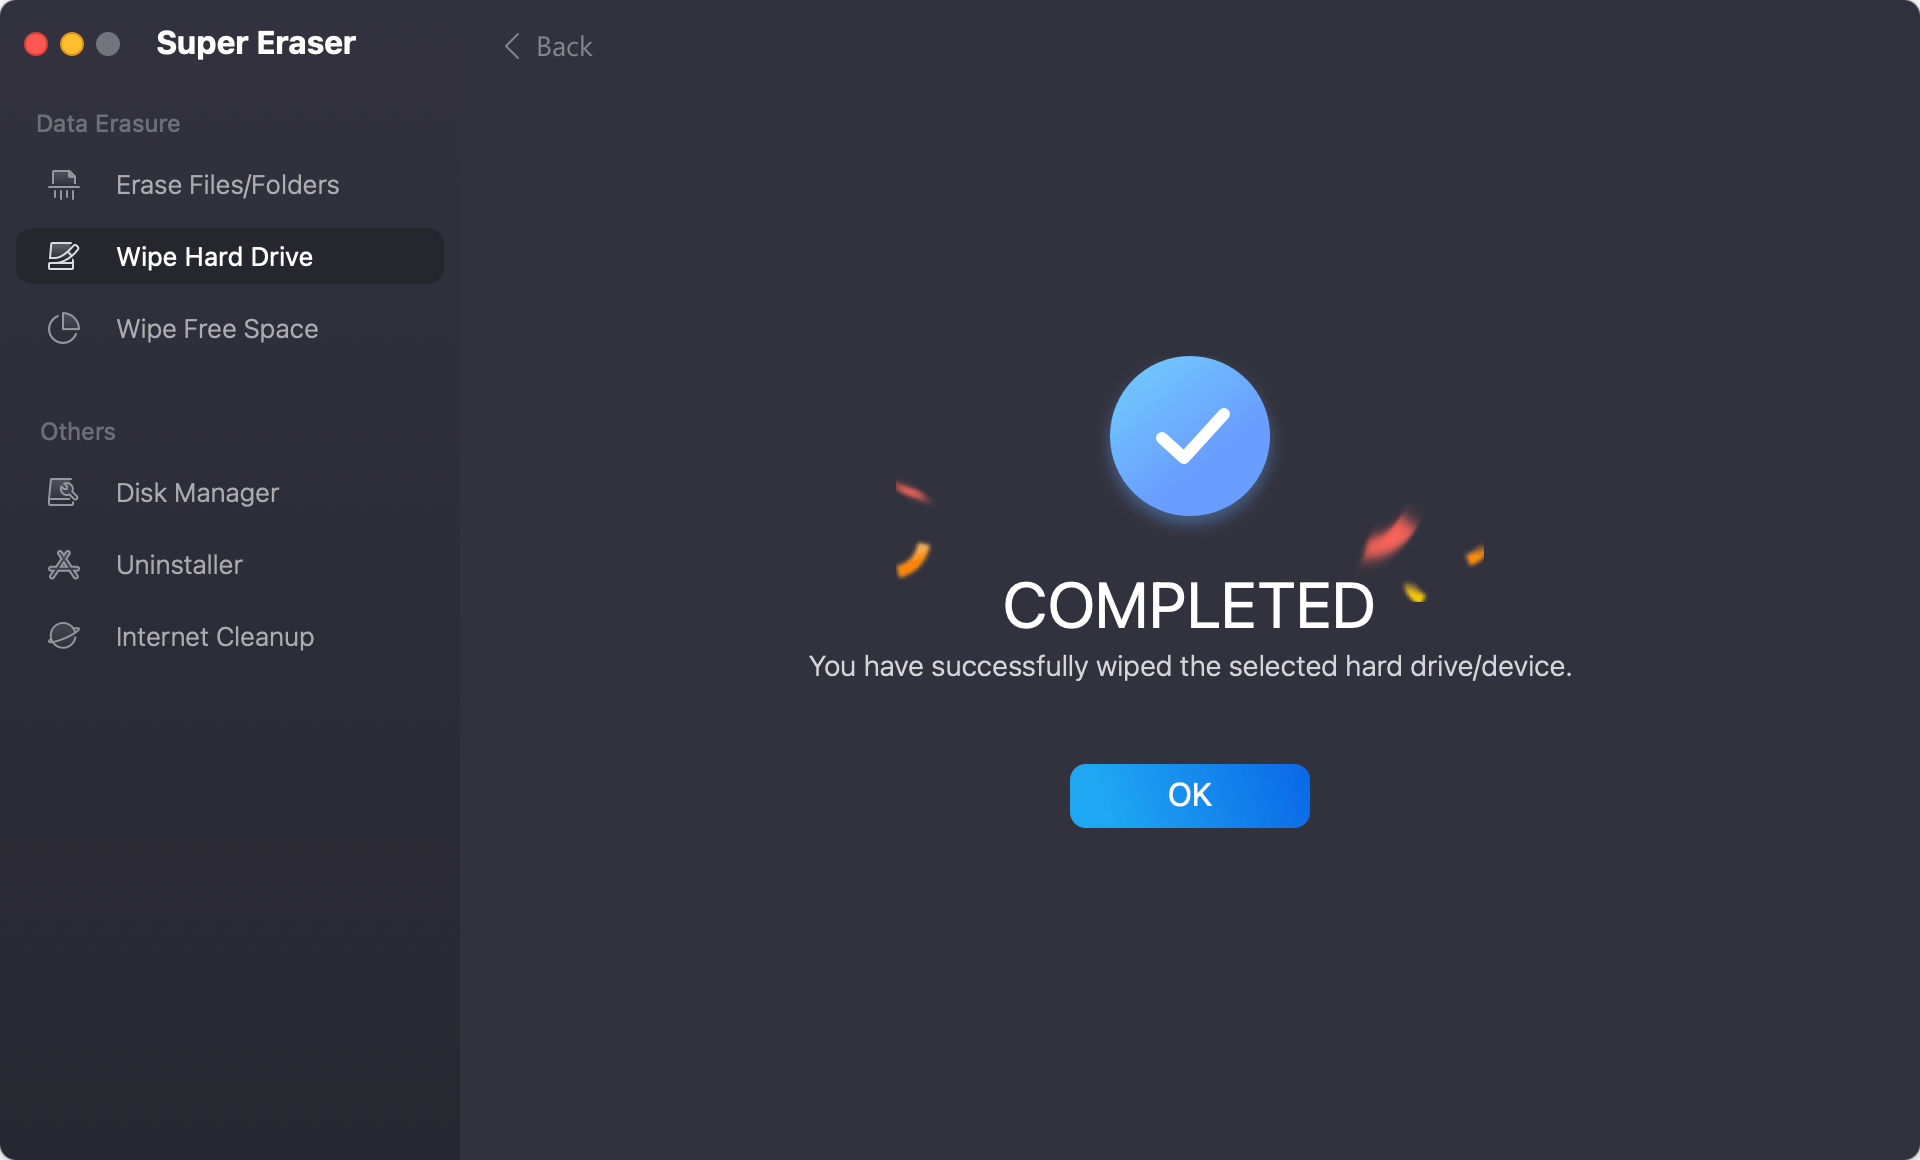
Step 4. It will format and wipe the HDD, all data (existing data, deleted/lost data included) stored on the HDD will be permanently erased.
Conclusion:
You need to know how to format or wipe an HDD on a Mac to get new drives ready, fix problems that won't go away, and keep your info safe. This guide gives you the steps to make the process easy and stress-free, whether you choose the Disk Utility or data erasure software.
By doing these things, you can be sure that your data is deleted safely and that your drive is formatted correctly to work at its best. If you know how these things work, you can better manage your storage needs, keeping your data safe and your Mac running smoothly.

DoYourData Super Eraser for Mac
DoYourData Super Eraser for Mac is a 100% safe, powerful and easy-to-use data erasure program. It offers certified data erasure standards including Peter Gutmann, U.S. Army AR380-19, DoD 5220.22-M ECE to permanently erase data from Macs and external devices, making data recovery be impossible.
Written & Updated by Shirly Chen
Shirly Chen has been writing data recovery, data erasure articles for DoYourData over 4 years. She has been working as a professional website content writer & editor for quite a long time. She also writes articles about disk clone, Mac optimization, disk backup, etc.