How to Use Time Machine to Restore Data on Mac?
![]() Updated by Justin Kenny on 2022-03-31
Updated by Justin Kenny on 2022-03-31
Your data and Mac preferences are at risk if you don't have a dependable backup strategy in place. There is a Time Machine app for the Mac, so we're grateful for that. A frequent backup of your data is something that you should perform regardless of how often your computer crashes.
Apple's own Time Machine is one of the numerous choices for backing up. Because it's free and simple to use, it's no wonder, so many Mac users went with this solution. Depending on whether you wish to recover data from a Time Machine backup, you have a variety of alternatives. We'll go through each one and demonstrate how to restore your Mac from Time Machine.
Do you know about Time Machine?
Apple Time Machine is a built-in macOS software that creates pictures or snapshots of everything on your Mac so that you may restore a particular file or the whole system if you ever need to. You may set up Apple Time Machine to automatically back up your data every hour, every day, and every month and to store weekly backups for material that is older than a month.
If your Time Machine backup drive is full, Time Machine will automatically delete the oldest backups to clear up space.
Types of restores in Time Machine
A Time Machine backup may be used to retrieve data from your MacBook, which was previously saved to a unique backup file created by Time Machine. You may do two sorts of restorations:
- You may save "snapshots" of your files and folders on your Mac as "backups," which are previous versions of the files and folders. No backup disk is required in order to access them.
- A complete backup of your MacBook on a different storage device. Gigabytes of data take longer to recover than snapshots, which are typically less than 10 gigabytes in size.
Using Time Machine to restore deleted and missing files
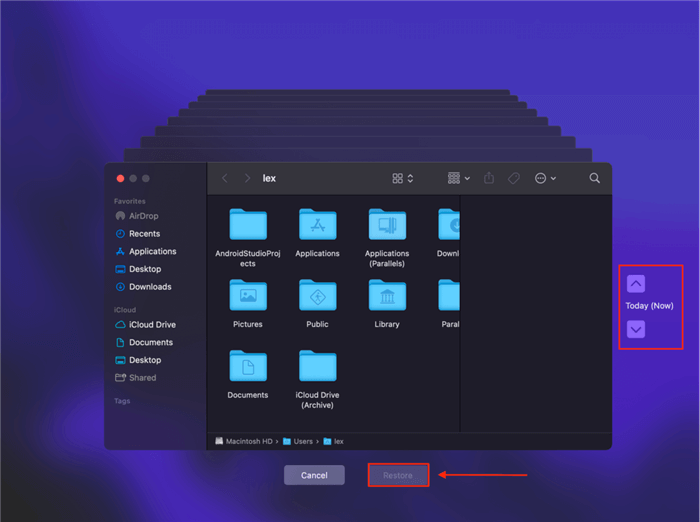
Time Machine's snapshot function is the most convenient when restoring individual files and folders. You may view all the previous versions of your files and folders that Time Machine has saved for you since you first allowed it to do so automatically. In order to fix it, here's how:
Launch System Preferences then Time Machine to access Time Machine on your Mac computer.

Make sure you've checked the "Show Time Machine in menu bar" checkbox on the Time Machine window.

Click the Time Machine button in the Apple menu bar's upper-right corner and choose "Enter Time Machine."

Using the arrow buttons on the right side of the screen, scroll through the snapshots. Click "Restore" after selecting the snapshot you wish to restore.
Recover data from a Time Machine Backup on your Mac
Recovering single files or folders is not the sole purpose of Time Machine. You may also use it to restore your Mac's user credentials and data in its entirety. Time Machine will not recover your operating system.
Migration Assistant will be used to retrieve data from your Time Machine backups after the OS has been installed. To restore your Mac from Time Machine, follow these instructions.
Set up a Time Machine backup by connecting the disk to your computer.
Open the Migration Assistant program, which is located in the Utilities section in the Applications folder.

Select the Time Machine backup you want to utilize for recovery, and then click on the Continue button to proceed.

Click Continue after selecting the backup you want to utilize for data recovery. Select the data you wish to send. Users, apps, files, directories, and system settings may all be transferred.

To begin the transfer, press the Continue button. Large restorations might take many hours to finish.
Restoring a Time Machine Backup to your computer's hard disk
Whether you're experiencing serious troubles with your present hard drive or you're moving to a new Mac, Time Machine can assist you in getting back on track quickly and easily.
- The macOS Recovery Partition may be accessed by holding down the Command and R keys when turning on your Mac. The macOS Utilities screen should appear when your Mac boots up.
- Click on Continue after selecting Restore from Time Machine Backup.
- Restore Your System page, then click on the Continue button to proceed.
- Once you've selected your Time Machine backup, just click on the Continue button.
- In order to proceed, choose the most recent backup of your hard drive. As soon as Time Machine has restored its backup, your Mac will reboot and begin using it again.
With the Time Machine, it is feasible to save a lot of time and work. We really hope that our advice on how to utilize Mac's time machine will enable you to retrieve all of your lost data easily.
How to recover lost data on Mac without backup?
How to recover deleted or erased data if you don’t back up your Mac? Don’t worry, if you can’t restore lost files via Time Machine, just try Mac data recovery software - such as Do Your Data Recovery for Mac.
Do Your Data Recovery for Mac
- Recover permanently deleted files on Mac.
- Recover formatted or erased data on Mac.
- Recover lost data from Mac and external device.
- Three steps to get all lost data back.
Now, follow the steps below to recover lost files on Mac using Do Your Data Recovery for Mac:
Step 1. Select the hard drive where you delete/lose your files.
To start data recovery, just open Do Your Data Recovery for Mac and make sure the hard drive where your lose your files is connected to your Mac. Then select the target disk.

Step 2. Scan the disk to find lost files.
Click on Scan button. It offers two scan mode: quick scan and deep scan. If the quick scan can’t find all deleted files, just try deep scan mode to find much more lost files.

Step 3. Recover lost files once scan is completed.
When the scan gets finished, you can preview all recoverable files. Then selected the wanted files and save them.

Written & Updated by Justin Kenny
Justin Kenny is a writer & editor of DoYourData. He joined DoYourData in 2016 and focuses on writing articles about Windows data recovery, Mac data recovery, external device data recovery, hard drive clone, data erasure, Mac cleanup, computer issue fixes, etc. He is a super fan of Apple devices and is big on testing new digital device and system utility software.