Quick Navigation:
- 1. Samsung Portable SSD Not Detected on Mac Fixes
- 2. Recover Lost Data from Formatted or Erased Samsung Portable SSD
- 3. FAQs About Fixing Samsung SSD Not Detected on Mac
Samsung's official Portable SSD software is an optimization and management application that allows customers to set passwords and upgrade firmware easily. It has a significant fanbase since it can be used on PCs, Macs, and Androids.
Samsung's internal and external SSDs, including the portable SSD T3/T5/T7/X5, 850 Evo SSD, 860 Evo SSD, 960 SSD, etc., are among the best in the industry. You may attempt a few fast fixes if your Samsung SSD isn't detecting or opening on your computer.
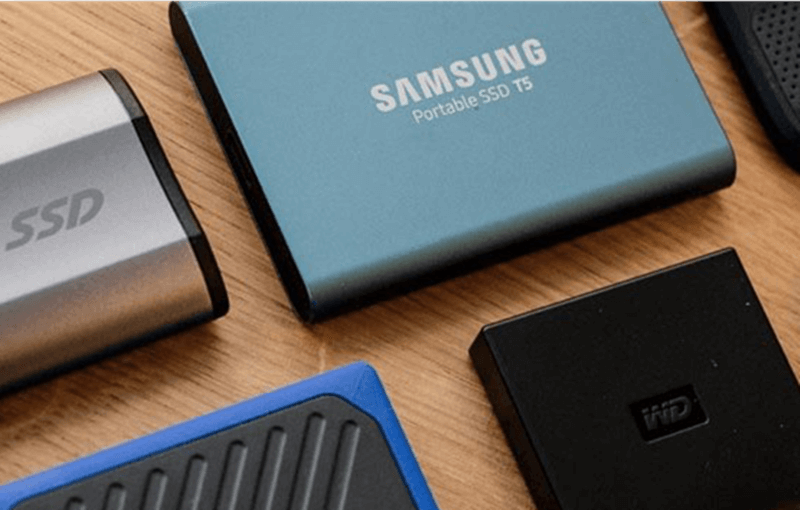
Try another one if the power adapter or USB cable, USB hub isn't working. Connect the Samsung SSD to a different computer and see if it is detected. If there is an outdated driver, update it.
However, if the Samsung SSD is still not recognized by your computer or you cannot access the Samsung SSD, you can attempt the solutions provided below.
Samsung Portable SSD Not Detected on Mac Fixes
There are many reasons behind the Samsung SSD not showing up on Mac. Depending on the reasons, you can find the corresponding solution to fix this issue. There are a couple of fixes that you can do it by yourself to solve this problem. And no matter what you’ve done to the Samsung SSD, you can recover lost data from it with a data recovery application.
Fix 1. Upgrade your Mac and reboot it
If you have tried to change your USB cable/hub or the connect the Samsung SSD to another computer to check if it could be recognized and still can’t make your Samsung SSD be detected on your Mac, you can upgrade the macOS to the latest version, update all apps in Appstore, then restart your Mac.
You also can download Samsung portable SSD software and install it on your Mac. Then check if could help to solve the SSD not showing up issue.
Fix 2. Mount the Samsung SSD in Disk Utility
If the Samsung SSD is an NTFS drive, it may not mount on your Mac (especially on a Mac with Apple silicon chip). To solve this issue, just open Disk Utility and find this SSD. Click on Mount button. If it does not work, you can click Erase to erase it to APFS or exFAT drive.
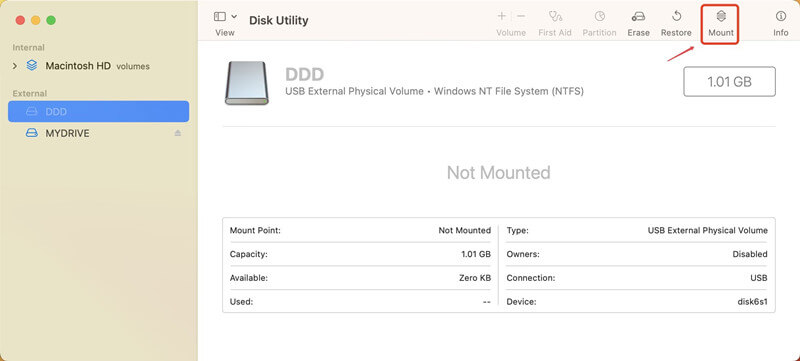
Fix 3. Chang your Mac Finder’s settings
If you can find the Samsung SSD in Disk Utility and it is mounted, but can’t find it on desktop and Finder, you should change the Finder’s settings.
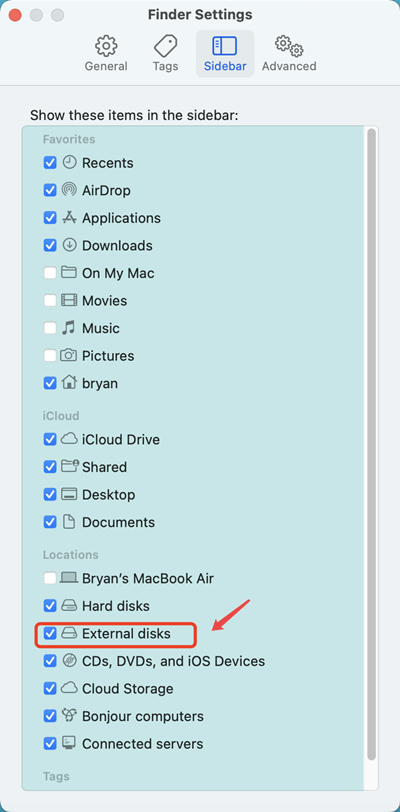
Open a Finder, and click Finder, choose “Settings...”
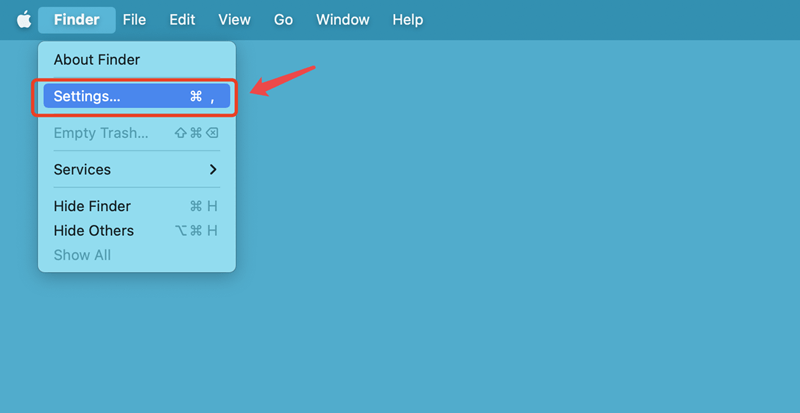
Click General and select “External disks”, then your Samsung SSD will be showing up on Mac’s desktop.
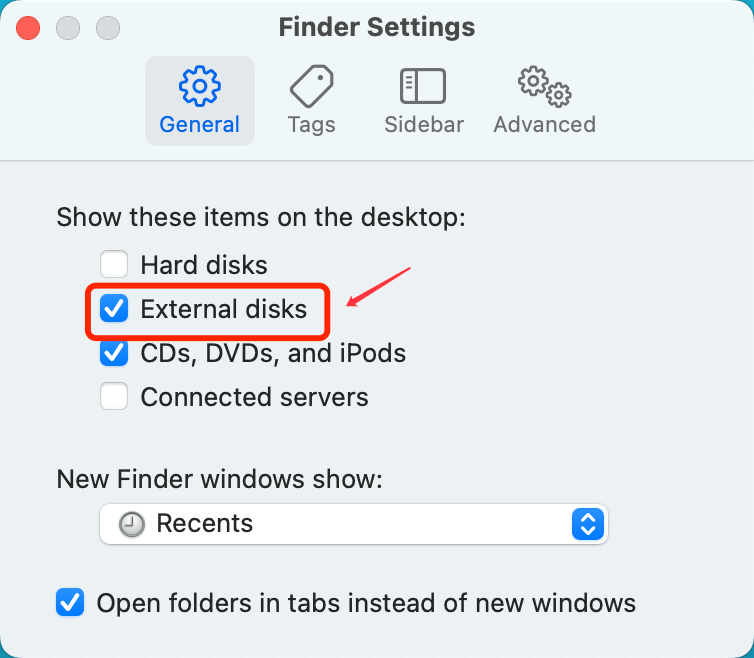
Click Sidebar and select “External disks”, then you can find Samsung SSD in Finder.
Fix 4. Run First Aid to repair the Samsung SSD
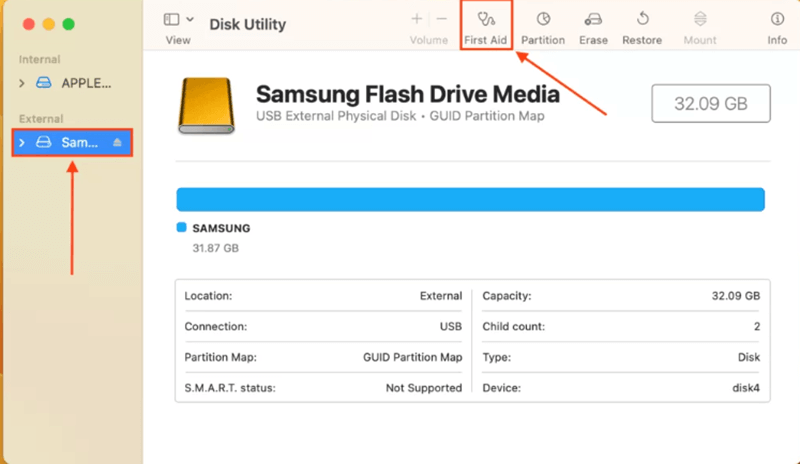
Disk Utility is a built-in disk repair tool in macOS, the First Aid feature can help you check and repair the Samsung portable SSD and other external storage devices.
Just open Disk Utility and find the Samsung device, click First Aid, follow the wizard to repaid the damaged Samsung portable SSD.
Fix 5. Check your Mac security settings
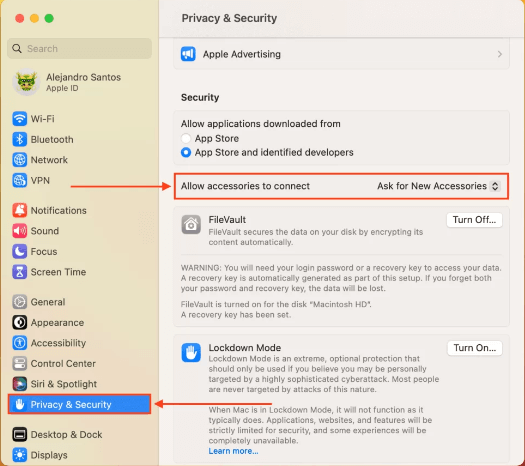
macOS is the most secure operating system and it may restrict itself to use unsafe external device. If it is the first time you connect the Samsung portable SSD to your Mac, you can check if it is blocked by your Mac and allow to use it.
Click Apple logo, and choose “Settings...”, on the left bar, select Privacy & Security, then check Allow accessories to connect setting.
Recover Lost Data from Formatted or Erased Samsung Portable SSD
If you lose important data due to erasing the Samsung portable SSD, just download a data recovery application to help you get the lost data back.
Do Your Data Recovery for Mac is one of the most powerful Mac data recovery apps, it supports to recover existing files, deleted/formatted data from the Samsung portable SSD.
Do Your Data Recovery for Mac
- Unformat Samsung portable SSD.
- Recover deleted files from Samsung portable SSD.
- Export inaccessible data from Samsung portable SSD to your Mac.
Step 1. Open Do Your Data Recovery for Mac and select the Samsung portable SSD to start data recovery.

Step 2. Click on Scan button to deeply scan the Samsung portable SSD.

Step 3. Preview and recover the lost files.

FAQs About Fixing Samsung SSD Not Detected on Mac
- Download and install Do Your Data Recovery for Mac.
- Select the Samsung portable SSD.
- Click on Scan button.
- Recover all data from the Samsung portable SSD.
- Choose Utilities from the list of apps in the Finder's menu.
- To open Disk Utility, double-click its icon.
- Choose your removable SSD drive on the left.
- If your SSD is currently unmounted, click the Mount button to do so.
- Select "First Aid" in the main menu, then "Run."
- Please be patient while Disk Utility fixes your damaged SSD.
- Startup Disk Management with the drive plugged into your computer.
- When you get to where your SSD is, right-click it and select Format.
- Type in the volume's name, choose the appropriate file system (NTFS is recommended) and hit OK.
If you accidentally delete any crucial files before implementing this patch, you should have data recovery software handy.
- Open Device Manager by pressing WIN + X.
- Expand the Disk Drives subcategory when you find it.
- To upgrade the driver for the SSD, right-click on it and select the option to do so.
- Install any available updates by selecting "Search automatically for updated driver software."
Conclusion:
While Samsung SSDs are quick and dependable, they are not immune to the problems that can arise with any external storage device. Most of these problems can be fixed by the abovementioned methods, but you should back up your files before attempting to do so. To safeguard against future data loss, we advise you to utilize Time Machine for regular backups.