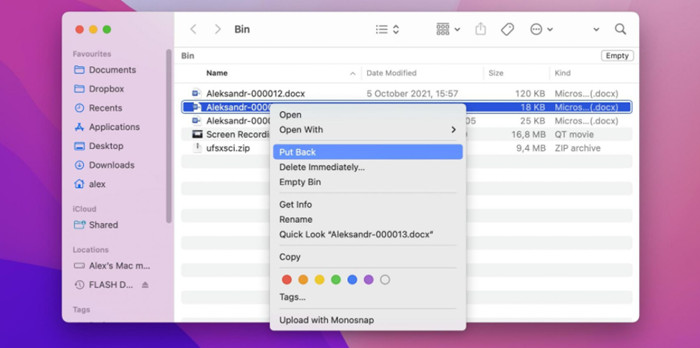
It's nearly impossible to never unintentionally delete a file on your Mac, no matter how hard you try. Your position might look bleak when you learn you have emptied the Trash after the deletion. Don't be discouraged. We'll teach you how to restore your lost data using either native operating system capability or data recovery tools. Do Your Data Recovery for Mac helps recover data that have been permanently deleted from the Trash on your Mac Pro machine. It also supports to recover lost data from iMac Pro, MacBook, MacBook Air, MacBook Pro, Mac Studio, USB flash drive, external hard drive, memory card, digital camera, etc.
“Mac Pro is a series of workstations and servers for professionals that are designed, developed and marketed by Apple Inc. since 2006.” - Wikipedia
How to recover deleted files from the Trash on a Mac Pro (Not Emptied Yet)
When you notice that certain files on your Mac Pro are missing, the first thing you should do is look in the Trash Bin. The Trash Bin is a unique folder that saves deleted files temporarily until they are emptied.

The following approach can be used to retrieve files from the Trash Bin:
- Click on the Trash Bin icon to open it.
- Locate the files you want to recover that have been lost or destroyed.
- Right-click on the file or folder you want to open.
- To restore deleted files on Mac to their original place, select Put Back.
External devices linked to your Mac Pro also have a Trash Bin that may be utilized in the same way to retrieve lost files. The trash for that device is saved in a secret folder called ".Trashes" by macOS. You can opt to display hidden files, after which you can use the ".Trash" folder for the external drive in the same way you used the primary Trash Bin on your Mac Pro.
How to retrieve deleted files on a Mac (from an Emptied Trash)
1. Get Do Your Data Recovery for Mac and install it.
The first step is to go to our website and download the Do Your Data Recovery for Mac program for free. Mac OS X 10.7 or later is required. Double-click the ".dmg" file in your Downloads folder when it has finished downloading. When asked, drag the Do Your Data Recovery for Mac icon to your Applications folder.
2. On your Mac Pro, open the Do Your Data Recovery for Mac.
Launch Do Your Data Recovery for Mac from Launchpad after it has been installed. To allow Do Your Data Recovery for Mac to scan your disk, you must first input your computer's administrator password.
Connect your external device to your Mac Pro right now if you need to recover deleted files from it. If you want to retrieve a deleted file from your Mac Pro's internal hard disk, skip this step.
3. Select the drive to be scanned for lost files.
A list of the drives linked to your Mac Pro computer will appear in the main Do Your Data Recovery for Mac window. Choose the drive from which you want to recover deleted files, then click the "Scan" button. That is all there is to it. You won't have to do anything else while Do Your Data Recovery for Mac runs through all of its scanning procedures.

4. Scan for deleted files in a hurry.
Quick Scan will quickly scan the hard drive and find recently deleted files.
5. Deep Data Recovery Scan
When all other methods fail, Deep Scan can help you recover deleted files from your Mac. It does a binary scan of your whole disc or partition. Depending on the size of your hard disk, the scan might take several hours.

6. Preview and recover deleted/lost files.
Once the scan gets finished, you can see all found files. You can click to preview the recoverable files. Then select the wanted files and save them.

We strongly recommend you to back up your Mac Pro data regularly, so that you can get lost files back when data loss happens on your Mac Pro. You can back up your Mac Pro with Time Machine or a Mac disk cloning software - such as DoYourClone for Mac.