Quick Navigation:
- About Disk Initialization on Mac
- Immediate Steps to Take After Initializing a Disk
- Methods to Recover Lost Data from a Disk Which Is Initialized on Mac
- Conclusion
- FAQs About Data Recovery from Initialized or Uninitialized Disk on Mac
Disk initialization is a common process that occurs when your Mac does not recognize a storage device, such as an external hard drive, SD card, SSD, or USB flash drive. This can happen for various reasons, including corruption, improper formatting, or disk errors. When you initialize a disk on a Mac, you are essentially erasing all the existing data and reformatting the storage device, which often leads to panic and frustration.

However, losing data after initializing a disk does not always mean your files are gone forever. With the right approach and tools, it is possible to recover your data successfully. In this article, we will guide you through the steps to recover lost data after initializing a disk on a Mac and provide practical advice to help you avoid data loss in the future.
About Disk Initialization on Mac
Disk initialization is the process of preparing a storage device for use by the Mac operating system. This process involves creating a new partition map, formatting the disk with a specific file system (like APFS or HFS+), and making the disk ready to store data. Here are some common reasons why a disk may need initialization:
- Unreadable Disk: If your Mac cannot read the disk's file system, it may prompt you to initialize the disk.
- Corrupted Disk: Physical or logical damage to a disk can cause the file system to become corrupted, leading to an initialization prompt.
- New Storage Device: When connecting a new or unformatted external storage device to your Mac, the system may require you to initialize it.
It is essential to understand that initializing a disk typically involves erasing all existing data. Once the process is complete, the data is technically removed from the storage device, making recovery more challenging. However, with immediate action and the right tools, there is still a high chance of recovering lost files.
Immediate Steps to Take After Initializing a Disk
If you have accidentally initialized a disk on your Mac and lost important data, the first thing to remember is not to write new data to the disk. Writing new data can overwrite the lost files, making recovery much more difficult or even impossible. Here are the steps to take immediately:
- Stop Using the Disk: Disconnect the initialized disk from your Mac to prevent any new data from being written. If it is an internal drive, shut down your computer until you are ready to start the recovery process.
- Determine the Extent of the Data Loss: Identify which files or folders are most important and prioritize their recovery. This will help guide your efforts in the subsequent steps.
- Consider the Recovery Options: Depending on your situation, there are multiple methods to recover data:
- Use built-in Mac tools, such as Time Machine and Disk Utility.
- Use specialized third-party data recovery software.
- Seek professional data recovery services if necessary.
Let's explore these options in detail.
Methods to Recover Lost Data from a Disk Which Is Initialized on Mac
Method 1. Recover Data Using Built-In Mac Tools
Mac provides several built-in tools that can help recover lost data. Here are two primary methods:
1. Time Machine Backup
If you have been using Time Machine, the built-in backup feature on macOS, there's a chance you can recover your lost data from a recent backup. Follow these steps:
- Connect the Time Machine Backup Drive: Ensure that the drive containing your Time Machine backups is connected to your Mac.
- Open Time Machine: Click on the Time Machine icon in the menu bar or go to System Preferences > Time Machine or System Settings > General > Time Machine.
- Enter Time Machine Interface: Click "Enter Time Machine" or "Browser Time Machine Backups" to browse through your backups.
- Find the Files to Recover: Use the timeline on the right side of the screen to navigate through your backups and find the files you need to recover.
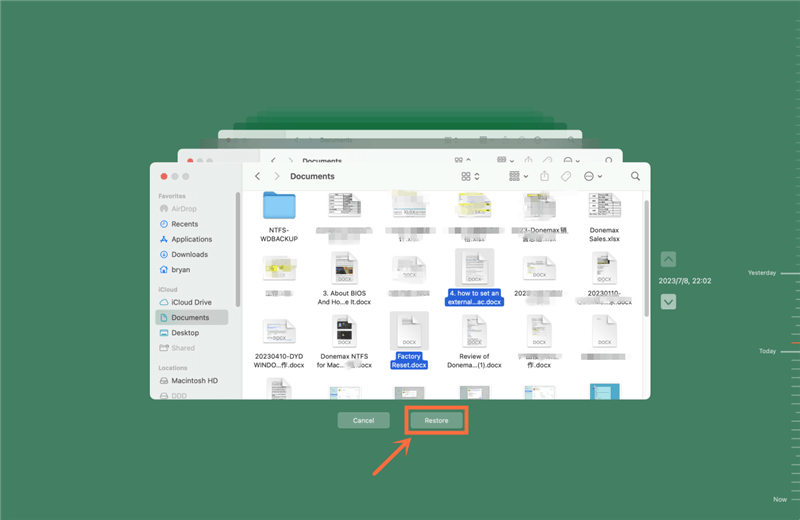
- Restore the Files: Select the files or folders you wish to recover and click "Restore."

While Time Machine is an excellent tool, it only works if you have previously set up and maintained regular backups. If you have not been using Time Machine, consider other methods for data recovery.
2. Disk Utility's First Aid
Disk Utility is another built-in macOS tool designed for managing and troubleshooting disks. Here’s how to use Disk Utility’s First Aid feature:
- Go to Utilities from Applications, and then choose Disk Utility
- Select the Initialized Disk: In Disk Utility, find and select the disk you initialized.
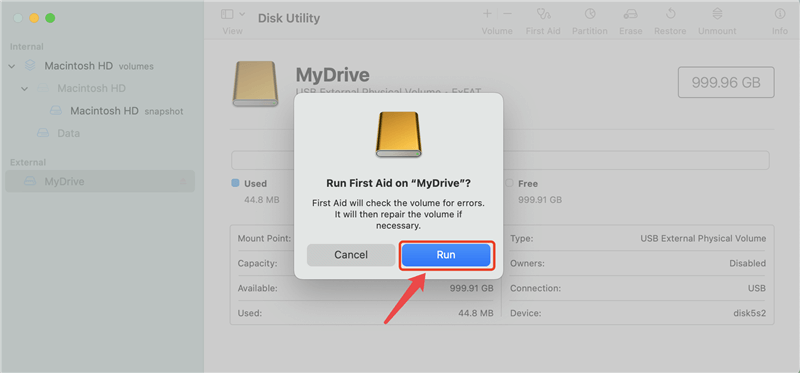
- Run First Aid: Click on the "First Aid" button and let Disk Utility scan and repair the disk for any errors.

First Aid can fix some file system errors and minor corruption issues but is limited in its ability to recover data after disk initialization. If Disk Utility’s First Aid does not resolve your issue, proceed to the next method using third-party software.
Method 2. Use Third-Party Software for Data Recovery
If built-in tools do not work, the next best option is to use specialized data recovery software. Do Your Data Recovery for Mac is a powerful Mac data recovery program which is able to easily and completely recover lost data from an initialized HDD/SSD, USB drive, memory card, digital camera, disk volume, etc.
Do Your Data Recovery for Mac
- Recover deleted, formatted or lost data from initialized disk on Mac.
- Recover inaccessible or erased data on Mac.
- Repair damaged hard drive on Mac.
Step 1. Run the software and choose the initialized disk.
Launch the data recovery software on your Mac and you will see the connected drives, including the initialized disk. Please ensure to select it to continue.

Step 2. Click the Scan button to scan the disk.
Click the Scan button and it will start to scan your initialized USB flash drive or external drive. The software will scan and try to search for all the lost data on the disk.

Step 3. Preview and recover the lost data.
After the scan process is completed, the software will list all the found lost files. Please check and preview the files first. Then choose the wanted files to recover to another drive.

How to Choose the Right Data Recovery Method
When faced with data loss after initializing a disk on a Mac, selecting the most appropriate recovery method is crucial. The right approach can save time, money, and, most importantly, recover your valuable files. This section will help you decide which recovery method to choose based on several key factors, such as the type of data loss, urgency, budget, and your level of technical expertise.
1. Criteria to Consider When Choosing a Data Recovery Method
Understanding the criteria for selecting a data recovery method can help you make an informed decision:
Type of Data Loss:
- Different types of data loss require different recovery approaches. For example:
- Logical Errors: If your data loss is due to logical errors, such as accidental deletion or disk formatting, recovery software may be sufficient. These tools can scan for lost files and restore them without needing any specialized hardware.
- Physical Damage: If your disk has suffered physical damage (e.g., mechanical failure, water damage, electrical surge), recovery through software is unlikely. Professional data recovery services are typically required to handle hardware repairs and complex data extraction.
Urgency:
- Consider how quickly you need the data back. If the data is vital for immediate business operations or personal use, and there is no time to experiment with different methods, professional services may offer a quicker and more reliable solution.
- For less urgent cases, you might try DIY methods first. Recovery software often allows you to scan the disk and preview recoverable files, giving you an idea of success before committing to a more expensive option.
Budget:
- Your budget will heavily influence your choice:
- DIY Software: Generally, third-party data recovery software is relatively affordable, often costing between $0 to $150. Many programs offer a free trial or limited-function versions, which can help you determine if the tool will be effective before purchasing the full version.
- Professional Services: Professional data recovery services can be expensive, typically ranging from $300 to several thousand dollars, depending on the complexity of the recovery and the condition of the disk. This option is often best reserved for cases where DIY methods have failed or when the data is of extremely high value.
Technical Expertise:
- Assess your comfort level with technology:
- Low Technical Expertise: If you're not tech-savvy or uncomfortable using software tools, opting for professional services may be safer to avoid potentially making the situation worse.
- Moderate to High Technical Expertise: If you're comfortable using recovery software and have experience troubleshooting disk issues, attempting a DIY recovery with a trusted tool can save money and may be sufficient for minor data loss scenarios.
Conclusion
Recovering lost data after initializing a disk on a Mac is challenging, but not impossible. By taking immediate action, using built-in tools, exploring third-party software, and choosing the right data recovery method, you have a good chance of recovering your lost files. However, the best defense against data loss is a proactive approach: back up your data regularly, handle storage devices with care, and maintain the health of your disk.
By following these guidelines, you can minimize the risk of data loss and ensure your important files remain safe and accessible.
FAQs About Data Recovery from Initialized or Uninitialized Disk on Mac
1. Why need to initialize a disk on Mac?
Normally, if you insert a new drive into your Mac, you have to initialize it first. Otherwise, it's not able to mount and use the drive on the machine. However, if there are some issues happen on a USB flash drive or external drive, you may also be required to initialize the drive once you connect the drive to your Mac.
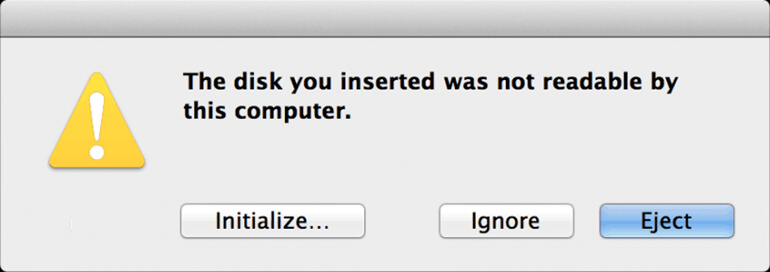
- "The disk you inserted was not readable by this computer."
- "The disk you attached was not readable by this computer."
Have you ever seen above messages when you connect your portable drive, like USB flash drive and external drive? If you see the message and ensure the drive is ever used with data on the drive, then there should be issues with the drive. Normally, if you encounter such an issue, you can solve it by initializing the drive directly in most cases. After you initialize the disk, you can reuse the disk. However, after initializing the drive, it's empty and your data on the disk will not be accessed.
2. How to recover lost data after initializing disk on Mac?
Mac data recovery software can help you recover lost data from an initialized or uninitialized disk on Mac:
- Download and install Do Your Data Recovery for Mac.
- Open Do Your Data Recovery for Mac, select the initialized or uninitialized disk.
- Click on Scan button to deeply scan the disk.
- Preview and recover lost files after scanning.
3. How to repair a damaged disk on Mac?
You can open Disk Utility, select the damaged disk, click on First Aid button to repair the disk.
To avoid the corruption for USB flash drive or external drive, we suggest you always properly eject the drive. If there are still some other issues happen on the drive and lead to such an issue, you can still try to recover the data with the data recovery software. As popular data recovery software, Do Your Data Recovery for Mac can help you recover the data effectively. What's more, you can use the software to recover data in other situations. If you want to recover deleted or lost data on Mac, feel free to download and try with the software.

Do Your Data Recovery for Mac
Do Your Data Recovery for Mac, one of the best Mac data recovery software, can help you easily and completely recover deleted, formatted or lost files from Mac HDD/SSD, external HDD/SDD, USB drive, memory card, digital camera, or other storage devices.