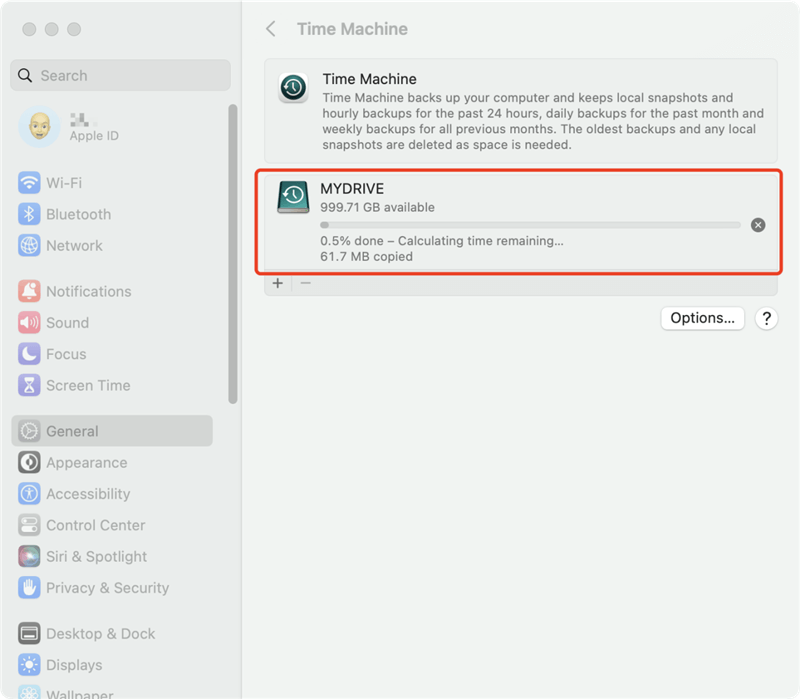
Back up your files regularly on Mac.
It's easy to create backups with Time Machine or other backup software. Read more >>

Quick Navigation:
Excel files are an essential part of daily operations for many individuals and organizations in the digital age. They are used for a variety of purposes, from financial planning and data analysis to project management and personal budgeting. However, despite their importance, Excel files are not immune to mishaps. Whether it's an accidental deletion, an unexpected system crash, or a corrupted file, losing an important Excel document can be a nightmare. If you're a Mac user, recovering Excel files can be difficult, but with the correct knowledge and tools, it is completely possible. This article will guide you through the various methods to recover Excel files on a Mac, ensuring you can retrieve your valuable data with minimal stress.
Before diving into the recovery methods, it's crucial to understand the common scenarios that lead to Excel file loss on Mac. This understanding can help in choosing the most appropriate recovery method and preventing future occurrences.
| Reason | Description |
|---|---|
| 🗑️ Deletion by mistake | It's common for users to deleted wrong data when cleaning up drive or remove some unwanted files on Mac. |
| 🧹 Accidental formatting | Formatting a wrong drive will remove all the files on the drive, including Excel or other data. |
| 🖥️ System crashes | Sudden system crashes may lead to data loss on Mac, especially when you are handling the Excel or other files. |
| ⚠️ File system corruption | File system of the drive corruption will cause the drive and data inaccessible. |
| ❎ Unexpected quit | When editing Excel files, the app might be quit unexpected and cause the edited data not saving. |
| If there are bad sectors or other issues with the drive, it will case the Excel file damage or cannot open. | |
| ☠️ Malware infection | Malware or virus attack can easily remove or damage data on your computer. |
| 🔨 Physical damage | If the drive was dropped or crushed, it may be damaged and the data on the drive is lost. |
| 🤦 User error | Some wrong operations, like cut down power supply suddenly, unplug disk without ejecting, or other errors will cause damage or loss for the data on Mac. |
Before attempting any recovery methods, it's important to follow some preliminary steps to increase the chances of successful file recovery.
1. Stop using the affected drive: If the Excel file was stored on an external drive or a specific partition, avoid using that drive or partition. Continued use could overwrite the lost file, making recovery impossible.
2. Check the Trash: If the file was accidentally deleted, it may still be in the Trash. Open the Trash on your Mac and search for the Excel file. If you find it, you can easily restore it by right-clicking on the file and selecting "Put Back."
3. Search for temporary files: Excel creates temporary files while you are working on a document. These files can sometimes be recovered if the original file is lost. To search for temporary Excel files, navigate to the temporary directory on your Mac and look for files with the ".tmp" extension.
4. Check AutoRecover: Excel has a built-in AutoRecover feature that saves your work at regular intervals. If Excel crashes or your system shuts down unexpectedly, AutoRecover may have saved a version of your file. To check for AutoRecover files, open Excel and go to "File" > "Open Recent" > "More..." > "Recent".
There are several methods you can use to recover lost Excel files on a Mac. The best method for you will depend on the circumstances of the file loss and the tools you have available.
The Trash bin is the first place to look when you accidentally delete an Excel file. All the recently deleted files might be found there. Here's how you can recover your Excel file from the Trash bin:
Step-by-step instructions

📌 Tips:
If your Trash bin has a lot of files, you might need to spend some time looking through them. The search bar can help narrow down the results.
If the file is not in the Trash bin, it may have been deleted permanently, in which case you'll need to use other methods listed below.
Microsoft Excel for Mac has built-in features like AutoSave and "Recover Unsaved Workbooks" that can help you retrieve lost files. These features save copies of your workbook at regular intervals, making it possible to recover them even after a crash or unexpected shutdown.
Steps to recover unsaved Excel files

📌 Tips for using recent versions:
Regularly save your work to avoid relying solely on the AutoSave feature.
Enable the AutoRecover feature in Excel's preferences to ensure your files are periodically saved.
Time Machine is a built-in backup feature on Macs that automatically saves copies of your files, including Excel workbooks. If you've set up Time Machine, recovering a lost Excel file can be straightforward.
How to restore Excel files from Time Machine


📌 Tips for using Time Machine:
Make sure Time Machine is regularly backing up your data by checking its status in System Preferences.
Consider setting up more frequent backups to reduce the risk of data loss.
Many users store their Excel files on cloud services like OneDrive, iCloud, or Google Drive. If you have enabled cloud backup or synchronization, recovering a deleted or lost Excel file is relatively simple. Here we use iCloud as an example:
Recovering files from iCloud Storage
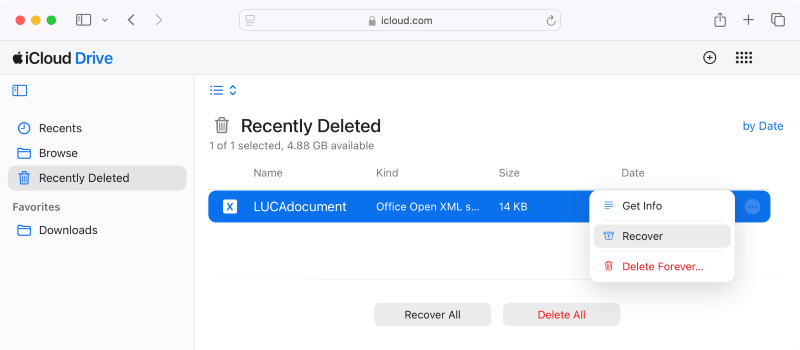
📌 Tips for Cloud Storage recovery
Ensure that automatic backup or sync is enabled on your Mac to keep all files updated in the cloud.
Regularly check the storage capacity and subscription plans of your cloud service to avoid running out of space.
Excel's AutoRecover feature can be a lifesaver when you lose an unsaved file due to a system crash or an unexpected shutdown. AutoRecover automatically saves a copy of your file at regular intervals, allowing you to recover your work even if you didn't save it manually.
Steps to recover Excel files using AutoRecover:
📌 Note: AutoRecover only works if Excel is set to save AutoRecover information. You can check or change this setting by going to "Excel" > "Preferences" > "Save" and ensuring that "Save AutoRecover information" is checked.
When you work on an Excel file, the system creates temporary files that can sometimes be recovered if the original file is lost. These temporary files are stored in the "Temporary" folder on your Mac.
Steps to recover Excel files from the temporary folder:
This method is not always successful, as temporary files may be deleted automatically when the system is restarted. However, it's worth checking if other recovery methods fail.
The deleted files might be emptied from Trash or the Excel files were permanently removed with "Command" + "Del" keys. Or you may lost files due to formatting or other issues and don't have backups. If you cannot find the lost Excel files with all the above methods, there is still a chance to get back the lost Excel files with professional software Do Your Data Recovery for Mac.
This software can recover lost Excel files or other data in any data loss scenarios. If you cannot recover the deleted or lost Excel files with other methods, you can try this one.
After installing the software and run it on your Mac, you can then try to recover the lost Excel files with the following steps:
Step 1. Run the software from launchpad. Select the drive where you lost the Excel files.

Step 2. Click the Scan button to search for the lost Excel files from the selected drive.

Step 3. Preview and check the files after the scan is finished.

Step 4. Select the wanted Excel files and click Recover button to save to another drive.

To avoid data loss in the future, it's strongly suggest to back up your data regularly. For example, you can back up your files with the system built-in tool Time Machine or third-party backup software.
Back up your files regularly on Mac.
It's easy to create backups with Time Machine or other backup software. Read more >>
Recovering lost or deleted Excel files on a Mac doesn't have to be a daunting task. By checking the Trash Bin, using the "Undo" feature, restoring from recent versions, utilizing Time Machine backups, or relying on cloud storage, you can often recover your files quickly and easily. In more challenging situations, third-party data recovery software or professional data recovery services can provide the solution you need. To prevent future data loss, regularly back up your files using Time Machine or cloud services, and always save your work frequently.
Do Your Data Recovery for Mac
Do Your Data Recovery for Mac, one of the best Mac data recovery software, can help you easily and completely recover deleted, formatted or lost files from Mac HDD/SSD, external HDD/SDD, USB drive, memory card, digital camera, or other storage devices.
