Quick Navigation:
- What is M1 Max Chip?
- Common Causes of Data Loss on M1 Max Macs
- Methods to Recover Lost Data from M1 Max Chip Macs
- Preventing Data Loss on M1 Max Macs
- Conclusion
- FAQs About M1 Max Chip Mac Data Recovery
Apple's M1 Max chip has revolutionized the computing world with its incredible performance, efficiency, and power. Launched in October 2021, the M1 Max is part of Apple's series of custom silicon chips designed for Macs, promising a quantum leap in processing capabilities. However, with new technology comes new challenges, and one significant concern is data loss. Despite any reason, data loss is a common issue many Mac users face, even those using the M1 Max chip. In this article, we will explore what the M1 Max chip is, its benefits, and the steps to recover lost data from a Mac using this advanced chip.
What is M1 Max Chip?
Overview of the M1 Max Chip:
The M1 Max is a high-performance chip designed by Apple, specifically for Mac devices. It builds upon the foundation laid by the M1 and M1 Pro chips, providing even more power, efficiency, and versatility.
Key Features and Specifications
- Unified Memory Architecture (UMA): The M1 Max uses a unified memory architecture, which means the CPU, GPU, and Neural Engine all share the same memory pool. This design reduces latency and increases bandwidth, allowing for faster and more efficient data processing.
- High-Efficiency Media Engine: It features a dedicated ProRes encoder and decoder, enabling professionals to handle multiple streams of high-resolution video with ease. This makes it ideal for video editors and content creators.
- Enhanced Security Features: The M1 Max includes a Secure Enclave for secure boot and encrypted storage, making it one of the most secure chips available.
- Advanced Power Management: Despite its power, the M1 Max is energy-efficient, offering longer battery life than most high-performance laptops.
Differences from M1 and M1 Pro Chips:
While the M1, M1 Pro, and M1 Max are all part of Apple's custom silicon family, the M1 Max offers significantly more power and capabilities. The M1 Max has double the GPU cores compared to the M1 Pro and quadruple that of the original M1, providing a massive boost in graphics performance. The M1 Max also supports more memory bandwidth, up to 400GB/s, which is twice that of the M1 Pro and six times more than the M1. This makes the M1 Max ideal for professional-grade tasks like video editing, 3D rendering, and machine learning.
Impact on Apple Devices:
The M1 Max chip powers several of Apple's high-end devices, such as the MacBook Pro 14-inch and 16-inch models. These devices are designed for professionals who need top-tier performance, battery life, and security. The M1 Max represents a significant step forward for Apple's transition away from Intel chips, allowing for greater control over hardware and software integration. It offers a more seamless and efficient user experience, with faster app performance, instant wake-from-sleep, and enhanced battery life.
Common Causes of Data Loss on M1 Max Macs
Even with the advanced technology and security features of the M1 Max, data loss can still occur. Understanding the common causes of data loss can help users prevent and recover from these incidents more effectively.
Software-Related Causes:
- Accidental File Deletion or Formatting: Users may accidentally delete files or format a disk, resulting in the loss of important data.
- System Crashes or macOS Updates: Sometimes, macOS updates or unexpected system crashes can lead to data corruption or loss. During the update process, files may get corrupted or lost if there is a sudden power failure or an unexpected error.
- Malware or Virus Attacks: Although Macs are known for their robust security, they are not entirely immune to malware or viruses. Such malicious software can corrupt, delete, or steal data.
Hardware-Related Causes:
- Physical Damage or SSD Failure: Like any hardware, Macs are susceptible to physical damage from drops, spills, or other accidents. Such damage can lead to SSD (Solid State Drive) failure, which may result in data loss.
- Issues Specific to the M1 Max Chip Architecture: While the M1 Max chip is a powerful and reliable component, its architecture is different from traditional Intel-based Macs. The unique design may cause compatibility issues with some third-party software, leading to data loss or corruption in rare cases.
Methods to Recover Lost Data from M1 Max Chip Macs
Recovering lost data from an M1 Max chip Mac requires a systematic approach. Depending on the nature and extent of the data loss, different methods may be employed. Below are some of the most effective ways to recover lost data on these devices:
1. Using Time Machine Backups
Time Machine is Apple's built-in backup solution that allows users to create regular backups of their entire system, including files, applications, and settings. If you have been using Time Machine, recovering lost data can be straightforward:
- Attach your Mac to your Time Machine backup drive.
- From the Applications folder or the Dock, launch the Time Machine application.
- To find the time and date that the file was last accessible, use the timeline on the right side of the screen.
- Choose the file or folder that needs to be restored and hit "Restore." On your Mac, the file will be moved back to its original location.
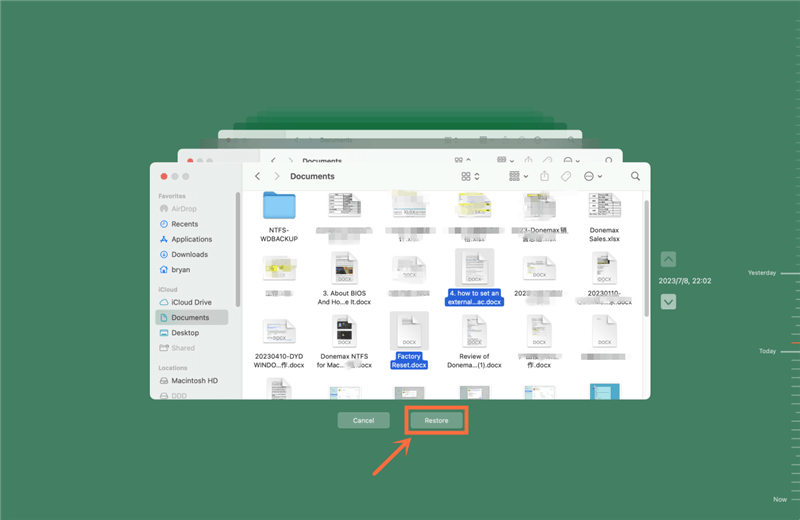
Time Machine is an excellent preventive tool, but it only works if regular backups have been made. If you haven't set up Time Machine or your backup is outdated, you will need to explore other recovery methods.
2. Using Do Your Data Recovery for Mac
Do Your Data Recovery for Mac is a popular data recovery software that is compatible with M1 Max Macs. It supports the recovery of lost or deleted files from devices like internal SSD, external hard drives, and USB flash drives. Here's how to use Do Your Data Recovery for Mac to recover data:
Step 1. Download the software by clicking on Download button below, then install this software on your M1 Max Mac computer.
Step 2. Open Do Your Data Recovery for Mac, then select the drive where you lose your files.

Step 3. Click on Scan button to deeply scan the drive and find all recoverable files.

Step 4. Once the scan is completed, you can preview all recoverable files. Then select the wanted files, and save them by clicking on Recover button.

Do Your Data Recovery for Mac is user-friendly and offers a free trial version, though the full functionality may require a paid license. It is effective in recovering a wide range of file types, including documents, photos, videos, and more.
3. Using macOS Recovery Mode
macOS Recovery Mode is a built-in feature that allows users to troubleshoot and restore their Macs in the event of software issues. It also provides a way to recover data if your Mac becomes unbootable or the internal drive is inaccessible. Here's how to use Recovery Mode for data recovery:
Step 1. Shut down your Mac completely.
Step 2. Press and hold the power button until the "Loading startup options" screen appears.
Step 3. Select "Options" and click "Continue" to enter Recovery Mode.
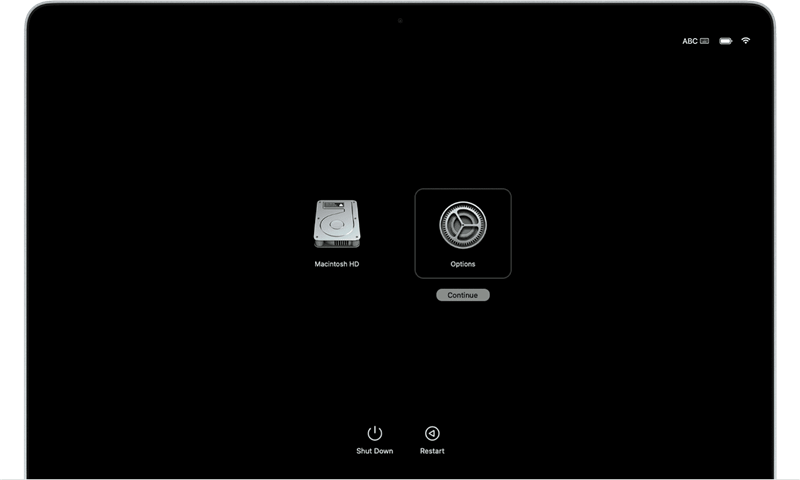
Step 4. In Recovery Mode, open Disk Utility. Here, you can attempt to repair the disk using the "First Aid" feature. If the drive is repairable, you may regain access to your files.

Step 5. If Disk Utility cannot repair the disk, you can try to use Terminal in Recovery Mode to copy important files to an external drive.
Recovery Mode is a powerful tool for troubleshooting and can be particularly useful if the M1 Max Mac is unresponsive or experiencing severe software issues. However, it may not be effective if the drive has suffered significant physical damage or corruption.
4. Using iCloud Backup
If you have been using iCloud to store your files, you can recover lost data directly from iCloud. This method is particularly useful for recovering specific files or small amounts of data, such as documents, photos, and contacts. Here's how to recover files from iCloud:
Step 1. Go to the iCloud website and log in with your Apple ID.
Step 2. Navigate to the "iCloud Drive" section, where you will see a list of files stored in your iCloud.
Step 3. Locate the file or folder you want to recover. If you’ve accidentally deleted the file, you can check the "Recently Deleted" folder within iCloud Drive.
Step 4. Select the file and click "Recover." The file will be downloaded to your Mac.
iCloud backup is a convenient option for users who regularly sync their files with Apple's cloud storage service. However, it may not be suitable for recovering large amounts of data or entire system backups.

Preventing Data Loss on M1 Max Macs
While it's important to know how to recover lost data, prevention is always better than cure. Here are some tips to help you avoid data loss on your M1 Max Mac:
- Regular Backups: Set up regular backups using Time Machine, iCloud, or another backup solution. This ensures that you have a copy of your data even if something goes wrong.
- Use Reliable Software: Avoid installing software from untrusted sources, as it may contain malware or cause system instability.
- Keep Your System Updated: Regularly update macOS and all installed applications. Updates often include security patches and bug fixes that can prevent data loss.
- Enable FileVault: FileVault is a disk encryption program that protects your data by encrypting the contents of your drive. While it may not prevent data loss, it ensures that your data remains secure if your Mac is lost or stolen.
- Be Cautious with File Deletion: Double-check files before deleting them, especially if they are important. Consider using a tool that requires confirmation before permanent deletion.
- Monitor Hardware Health: Use tools like Disk Utility to check the health of your drives periodically. Early detection of hardware issues can prevent data loss.
Conclusion
The M1 Max chip represents a significant advancement in computing power, offering exceptional performance for professional users. However, with great power comes the responsibility to protect and recover your data. Whether you're a creative professional handling large files or a casual user storing important documents, understanding how to recover lost data on an M1 Max-equipped Mac is crucial.
By using methods such as Time Machine, Do Your Data Recovery for Mac, macOS Recovery Mode, and iCloud, you can effectively recover lost data. Additionally, taking preventive measures, such as regular backups and system updates, will help you avoid data loss in the first place. Remember, the key to managing data loss is preparation, so make sure to implement these practices to safeguard your valuable information.
FAQs About M1 Max Chip Mac Data Recovery
1. How to recover lost data from a Mac with M1 Max chip?
Here are some effective methods you can try:
- Check trash. If the deleted files are stored in trash, select them and put them back.
- Recover deleted items from iCloud.
- Restore lost files from Time Machine backup or disk clone backup.
- Use data recovery software to recover lost data from a M1 Max chip Mac.
- Use data recovery service.
- Use Disk Utility to repair the hard drive.
2. What is the best data recovery software for M1 Max chip Mac?
Here are two excellent tools that can help you recover lost data on a Mac with Apple silicon M1 Max chip:
Do Your Data Recovery for Mac:

The first of these 2 data recovery software for the M1 Max chip is Do Your Data Recovery for Mac. It supports many macOS versions including the very latest, macOS Tahoe. In addition to recovering lost data from Mac computers, it can also recover files from SSDs, USB storage, and even memory cards.
Do Your Data Recovery for Mac recovers different file types such as photos, videos, documents, emails, and more. Moreover, it further claims to recover data from Mac volumes whether they were deleted or damaged. Other potential events that are covered by this software include human error, power failure, hard drive error, etc.
Here is a sneak peek of some features of Do Your Data Recovery for Mac.
- Promises to be 100% safe/secure for use on Mac computers
- Can recover data from a Mac computer based on an Intel chipset as well as the latest Apple Silicon chips.
- Claims to offer free scanning and previewing of files so that you can purchase it if your lost files are found in the scan result.
Magoshare Data Recovery for Mac:
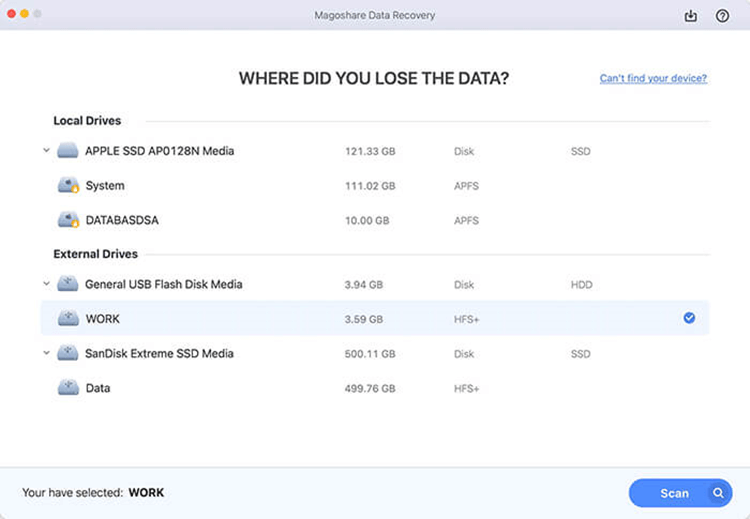
The second recovery software that we have cured keeping in mind the security features of M1 Max chipset is Magoshare Data Recovery for Mac. It covers different data loss cases such as sudden power outages, human error, and more.
Magoshare also offers to recover data if your Mac computer does not turn on due to file system errors or a macOS crash. It can recover files from a hard drive that was mistakenly formatted using Disk Utility or a disk management tool.
Other data recovery possibilities that it supports include corrupted drive data recovery, deleted files recovery, and unreadable drive file recovery (details on the link).
Different devices where this software can be used to recover data are SSDs, HDDs, USB Drives, and various Mac computers. Magoshare recovery software also clarifies that it can recover 1000+ file formats.
Like the DoYourData recovery program, this software also has two scan modes (Deep Scan and Quick Scan). Also, it fully supports the newest macOS which is macOS Tahoe.
Some highlights of this software are given below.
- Its free version offers to recover files up to 200MB for free
- The testing and previewing are also free, just like Do Your Data Recovery Software for Mac
- You can also save or load a scan session to recover it later
- Magoshare affirms that it is an "Apple trusted and certified developer", and "is 100% safe."
3. How to use data recovery software to recover lost data on M1 Max Mac?
Follow the steps below to get all lost data back:
- Download and install Do Your Data Recovery for Mac on your M1 Max Mac.
- Open Do Your Data Recovery for Mac, select the drive where you lose your files.
- Click on Scan button to deeply scan the drive.
- Preview and recover lost files.
Do Your Data Recovery for Mac
Do Your Data Recovery for Mac, one of the best Mac data recovery software, can help you easily and completely recover deleted, formatted or lost files from Mac HDD/SSD, external HDD/SDD, USB drive, memory card, digital camera, or other storage devices.