Quick Navigation:
- About Photo Deletion on macOS Sierra
- Top 6 Method to Recover Deleted Photos on macOS Sierra
- Prevent Future Photo Loss
- Conclusion
Photos are often some of our most treasured digital assets, capturing precious memories and moments. However, accidental deletion or data corruption can sometimes lead to losing these valuable files. If you are a macOS Sierra user and find yourself in this situation, don't worry. In this article, we will help you explore various methods, ranging from built-in macOS tools to third-party data recovery software to recover deleted photos on macOS Sierra.
About Photo Deletion on macOS Sierra
When you delete a photo on macOS Sierra, it isn't immediately removed from your system. Instead, it's often temporarily moved to a different location, such as the "Recently Deleted" folder, where it can be easily restored within a specific period. Even after this period expires or the files are removed from this folder, the data may still reside on the storage drive until it is overwritten by new data.
This means there are multiple opportunities to recover deleted photos, but it's important to act quickly. The more you use your computer after the deletion, the higher the chance that the data will be overwritten and become unrecoverable.
Top 6 Method to Recover Deleted Photos on macOS Sierra
Method 1: Check the Recently Deleted Folder
The first place to check when you accidentally delete photos is the "Recently Deleted" folder in the Photos app.
How to Access the Recently Deleted Folder?
- Open the Photos App: Click on the Photos app from your dock or launch it from the Applications folder.
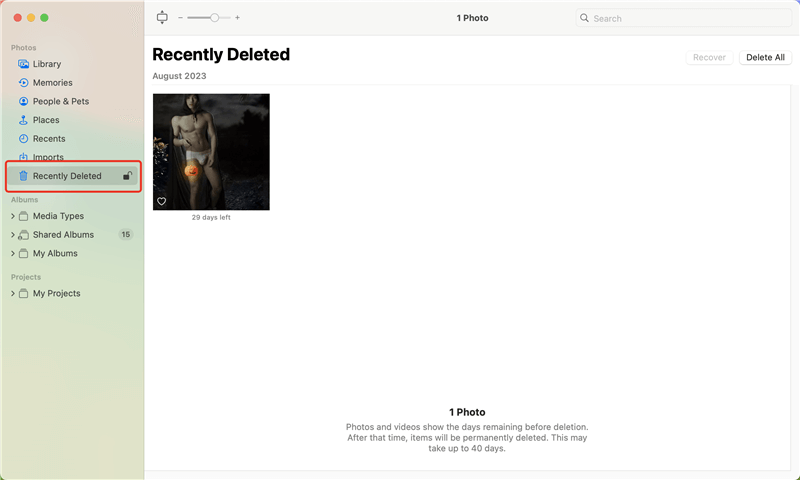
- Navigate to Recently Deleted: In the sidebar, find the "Recently Deleted" folder under "Library."
![best macOS Sierra photo recovery freeware]()
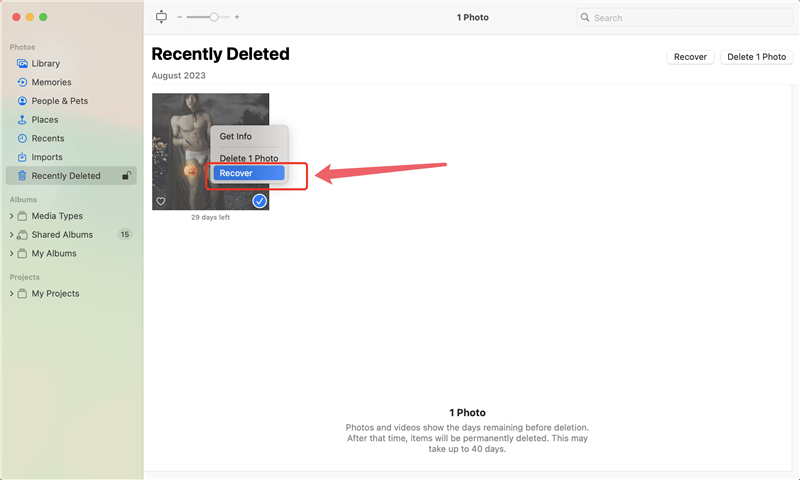
- Recover the Photos: Browse through the photos. Select the ones you wish to recover and click the "Recover" button in the upper-right corner.
![best macOS Sierra photo recovery freeware]()
Photos in this folder are typically stored for up to 30 days before being permanently deleted. If your photos are within this time frame, this is the easiest way to recover them.
Method 2: Recover Deleted Photos from iCloud
If you have enabled iCloud Photo Library on your macOS Sierra device, your photos are automatically synced and backed up to iCloud. This feature can be a lifesaver if you accidentally delete photos from your device, as the deleted photos may still be recoverable from iCloud.
How to Recover Deleted Photos from iCloud:
- Go to iCloud.com:
- Open a web browser and go to iCloud.com.
- Sign in with your Apple ID and password.
- Access the Photos App:
- Click on the "Photos" app icon to open your iCloud Photo Library.
- Check the Recently Deleted Album:
- In the sidebar, find the "Recently Deleted" album.
- This folder contains photos that were deleted within the last 30 days. Browse through the album to find your deleted photos.
- Select and Recover Photos:
- Select the photos you want to recover by clicking on them.
- Click on the "Recover" button in the upper-right corner of the screen to restore the photos back to your iCloud Photo Library.
![best macOS Sierra photo recovery freeware]()
- Sync Back to Your Device:
- After recovery, the photos will automatically sync back to your macOS Sierra device and any other devices connected to your iCloud account.
Method 3: Recover Photos Using iMessage
If you have shared the deleted photos with someone via iMessage, you can recover them directly from the message thread. iMessage automatically saves the photos you send and receive, making it an unexpected but effective way to recover lost photos.
Steps to Recover Photos from iMessage:
- Open the Messages App:
- Launch the Messages app on your macOS Sierra.
- Select the Relevant Conversation:
- Browse through your conversations to find the thread where the deleted photos were shared.
- Access the Photos in the Conversation:
- Scroll through the conversation to locate the deleted photos.
- Alternatively, click on the "Details" button (usually an "i" icon) at the top right of the conversation window to see all the media shared in that conversation.
![best macOS Sierra photo recovery freeware]()
- Save the Photos:
- Right-click on the photos you wish to recover and select "Add to Photos" to save them back to your Photos library.
- You can also drag and drop the photos to your desktop or any desired folder.
💡 Tip: Regularly check and save important photos from iMessage threads to prevent losing them if a thread is deleted or cleared.
Method 4: Recover Deleted Photos from Trash
When you delete photos on macOS Sierra, they are initially moved to the Trash folder. If you have not emptied the Trash, the photos can be easily restored.
Steps to Recover Deleted Photos from Trash:
- Open the Trash Folder:
- Click on the Trash icon located in the Dock to open the Trash folder.
- Find Your Deleted Photos:
- Browse through the items in the Trash folder to locate the deleted photos.
- Use the search bar at the top right of the window to quickly find specific files by typing keywords such as the file name or type (e.g., "jpg" or "png").
- Restore the Photos:
- Right-click on the photo(s) you want to recover and select "Put Back."
- The photos will be restored to their original location on your Mac.
![best macOS Sierra photo recovery freeware]()
- Alternative Method:
- Drag and drop the recovered images from the Trash folder into the folder of your choosing if you choose to save them somewhere else.
Method 5: Restore Photos from a Time Machine Backup
Restoring deleted images from Time Machine backups is a fairly simple process if you use it often.
Steps to Restore from Time Machine:
- Make sure the drive used for Time Machine backups is connected to your Mac.
- Launch the Photos app.
- In the menu bar, click on the Time Machine icon and choose "Enter Time Machine."
![best macOS Sierra photo recovery freeware]()
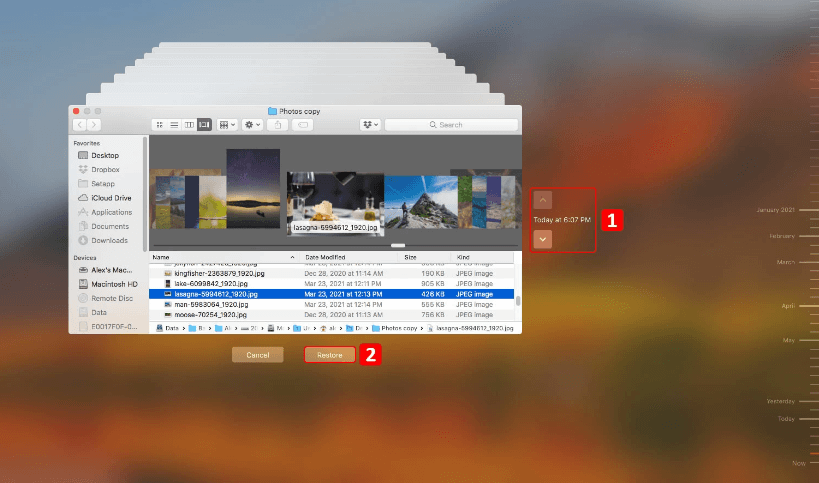
- Navigate to the Date Before Deletion: To locate a backup date from when the pictures were still on your Mac, use the timeline shown on the right side of the screen.
- Select and Restore Photos: Once you find the photos, select them and click the "Restore" button.
![best macOS Sierra photo recovery freeware]()
Time Machine will automatically restore the photos to their original location. Ensure your Time Machine backups are up to date to prevent losing important files in the future.
Method 6: Recover Deleted Photos with Third-Party Freeware
When the built-in options do not work, third-party data recovery software can be a powerful solution. These programs can scan your storage drive and recover files that were deleted, corrupted, or lost due to formatting.
The top third-party recovery software for macOS Sierra we recommend is Do Your Data Recovery for Mac Free. With the software, you can easily recover the deleted photos or any other lost files on macOS Sierra. Also, the software is compatible with all the recent macOS versions.
Do Your Data Recovery for Mac Free
- Best free data recovery for macOS Sierra and other macOS systems.
- Easy to use and recover up to 1GB data for free.
- Data recovery for deleted files, formatted data, or other lost data.
To recover lost files in macOS Sierra, you need to download and install the software on your Mac first. Then refer to the following guide to accomplish the task step by step:
Step 1. Launch the applications and choose the drive where you deleted photos or lost other data.

Step 2. Click the Scan button to start the search. It will deeply scan the drive to search for deleted or lost files.

Step 3. After the scan is finished, locate the wanted files by type, path, date, name, etc. You can also preview the files to confirm if they are recoverable.

Step 4. At last, choose the needed files and click Recover button, choose a location on another drive to save the files.

Prevent Future Photo Loss
To avoid the hassle and stress of recovering deleted photos, follow these preventative measures:
- Regular Backups: Use Time Machine or another backup solution to back up your Mac regularly.
- Use iCloud Photo Library: Sync your photos with iCloud to ensure they are always backed up and accessible from any device.
- Organize Your Photos: Regularly organize and review your photo library, deleting unnecessary files to reduce the risk of accidental deletion.
- Be Cautious with Deletion: Always double-check before deleting any files or emptying the Trash.
Conclusion
Losing your photos on macOS Sierra can be a stressful experience, but several effective methods can help recover them. Start by checking the "Recently Deleted" folder, utilize Time Machine backups, or try using Terminal commands. If these options fail, third-party data recovery freeware or professional services can provide additional recovery methods.
By taking proactive steps like regular backups and using cloud storage, you can minimize the chances of losing your precious photos again. Remember, the key to successful data recovery is acting quickly and carefully.

Do Your Data Recovery for Mac Free
Do Your Data Recovery for Mac, one of the best Mac data recovery software, can help you easily and completely recover deleted, formatted or lost files from Mac HDD/SSD, external HDD/SDD, USB drive, memory card, digital camera, or other storage devices.
