Quick Navigation:
- Causing the WD Elements Not Mounting on Mac Problem
- Solutions to Fix WD Elements Not Mounting or Not Showing Up on Mac
- Recover Lost Data from WD Elements Drive on Mac
- Conclusion
- FAQs About Using WD Elements on Mac
Do you ever get annoyed when your WD Elements portable hard drive tries to hide from your Mac? Everyone has been there! Imagine having your important files ready to go when your trusted storage friend suddenly doesn't show up. Don't worry, though; we're here to make you smile. In this simple guide, let's explore why your WD Elements isn't getting along with your Mac.
We'll review methods that even your neighbor, who isn't very good with computers, could understand, from simple cable checks to learning to use Disk Utility. Let's make that WD Elements and Mac pair the powerful they were meant to be!

Causing the WD Elements Not Mounting on Mac Problem:
The following things may be causing the mounting or viewing problems:
Cable Connection Snags:
The USB cord that connects your WD Elements to your Mac must be in good shape. Make sure the cable is not only plugged in firmly but also doesn't have any damage that you can see. If the cords between the WD Elements and your Mac are damaged or loose, they might be unable to talk to each other.
Problems with the power supply:
The external hard drive might not work right if the power source isn't strong enough. Whether the power adapter is broken or there are problems with the power source, those can cause mounting problems. Check the power charger plugged into the WD Elements to ensure it works. Try using a different power source, and if you can, connect the drive straight instead of using a power strip.
File System Compatibility:
Compatibility with other file systems is very important. Mounting problems could happen if the WD Elements is set up with a file system that macOS doesn't support. Make sure that macOS can read the files that the WD Elements uses. ExFAT and Mac OS Extended (Journaled) are two file systems that are often enabled. If you need to, you can make a copy of your data and format the drive with the right file system using Disk Utility.
Corrupted or Outdated Drivers:
The drivers that let the WD Elements talk to your Mac might be outdated or broken, making it impossible for the devices to recognize and mount. Check the Western Digital website to see if any driver updates work with your Mac's running system. Get the newest drivers and install them to make sure communication works well.
USB Port Gremlins:
If your Mac's USB port is broken or not working correctly, the link can be lost, stopping the external drive from mounting. The WD Elements drive might be having trouble with one USB port on your Mac. Try connecting it to a different port to make sure. The first port might be broken if the drive shows up after using a different port.
Solutions to Fix WD Elements Not Mounting or Not Showing Up on Mac
Fix1. Restart Mac, Try Different USB Port or Device
Sometimes, all you need is a restart to fix something. After restarting your Mac, check whether the WD Elements drive can be accessed again.
The WD Elements drive might be having trouble with one USB port on your Mac. Try connecting it to a different port to make sure. The first port might be broken if the drive shows up after using a different port.
Connect the WD Elements to a different Mac if you can. That helps you determine if the problem is just with your Mac or if the external drive is having issues.
Fix2. Use Disk Utility to fix the WD Elements drive on Mac
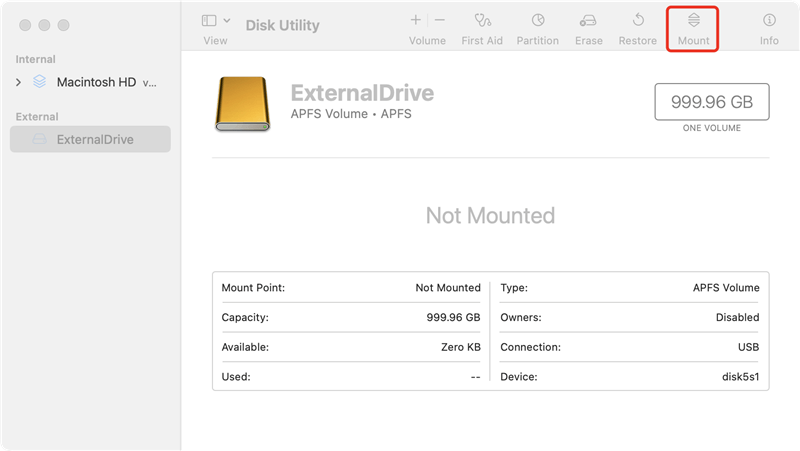
On your Mac, open Disk Utility and look for the WD Elements drive in the list. If you can see the drive but it's greyed out, use Disk Utility to try to fix the disk.
- If the WD Elements drive is not mounting, click on Mount button.
![fix WD Elements Not Mounting on Mac]()
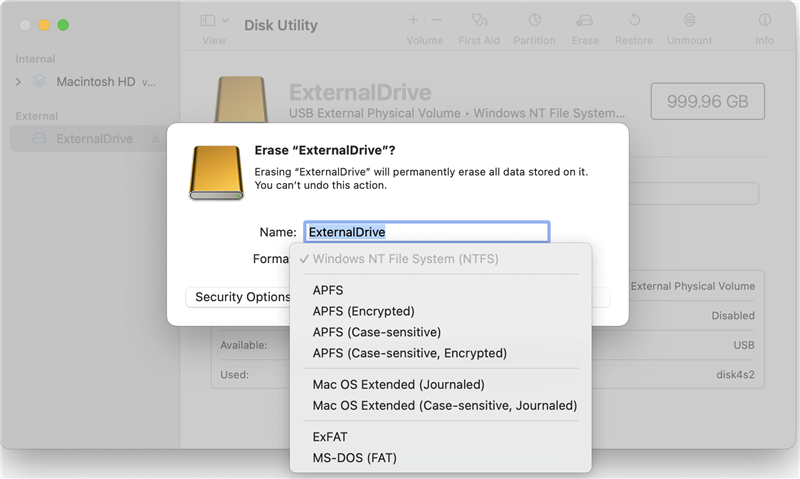
- NTFS file system is not compatible with macOS, click on Erase button, then select ExFAT, APFS or Mac OS Extended as the file system, click on Erase button again.
![fix WD Elements Not Mounting on Mac]()
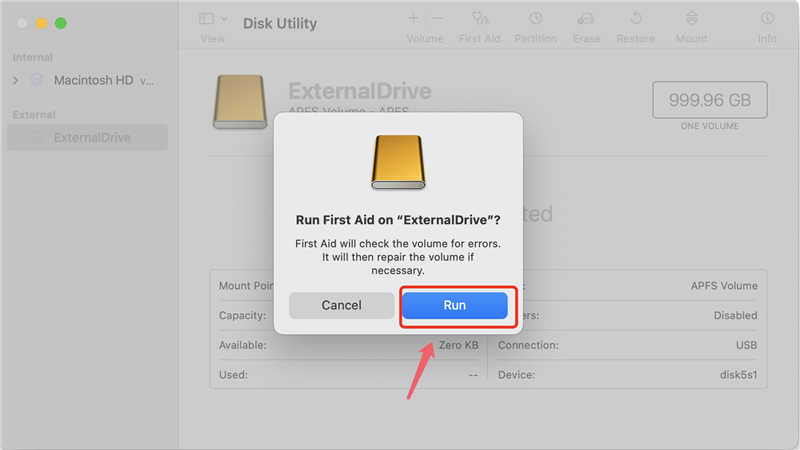
- If the Mount button or Erase button is not available, click on First Aid button to repair the WD Elements drive.
![fix WD Elements Not Mounting on Mac]()
Fix3. Select External disks in Finder Settings
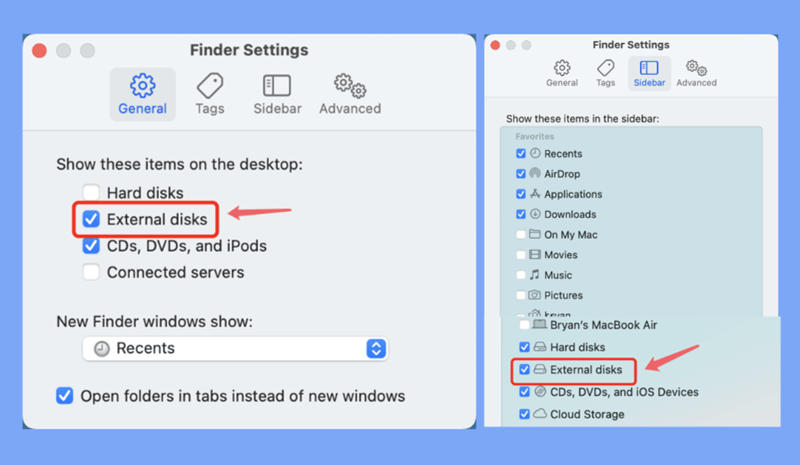
If the WD Elements is recognized by Disk Utility and is mounted but you can’t see it on Desktop and Finder, just check the Finder Settings.
Open a Finder, then click Finder on Apple menu.
Choose Settings.
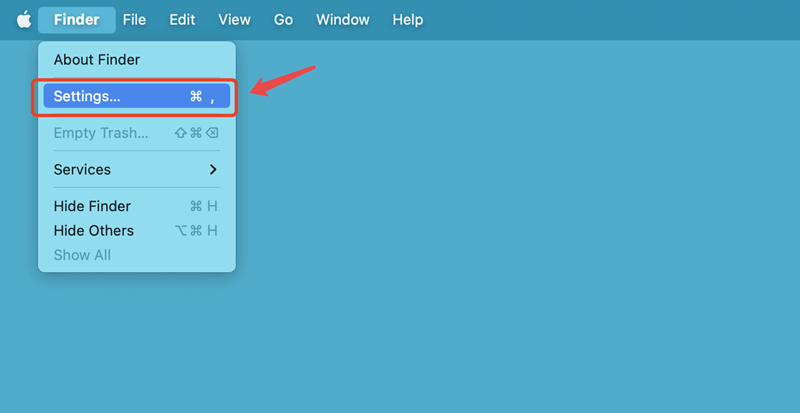
Make sure you have selected External disks under General and Sidebar.
Fix4. Use NTFS for Mac Tool to Mount WD Elements on Mac
NTFS for Mac is a tool which can help you add NTFS read-write support on Mac and manage external storage devices on Mac. Whether your WD Elements has been formatted to NTFS or APFS/ExFAT/Mac OS Extended, you can use this tool to mount it on Mac.
Step 1. Download and install DoYourData NTFS for Mac on your Mac, then connect the WD Elements drive to your Mac.
Step 2. Open DoYourData NTFS for Mac, select the WD Elements, click on Mount button.
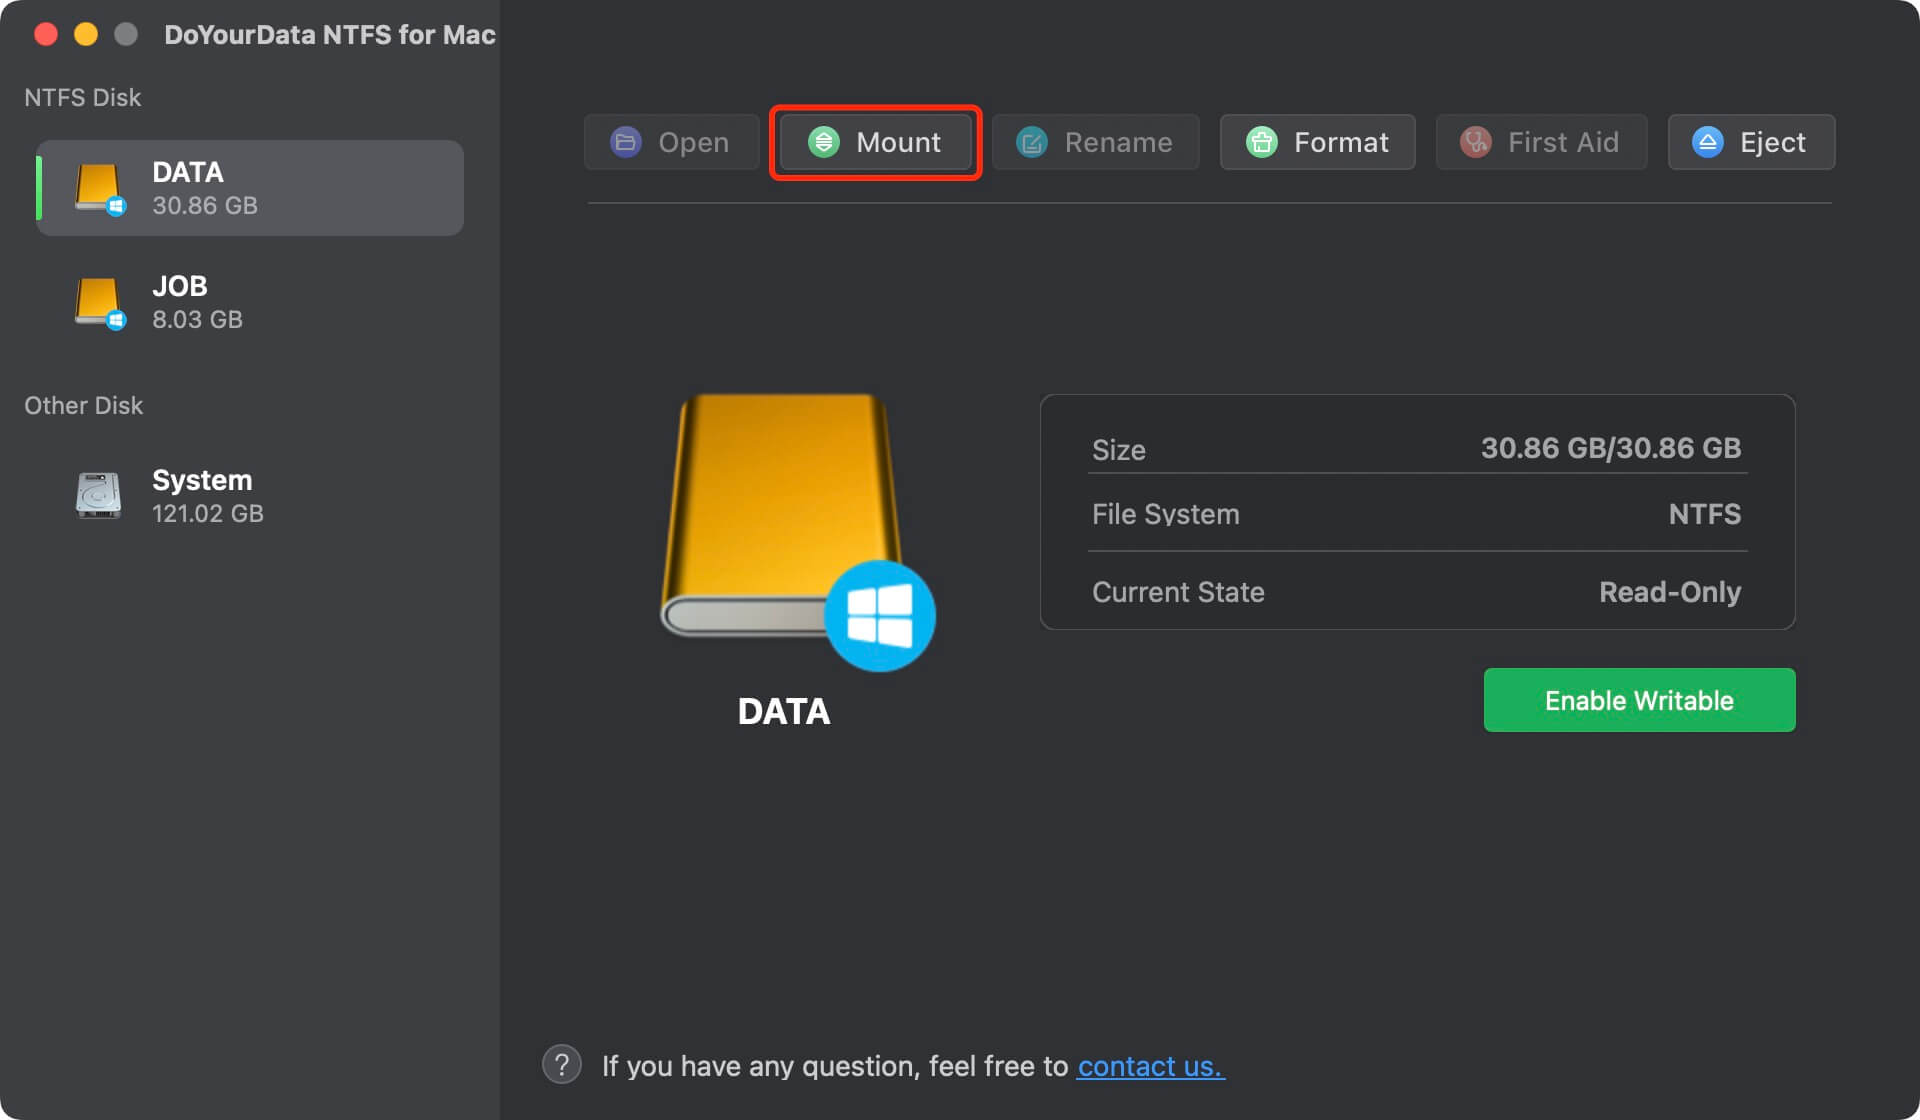
If you want to use a NTFS WD Elements drive on Mac without formatting, just click on Enable Writable button to allow you to read-write NTFS drive on Mac.

Recover Lost Data from WD Elements Drive on Mac
Erasing or Running First Aid will delete all contents stored on the WD Elements drive. If you lose important data from the WD Elements drive, just use a data recovery app to get the lost data back.
Step 1. Download and install Do Your Data Recovery for Mac, open it.
Step 2. Connect the WD Elements drive to your Mac, then open Do Your Data Recovery for Mac. Select the WD Elements drive.

Step 3. Click on Scan button to deeply scan the WD Elements drive.

Step 4. Find the wanted files, select them and click on Recover button to save them.

Conclusion:
You're now able to use your WD Elements and Mac together again. We figured out why the hiccup happened with the setup by following these easy steps. Remember that technology can be weird, but you can't be stopped if you know how to fix problems.
You can call it a wire dance or a power supply tango, but your WD Elements is now ready for a second dance. If there are any more tech problems, don't worry - you know how to fix them. So, here's to easy file access, stress-free tech moments, and the joy of beating the gadgets that won't work with us. Continue to do well in the internet world!
FAQs About Using WD Elements on Mac
1. How to mount WD Elements drive on Mac?
Make sure the WD Elements is connected to your Mac correctly. Then open Disk Utility, click on Mount button. When the Mount button is grayed out, click on First Aid to repair the WD Elements drive.
2. Can I use a NTFS WD Elements drive on Mac without formatting?
Mac OS does not support NTFS, but you can install a NTFS for Mac tool and run it to add NTFS read-write support to your Mac.
DoYourData NTFS for Mac is able to enable writable for NTFS drive. Just connect the WD Elements drive to your Mac, then select it, click on Enable Writable button. It can quickly fix WD Elements drive read-only on Mac issue, no need to reformat the drive.
3. How to format WD Elements drive for both Windows OS and macOS?
ExFAT is a file system which is compatible with both Windows and macOS. You can run Disk Utility to erase the WD Elements drive to ExFAT so you can use this drive on Windows PC and Mac.
4. WD Elements is not showing up on Mac, how to fix this issue?
Just go to Apple menu > Finder > Settings, then select External disks under General and Sidebar.
After that, check if you could find the WD Elements drive on desktop and Finder sidebar.
