Unformat Hard Drive on Mac
Run Do Your Data Recovery to scan the erased hard drive (erased by Disk Utility or other software) and get all lost files back.
Home > Hard Drive Solutions for Mac
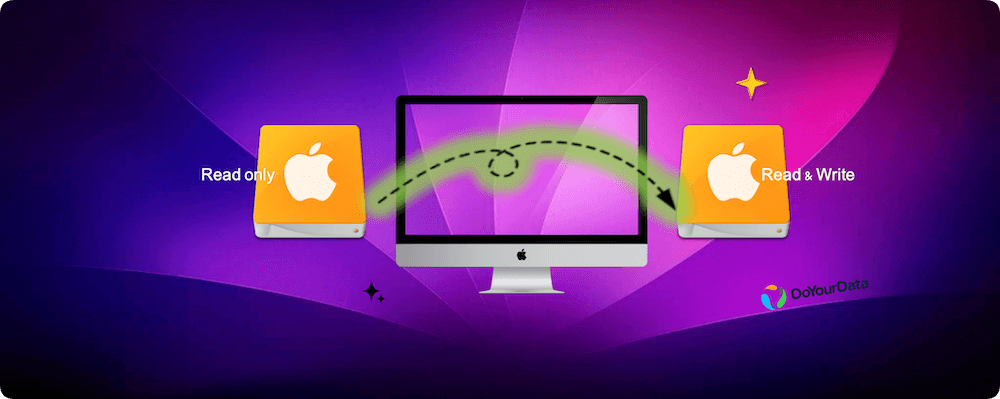
What to do if the file/folder or disk becomes read-only on Mac? Check this guide to help you change read-only settings on Mac. If the disk has been formatted to NTFS file system, you can download and install Donemax NTFS for Mac on your Mac, then run it to help you add read-write support for the NTFS drives.
![]() Updated by Justin Kenny on January 05, 2026
Updated by Justin Kenny on January 05, 2026
Quick Navigation:
It might feel like you're lost in a digital maze trying to figure out what's happening with your Mac's read-only disk. When you try to save a file or make changes, do you get the annoying message that your disk can only be read? Do not be afraid! This guide is your helpful friend as you try to free your Mac from these restrictions.
Think of your computer as a busy city and your read-only disk as a gate that keeps you from getting to some places. We'll give you the keys to that gate, letting you freely explore, change, and make your digital world your own. Hold on tight, Mac Explorer! We're going on a trip to change disk read-only on Mac and take back control of your data kingdom!
There are many reasons why files on a Mac might become read-only, but the most common ones are problems with the file system, rights, outside factors, and problems with compatibility. Here is a more in-depth breakdown:
The easiest way to change file rights is to use Finder:
Step 1. Use the Finder to find the file or folder.
Step 2. Right-click the file and select "Get Info" or "Command + I."
Step 3. Scroll to the "Sharing & Permissions" paragraph in the Info box.
Step 4. If the lock icon is locked, click it and enter the password to confirm.
Step 5. Change the user's privileges by changing the "Read Only" dropdown menu to "Read & Write."
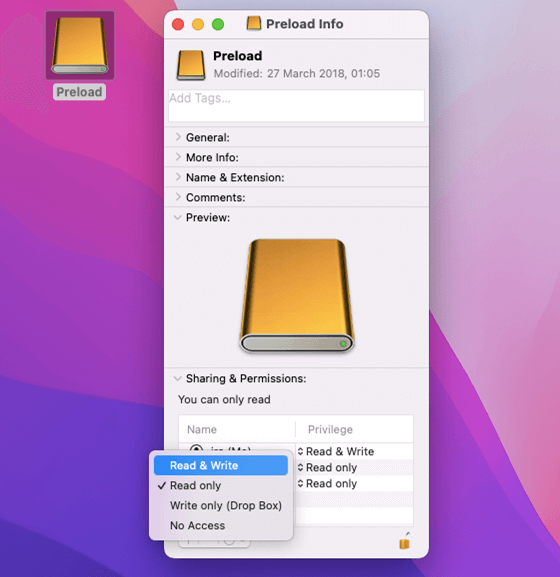
That is the best way to manage rights for single files or folders because it doesn't require you to go into more complicated settings.
Terminal is a powerful tool for people who are used to using the command line:
Step 1. Go to Applications > Utilities and open Terminal.
Step 2. Follow the 'cd' command to get to where the read-only file is.
Step 3. To allow writing, run the command "chmod +w filename" (change "filename" with the name of your file).
Step 4. Use 'ls -l' to confirm modifications and verify them.
Terminal commands give you fine-grained control, but you must know much about command-line grammar to use them. Make sure you're right to avoid unexpected results.
Disk Utility is a good tool for you to format the crashed or incompatible disk for your Mac so that you can read-write the disk.
Step 1. Make a backup of the data stored on the disk.
Step 2. Go to Applications > Utilities and open Disk Utility.
Step 3. Select the disk, click Erase.
Step 4. Select a file system that can work on your Mac, such as APFS, Mac OS Extended or ExFAT.
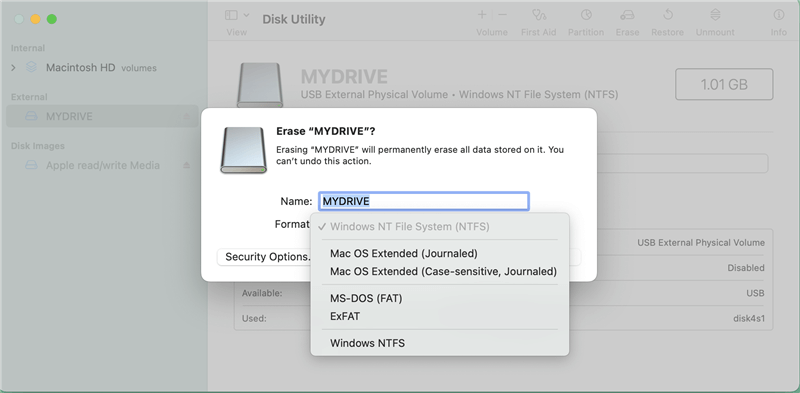
Step 5. Click Erase again. When it completes, click Done.
📍 Note: If you want to use the disk on both Windows and Mac OS, select ExFAT or MS-DOS (FAT) as the file system.
If you have lost data due to erasing hard drive using disk utility, try data recovery software to get lost data back.

Unformat Hard Drive on Mac
Run Do Your Data Recovery to scan the erased hard drive (erased by Disk Utility or other software) and get all lost files back.
To change a NTFS drive from read-only to read-write on Mac without formatting, just try NTFS for Mac tool. We know that NTFS is a native file system of Windows OS and it is not compatible with macOS. Fortunately, with installing a NTFS for Mac on Mac, the macOS will have the ability to read-write NTFS drive without any limitation.
Step 1. Download and install DoYourData NTFS for Mac - a reliable, easy-to-use & 100% safe NTFS for Mac tool.
Step 2. Connect the NTFS disk to your Mac, open DoYourData NTFS for Mac.
Step 3. Select the NTFS disk, click on Enable Writable. Then you can read-write NTFS drive on your Mac.

Resetting disk from read-only to read-write on Mac requires several fixing steps, ranging from making changes to the software to looking at the hardware. You should follow the steps in this guide to find and fix the problems making your disk read-only.
Always make a copy of your data before making big changes to the disk settings. If the problems stay, you may need help from Apple Support or a qualified expert. Following these steps, you can regain control of your storage devices and ensure your Mac computer works smoothly.
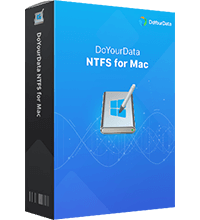
DoYourData NTFS for Mac
DoYourData NTFS for Mac is a safe, powerful and easy-to-use NTFS for Mac tool. It allows macOS to read & write files on NTFS drives without any limitation. It is also a comprehensive disk management tool for Mac to mount/unmount disk, format disk, repair disk, read-write disk...on Mac.
Written & Updated by Justin Kenny
Justin Kenny is a writer & editor of DoYourData. He joined DoYourData in 2016 and focuses on writing articles about Windows data recovery, Mac data recovery, external device data recovery, hard drive clone, data erasure, Mac cleanup, computer issue fixes, etc. He is a super fan of Apple devices and is big on testing new digital device and system utility software.