Home > Hard Drive Solutions for Mac
How to Use SanDisk PRO-BLADE SSD on Mac?
If your SanDisk PRO-BLADE SSD has been pre-formatted to NTFS file system, you can use Disk Utility to reformat it to APFS, Mac OS Extended or ExFAT. If you don't want to reformat it, just install a NTFS for Mac tool on your Mac, then run it to enable writable for the NTFS drive. After enabling writable, you can read-write NTFS SanDisk PRO-BLADE SSD on Mac without any limitation.
![]() Updated by Justin Kenny on September 11, 2024
Updated by Justin Kenny on September 11, 2024
Quick Navigation:
- PRO-BLADE SSD: Is It a Good SSD for Mac?
- Setting Up the PRO-BLADE SSD on Mac
- How to Use the PRO-BLADE SSD with macOS?
- Can I Use An NTFS SanDisk PRO-BLADE SSD on Mac?
- Conclusion
SanDisk's PRO-BLADE SSD is a cutting-edge storage option for people who want speed, stability, and many options. The SanDisk PRO-BLADE SSD works well whether you're a creative worker working with big video files or just need fast, safe external storage.
This SSD's flexible design makes switching between different SSD mags easy, so you can easily increase or decrease the storage you need. It works with both Windows and macOS, but it works best for Mac users who need to move data quickly and have reliable workflow performance.
This guide will show you how to set up and use the SanDisk PRO-BLADE SSD on your Mac to get the most out of it. We'll go over all the steps you need to take to easily use this powerful SSD for your daily tasks, from formatting the drive to handling files and speeding things up.

PRO-BLADE SSD: Is It a Good SSD for Mac?
Western Digital's SanDisk name makes the PRO-BLADE SSD. SanDisk is known for making durable and large storage devices. It's made to meet the needs of workers who work with big files and need to send and receive data quickly. The PRO-BLADE SSD has flexible storage, meaning users can easily add more storage by switching between different SSD mags.
The SSD works with macOS, making it a great choice for Mac users who need to store and work on big files like photos, videos, and complicated projects. The PRO-BLADE SSD ensures your work stays smooth and efficient, with read speeds of up to 3000 MB/s and write speeds of up to 2600 MB/s.
Setting Up the PRO-BLADE SSD on Mac
To begin using the PRO-BLADE SSD on your Mac, you must set it up correctly, ensuring optimal performance and compatibility with macOS. Follow these steps to get started:
Step 1. Connecting the SSD.
After buying your PRO-BLADE SSD, carefully remove it from the box. Inside the box, you will find the SSD, a USB-C cable, and a PRO-BLADE Transport (if you choose one). The PRO-BLADE Transport is a movable case that holds the PRO-BLADE SSD mag and lets you connect it to your Mac.
Here's how to connect the PRO-BLADE SSD to your Mac:
- Insert the SSD Mag into the PRO-BLADE Transport: Make sure the ports are lined up, then slide the SSD mag into the transport case until it clicks into place.
- Connect the USB-C Cable: The USB-C connection has two ends. One end goes into the PRO-BLADE Transport, and the other goes into a Mac USB-C or Thunderbolt 3/4 port.
Your Mac should immediately see the SSD as an external storage device.
Step 2. Formatting the SSD for macOS.
To work perfectly with macOS, it is suggested that the SSD be formatted to the APFS (Apple File System) format. This file system works best with flash and SSD storage, so it's faster and more reliable.
To format the PRO-BLADE SSD:
- Open Disk Utility: Press Command + Space and type "Disk Utility".
- Select the PRO-BLADE SSD: On the left side of the Disk Utility window, you should see your PRO-BLADE SSD mentioned under "External."
- Erase the Drive: To delete the drive, click the "Erase" button at the top of the screen. In the box that pops up, type:
- Name: Give your SSD a name, like "PRO-BLADE."
- Format: Choose "APFS" from the drop-down box for the format. If you want to use the SanDisk PRO-BLADE SSD on both Windows and macOS, select ExFAT as the file system.
- Scheme: For the scheme, choose "GUID Partition Map."
- Erase the Drive: Click "Erase" to format the drive. Before you start this process, make sure you have a backup of any important files, as it will delete everything on the SSD.
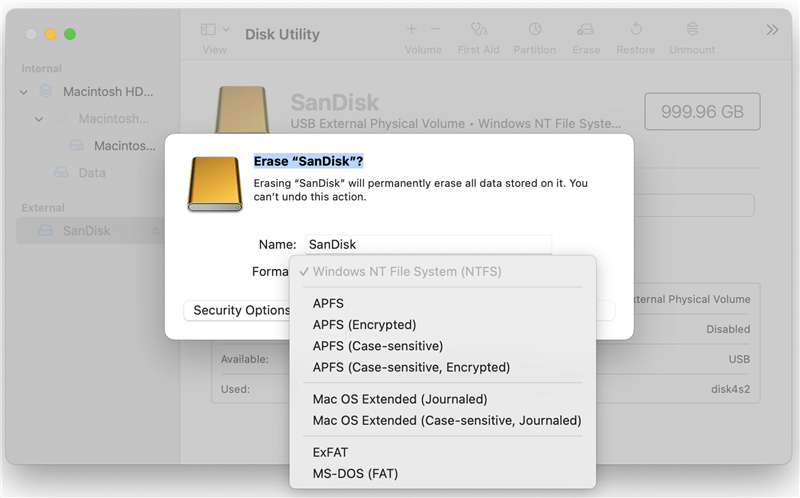
Once the formatting is done, your PRO-BLADE SSD is ready to use on your Mac.
How to Use the PRO-BLADE SSD with macOS?
Once your PRO-BLADE SSD is set up, you can use it with macOS for file transfers, managing storage, and enhancing your workflow efficiency. Here's how to make the most of it:
Step 1. Transferring Files.
Once the PRO-BLADE SSD is linked and formatted, you can start moving files. Because it is so fast, the SSD is perfect for quickly moving big files.
To transfer files:
- Drag and Drop: Open Finder and select the folders or files you want to move. You can move them from your Mac's internal storage to the PRO-BLADE SSD icon in Finder.
- Copy and Paste: Use "Copy" (Command + C) and "Paste" (Command + V) to move files to and from the SSD.
The size of the files and the speed of your Mac's USB-C or Thunderbolt ports determine how fast they can move.
Step 2. Managing Storage with Multiple SSD Mags.
Switching SSD mags is one of the best things about the PRO-BLADE SSD setup. This modular method makes it easy to manage many storage mags, which is useful if you work with a lot of data.
To swap SSD mags:
- Eject the Current SSD Mag: Before you remove the SSD mag, ensure it is safely removed. Find the SSD icon on your screen and right-click on it. Then, choose "Eject." To remove the SSD, drag its picture to the Trash.
- Swap the Mag: Slide out the present SSD mag from the PRO-BLADE Transport and put in a different one.
- Reconnect the Transport: When you reconnect the Transport, your Mac will see the new mag as a different external drive, and you can start using it immediately.
Professionals who need to keep different storage for different projects will find this option very useful.
Step 3. Working with Professional Applications.
Video editing software, 3D modelling programs, and tools for large-scale data analysis all need fast access to data. The PRO-BLADE SSD is designed to meet these needs.
When using these kinds of apps:
- Set the PRO-BLADE SSD as the Scratch Disk: Many programs let you set a scratch disk, which stores temporary project files. Using the PRO-BLADE SSD as a scratch disk can greatly speed up your work.
- Store Project Files on the SSD: Storing the files directly on the PRO-BLADE SSD makes them easy to access and reduces start times for big projects.
Can I Use An NTFS SanDisk PRO-BLADE SSD on Mac?
NTFS is a Windows-based file system and it is not compatible with macOS. If you wan to use an NTFS SanDisk PRO-BLADE SSD on your Mac, you need to install an NTFS driver on your Mac.
Step 1. Download and install DoYourData NTFS for Mac, then connect your SanDisk PRO-BLADE SSD to your Mac.
Step 2. Open DoYourData NTFS for Mac, select the SanDisk PRO-BLADE SSD, click on Enable Writable button to allow your Mac to read-write NTFS drives without any limitation.

DoYourData NTFS for Mac also can help you mount SanDisk PRO-BLADE SSD on Mac, fix damaged SanDisk PRO-BLADE SSD on Mac, format SanDisk PRO-BLADE SSD on Mac.
Conclusion:
For Mac users, the SanDisk PRO-BLADE SSD is a powerful and flexible storage option with great speed, flexibility, and dependability. If you follow the steps in this guide, the PRO-BLADE SSD will work perfectly with your Mac, whether you move files, handle multiple storage drives, or use demanding professional programs.
Since it works quickly, it's great for both creative and technical jobs. It handles data quickly and streamlines workflows. The PRO-BLADE SSD will help you be more productive and keep your projects running smoothly.
Written & Updated by Justin Kenny
Justin Kenny is a writer & editor of DoYourData. He joined DoYourData in 2016 and focuses on writing articles about Windows data recovery, Mac data recovery, external device data recovery, hard drive clone, data erasure, Mac cleanup, computer issue fixes, etc. He is a super fan of Apple devices and is big on testing new digital device and system utility software.