
Recover Lost Data from G-DRIVE SSD on Mac
Three steps to help you recover deleted, formatted or lost data from a G-DRIVE SSD on Mac.
Home > Hard Drive Solutions for Mac
Here is the guide to make use of G-DRIVE SSD or external hard drive on a Mac. If it is incompatible with the macOS, you need to reformat it to APFS, ExFAT, Mac OS Extended. If you want to use an NTFS G-DRIVE SSD on both Windows and Mac, you can download and install an NTFS for Mac tool on your Mac, use it to enable NTFS support on macOS, no need to reformat it.
![]() Updated by Justin Kenny on January 2, 2024
Updated by Justin Kenny on January 2, 2024
Quick Navigation:
Data security and accessibility are paramount in today's technologically advanced environment. G-DRIVE SSD is the perfect companion for Mac users looking to increase storage capacity and simplify data management. Imagine having a problem-free experience, backing up precious memories, making roomy workplaces, and enabling incredibly rapid data transfers.
If you own a Mac and want to get the most out of G-DRIVE, this guide is for you. Learn all you need to know about this external storage solution, from how to set it up quickly and easily to fixing typical problems. Let me show you how G-DRIVE can provide unparalleled ease, efficiency, and dependability at your fingertips and completely transform your Mac experience.
We also provide solutions to help you solve typical problems of using G-DRIVE SSD on Mac, such as:
To use G-DRIVE SSD, your Mac should have installed OS X 10.11 or later operating system (Intel-based, Apple T2 Security and Apple silicon chips are full supported). Turn on your Mac, then connect the G-DRIVE SSD to your Mac via USB cable/USB hub, etc.
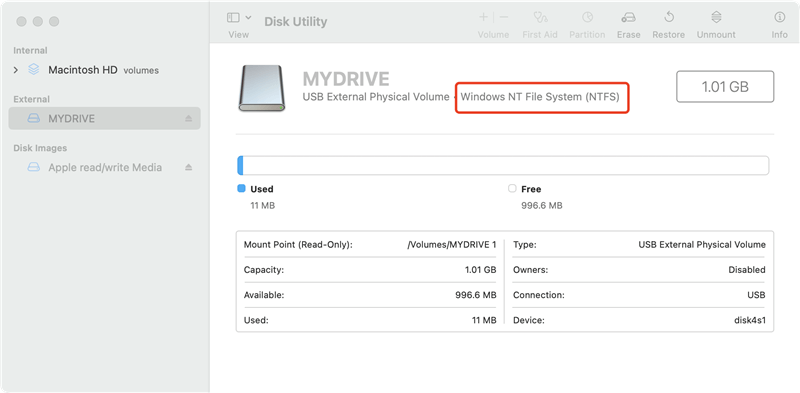
First of all, check if you can see the connected G-DRIVE SSD on desktop and Finder. Then open Disk Utility (go to Launchpad > Other > Disk Utility) to check the disk information. You can check if the G-DRIVE SSD is mounted, what the file system is, if it is compatible with macOS, etc.
Make sure the G-DRIVE SSD is powered on and then open it via Finder, check the files and folders stored on the G-DRIVE SSD. You also can use Disk Utility to reformat the drive or create new volumes on it.
It is pretty simple to format a G-DRIVE SSD for Mac. Just open Disk Utility on your Mac, then find the G-DRIVE SSD. Follow the steps below to format the G-DRIVE SSD:
Step 1. Click to select the G-DRIVE SSD, click Erase.
Step 2. Select a file system:
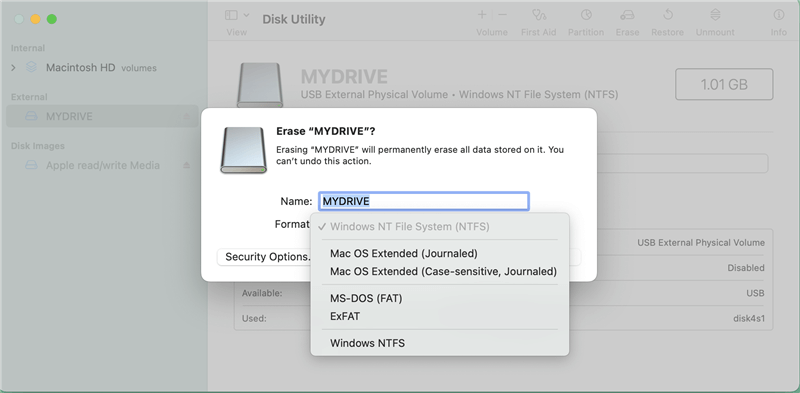
Step 3. If you want to rename it, give it a new name. Then click on Erase button again. When it completes, click on Done button.
Please make a full backup before you format the G-DRIVE SSD. However, if you have lost data from your G-DRIVE SSD and don’t have a backup, you can use a data recovery application to help you undelete the files or unformat the drive.
Recover Lost Data from G-DRIVE SSD on Mac
Three steps to help you recover deleted, formatted or lost data from a G-DRIVE SSD on Mac.
There are several reasons behind why a connected G-DRIVE SSD is not showing up on a Mac. Here are some solutions:
| G-DRIVE SSD not showing up on Mac | Solutions |
|---|---|
| The G-DRIVE SSD is not compatible with the macOS, or it is not initialized, it gets damaged, etc. | Open Disk Utility, find the G-DRIVE SSD, click Erase or First Aid button to fix the G-DRIVE SSD. |
| G-DRIVE SSD is unmounted. | Open Disk Utility, click on Mount button. Or click on First Aid button to repair it. |
| Improper Finder settings, you can’t see the G-DRIVE SSD on desktop and Finder. | Open a Finder, then click Finder on Apple menu bar, then choose Settings. Then it will open Finder Settings window, click General and Sidebar, make sure the External disks is selected. |
| G-DRIVE SSD is formatted to NTFS file system. | Open Disk Utility, and select the G-DRIVE SSD, then click Erase. Select a compatible file system and format it. |
| Bad connection | Try another USB cable or USB hub, or try the G-DRIVE SSD on another computer. |
| macOS Issue | Update the macOS to the latest version, restart the Mac and check if it could recognize the G-DRIVE SSD. |
NTFS file system is a Windows-based file system and it is not compatible with macOS. Most of external HDDs/SSDs are formatted to NTFS. If you want to use an G-DRIVE SSD with NTFS file system on Mac and don’t want to format it, just try NTFS for Mac tool. It will add NTFS support on Mac so that Mac users can read-write NTFS drives on Mac without any limitation.
Step1. Download and install DoYourData NTFS for Mac on your Mac, then open it.
Step2. Then connect the G-DRIVE SSD to your Mac, you can see it on the main interface of DoYourData NTFS for Mac. Click to select this SSD.
Step3. Click on Enable Writable button. Then you can read-write the NTFS G-DRIVE SSD on your Mac without any limitation.

1. How to format a G-DRIVE SSD for Mac?
2. Can I use a G-DRIVE SSD on both Windows and Mac?
Yes, you can use a G-DRIVE SSD on Windows and Mac, here are two solutions:
3. How to set G-DRIVE SSD as the Time Machine drive on Mac?
Follow the steps below to set the G-DRIVE SSD as the Time Machine backup drive for your Mac:
4. How to wipe a G-DRIVE SSD on Mac before selling or donating it?
To wipe a G-DRIVE SSD on Mac and make sure the data is erased permanently, can’t be recovered by data recovery software, you can try data erasure software.
DoYourData Super Eraser for Mac is a Mac data erasure tool, open it on your Mac, choose Wipe Hard Drive mode, then select the G-DRIVE SSD and click on Wipe Now button. It will permanently erase all data stored on the G-DRIVE SSD.

It is easy to set up G-DRIVE SSD on Mac. Just connect the G-DRIVE SSD to your Mac and check the disk information via Disk Utility. With this disk management tool, you can reformat the G-DRIVE SSD for Mac, repair damaged G-DRIVE SSD, mount G-DRIVE SSD on Mac, etc. It is strongly recommended to back up your data before you erase the G-DRIVE SSD. If you want to use an NTFS G-DRIVE SSD on Mac, try NFTS for Mac tool. It will enable NTFS support on Mac so that Mac users can read-write NTFS drives on Mac without formatting.
Written & Updated by Justin Kenny
Justin Kenny is a writer & editor of DoYourData. He joined DoYourData in 2016 and focuses on writing articles about Windows data recovery, Mac data recovery, external device data recovery, hard drive clone, data erasure, Mac cleanup, computer issue fixes, etc. He is a super fan of Apple devices and is big on testing new digital device and system utility software.