Quick Navigation:
- How to Fix WD Elements SE SSD Not Working on Mac?
- Recover Lost Data from Your WD Elements SE SSD on Mac
- Final Words
“Hi, the 1TB WD Elements SE SSD is not detected on my new MacBook Pro. I can use it on my Windows 11 PC, but it is not recognized on my MacBook Pro, why? How to make it work on my MacBook Pro?” - Linnte
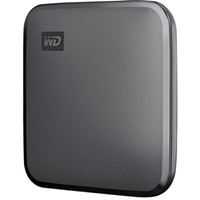
There are several reasons why a WD Elements SE SSD may not work on your Mac computer. First of all, check the USB connection or reconnect the WD Elements SE SSD to your Mac, restart your Mac, etc. If the WD Elements SE SSD is still not working on your Mac, you can read this article, we will find the possible reasons and show you how to find the right solution to fix the WD Elements SE SSD not working on Mac issues.
How to Fix WD Elements SE SSD Not Working on Mac?
It is strongly recommended to try the WD Elements SE SSD on another computer and check if it could work well. If the WD Elements SE SSD can work on another computer, you can copy all files from the SSD to your computer. Then reconnect the WD Elements SE SSD to your Mac, find the reason why it is not working and solve the problem accordingly.
#1 Fix WD Elements SE SSD not showing up on Mac Finder and Desktop
Open Disk Utility, if you can see the WD Elements SE SSD, but you can not see it in Finder and on the desktop, just adjust the Finder Settings.
Step1. Open a Finder and click Finder on Apple menu bar, choose Settings.
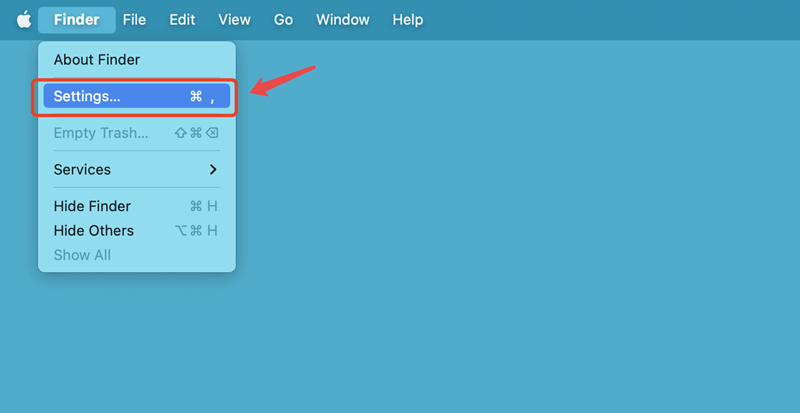
Step 2. If you want to see the WD Elements SE SSD on Mac desktop, just select External disks under General > Show these items on the desktop.

If you want to show the WD Elements SE SSD in Finder, click Sidebar, and select External disks under Show these items in the sidebar.

#2 Fix crashed, unmounted or incompatible WD Elements SE SSD with Disk Utility
Disk Utility is the most reliable tool for you to fix any damaged hard drive on your Mac. Go to Applications > Disk Utility, and open this disk management tool.
Disk Utility will list all hard drives and external devices, find the WD Elements SE SSD and click it. If the WD Elements SE SSD is unmounted, just click on Mount button.

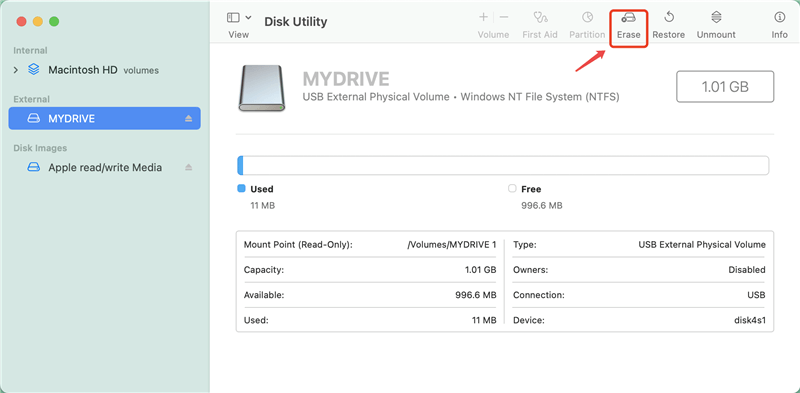
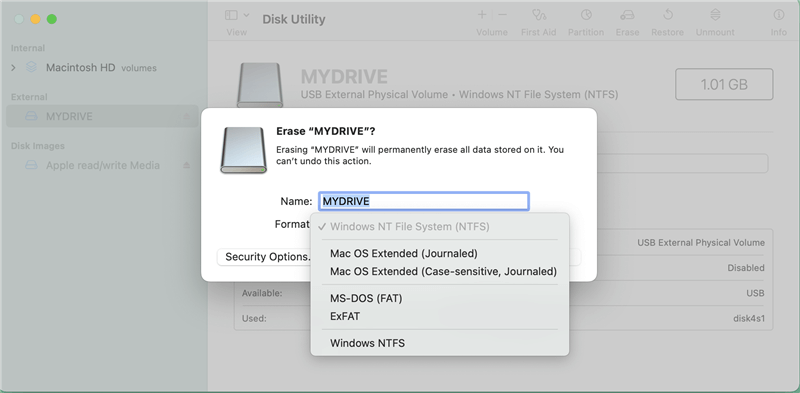
Erase can help you erase and format the WD Elements SE SSD, if the WD Elements SE SSD gets crashed, not initialized or it is incompatible with your Mac, just click on Erase button, select a file system (ExFAT, APFS, Mac OS Extended), and click on Erase button again. It will erase and format the WD Elements SE SSD.
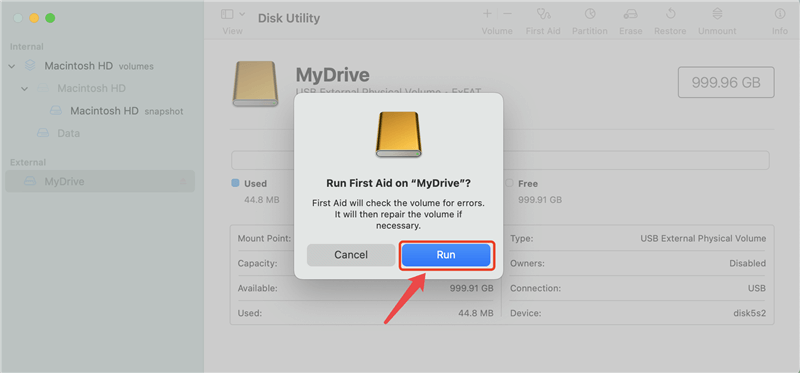
Click on First Aid if the WD Elements SE SSD gets crashed, this feature will help you fix the damaged WD Elements SE SSD on your Mac.
#3 Fix WD Elements SE SSD read-only issue on Mac
If you can open WD Elements SE SSD on your Mac, but can not copy files from your Mac to it or edit/delete/add files on it, you can open Disk Utility to check if the SSD is read-only. If it is a read-only drive, just check the methods listed below to fix this issue.
Fix1. Check the disk settings
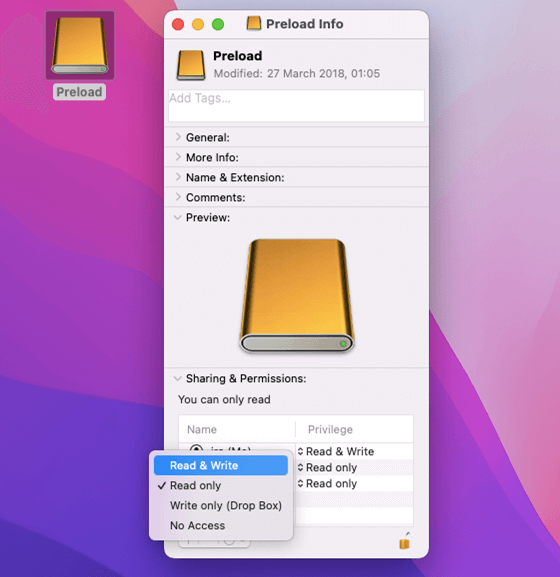
Find the WD Elements SE SSD on desktop, right-click it and choose Get Info. If it has been set read-only before, just change the setting to read-write.
Fix2. Format the SSD to Mac compatible system
If the WD Elements SE SSD has been formatted to NTFS, a Windows-based file system, it will be used as a read-only drive on your Mac. To use it on your Mac, you can use Disk Utility to reformat it to ExFAT, APFS or Mac OS Extended, etc.
Step 1. Open Disk Utility.
Step 2. Select the WD Elements SE SSD and click Erase.
Step 3. Select a file system and click Erase again.
Step 4. When it gets finished, click Done.
Fix3. Use NTFS for Mac tool
If you don’t want to format the NTFS WD Elements SE SSD and want to use the SSD on both Windows and Mac OS, you can install an NTFS for Mac tool on your Mac, then use it to enable read-write for all NTFS drives on your Mac.
Step 1. Download and install DoYourData NTFS for Mac.
Step 2. Open DoYourData NTFS for Mac, select WD Elements SE SSD under NTFS disk.
Step 3. Click on Enable Writable button. Then you can read-write the NTFS WD Elements SE SSD on your Mac without any limitation.

Recover Lost Data from Your WD Elements SE SSD on Mac
If you have lost important data from the WD Elements SE SSD due to deletion or formatting, you can use a data recovery application to scan the SSD and get all lost data back.
Do Your Data Recovery for Mac is a powerful and easy-to-use file recovery application which is able to recover lost data from Mac SSD or any other external storage device. With this software, you can easily recover deleted, formatted and inaccessible data from a WD Elements SE SSD.
Step 1. Download and install Do Your Data Recovery for Mac on your Mac, and open it.
Step 2. Connect the WD Elements SE SSD on your Mac, it will be recognized by Do Your Data Recovery for Mac automatically. Select it to start data recovery.

Step 3. Click on Scan button. It will deeply scan the WD Elements SE SSD and show you the recoverable files.

Step 4. Once the scan is completed, select the wanted files, click on Recover button. Then select a location to save the recovered files.

Final Words:
Before you fix the damaged WD Elements SE SSD on your Mac, you’d better make a backup of the important data or use a data recovery app to recover the files from the damaged WD Elements SE SSD. Then you can use Disk Utility or third-party disk management tool to fix the issues. If the WD Elements SE SSD is an NTFS drive, you can download and install an NTFS for Mac tool to help you grant full read-write access to the WD Elements SE SSD so that you don’t need to format the SSD.