Home > Hard Drive Solutions for Mac
How to Write Data to NTFS Drives on Apple Silicon Mac?
The easiest way to enable NTFS support on Apple silicon Mac is using Microsoft NTFS for Mac driver software. Download and install DoYourData NTFS for Mac, then quickly enable writable for NTFS drives. You can get full read-write access to the NTFS drives on your Mac without formatting, and you can write data to them or edit/modify/delete/add files on the NTFS drives.
![]() Updated by Justin Kenny on Jannuary 04, 2026
Updated by Justin Kenny on Jannuary 04, 2026
Quick Navigation:
- Does NTFS Work on Mac with Apple Silicon?
- Apple Silicon Mac NTFS Driver
- How to Write to NTFS Drive on Apple Silicon Mac?
- FAQs about Enabling NTFS Write Support on M-Chip Mac
- Conclusion:
Apple has a history of constantly innovating its products to enhance the customer experience. Apple has previously worked with Intel Corp on processing chips, but in 2020 they released their CPU, the Apple Silicon M1 Chip, ending their partnership with Intel.
The new MacBook's M Chip Series CPUs significantly improve the computer's speed and battery life. With the revolutionary new technology built into the system, several people had high hopes for the NTFS for Mac driver. However, the M-chip Macs did not fix Mac's NTFS read-only problem.
Then, how to enable NTFS support on Apple silicon Mac? In this guide, we will outline the easy-to-use and reliable NTFS for Mac tool and how to use the software in detail.
Does NTFS Work on Mac with Apple Silicon?
Since November 2020, the newest Mac computers have included the M1 processor. It's common knowledge that Macs can only mount NTFS drives for reading. Worse yet, several forum posters have claimed that the new M1-based computer cannot view the data above structures. To illustrate, consider the following case:
If you're having trouble editing or transferring files on your Mac, download the free NTFS for Mac software. With the help of NTFS for Mac software, Mac users can use the NTFS hard drive as a local hard drive on Mac with Apple silicon.
Apple Silicon Mac NTFS Driver
Apple's Silicon processor is built on the ARM architecture, which means it is not compatible with Intel software and programs unless you use Rosetta 2 to translate Intel x86_64 instructions to the ARM64 instruction set.
To provide complete, stable, and native compatibility with Macs using Apple Silicon, the professional version of Microsoft's NTFS for Mac has been recast in the ARM64 architecture.
DoYourData NTFS for Mac is an easy-to-use NTFS for Mac tool. It works well on Intel-based Macs, Apple T2 Security Macs and Apple silicon Macs. The main features:
- Enable writable for NTFS drives on Mac so that you can write data to the NTFS drives or edit, save, add, delete, rename, modify, create, hide, overwrite files on your Mac without any limitation.
- Mount or unmount NTFS hard drives on Mac.
- Eject external hard drive in safe mode.
- Open hard drive on Mac.
- Format or repair damaged hard drive on Mac.
How to Write to NTFS Drive on Apple Silicon Mac?
Managing massive amounts of data copied and pasted between operating systems and file-sharing platforms is a major pain. It isn't easy to access, initiate read, and write operations on all data when stored in various file systems. The data must be converted or formatted so your computer's file system can read it.
Here is where the tension between Mac users and those who use the NTFS file system starts to build. The reasons why Mac cannot use the NTFS write function have already been discussed. However, some workarounds allow you to write NTFS files on your M1 ~ M5 Mac.
There are a few software solutions for making NTFS drives compatible with your Apple silicon Mac. The DoYourData NTFS for Mac software is the best option. This program allows your Apple silicon Mac to access and modify NTFS disks. The Apple Silicon Mac's NTFS read-only solution is cross-platform and compatible with all versions of Mac OS. Here are the prerequisites for starting this software and reaping its benefits.
Follow the steps below to enable writable for NTFS drives on Apple silicon Mac:
Step 1. Download and install DoYourData NTFS for Mac. Then open it from Launchpad. Connect the NFTS hard drive to your Mac.
DoYourData NTFS for Mac
- Most reliable Microsoft NTFS for Mac driver tool.
- Easy-to-use and improve the NTFS drive performance on Mac.
- Fully compatible with latest M5 chip Macs and macOS Tahoe.
Step 2. Under NTFS Disk, find the NTFS hard drive, select it. Then click Enable Writable button.

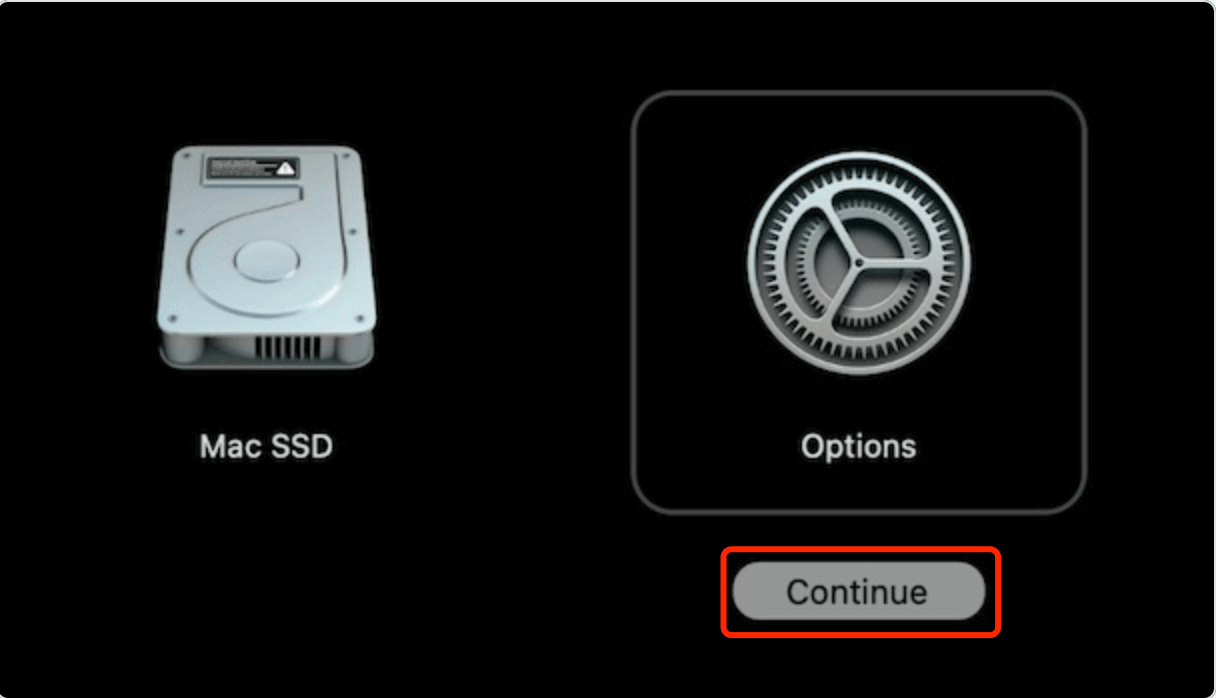
Step 3. Restart the Mac, press and hold the Power button until you see Options. In macOS Recovery mode, choose Options and click on Continue button.
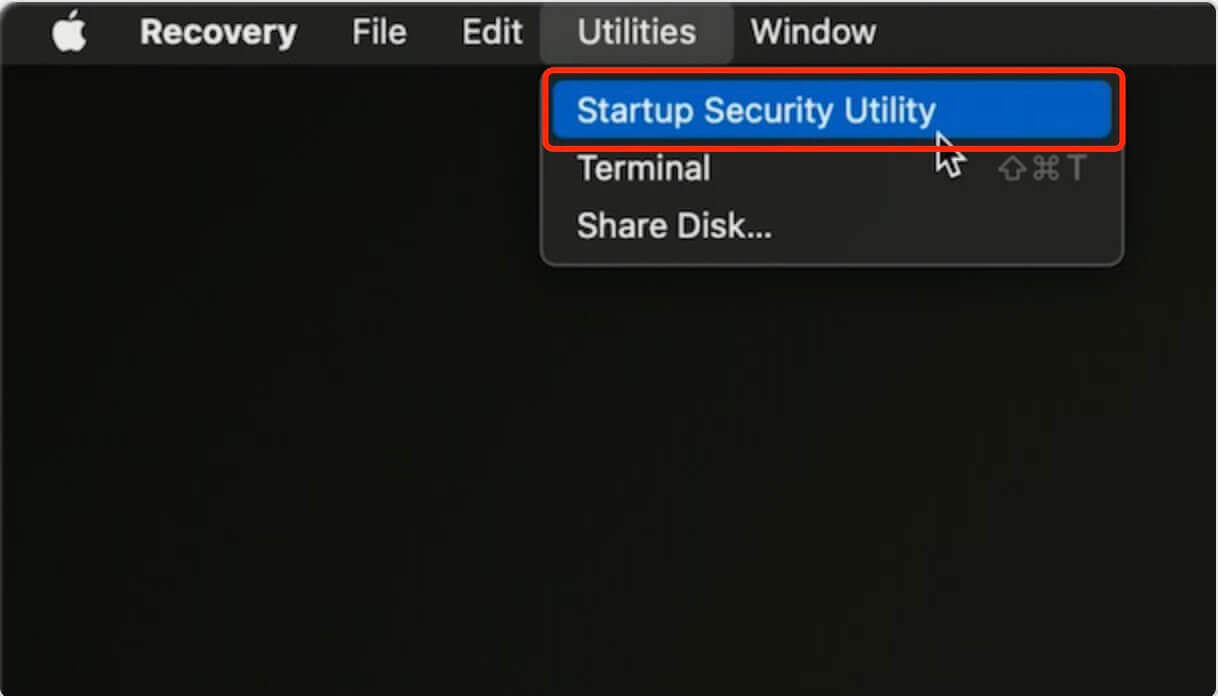
Step 4. Click Utilities, select Startup Security Utility.
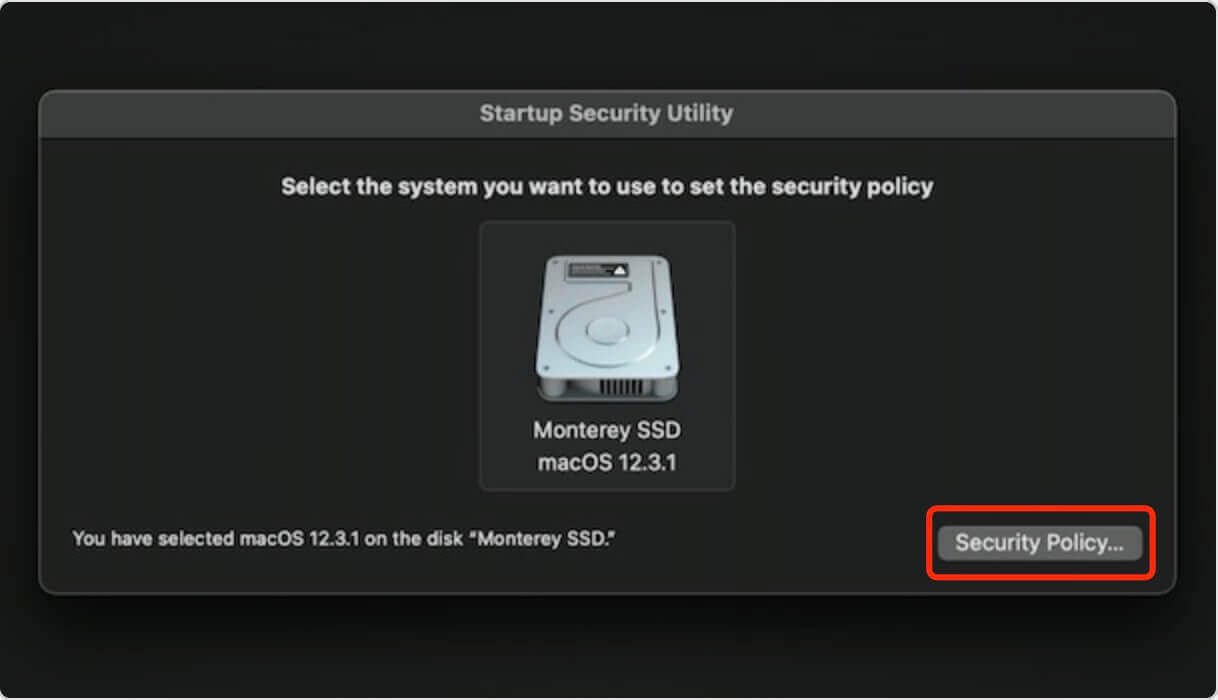
Step 5. Select the startup disk, click Security Policy...
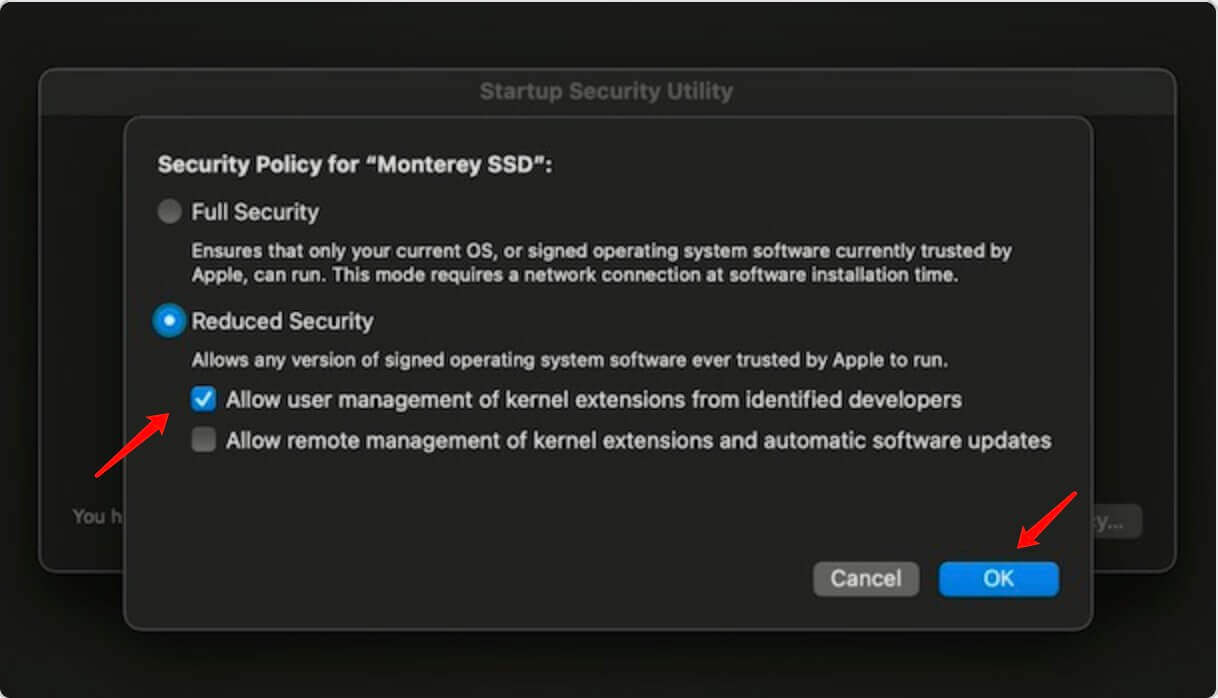
Step 6. Select Reduced Security and Allow user management of kernel extensions from identified developers then click on OK button to save the setting.
Step 7. Then restart the Mac, open DoYourData NTFS for Mac again. Click Enable Writable.
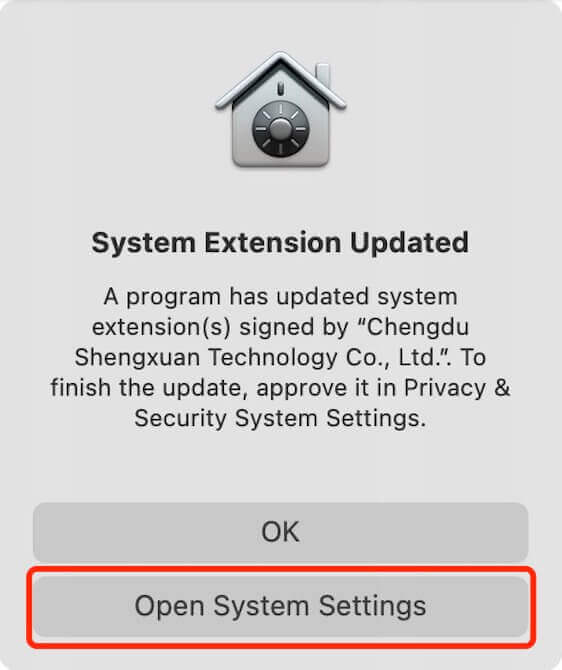
Step 8. It will pop up a window, click Open System Settings.
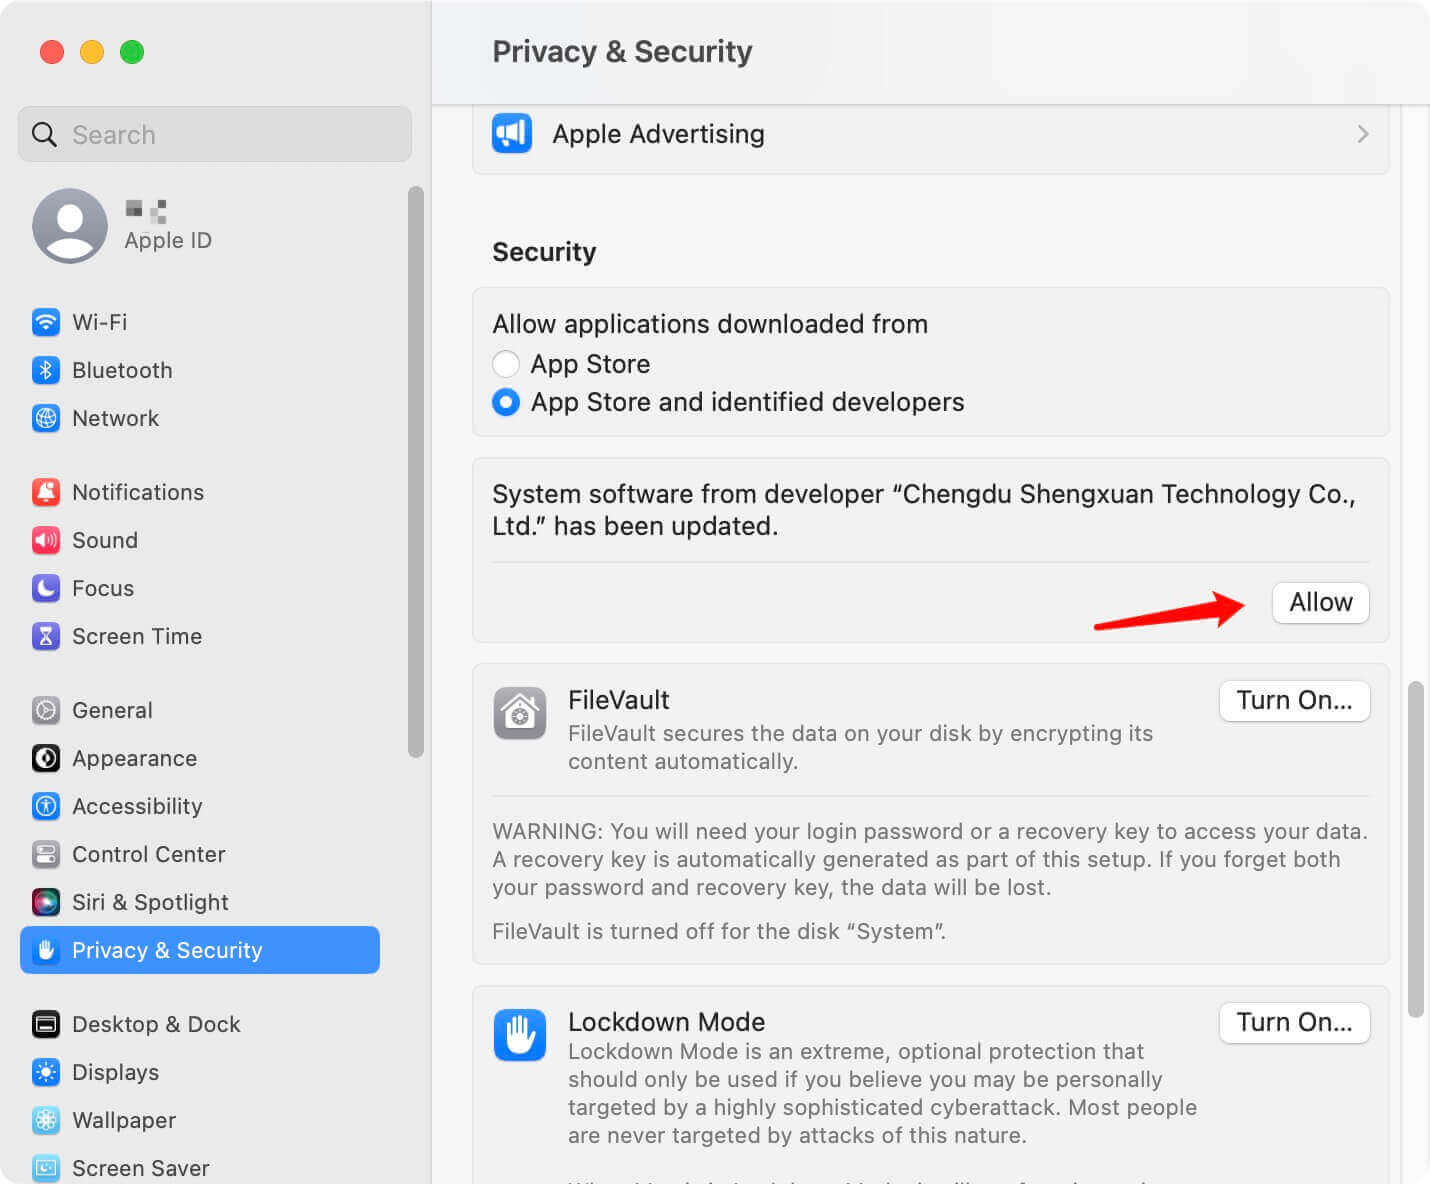
Go to Privacy & Security → Security, click on Allow button.
Step 9. Finally, restart your Mac, make sure the NTFS drive is connected to your Mac. Open DoYourData NTFS for Mac, select the NTFS hard drive, click Enable Writable. Now, you can write data to the NTFS hard drive without any limitation.
FAQs about Enabling NTFS Write Support on M-Chip Mac
- Download and install DoYourData NTFS for Mac.
- Connect an external hard drive to your Mac.
- Open DoYourData NTFS for Mac and select the external hard drive.
- Click on Enable Writable.
Remember that you may only follow these steps if you have already used Time Machine to create a Boot Camp Windows partition.
- One of the first things you should do is rename the Boot Camp volume to anything else. The Boot Camp volume is now accessible via Time Machine.
- The second step is to select Options in the Time Machine preferences menu.
- Third, choose the NTFS disk from the list and click the Remove from Exclusions button. After that, any NTFS drive you specify will be backed up automatically whenever you use Time Machine on your Mac.
Conclusion:
The NTFS drive read-only problem on Apple silicon Mac can be resolved using third-party NTFS for Mac software. It is the simplest method to enable NTFS read-write support on Apple silicon Mac. You may get software online that allows your Mac to read and write to NTFS volumes. But a few software options that use Apple's silicon work on the Mac. One reliable piece of software is DoYourData NTFS for Mac - a professional Microsoft NTFS driver for Apple Silicon Macs.
DoYourData NTFS for Mac
DoYourData NTFS for Mac is a safe, powerful and easy-to-use NTFS for Mac tool. It allows macOS to read & write files on NTFS drives without any limitation. It is also a comprehensive disk management tool for Mac to mount/unmount disk, format disk, repair disk, read-write disk...on Mac.
Written & Updated by Justin Kenny
Justin Kenny is a writer & editor of DoYourData. He joined DoYourData in 2016 and focuses on writing articles about Windows data recovery, Mac data recovery, external device data recovery, hard drive clone, data erasure, Mac cleanup, computer issue fixes, etc. He is a super fan of Apple devices and is big on testing new digital device and system utility software.