Home > Hard Drive Solutions for Mac
Mac File System Read-only Issue, How to Fix It?
Not all of the file systems support macOS. For example, NTFS is a read-only file system for Mac. If your external hard drive or USB flash drive has been formatted to NTFS, it won't be read-write on Mac. You need download a third-party NTFS for Mac tool to fix Mac file system read-only issue without formatting your device or hard drive.
![]() Updated by Justin Kenny on March 25, 2026
Updated by Justin Kenny on March 25, 2026
Quick Navigation:
An external hard drive makes it simple to transfer files between computers. Since it stores so much of your vital information that could be required at crucial junctures, finding it in Read-Only Mode would cause you significant anguish. When the disk is in read-only mode, you can only examine the stored data; you can't make copies to use elsewhere or delete files to make room.

Have you activated Read Only Mode on your external hard drive? Is the Read-Only setting preventing you from accessing the files on your Mac's external hard drive? The good news is that you can stop stressing since this article will show you how to solve External Hard Drive Read Only Mode on Mac or Mac file system is read-only issue without erasing any of your data.
What Causes the Mac File System "Read-Only" Error?
When a hard drive displays a notification saying it is read-only, there are two possible explanations:
- Due to the drive's formatting, your Mac can only read from it. That is a potential problem with NTFS-formatted disks.
- Disk writing is disabled on either your Mac or your user account due to the current permissions settings.
- Pick the disk in the Finder, press Command-I or right-click and pick Get Info to find out which is malfunctioning.
- There should be a set of settings under "General." See the one labeled "Format." If you see "NTFS," you know what the issue is.
Mac File System Read-Only Disk Fixes
The best ways to fix the Mac file system read-only problem are next. This article discusses four exceptional ways to access an external hard disk on Mac.
#1 External hard drive formatting:
Reformat the drive to fix the Mac external drive read-only error. Back up the external hard disk first to save its data. After backing up, reformat the external hard drive on your Mac:
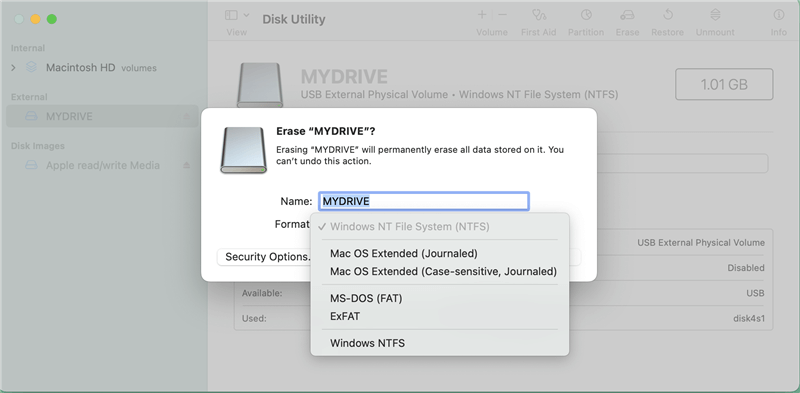
Step 1. Open Finder on your Mac and click "Applications" on the left panel. Find "Disk Utility" in the "Utilities" folder.
Step 2. In a new window, choose the external hard disk in the left panel and click "Erase" on top. Viewing the external hard disk may require changing the top "View" settings.
Step 3. Opens reformatting settings, where you must specify drive specifics after formatting. Apple supports APFS, HFS+, and exFAT file systems. Change "Scheme" to "GUID Partition Map" and click "Erase" to finish. After reformatting the external hard disk, you may easily restore all data.
If you have lost data due to erasing the external hard drive, and you don’t have a backup, you can download a data recovery application to scan the hard drive and it will find the lost files. Select the wanted files and save them.
#2 Setting permissions and sharing:
Consider changing your Mac's "Sharing & Permissions" settings to avoid the read-only error on your external hard drive. File format difficulties and unusual permission and sharing settings can cause the problem. Follow these easy methods to overcome this obstacle:
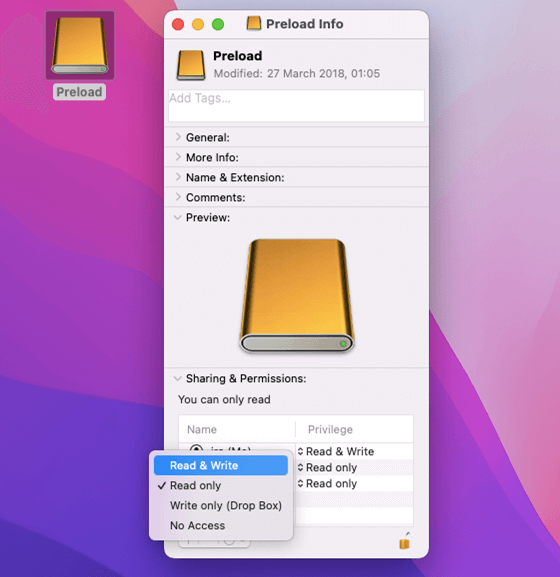
Step 1. Open Finder on your Mac and choose the external hard drive in the sidebar to alter rights and sharing options. "Control+Click" and "Get Info" in the drop-down menu open drive details. The "Command + I" shortcut opens the drive information panel.
Step 2. Expand "Sharing & Permissions" underneath. Check the privilege settings for Mac users who can examine the external hard disk. Click the settings to change them in the drop-down.
#3 Drive permissions and sharing restrictions:
The following limitations apply to this method of fixing the Mac external hard drive read-only error:
- That can mess up the drive's settings and produce several abnormalities, putting data at risk.
- Third-party apps may conflict after adjusting external hard drive permission and sharing settings.
#4 Ignore Finder External Hard Drive Permissions:
Bypassing permissions is another option for fixing the read-only problem on an external hard disk. It will work if you are certain that the permission settings on the hard drive are at fault.
Someone, for whatever reason, has set the hard disk to read-only, as in the case of changing permissions. This method, in contrast to the previous one, will show you how to disregard the security settings. The procedure is as follows:
- Get your external hard drive hooked up to your Mac.
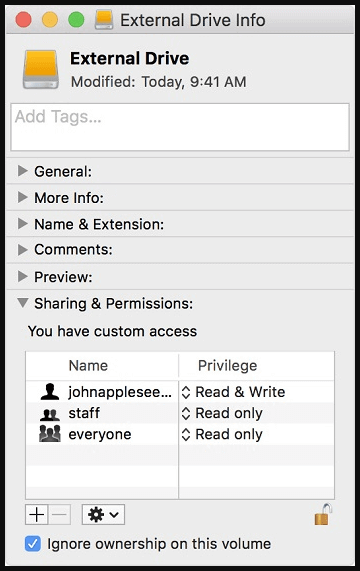
- To view information about the external hard drive, right-click its icon on your Mac and choose "Get Info."
- Expand the "Sharing & Permissions" section to access this feature, and select the lock icon.
- Once you've checked the box labeled "Ignore ownership on this volume," you're finished.
#5 Install a third-party NTFS for Mac tool:
If the hard drive is formatted to NTFS file system, you don't need to format it to APFS, HFS+, ExFAT, you just install a third-party NTFS for Mac tool to help you enable NTFS read-write support on Mac.
Step 1. Download and install DoYourData NTFS for Mac, a reliable NTFS for Mac tool.
DoYourData NTFS for Mac
- The best Microsoft NTFS driver for macOS.
- Reliable tool to make NTFS drive writable on Mac.
- 100% safe and trustworth NTFS for Mac software.
Step 2. Connect the NTFS drive to your Mac and open DoYourData NTFS for Mac.
Step 3. Click Enable Writable, then the NTFS drive will become read-write on your Mac.

Conclusion:
Adjusting permissions or installing third-party software to support the NTFS file system on a Mac are two successful methods discussed in this article for fixing the "read-only" error message that appears when attempting to access an external hard drive on a Mac. Using the Terminal or formatting the HDD are viable options for dealing with this unpleasant circumstance. If you're still having trouble with your Mac after trying these solutions, it may be time to call the experts.
DoYourData NTFS for Mac
DoYourData NTFS for Mac is a safe, powerful and easy-to-use NTFS for Mac tool. It allows macOS to read & write files on NTFS drives without any limitation. It is also a comprehensive disk management tool for Mac to mount/unmount disk, format disk, repair disk, read-write disk...on Mac.
Written & Updated by Justin Kenny
Justin Kenny is a writer & editor of DoYourData. He joined DoYourData in 2016 and focuses on writing articles about Windows data recovery, Mac data recovery, external device data recovery, hard drive clone, data erasure, Mac cleanup, computer issue fixes, etc. He is a super fan of Apple devices and is big on testing new digital device and system utility software.