Home > Hard Drive Solutions for Mac
How to Format an USB Flash Drive to NTFS File System on Mac?
If you can't format your USB flash drive to NTFS by using Terminal or Disk Utility, you can try NTFS for Mac tool. DoYourData NTFS for Mac offers disk formatting tool and it can help you force format an USB flash drive to NTFS on Mac (Format FAT32 to NTFS, format ExFAT to NTFS, format APFS to NTFS, format Mac OS Extended to NTFS, etc.). Before converting your USB flash drive to NTFS, make a backup of your important data.
![]() Updated by Justin Kenny on August 25, 2024
Updated by Justin Kenny on August 25, 2024
Quick Navigation:
- Can Mac Use NTFS File System?
- Format an USB Flash Drive to NTFS on Mac Using Terminal
- Format an USB Flash Drive to NTFS on Mac Using NFTS for Mac Tool [100% Work]
- How to Recover Lost Data After Formatting USB Flash Drive?
- Troubleshooting Common Issues
- Conclusion
- FAQs About Formatting USB Flash Drive to NTFS on Mac
Ensuring your USB flash drive is properly formatted is very important when working on computers with different operating systems. Windows computers mostly use the NTFS (New Technology File System), which is safer, compresses files better, and lets you store bigger files than FAT32 and ExFAT. However, by default, macOS only allows NTFS in read-only mode, which means users can only read files and not change them or make new ones.
This guide will show you how to change the format of a USB flash drive on a Mac to NTFS. By the end of this guide, you will know how to format your USB drive to NTFS on a Mac properly.

Can Mac Use NTFS File System?
NTFS is a file system that Microsoft made for the Windows operating system. Compared to FAT32 and ExFAT, it offers better security, file compression, and bigger file size limits. However, macOS only works with NTFS in read-only mode, which means you can only look at files and not change them or make new ones without extra software. It's almost impossible to format an USB flash drive to NTFS on Mac using built-in tools such as Disk Utility.
On a Mac, you must use third-party tools or the Terminal with certain commands to fully format an USB flash drive to NTFS. Let's look at the different ways that can be used.
Why Format Your USB Flash Drive to NTFS on Mac?
Setting up your USB flash drive to NTFS might be a good idea if:
- A lot of the time, you move big files between your Mac and your Windows computer.
- You must use certain parts of the NTFS file system, like encrypting or compressing files.
- You're going to use the drive mostly with a Windows computer.
Format an USB Flash Drive to NTFS on Mac Using Terminal
Since it is almost impossible to format an USB flash drive to NTF with Disk Utility, you should try another tool to help you. Terminal commands may help you convert your USB flash drive from ExFAT or FAT32 to NTFS.
Step 1. Open the Launchpad and go to "Utilities" > "Terminal."
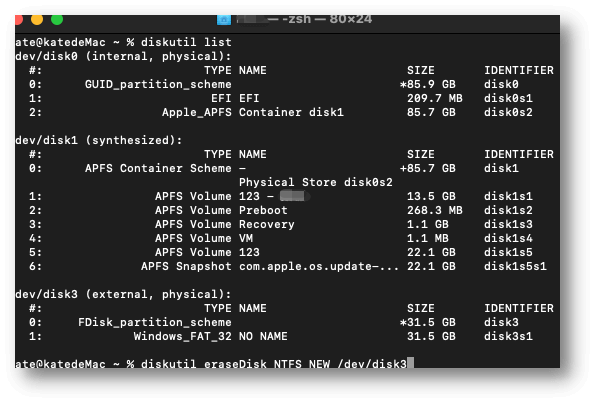
Step 2. In the Terminal window, type "diskutil list." When you press Enter, all the disk details will show up below.
Step 3: To change the drive to NTFS on a Mac, type "diskutil eraseDisk NTFS NEW /dev/disk3." Make sure to change "NEW" to the name you want for your NTFS file and "/dev/disk3" to the correct disk identifier for your USB drive.
Format an USB Flash Drive to NTFS on Mac Using NFTS for Mac Tool [100% Work]
If you can't format your USB flash drive to NTFS on Mac with Terminal or Disk Utility, you can try NTFS for Mac tool. This tool can help you force format an USB flash drive to NTFS file system on Mac.
Step 1. Download and install DoYourData NTFS for Mac. It is one of the best NTFS for Mac tools and is fully compatible with OS X, macOS, Intel Macs, Apple silicon Macs, etc.
Step 2. Open DoYourData NTFS for Mac, then find the USB flash drive and select it. Click on Format button.
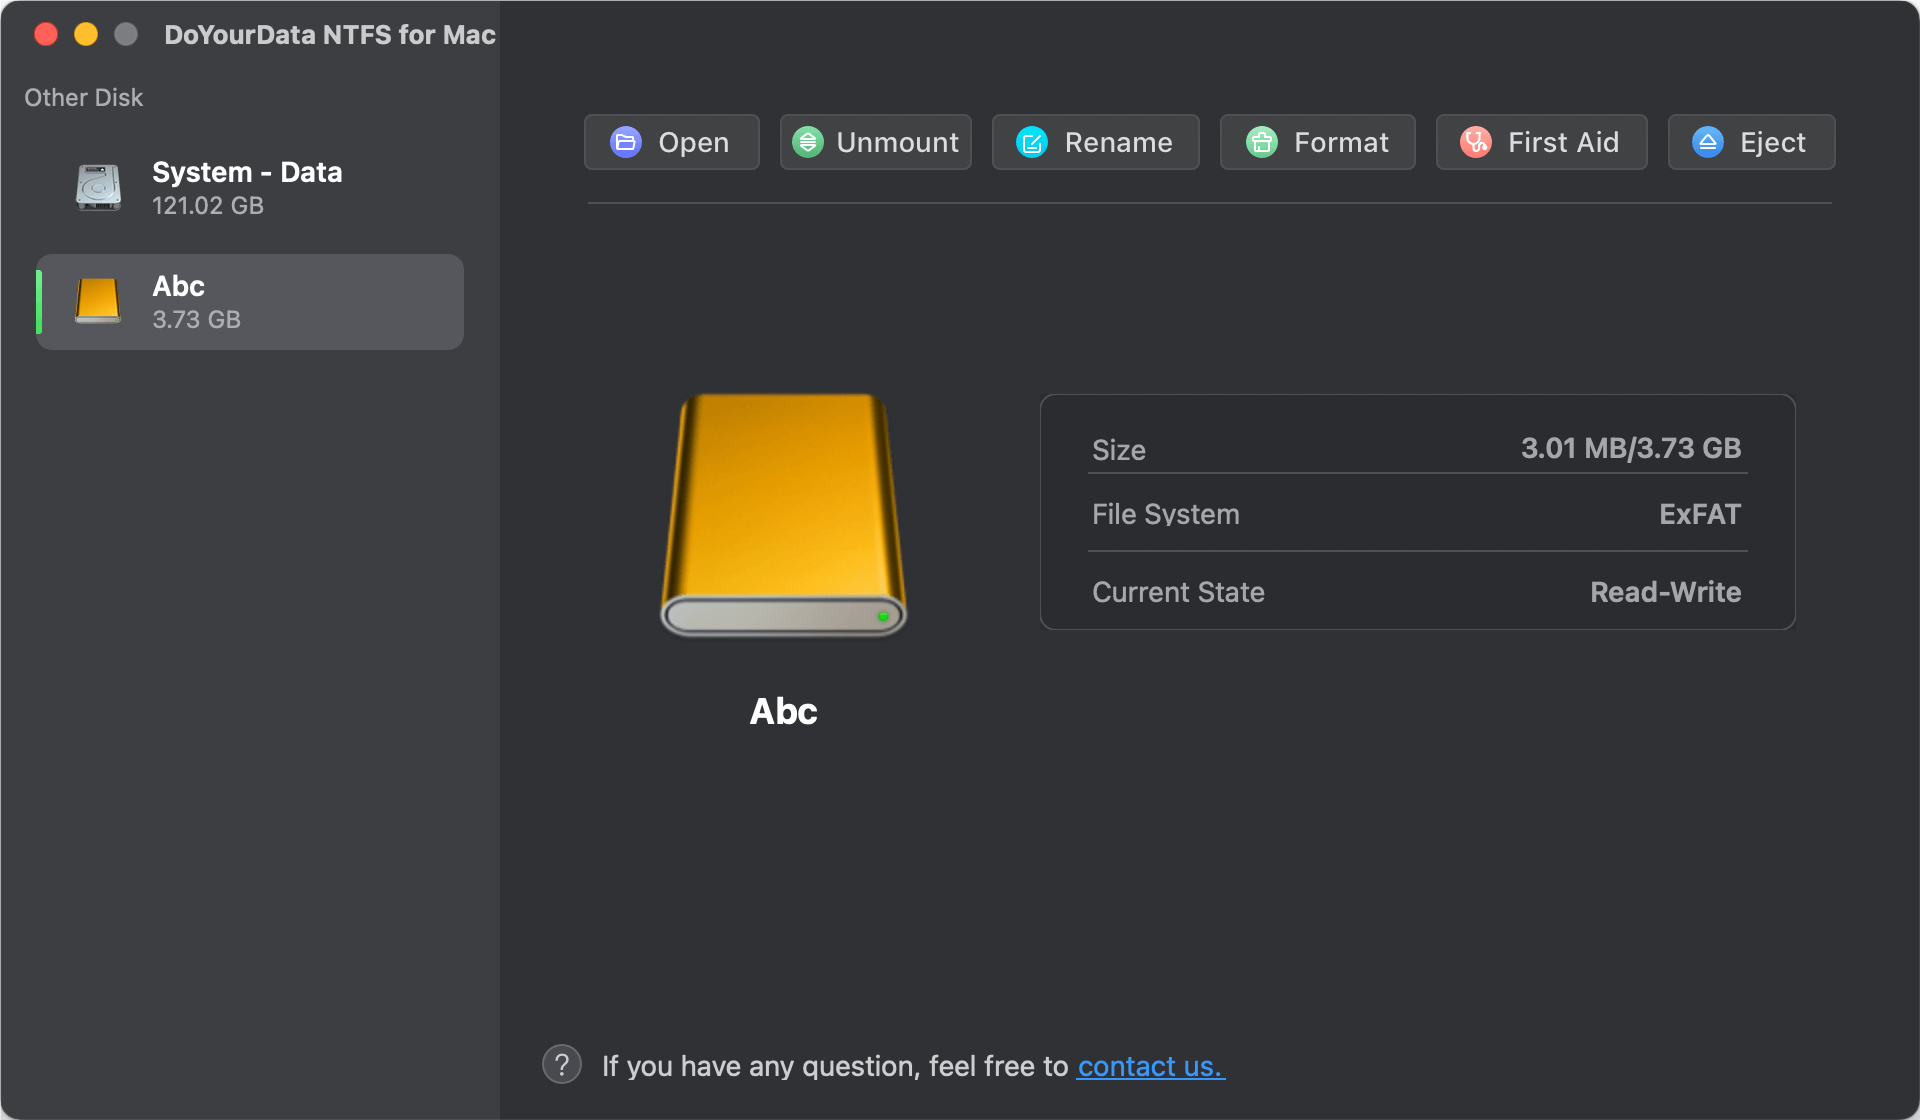
Step 3. Select NTFS as the file system (Format), then click on Continue button.

It will quickly format the USB flash drive to NTFS. If you want to read-write the NTFS drive on your Mac, click on Enable Writable button.

How to Recover Lost Data After Formatting USB Flash Drive?
Data recovery software can help you unformat the USB flash drive and get all lost data back:
Step 1. Download and install the reliable Mac data recovery software - Do Your Data Recovery for Mac on your Mac and connect the USB flash drive to the same Mac.
Step 2. Open Do Your Data Recovery for Mac. It lists all the drives and devices, just select the USB flash drive to start data recovery.

Step 3. Click on Scan button to deeply scan the formatted USB flash drive and find all lost files.

Step 4. Once the scan is completed, you can preview all recoverable files. Then select the wanted files and save them.

Troubleshooting Common Issues
USB Drive Doesn't Work:
These steps should help if your USB drive isn't seen:
- Connect the Drive Again: Take the USB drive off and back on.
- Check the USB ports: Try using a different USB port on your Mac.
- Start up your Mac again: To make your Mac work better, restart it.
NTFS Format Option Not Available:
If the NTFS format option isn't there, ensure you have DoYourData NTFS or NTFS-3G installed and follow the steps properly.
Permission Issues:
If you have problems with permissions in Terminal, ensure you are running tasks that need administrative rights with sudo.
Conclusion:
It takes more work to format an USB flash drive to NTFS on a Mac, but it ensures it works with both Windows and macOS. This guide gives you the steps to finish the job, whether you use command-line tools, or third-party NTFS for Mac software. Following these steps, you can use all of NTFS's advanced features, like better security and handling bigger file sizes, while working smoothly on different platforms. You can confidently change your USB flash drive to NTFS on a Mac now that you know what to do.
FAQs About Formatting USB Flash Drive to NTFS on Mac
1. Is it possible to format an USB flash drive to NTFS by using Disk Utility?
Actually, it is almost impossible to format an ExFAT or FAT32 USB flash drive to NTFS with Disk Utility. In some special cases, you still can format your USB flash drive to NTFS with Disk Utility, just take a try.
- What format is the flash drive in? That's the first thing you should do before you change it. To do that, open Finder and look for the flash drive on the left side of the window. Choose Get info from the menu when you right-click on the flash drive.
- When you do this, all the information about the flash drive will show up. The information you need is under "Format."
- Close the program once you know how the drive is formatted. In Finder, choose "Application" from the sidebar. Then, look for "disk utility" to open "Utilities."
- Open Disk Utility, all the drives linked to the Mac will appear in the app under the "external" tab.
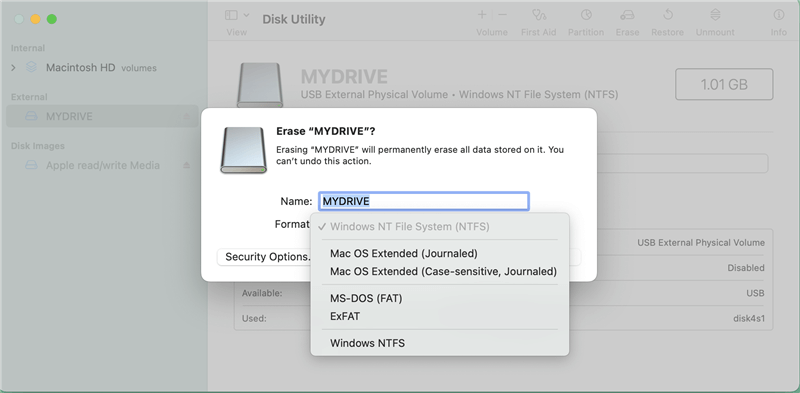
- Click the "Erase" button. Make sure you pick the drive before you press the button. Before you can erase, you must name the drive as shown below. Changing the drive's format to NTFS before you erase it is important.
- When you click the "Erase" button, all the information will be erased, and a message will appear afterward.
2. How to Format USB to NTFS in Windows Disk Management?
Windows has a Disk Management tool lets users care for their hard drives and other storage devices. People can change drive letters and paths and make, remove, and format partitions With Disk Management.
- Right-click "This PC" and select "Manage."
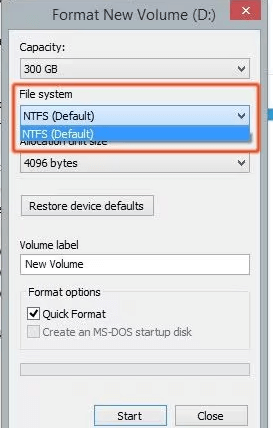
- Go to "Disk Management," find your USB flash drive, right-click it, and pick "Format."
- Pick the NTFS file system, check the box written "Perform a quick format," and hit "OK" in the window that appears.
3. How to format an USB flash drive to NTFS on Mac?
DoYourData NTFS for Mac tool can help you securely and quickly format any USB flash drive to NTFS on Mac:
- Download and install DoYourData NTFS for Mac, open it from Launchpad.
- Select the USB flash drive and click Format.
- Select NTFS as the Format, then format the USB flash drive to NTFS.
4. Which tool can help to format an USB flash drive to NTFS on Mac?
Here are some tools can help you format an USB flash drive to NTFS on Mac:
- DoYourData NTFS for Mac
- Disk Utility
- Terminal
- Donemax NTFS for Mac
5. How to unformat an NTFS USB flash drive on Mac?
Mac data recovery software can deeply scan the formatted USB flash drive and find all lost files.
- Download and install Do Your Data Recovery for Mac, open it.
- Select the formatted USB flash drive.
- Click on Scan button.
- Preview and recover lost files after scanning.
6. How to format an USB flash drive to NTFS on Mac using Terminal?
It is possible to format an ExFAT or FAT32 USB flash drive to NTFS on Mac with Terminal Commands:
- Go to Launchpad > Other > Terminal, open Terminal.
- Type diskutil list to list all drives, find the USB flash drive.
- Type diskutil eraseDisk [USB name] NTFS /dev/disk X (X is the USB flash drive's disk identifier).
- Format the USB flash drive to NTFS.
7. Can Mac read-write NTFS USB flash drive?
No, Mac can only read NTFS USB flash drive. If you want to write data to it, just use NTFS for Mac tool to enable writable for the drive:
- Download and install DoYourData NTFS for Mac, open it.
- Select the NTFS USB flash drive.
- Click on Enable Writable button.
DoYourData NTFS for Mac
DoYourData NTFS for Mac is a safe, powerful and easy-to-use NTFS for Mac tool. It allows macOS to read & write files on NTFS drives without any limitation. It is also a comprehensive disk management tool for Mac to mount/unmount disk, format disk, repair disk, read-write disk...on Mac.
Written & Updated by Justin Kenny
Justin Kenny is a writer & editor of DoYourData. He joined DoYourData in 2016 and focuses on writing articles about Windows data recovery, Mac data recovery, external device data recovery, hard drive clone, data erasure, Mac cleanup, computer issue fixes, etc. He is a super fan of Apple devices and is big on testing new digital device and system utility software.