Recover Lost Data from An Erased Hard Drive
Data recovery software takes only three steps to completely recover lost data from a hard drive which is erased by Disk Utility.
Quick Navigation:
With the introduction of the Apple Silicon M3 chip, the Mac computing landscape has shifted dramatically, with improved performance, efficiency, and a more streamlined user experience in the offing. However, as with every technological evolution, it has ushered in its fair share of compatibility issues.
One of the most common problems with the Apple Silicon M3 Mac is that external hard drives are read-only, meaning that users cannot write to or otherwise alter the drive's contents. This annoying issue can slow down your work and make it difficult to handle your files, but there are several ways to fix it.
There are many possible causes for an external hard disk to be Mac-only. The three most frequent are listed below.
Errors in the formatting of any hard disk can cause various issues. Your external hard drive will be rendered read-only as a result. Errors in the drive's formatting will prohibit you from saving any data, so you may have seen a notification that the external device was mounted in read-only mode.
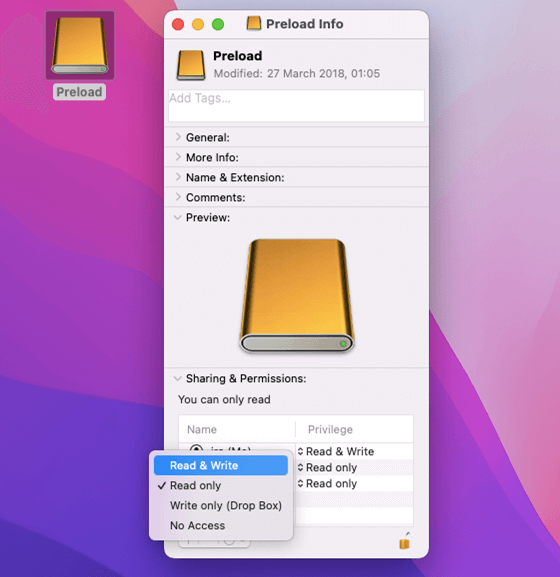
Like your local hard drive, an external hard drive is subject to the permission settings of your operating system. All the files and folders on the device are now subject to these permissions.
If Mac is running a different operating system won't be able to read the drive or make the necessary permissions changes. In other words, you don't have authorization to write to the external HDD on a Mac and won't be able to use your disk as usual.
The file system format of your drive is important because macOS doesn't support all of them. More specifically, macOS doesn't support NTFS. The most typical issue caused by this incompatibility is permanently setting your hard disk to read-only.
NTFS external drives are unique to Windows devices; thus, macOS can't write to them. Right-click your device and left-click Get Info to check NTFS.

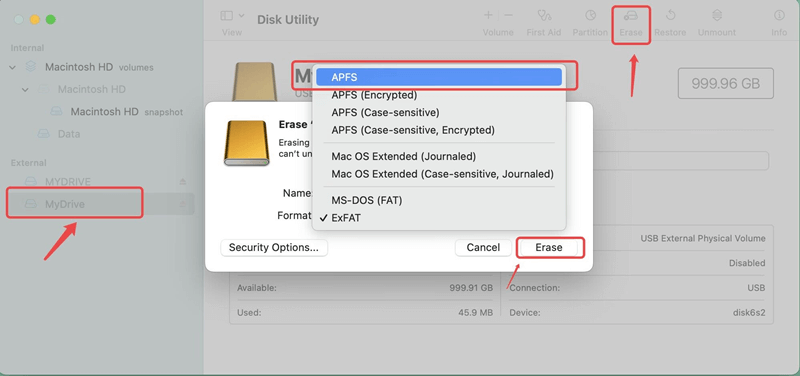
Launch "Disk Utility" on your M3 Mac and double-check the external hard drive's file system format. You can convert the drive's file system from NTFS or exFAT to Apple File System (APFS) or Mac OS Extended, both supported by macOS.

Please back up your data stored on the external hard drive before you erase the external hard drive. If not, you can use a data recovery app to get lost files back.
Recover Lost Data from An Erased Hard Drive
Data recovery software takes only three steps to completely recover lost data from a hard drive which is erased by Disk Utility.
Make sure the external drive has read/write access and adjust the appropriate permissions:

If the external hard drive is an NTFS drive, you don’t need to format it. Just install a NTFS for Mac tool on your M3-chip Mac, then open this tool on your Mac.
Make sure the external hard drive is connected to your M3-chip Mac, and then select the external hard drive, click on Enable Writable button. (If the external hard drive is unmounted, click on Mount button.)

If using an external hard drive with your M3 Mac, check that the USB cable is plugged into both devices. Test using a different USB port or cable to rule out connection issues.
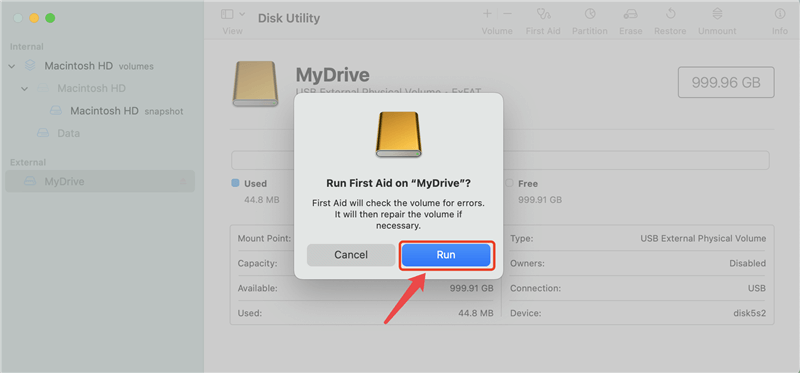
If there are any faults or corruptions on the external hard drive, use the "First Aid" option of Disk Utility to fix them.

Troubleshooting an Apple Silicon M3 Mac's read-only external hard drive can be difficult, but these techniques often work. Implementing the proper remedy requires understanding the root problems, such as file system incompatibility, permissions, connection issues, or drive errors.
Before reformatting or repairing backup important data, some workarounds need third-party software or extra procedures. However, fixing the read-only bug can restore full functionality and enable data management across external drives and Apple Silicon M3 Macs.
These detailed troubleshooting procedures can fix the read-only issue and maximize external storage devices on Apple Silicon M3 chip-based Macs.
