Home > Hard Drive Solutions for Mac
How to Read and Write NTFS Hard Drive on macOS Ventura?
Download and install reliable NTFS for macOS Ventura driver, then you can use NTFS hard drive on macOS Ventura without formatting the drive. DoYourData NTFS for Mac is an easy-to-use, safe and powerful NTFS driver for macOS Ventura, download it now.
![]() Updated by Justin Kenny on July 23, 2023
Updated by Justin Kenny on July 23, 2023
Quick Navigation:
- 1. Why can't macOS use NTFS for file storage?
- 2. How do I format an NTFS drive in macOS Ventura?
- 3. The easiest way to read and write to NTFS drives on macOS Ventura
- 4. FAQs about enabling NTFS read-write support on macOS Ventura?
The newest version of Apple's OS, macOS 13 Ventura, was released not too long ago. The anticipation continues to astound us, even though the fact that the program is coming out on the market is old news.
Many people were looking forward to the new OS because they believed it would bring about changes such as enhanced Mail capabilities, direct NTFS write support fixes and streamlined processes.
The new macOS Ventura has delivered on the latter part of the promise, although it does not yet provide complete compatibility for NTFS-formatted devices. Even worse, it prevents Mac users from manually enabling NTFS write support. Now we can talk about some potential answers to the problem.
Why can't macOS use NTFS for file storage?
Since the early 1990s, Windows has used Microsoft's proprietary NTFS file system. It debuted in Windows NT 3.1 and has been included in every version.
Since Microsoft is not making the whole NTFS specification available as open source standards, Apple may be required to purchase expensive licenses to implement it across all their products. What's more, why would they back the protocol of their biggest rival?
How do I format an NTFS drive in macOS Ventura?
Because of its unreliability, a free NTFS for Mac driver is better suited for occasional use than a permanent installation. Few options are left for restoring write access to an NTFS drive after macOS Ventura rejects all free approaches. These three methods are:
- To allow writing to your device while running macOS Ventura, download a third-party program like NTFS for Mac.
- If you want to be able to write to the NFTS drive from your macOS Ventura computer, you'll need to format it to either APFS or FAT/ExFAT.
- It is possible to use NTFS drives in Windows by installing Windows on a Mac.
If you want to format an NTFS hard drive to Mac-compatible file system, you should make a backup of the files stored on the NTFS hard drive because the formatting operation will delete all files on the NTFS hard drive. Then follow the steps below to format an NTFS hard drive to ExFAT/FAT32 or APFS, Mac OS Extended, etc.
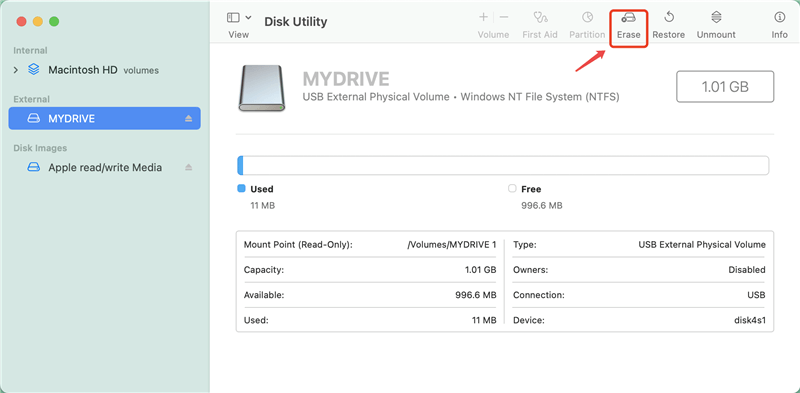
Step 1. Connect the NTFS hard drive to your Mac, then open Disk Utility.
Step 2. Select the NTFS hard drive and click Erase.
Step 3. Select the ExFAT as the file system if you want to use this hard drive on both Windows OS and Mac OS.Then click on Erase button again.
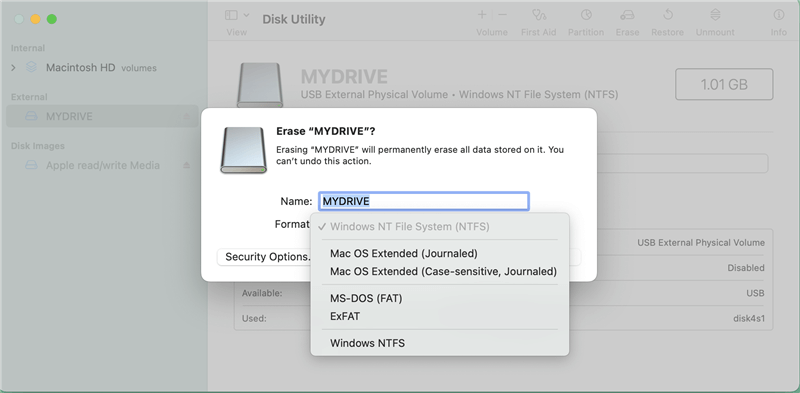
Once the process gets finished, click on Done button. If you have not backed up the NTFS hard drive and format it by mistake, you can download a data recovery application to scan the formatted NTFS hard drive and it will help you recover the lost files and documents.
The easiest way to read and write to NTFS drives on macOS Ventura
An NTFS drive can be read from and written to on macOS Ventura. However, Mac OS cannot read or write directly to an NTFS drive without a third-party NTFS for Mac tool, converting the NTFS drive to a Mac-compatible file system, or running Windows on Mac. That is because Apple has changed the entire mount process of NTFS drives.
Using an NTFS for Mac application like DoYourData NTFS for Mac compatible with macOS Ventura will be the simplest and safest option for enabling NTFS support and preventing data loss on a Mac. The following steps must be taken to continue with the operation.
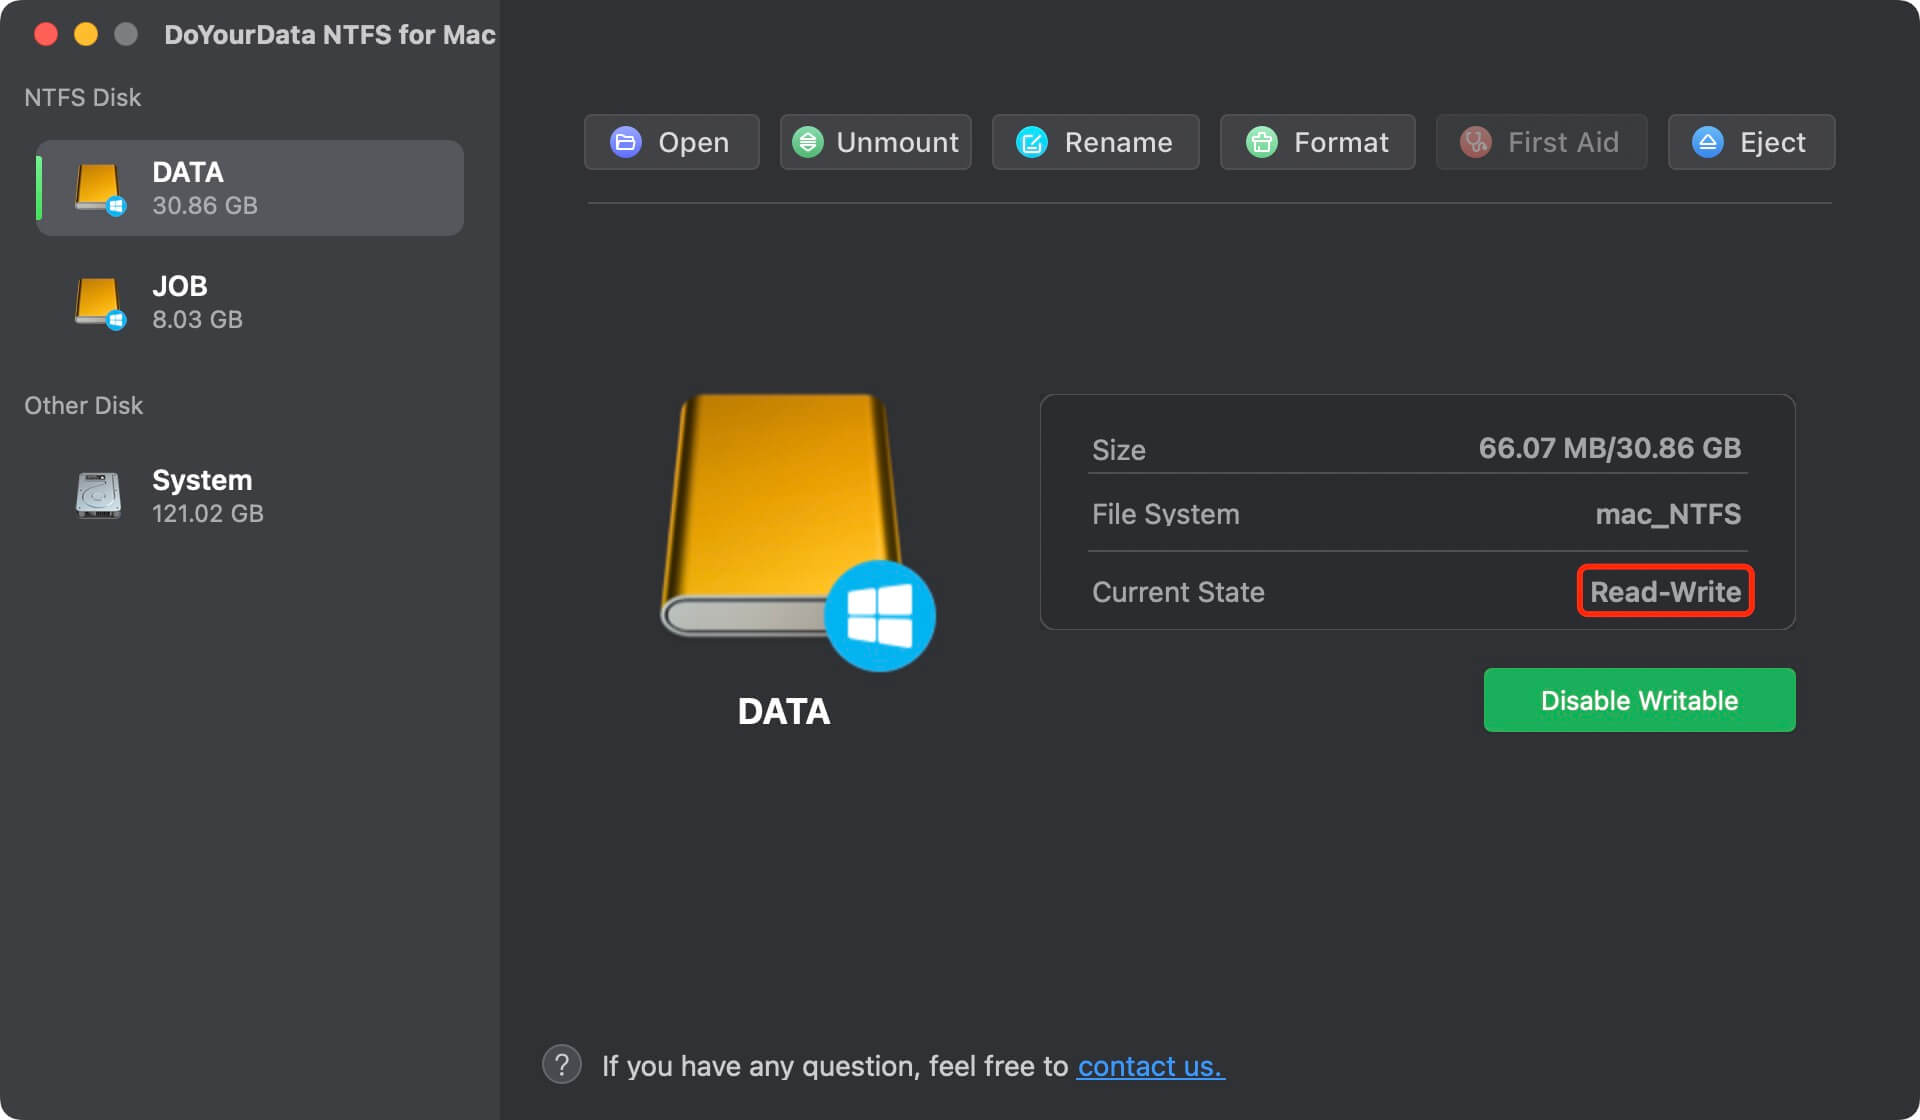
Step 1. Download and install DoYourData NTFS for Mac. Then run it from Launchpad. You should connect the NTFS hard drive to your Mac via USB port or USB hub.
Step 2. On the left side, you will see the NTFS Disk. Then select the connected NTFS hard drive. Click Enable Writable.

FAQs about enabling NTFS read-write support on macOS Ventura?
1. Is there any other NTFS for Mac app can enable NTFS support on macOS Ventura?
Yes. As far as we know, Paragon NTFS for Mac is the first application to bring NTFS functionality to macOS Ventura. This program, specializing in NTFS for Macs, has existed since the early 1990s. Users interested in trying out this fantastic software can do so for 10 days at no cost and with full access to all its features. After the trial period ends, you must pay a reasonable fee to unlock the full version.
Paragon Software's Step-by-Step Guide on Reading and Writing to an NTFS Drive:
- First, get the most recent version of NTFS for Mac from the Paragon Software website.
- The installation wizard can be accessed by double-clicking the.dmg file. Here, you'll be asked to specify where to set up the app on your device.
- Third, it requires your approval of a Privacy & Security system extension created by Paragon Software GmbH at the end of the installation process.
- To give Paragon NTFS for Mac permission to access your files, open System Settings in Mac Ventura and select Allow.
- To complete this action, please enter your password in the box below. The Mac's cache will then be updated. Please hold on for a second, and then restart your Mac.
- Paragon NTFS for Mac Software allows you to read and write NTFS files after a reboot.
2. How to use an NTFS external hard drive on macOS Ventura without formatting?
As said above, you can download a NTFS for Mac tool to help you lift all NTFS restrictions on macOS Ventura. For example, you can install DoYourData NTFS for Mac and then use it to grant full read-write access to any NTFS device on macOS Ventura.
3. How to fix external hard drive read-only issue on macOS Ventura?
Follow the steps below to fix external hard drive read-only issue on macOS Ventura:
- Connect the external hard drive to your Mac.
- Download and install DoYourData NTFS for Mac, open it on your Mac.
- Select the NTFS external hard drive.
- Click Enable Writable. Then the external hard drive will become Read-write. It means you can use it on your Mac without any limitation.
4. What is the best NTFS for Mac tool for macOS Ventura?
Here is the list of top 10 NTFS for Mac tools which are compatible with macOS Ventura.
- DoYourData NTFS for Mac
- Mounty for NTFS
- NTFS-3G
- Tuxera NTFS for Mac
- Paragon NTFS for Mac
- FUSE for macOS
- iBoysoft NTFS for Mac
- Donemax NTFS for Mac
- SL-NTFS
Conclusion:
Since NTFS is a Microsoft-only innovation, any other firm that wants to support it on their operating systems natively must first secure a license from Microsoft.
NTFS is not currently licensed to Apple. If you want to use an external hard drive or USB flash drive which is formatted with NTFS file system on the latest macOS Ventura, you should download and install an NTFS for Mac tool. It will help you quickly enable NTFS Read-Write support on macOS Ventura. Then you can write data to NTFS hard drive or modify documents on it.
Written & Updated by Justin Kenny
Justin Kenny is a writer & editor of DoYourData. He joined DoYourData in 2016 and focuses on writing articles about Windows data recovery, Mac data recovery, external device data recovery, hard drive clone, data erasure, Mac cleanup, computer issue fixes, etc. He is a super fan of Apple devices and is big on testing new digital device and system utility software.