How to Recover Lost Data from a GNARBOX 2.0 SSD
It is easy to recover deleted files, formatted data and lost files from a GNARBOX 2.0 SSD with data recovery software.
It is easy to format a GNARBOX 2.0 SSD on Windows or macOS. But the formatted data is not lost for good and can be recovered by data recovery software. If you will sell, donate or give your GNARBOX 2.0 SSD to others, you should permanently erase all data from it. Data erasure program - DoYourData Super Eraser can help you securely and permanently erase data from a GNARBOX 2.0 SSD, ensure no data is recoverable.
![]() Updated by Shirly Chen on September 14, 2024
Updated by Shirly Chen on September 14, 2024
Quick Navigation:
In today's digital age, data security is more important than ever. Whether you're upgrading to a new device, selling your old one, or simply need to make sure that sensitive information is completely removed, it's crucial to understand how to securely erase data from your storage devices. For users of the GNARBOX 2.0 SSD, a compact yet powerful tool designed for managing and backing up media files, securely erasing data requires a specific approach. This article will guide you through the process of permanently erasing data from your GNARBOX 2.0 SSD, ensuring that your information remains confidential.
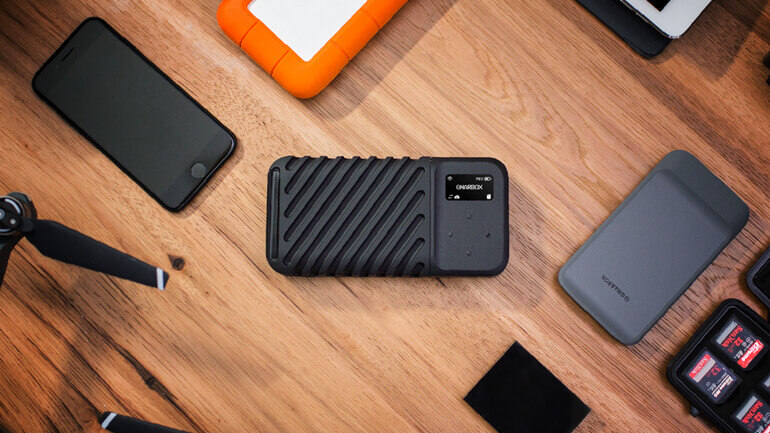
The GNARBOX 2.0 SSD is a rugged, portable drive designed primarily for photographers, videographers, and outdoor enthusiasts who need reliable data storage and management on the go. It combines an SSD (solid-state drive) with a robust, weatherproof enclosure, making it suitable for harsh environments. The SSD inside the GNARBOX 2.0 provides fast read and write speeds, which are essential for handling large media files.
When you delete files from a storage device, the data isn't immediately erased; instead, the space is marked as available for new data. This means that until new data overwrites it, the old data remains on the drive and can potentially be recovered using data recovery tools. For sensitive information, such as personal data, business documents, or proprietary media files, this poses a significant security risk.
How to Recover Lost Data from a GNARBOX 2.0 SSD
It is easy to recover deleted files, formatted data and lost files from a GNARBOX 2.0 SSD with data recovery software.
Securely erasing data ensures that it is completely and irreversibly removed, making it impossible to recover. This is particularly important if you plan to sell or dispose of the GNARBOX 2.0 SSD or if you want to prevent unauthorized access to confidential information.
Before proceeding with the data erasure process, there are several preparatory steps you should take to ensure everything goes smoothly:
There are several methods for securely erasing data from your GNARBOX 2.0 SSD. Each method has its own advantages and considerations. Here, we'll discuss some of the most effective approaches.
Before resorting to third-party software or physical destruction, it's worth checking if your GNARBOX 2.0 SSD offers any built-in data erasure options. Some devices come with utilities or settings designed to securely erase data. If such an option is available, it’s often the simplest and most efficient method to ensure your data is permanently removed.
If your GNARBOX 2.0 SSD does not have built-in data erasure tools, or if you prefer a more comprehensive solution, several third-party software options can securely erase data. These tools are designed to overwrite the data on your SSD, making it unrecoverable.
DoYourData Super Eraser is one of the best data erasure programs. It offers certified data erasure methods to help you securely and permanently erase data from a GNARBOX 2.0 SSD.
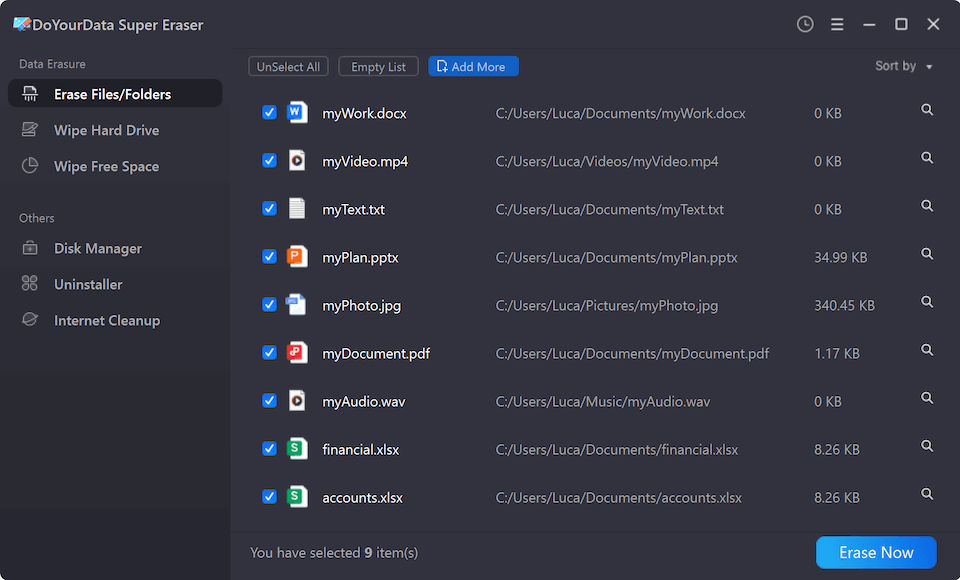
Mode 1. Selectively shred files from GNARBOX 2.0 SSD.
Just connect GNARBOX 2.0 SSD to your computer, then run DoYourData Super Eraser. Just select files/folders from GNARBOX 2.0 SSD for erasure. Then click on Erase Now button to permanently erase the selected files/folders from your GNARBOX 2.0 SSD.
Mode 2. Format and wipe GNARBOX 2.0 SSD to erase all data.
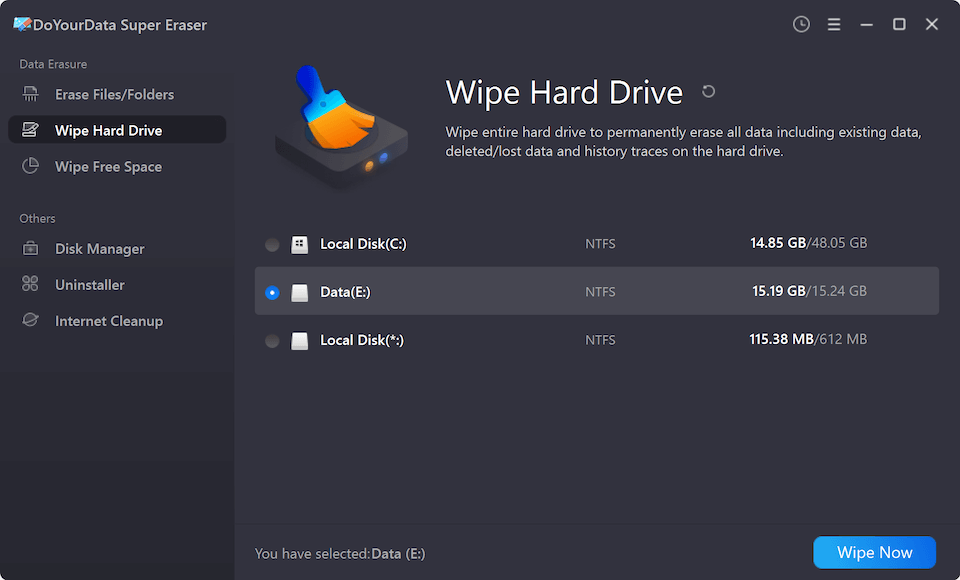
The second mode - Wipe Hard Drive can help you format and wipe your GNARBOX 2.0 SSD to permanently erase all data from it.
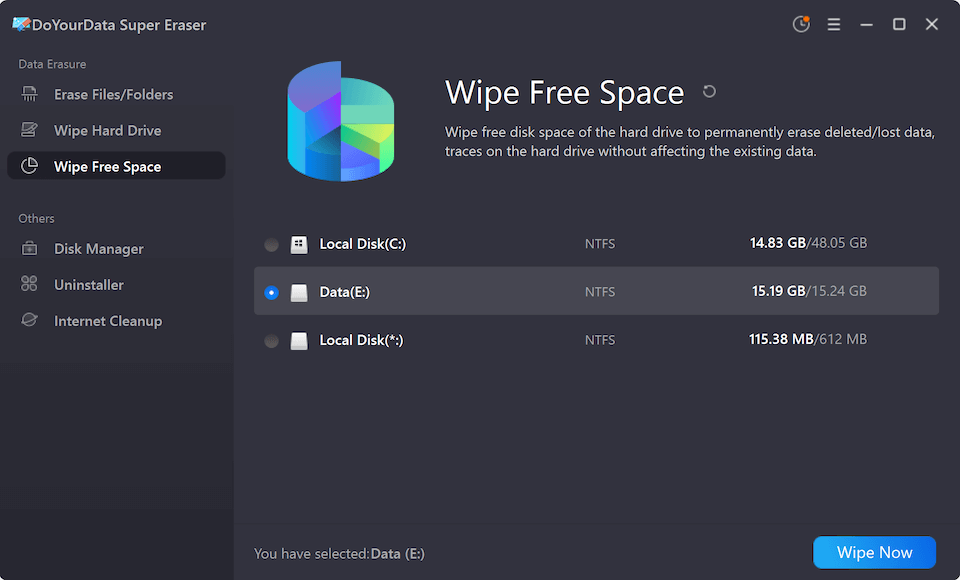
Mode 3. Wipe free disk space of GNARBOX 2.0 SSD.
This mode will help you wipe free disk space of GNARBOX 2.0 SSD and permanently erase all already deleted data from it. It will not affect the existing data stored on the GNARBOX 2.0 SSD.
Note: Once the data is erased by DoYourData Super Eraser, the data is lost for good, cannot be recovered by any method.
For those comfortable with command-line interfaces, using built-in command-line tools can be an effective way to erase data. Here's a basic guide:
As a last resort, especially for highly sensitive data, physical destruction of the SSD ensures that data cannot be recovered. This method involves:
Note: Physical destruction should only be used if you are certain you will not need the drive or its components again, as this method is irreversible.
After completing the data erasure process, it is important to verify that the data has been successfully removed. This ensures that no recoverable data remains on the GNARBOX 2.0 SSD.
If you encounter issues that you cannot resolve, consider reaching out to GNARBOX support for assistance. They can provide guidance specific to your device and help troubleshoot any problems you may face.
Securely erasing data from your GNARBOX 2.0 SSD is an essential step to protect your personal information and maintain privacy. By understanding the different methods available and following the appropriate procedures, you can ensure that your data is permanently removed and cannot be recovered. Whether using built-in tools, third-party data erasure software (such as DoYourData Super Eraser), command-line utilities, or physical destruction, each method has its own advantages. Choose the approach that best fits your needs and always verify the results to confirm the success of the erasure process. In a world where data breaches and identity theft are increasingly common, taking these steps to protect your information is more important than ever.
DoYourData Super Eraser
DoYourData Super Eraser, the award-winning data erasure software, offers certified data erasure standards including U.S. Army AR380-19, DoD 5220.22-M ECE to help you securely and permanently erase data from PC, Mac, HDD, SSD, USB drive, memory card or other device, make data be lost forever, unrecoverable!
Written & Updated by Shirly Chen
Shirly Chen has been writing data recovery, data erasure articles for DoYourData over 4 years. She has been working as a professional website content writer & editor for quite a long time. She also writes articles about disk clone, Mac optimization, disk backup, etc.