Quick Navigation:
- Voice Recorders and Their Storage Methods - Overview
- Built-In Device Options for Erasing Voice Recordings
- Manual and Software-Based Erasure Methods
- Best Practices for Ensuring Permanent Erasure
- Conclusion
Voice recordings can contain sensitive information, from personal conversations to confidential business discussions. As we become more aware of privacy issues and the risks associated with data breaches, it's essential to understand how to permanently erase voice recorder data from our devices. Deleting a file doesn't necessarily mean it is gone forever. In this article, we will explore the methods and techniques to ensure that your voice recordings are permanently erased, safeguarding your privacy and preventing any unwanted recovery of your data.
Voice Recorders and Their Storage Methods - Overview
Before exploring how to erase voice recordings permanently, it is important to understand the types of devices we are dealing with and how they store data. Voice recorders come in many forms, from dedicated digital voice recorders to smartphones and tablets that also have recording capabilities. These devices store audio data in different ways, which can affect how we approach deleting that data.
- Digital Voice Recorders: These are devices specifically designed for recording audio. They typically store data in internal memory or on removable storage media like SD cards or microSD cards. The files are usually saved in common audio formats such as WAV, MP3, or WMA.
- Smartphones and Tablets: Modern smartphones and tablets have built-in voice recording apps, and the recordings are stored in the device's internal memory or in cloud storage if the user has opted for that. The files are often saved in formats such as M4A, AMR, or MP3.
- External Memory Cards: Some devices use external memory cards to store data. These cards can be removed and used in different devices, making them a bit more challenging to manage when it comes to secure deletion.
Understanding how your device stores voice recordings is the first step toward erasing them permanently. If you know where the data is located, you can target it more effectively.
Built-In Device Options for Erasing Voice Recordings
Many devices come with built-in options that can help you securely delete files. Here's how you can use these options to erase voice recordings permanently.
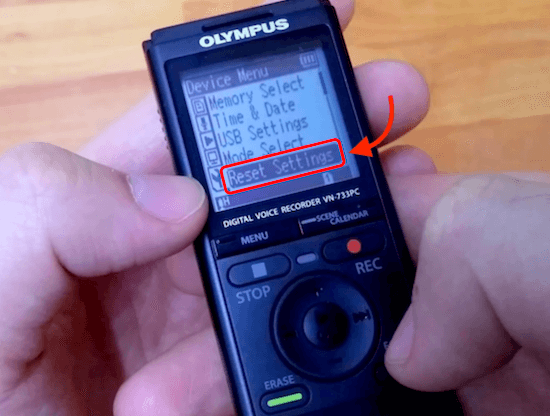
- Factory Reset: Performing a factory reset is one way to erase all data on your device, including voice recordings. This option restores the device to its original settings, deleting all personal data in the process. However, it's important to note that even after a factory reset, some data might still be recoverable unless the storage is overwritten.
![erase voice recorder data permanently]()
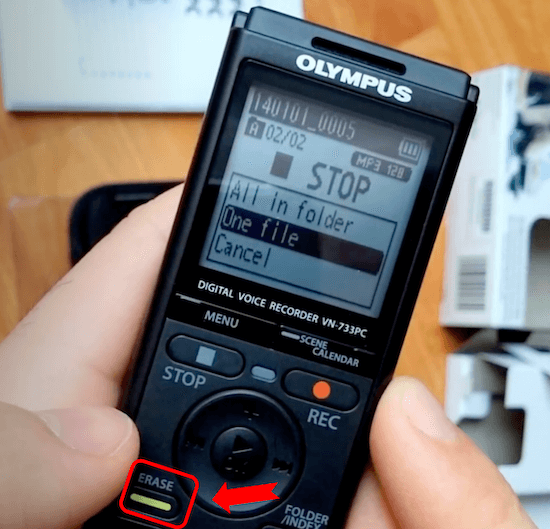
- Secure Delete Functions: Some devices have a secure delete option, which not only deletes the file but also overwrites the storage space where the file was located. This makes it much harder, if not impossible, for the file to be recovered. Check your device's settings or user manual to see if this option is available.
![erase voice recorder data permanently]()
To use these built-in options effectively, make sure you follow the instructions provided by the device manufacturer. It's also a good idea to double-check that the files are truly gone by using a recovery tool to see if anything can still be retrieved.
Manual and Software-Based Erasure Methods
If your device doesn't have built-in secure deletion options, or if you want to take additional steps to ensure your recordings are permanently erased, you can use software tools specifically designed for this purpose. These tools are often more thorough than standard deletion methods, as they overwrite the data multiple times to prevent recovery.
👨🔧 Using Data Erasure Software:
There are several software programs available that can securely delete files by overwriting them with random data. This process is known as data wiping or data shredding. Some popular tools include DoYourData Super Eraser, CCleaner, Eraser, and Secure Eraser. These programs allow you to select the files you want to delete and then overwrite the storage space to ensure the data is irrecoverable.
How to use the data erasure software?
To use these tools, simply download and install the software on your device. Then, select the voice recordings you want to delete and choose the option to securely delete or shred the files. The software will overwrite the data multiple times, making it nearly impossible for anyone to recover it.
To help you understand the process clearly and wipe voice recordings smoothly, we will use DoYourData Super Eraser as an example to show the steps:
Step 1. Download and install the software on your computer. Connect the voice recorder or the memory card to the computer.
DoYourData Super Eraser
- Best file shredder for voice recordings and other files.
- Permanently erase data to avoid data recovery.
- Wipe data simple with only a few clicks.
Step 2. Start the software and then choose the mode Erase Files/Folders. It can be used to shred any wanted files or folders, including voice recordings.
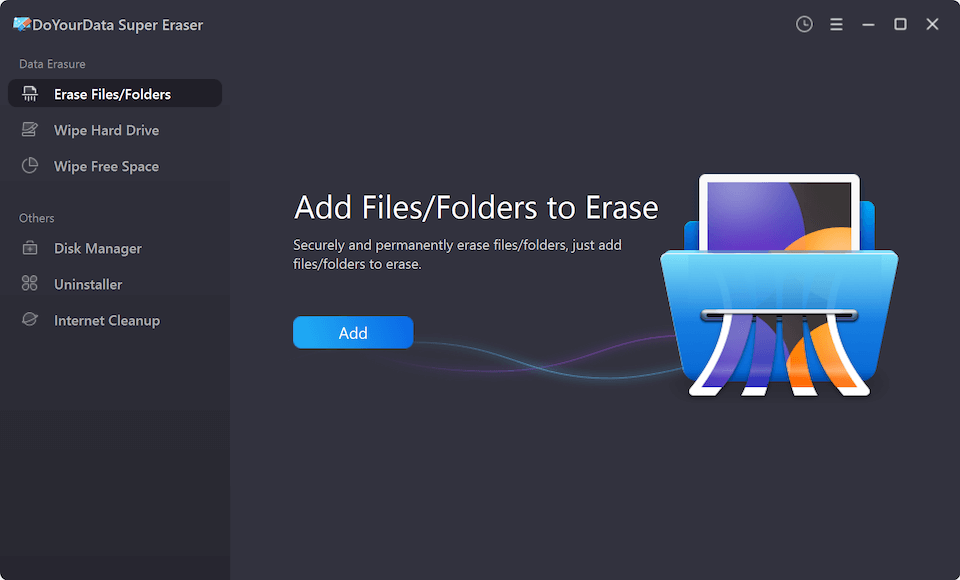
Step 3. Add the voice recordings which you want to remove permanently. All the selected files will be listed and you can confirm it before processing the data wiping.
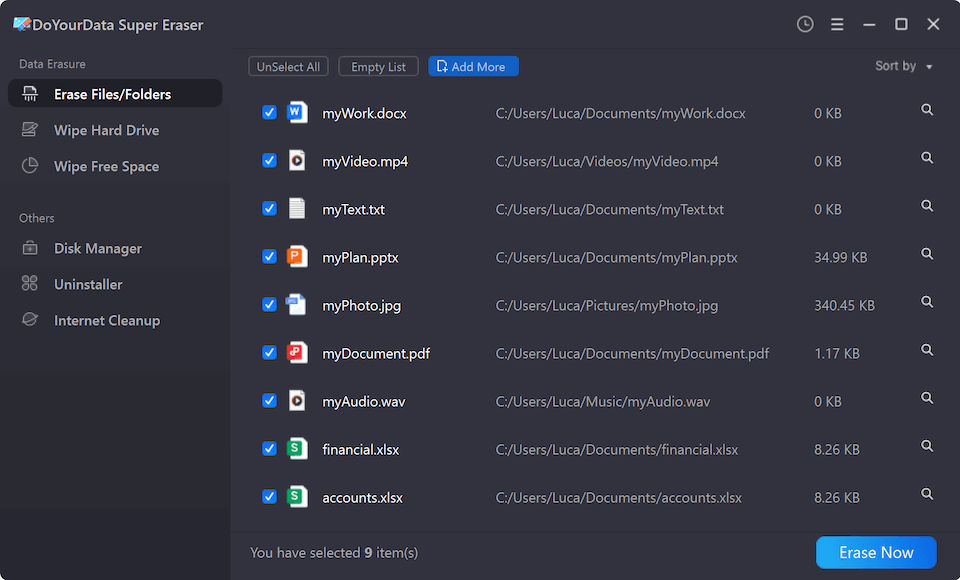
Step 4. Click Erase Now button and then you can select a data wiping algorithm.
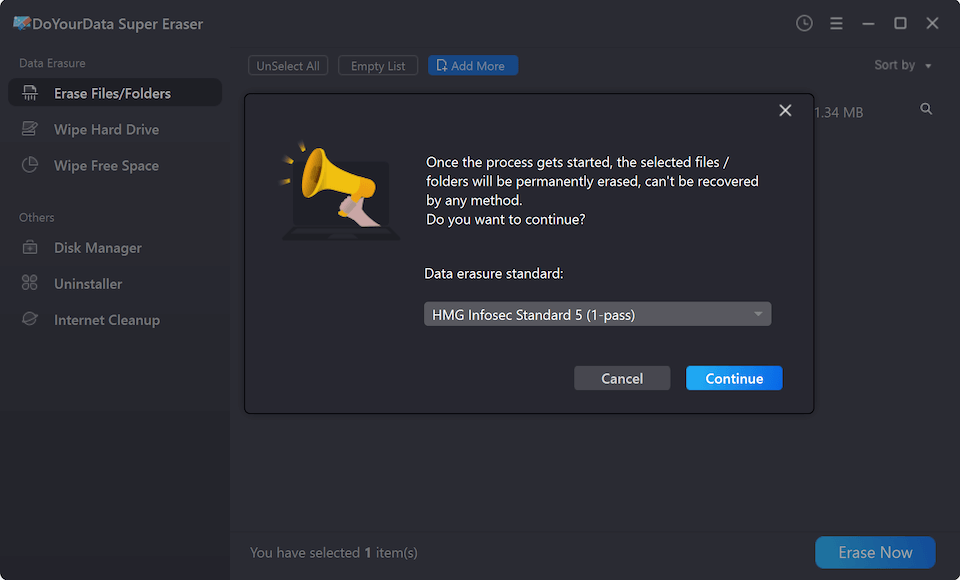
Step 5. At last, click the Continue button and the software will start to shred all the selected voice recordings.
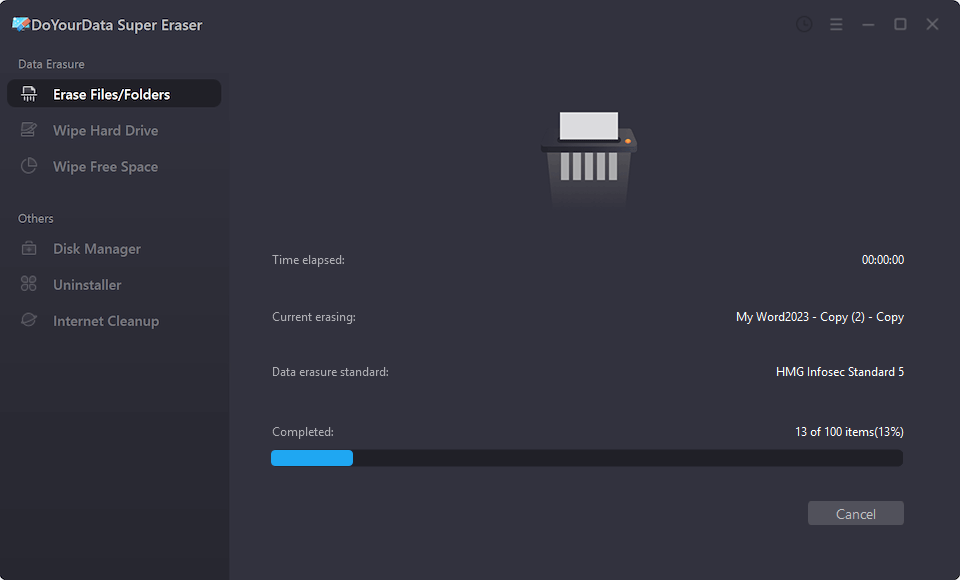
After it's done, the selected voice recordings are wiped permanently and gone for good. No data recovery software can recover these erased voice recordings. If you want to wipe all the data from the device, just choose "Wipe Hard Drive" and choose the device to wipe.
👨🔧 Command Line Tools:
For those who are more technically inclined, command line tools like diskpart, shred (available on Linux) or srm (secure remove) can be used to securely delete files. These tools work by overwriting the file's data multiple times before deleting it.
For Windows users, you can do as follows to wipe the data via command line.
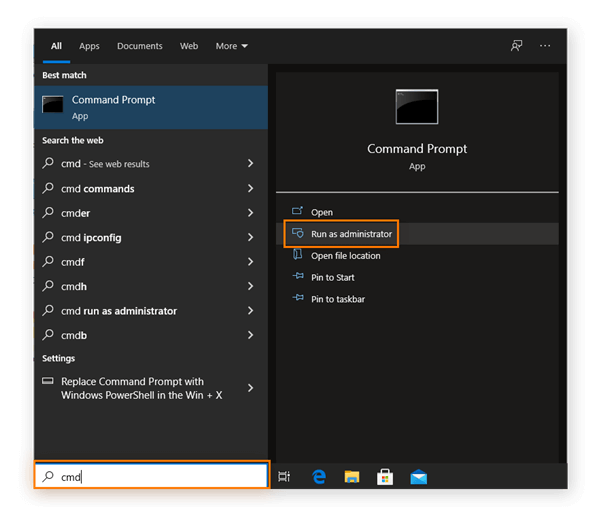
- Click the Start menu and enter "cmd" to search, select Command Prompt and choose "Run as administrator".
![erase voice recorder data permanently]()
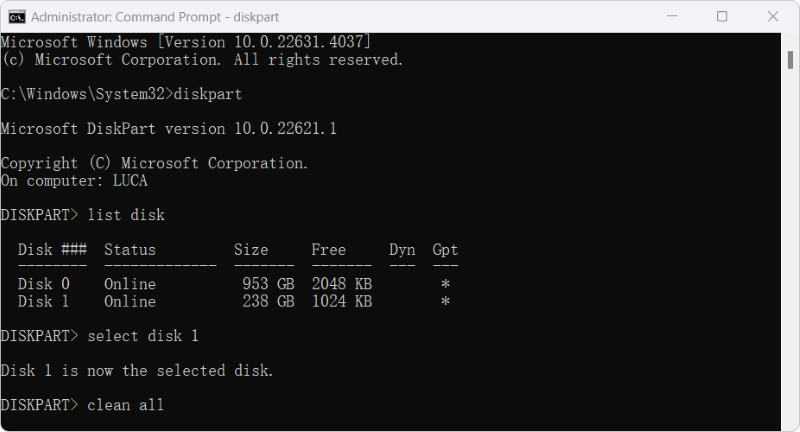
- Enter diskpart to start the command tool Diskpart.
- Type the command list disk to show all the devices.
- Choose your memory card for the recorder via the command select disk x
- Wipe all the data from the card with the command clean all
![erase voice recorder data permanently]()
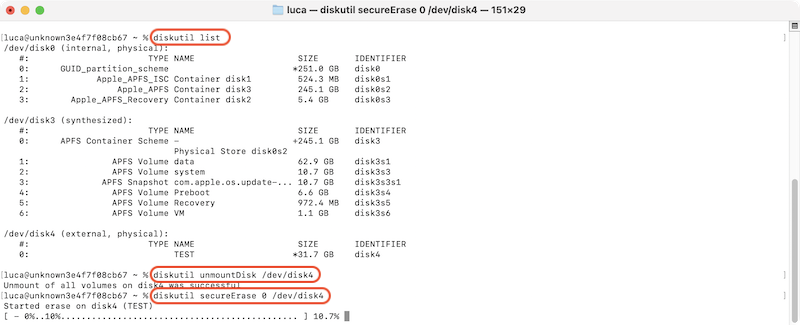
For Mac users, you can use the command rm to wipe files in Terminal:
- Open Terminal from Utilities under Applications.
- Enter the command diskutil list to show the drives.
- Unmount the memory card of recorder using the command diskutil unmountDisk /dev/diskX
- At last, erase it with the command diskutil secureErase 0 /dev/diskX
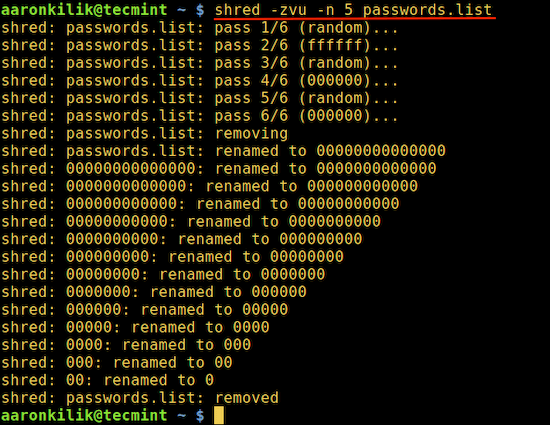
For Linux users, here's a basic example of how to use shred:
shred -zvu -n 5 filename
In this command, -n 5 means the file will be overwritten five times, -z adds a final overwrite with zeros to mask the shredding, and -u removes the file after shredding. -v display the wiping process. This approach is highly effective for ensuring that the data is permanently erased.
Best Practices for Ensuring Permanent Erasure
To ensure that your voice recordings are permanently erased, there are a few best practices you can follow. These methods help to add an extra layer of security to your deletion process.
1. Data Overwriting: Overwrite the storage space multiple times with random data to ensure deleted files cannot be recovered. Many data erasure tools provide options to do this, effectively erasing the original file.
2. Encryption: Encrypt your voice recordings before deleting them to make the data unreadable without the decryption key. Even if the file is recovered, it cannot be accessed without the key. Deleting an encrypted file adds an extra layer of security.
3. Regular Data Management: Regularly back up important files, organize your data, and securely delete files as soon as they are no longer needed. Staying on top of data management reduces the risk of leaving sensitive recordings on your devices.
4. Use Secure Delete Functions: Utilize built-in secure delete options on your device, if available, to ensure files are overwritten and cannot be easily recovered. These functions are designed to make deleted data unrecoverable.
5. Perform Periodic Data Audits: Regularly audit your storage devices to identify and securely erase any old or unnecessary voice recordings. This proactive approach helps maintain security by ensuring that no sensitive data is left behind.
Verifying Data Erasure
After you've gone through the process of deleting your voice recordings, it's a good idea to verify that the data has been permanently erased. This step ensures that your efforts have been successful and that the recordings cannot be recovered.
- How to Verify Data Is Truly Erased: There are a few tools and methods you can use to check if your data has been completely erased. Data recovery tools like Recuva or Disk Drill can scan your device's storage to see if any deleted files can still be recovered. If these tools cannot find the recordings you've deleted, it's a good sign that the data has been permanently erased.
- Data Recovery Tests: Performing a recovery test is a straightforward way to ensure that your data has been properly erased. After you've deleted the files, use a recovery tool to attempt to retrieve them. If the tool cannot recover the files, it means they have been successfully erased. Be sure to test this on all types of storage media that you've used for storing your recordings.
Conclusion
In this modern era, the importance of permanently erasing voice recordings cannot be overstated. Whether you are dealing with personal conversations or sensitive business data, ensuring that your recordings are truly gone can protect your privacy and prevent unwanted data breaches.
By understanding how your devices store data, using built-in options or specialized data wiping software for secure deletion, and following best practices like encryption and data overwriting, you can effectively erase your voice recordings. For those dealing with highly sensitive information, physical destruction of storage media may be necessary. Finally, always verify that your data has been erased to ensure that it cannot be recovered.

DoYourData Super Eraser
DoYourData Super Eraser, the award-winning data erasure software, offers certified data erasure standards including U.S. Army AR380-19, DoD 5220.22-M ECE to help you securely and permanently erase data from PC, Mac, HDD, SSD, USB drive, memory card or other device, make data be lost forever, unrecoverable!
