How to Change Mac Startup Disk?
Change the startup disk on Mac and help you boot from another drive. There are different ways to change the startup disk on Mac. All the methods will be introduced in this write-up. Also, if you want to create a bootable clone for Ma, use the professional disk cloning tool DoYourClone for Mac.
![]() Updated by Darren on February 21, 2025
Updated by Darren on February 21, 2025
Quick Navigation:
- What Is Startup Disk, Exactly?
- Why Do You Want to Do This?
- Quick way to change Mac's startup disk
- Change Your Mac's Startup Disk Using System Settings/Preferences
- Change Your Startup Disk Using The Command Prompt
- Create a bootable clone backup for Mac
- Conclusion:
Normally, Mac will boot from the internal system drive. However, it's necessary to boot from another drive in some causes. So you need to alter the startup disk to boot from a new device.

Your Mac may boot from a bootable external hard drive, CD or DVD, USB thumb drive, network volume, or any other disk other than the default. From Intel-based Macs to Apple silicon ones, the procedure of upgrading the starting disk changes in certain respects. Here, you'll learn how to change the startup disk on your Mac.
What Is Startup Disk, Exactly?
A startup disk is a sector of your drive that holds an operating system. When you power on your Mac for the first time, you have the option of choosing the startup disk from which it will run. It's a common technique among those who utilize Boot Camp to run both Windows and macOS on the same Mac.
Why Do You Want to Do This?
Why you may need to change the startup disk on Mac? Booting into a separate storage volume may be useful in a variety of situations. Among the most often seen are:
- If you want to restore or reinstall OS X, you may use these tools to boot into your Lion or Mountain Lion startup disk or any other physical recovery media that you have linked to your machine.
- In order to boot onto another Mac's hard drive using Target Disk Mode, these utilities must be installed on your Thunderbolt-equipped computer. You may use Mac A's operating system and files on Mac B's hardware in this fashion, which we prefer to do when we have our Mac Mini and MacBook Air at our desk at the same time. Boot Camp requires that you utilize these tools in order to choose whether OS X or Windows will be used to boot your computer, either on-demand or by default.
- The existence of several different OS X versions. These utilities allow you to choose which version of OS X to boot into, which is useful if you find it necessary to have two versions of OS X on your computer for compatibility reasons.
Quick way to change Mac's startup disk
If you only need to change the startup disk once, you can use the following way to replace the startup disk quickly:
For Apple Silicon chip Mac:
Step 1. Turn off your Mac.
Step 2. Press and hold the Power button.
Step 3. Keep holding until you see Loading startup options.
Step 4. Wait for the Startup Options screen to appear.
Step 5. Use the Left and Right arrow keys (or the trackpad or mouse if you can move the cursor around) to select a drive. Then, press Enter or select Continue to boot from it.
For Intel-chip Mac:
Step 1. Just restart your Mac or press Power button to start your Mac.
Step 2. Immediately press and hold the Option (Alt) key until you see the Apple logo.
Step 3. Use the Left and Right arrow keys (or the trackpad or mouse if you can move the cursor around) to select the drive you want to boot from. Then, press Enter or select the Up icon.

(If your Intel Mac uses an Apple T2 Security Chip, you won’t be able to boot from an external drive unless you modify your security settings via macOS Recovery.)
After that, the computer will reboot and start from the new startup disk once. Next time, the Mac will boot from the original startup disk.
Change Your Mac's Startup Disk Using System Settings/Preferences
With the above methods, you can only change the startup disk and boot from the changed startup disk once. However, you may need to change to a new startup disk for good in some cases. To alter the startup disk on your Mac completely, you can change it in "System Settings" (or "System Preferences") by follow these steps:
Connect the drive you want to utilize as your startup disk to your Mac first
Select System Settings (or "System Preferences") from the Apple menu.
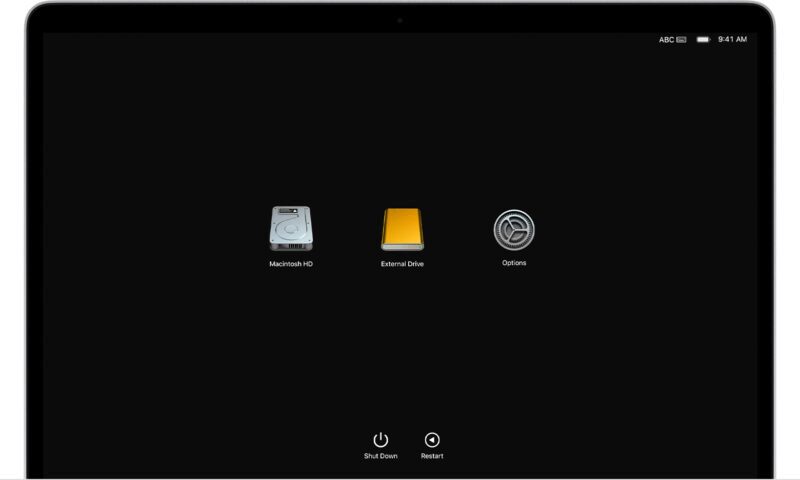
Navigate to the Startup Disk option under "General." The window displayed in the image below appears.

Select the hard drive or partition you wish to use as your startup disk.

Pressing the Restart button will force your computer to restart and use the specified startup disk.
In this way, the startup disk will be changed for good until you change the startup disk again. Repeat the steps and pick the main disk as the startup disk to return to the primary disk.
Change Your Startup Disk Using The Command Prompt
In Mac OS X Mavericks, the starting disk may be changed from inside the System Preferences window. Sometimes, there are situations in where it may be necessary to change the startup disk from within the Terminal.
- The Terminal application may be started by clicking the icon that looks like a magnifying glass at the top of the screen on a Mac. Once the Spotlight dialog box appears, enter "Terminal" and then choose "Terminal" from the list of results.
- Simply enter the command without quotation marks in the Terminal window: "sudo bless -mount /Volumes/Startup Disk Name -setBoot." You may change the startup disk with the Bless command.
- To boot from a specific drive, replace "Startup Disk Name" with the proper name of the disk. Enclose the full route in quotation marks if the name includes spaces. For example, You may use this command is titled "My Mac," sudo bless -mount "/Volumes/My Mac" -setBoot.
- To execute the program and modify the startup disk, press "Enter" on the command prompt. After restarting your Mac, you'll see that it's booting from the new drive. When you want to restart your Mac instantly from the command line, use the command: sudo shutdown -r now. Remember to save your work before running the command.
In addition to the disk selection screen, your Mac has several additional boot modes, such as Apple Diagnostics, Safe Mode, and Target Disk Mode, which you may activate by pressing particular starting key combinations. They're worth a look, so don't forget.
Create a bootable clone backup for Mac
It's necessary to create a full and bootable backup for Mac for data security. If there are problems happened to the Mac in the future, it will be easy and fast to get the files and macOS restored. With the bootable clone drive, it's able to boot the Mac directly from the cloned drive. It will be very useful in case you need to get the Mac working immediately.
DoYourClone for Mac can help you easily and securely create a bootable clone backup for Mac. Just free download it, install it on your Mac. Choose Clone OS mode to help you securely clone Mac startup to an external hard drive. Then you can use the external hard drive as a bootable drive.
DoYourClone for Mac
- Securely clone HDD, SSD or external hard drive on Mac.
- Create a bootable clone backup on Mac.
- Create a disk image backup for Mac.
Step 1. Open DoYourClone for Mac, select disk clone mode - Clone OS and select the empty external hard drive as the destination drive.
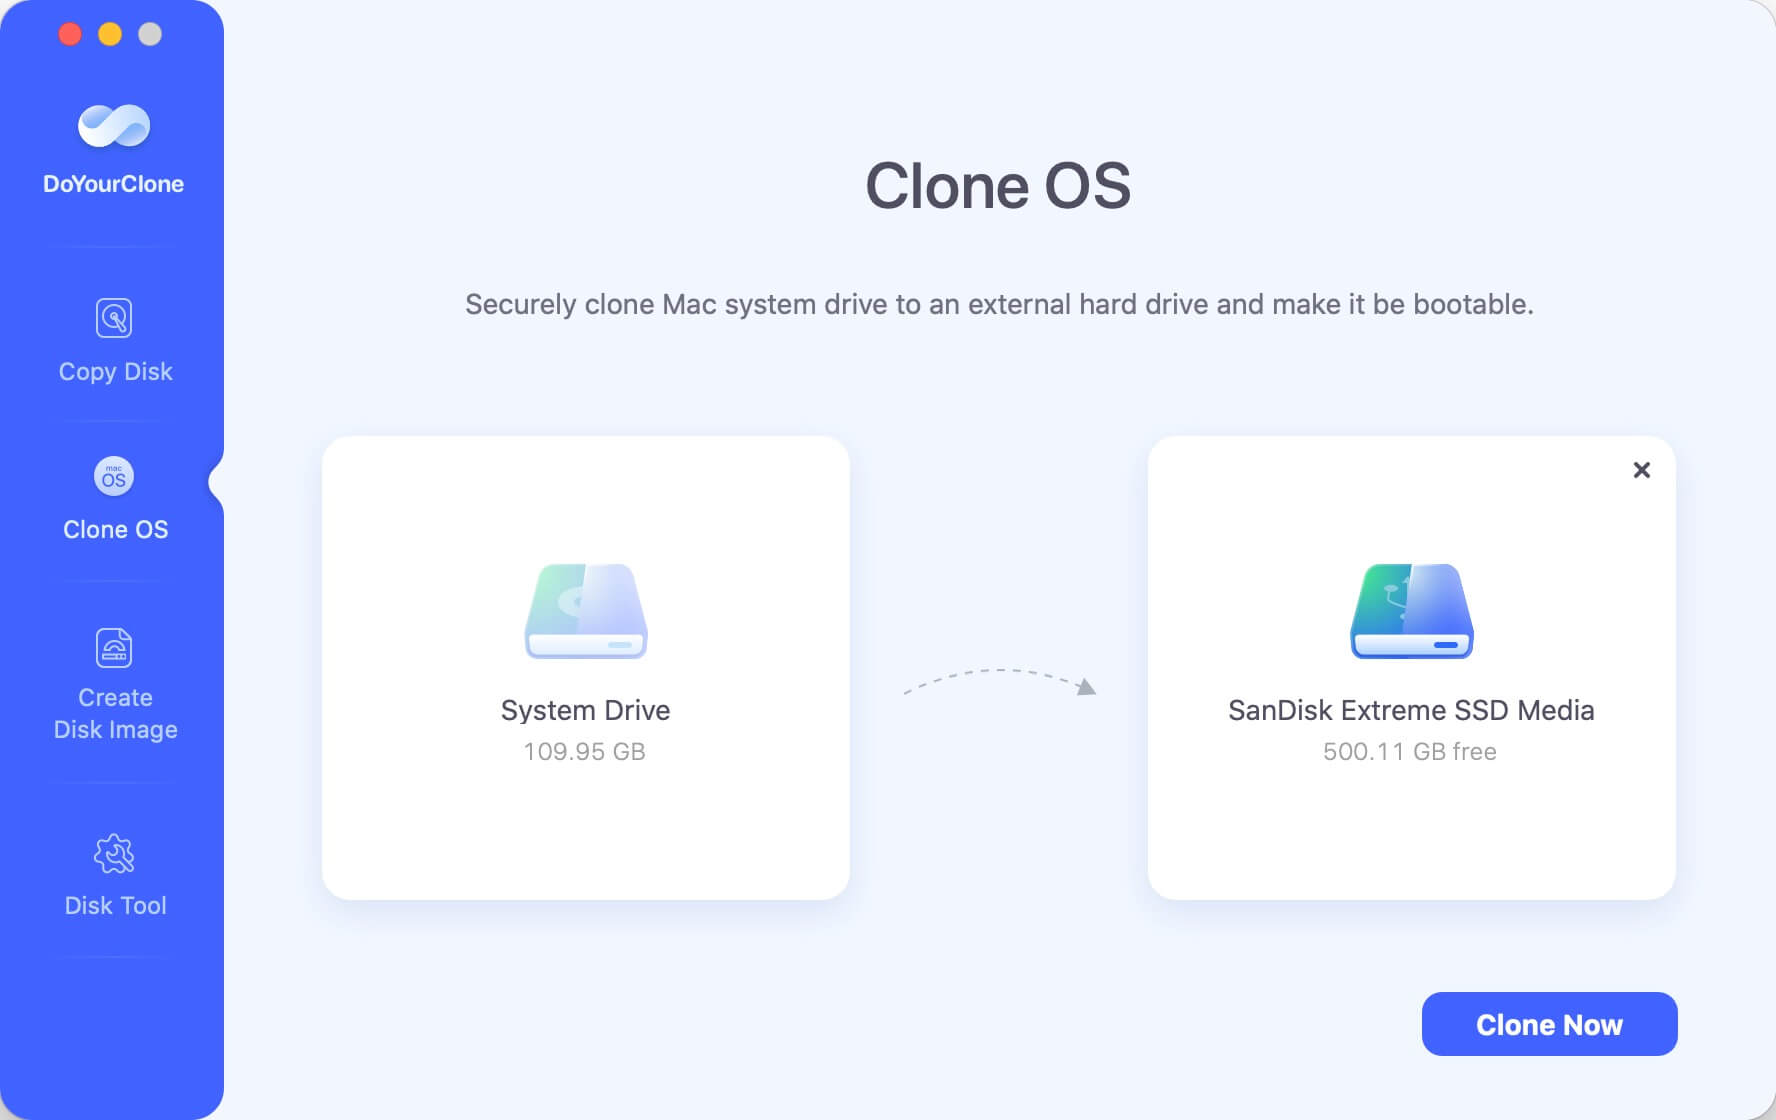
Step 2. Click on Clone Now button to securely clone Mac startup disk to the destination drive. It will completely clone everything on the disk.
💡 Tips: The macOS cloning process will overwrite the destination disk, so ensure to use an empty external drive as destination. Or move the important files from the disk before cloning startup disk to it.

Once the process gets finished, you will get a bootable external disk and can use it on any Mac. The cloned drive including the macOS data, along with all the installed programs, user settings and personal files.
Conclusion:
By following the guide, you can learn how to change start up disk temporarily or completely. For example, after creating a full clone backup for macOS, you can change the startup disk to verify if the cloned drive is bootable. Also, it's necessary to change the startup disk when installing macOS with a bootable USB installer, or using a bootable drive on another Mac, or boot Windows from Boot Camp.
If you don't have a bootable clone backup for Mac, it's highly suggested to create one for system and data safe. DoYourClone for Mac, which is a reliable disk copy tool, can help you create a complete and bootable clone for Mac.
DoYourClone for Mac
DoYourClone for Mac, one of the best Mac disk cloning software, can help you clone HDD, SSD, external storage device on Mac, upgrade HDD to SSD, create full disk image backup, etc. It also can clone everything from your Mac to an external HDD/SSD and create a full bootable clone backup. 100% safe and easy-to-use.
Written & Updated by Darren
Darren is an senior editor at DoYourData. Since 2021, Darren has written 100+ articles about data recovery, Mac file recovery, disk management, disk clone, computer issue fixes, etc. He helps lost of users to recover important data, get the reliable data backup solution, find optimization for PCs and Macs.