How to Clone IDE to SATA HDD/SSD?
Old computers may use IDE hard drives, if you want to back up data of IDE hard drive or upgrade old drive to new SSD, just try disk cloning software to clone IDE to HDD/SSD. DoYourClone is an easy-to-use disk cloning program, it supports to clone IDE drive to new SATA HDD/SSD.
![]() Updated by Darren on February 11, 2025
Updated by Darren on February 11, 2025
Quick Navigation:
- 1. Why clone IDE to SATA?
- 2. Prepare IDE hard drive for SATA cloning:
- 3. How to clone IDE to SATA Drive?
- 4. Troubleshoot Issues while Cloning IDE to SATA Drive
- 5. Conclusion
In older computers, storage is provided by an IDE hard drive, often known as a Parallel ATA (PATA) hard drive. From the early 1980s until the mid-2000s, IDE drives were the standard in personal computers until they were gradually phased out in favor of Serial ATA (SATA) drives.

Although IDE hard drives have fallen out of favor in newer PCs, several companies still include them in their products. Aside from a somewhat slow data transfer rate, IDE hard drives are sufficient for most common computer tasks. The upgrade from an IDE hard drive to a SATA HDD/SSD is strongly encouraged for those who value high loading times for video games.
By following these steps, you may make the most of the advantages of today's storage technology and ensure a smooth data transfer. In this write-out, there is a full guide about IDE, SATA, and how to clone IDE to SATA HDD/SSD. Okay, so let's begin!
Why clone IDE to SATA?
When connecting storage devices to a computer's system bus, there are two main options: IDE and SATA. IDE to SATA cloning can be done for the following reasons:
- Upgrade to a newer, more reliable hard disk. The hard disk may still be IDE if your PC is very old. SATA, on the other hand, is used by virtually all new hard drives and SSDs. In this scenario, cloning from IDE to SATA is required.
- Accelerate your reading and writing abilities. Compared to SATA's highest transfer rate of 6GB/s, IDE's tops at 133MB/s. You can get a better performance boost by cloning your IDE hard drive to a SATA one.
- Clone an IDE disk to a SATA one, and you can upgrade your storage space without reinstalling Windows. The original IDE disk's operating system, programs, and user files clone to the new SATA disk. Disk cloning is far more efficient than starting from scratch.
- Move data from IDE to SATA drive on new computer. In the new computers, the IDE interface is not available. If you want to move the data from an IDE drive to a new computer, it's essential to clone the IDE drive to SATA one.
Prepare IDE hard drive for SATA cloning:
You should get the following ready before you begin cloning an IDE hard disk to a SATA one:
1. Check the SATA Interface or converter: Verify that your motherboard supports SATA. If it does, you'll need a SATA cable and power cord to hook up the disk; otherwise, you'll need to invest in an IDE-to-SATA converter.
2. Get SATA drive ready: Purchase a SATA hard disk drive or solid-state drive. A SATA solid-state drive (SSD) is suggested to experience even better speed.

3. Reliable disk copy tool: It necessary to look for a trustworthy hard drive duplicator before cloing IDE to SATA drive. There are many disk copy tools available in the market. You need to check and choose one which can work with IDE drives. For system drive cloning, a professional clone software is required that can guarantee the cloned SATA drive will be bootable.
DoYourClone is the best disk copy tool recommended to clone IDE to SATA drive. The software can support IDE and SATA drives without a problem. It's the best choice for the users who need to clone IDE drive to a SATA one.
DoYourClone - Best Disk Cloning Software
- Clone IDE to SATA HDD/SSD.
- Clone HDD, SSD and external storage device.
- Create bootable clone for Windows PC.
With the software, you can clone drive between HD and SSD, no mater the drive is basic, dynamic, GPT or MBR, the software can work like a charm to clone the drive successfully. The software can clone partition or entire hard disk. It will be sure to copy all data from your partition or disk.
What's more, the software can create bootable clone for system drive. If you decide to move the system to a new computer, upgrade the current system drive from HDD to SSD, or replace the small system drive with a bigger one, this software is the best choice. The software can clone the system data along with the installed software, personalized settings and user data. This ensure to create a bootable and exact copy of your old system drive. You can continue using the new drive or machine the same as before without reinstalling and reconfiguring.
How to clone IDE to SATA Drive?
If you have everything ready, it's time to start the disk cloning from the IDE to SATA HDD or SSD.
Just remember that the cloning operation will overwrite the destination SATA SSD. You should back up your files in advance if there is any crucial information. Follow these steps to clone an IDE hard disk to a SATA one using DoYourClone:
1. First, ensure your computer recognizes the target SATA drive when you plug it into a port.
2. To begin, launch DoYourClone. Select Disk Clone. Choose the IDE hard drive from the list of source disks and select the SATA drive as the destination disk. Click Next button to continue.
💡 Note: Ensure to select right drives for both the source and destination. As the disk clone process will overwrite the destination drive, data loss will happen if you choose the wrong drives for cloning.

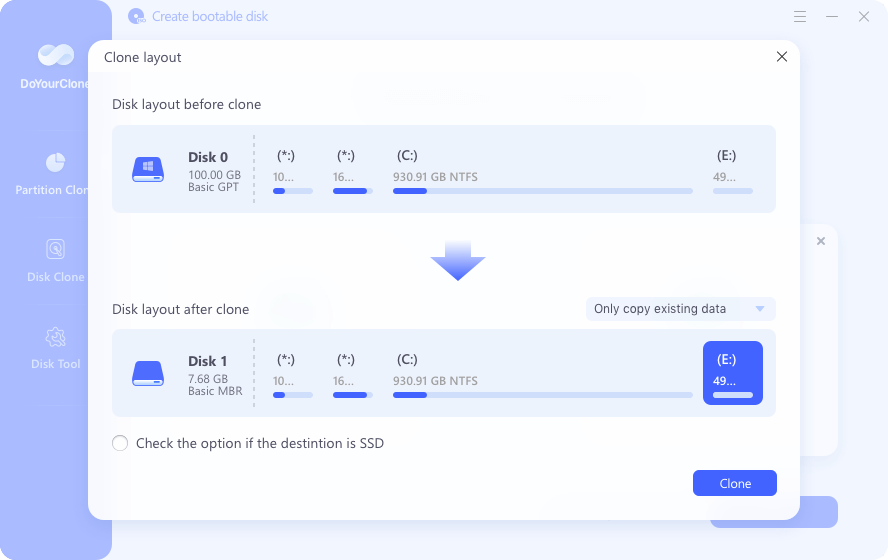
3. Preview the clone layout on the destination drive before you process the cloning process. Also, you can change the disk layout if you want.
Tick "Check this option if the destination is SSD" if the SATA drive is an SSD. This can optimize the SSD and make sure it perform well after the disk cloning..
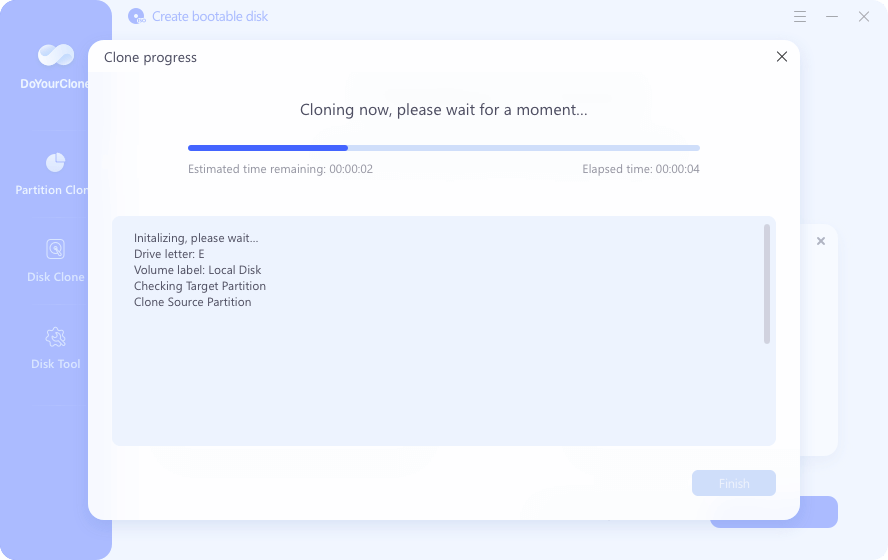
4. At last, click Clone button. The software will start to copy all data from the IDE drive to the SATA drive. It may take some time and you need to wait patiently.
Once the IDE drive is cloned successfully to the SATA drive, you can then go to the SATA drive to check the files and ensure the files are all copied.
If the system drive is cloned and you want to set the SATA drive as the new system drive, you need to do as the following steps:
Set BIOS SATA Hard Drive to IDE Mode:
After cloning an IDE to a SATA hard disk, you must alter many BIOS settings to avoid booting issues. To accomplish this, do as instructed below.
- Join your computer to the SATA hard drive.
- To access the BIOS, restart the computer and press F12 or Delete when the manufacturer's logo appears.
- To switch to IDE mode, select Configure SATA from the Main menu.
- Make sure to save your changes before exiting BIOS. After the reboot, continue with the cloning process.
Boot from the SATA Hard Drive:
You must change the boot order in the computer's BIOS to boot from the cloned SATA hard drive.
- To access the Boot menu in BIOS, press Del, F2 or any other keys depending on your computer mainboard.
- Set up your SATA hard drive as the primary boot device. Close the BIOS after saving. When you turn on your computer, Windows will load from your installed SATA drive.
Troubleshoot Issues while Cloning IDE to SATA Drive
There would be issues when you try to clone IDE to SATA drive. There are some common issues that will happen and the solutions to fix the issues:
1. SATA drive is not recognized
- If the connected SATA drive is not detected on the PC, you can first change the SATA interface. If it doesn't work, change a SATA cable or converter.
- Connect the SATA to another computer and check if it's detected. If not, it might be physically damaged and change a new SATA drive for cloning.
2. Failed to clone IDE to SATA drive
- Check if capacity of the SATA and confirm if it's enough to hold the copied data from the IDE drive. You can remove useless data from the IDE drive to try again. Or change a larger SATA drive to clone again.
- Also, check if the connection is stable. If there is additional power cord for the SATA drive, also connect the power cord and try to clone.
3. Cloned SATA drive is not bootable
- If the cloned system drive is not bootable, the clone might be not successful. If the size of the SATA drive is larger than the IDE drive, you can try to clone again and enable the "Sector by sector clone" option.
- If you use the cloned drive on a new computer with UEFI boot but the old machine use BIOS, you can change to legacy BIOS boot and try to boot again.
Conclusion:
This article contains comprehensive instructions for transitioning from an IDE to a SATA hard drive. It's tricky, but you can do it independently using our listed steps. Converting from an IDE to a SATA hard disk is a breeze with DoYourClone. When you clone IDE disks with DoYourClone, you won't have to worry about drive sizes or boot failure. In addition to its clone functionality, DoYourClone can also serve as a professional backup and disk management software. If the system fails to boot, you can make a bootable disk to get it going again.
DoYourClone - Best Disk Clone Software
DoYourClone is a 100% safe, powerful and easy-to-use disk cloning program. It supports to clone any hard drive, clone HDD to SSD, upgrade old drive to new drive, create bootable clone backup for Windows and macOS. With this program, you can easily clone any hard drive. It supports sector by sector clone, SSD upgrade clone, etc.
Written & Updated by Darren
Darren is an senior editor at DoYourData. Since 2021, Darren has written 100+ articles about data recovery, Mac file recovery, disk management, disk clone, computer issue fixes, etc. He helps lost of users to recover important data, get the reliable data backup solution, find optimization for PCs and Macs.